boot OPEL CALIBRA 1988 Service Repair Manual
[x] Cancel search | Manufacturer: OPEL, Model Year: 1988, Model line: CALIBRA, Model: OPEL CALIBRA 1988Pages: 525, PDF Size: 58.26 MB
Page 19 of 525
8Electric door mirror switch -
removal and refitting
2
Removal
1Disconnect the battery negative lead.
2Prise the plastic surround from the door
interior handle.
3Free the trim panel from the top edge of the
door by releasing the securing clips. This can
be done using a screwdriver, but it is
preferable to use a forked tool, to minimise
the possibility of damage to the trim panel and
the clips.
4Note the position of the mirror switch wiring
connector in the bracket at the top of the
door, then separate the two halves of the
connector.
5Prise the switch from the door trim panel,
and feed the wiring through the panel.
Refitting
6Refitting is a reversal of removal, but ensure
that the wiring is correctly routed, so as not to
foul the door interior handle mechanism.
9Sunroof operating switch -
removal and refitting
2
Removal
1Disconnect the battery negative lead.
2Prise the courtesy lamp from the roof trim
panel, and disconnect the wiring.
3Remove the two trim panel securing
screws, and withdraw the trim panel from the
roof, disconnecting the wiring from the
sunroof operating switch.
4Release the securing clips, then pull the
switch from the rear face of the trim panel.
Refitting
5Refitting is a reversal of removal.
10Courtesy lamp switch -
removal and refitting
2
Removal
1Disconnect the battery negative lead.
2Open the door and remove the switch
securing screw.
3Withdraw the switch from the door pillar,
and pull the wiring out sufficiently to prevent it
from springing back into the pillar.4Disconnect the wiring and remove the
switch.
Refitting
5Refitting is a reversal of removal.
11Luggage compartment lamp
switch - removal and refitting
2
Removal
1Disconnect the battery negative lead.
2Open the boot lid or tailgate, as applicable,
and remove the switch securing screw.
3Withdraw the switch from the body panel,
and pull the wiring out sufficiently to prevent it
from springing back into the body.
4Disconnect the wiring and remove the
switch.
Refitting
5Refitting is a reversal of removal.
12Brake lamp switch - removal
and refitting
2
Removal
1Disconnect the battery negative lead.
2Remove the lower trim panel from the
driver’s footwell.
3Disconnect the wiring plug from the brake
lamp switch, then twist the switch
anti-clockwise and remove it from its bracket.
Refitting
4Refitting is a reversal of removal.
13Handbrake “on” warning
lamp switch - removal and
refitting
3
For access to the switch, the handbrake
lever must be removed. Removal and refitting
of the switch is described as part of the
handbrake lever removal and refitting
procedure, in Chapter 9.
14Oil pressure warning lamp
switch - removal and refitting
3
Removal
1Disconnect the battery negative lead.
2The switch is screwed into the oil pump, on
the inlet manifold side of the engine. On 1.4
and 1.6 litre (except C16 NZ2), models the
switch projects at right-angles to the
crankshaft axis, while on C16 NZ2, 1.8 and
2.0 litre models it is parallel to the crankshaft
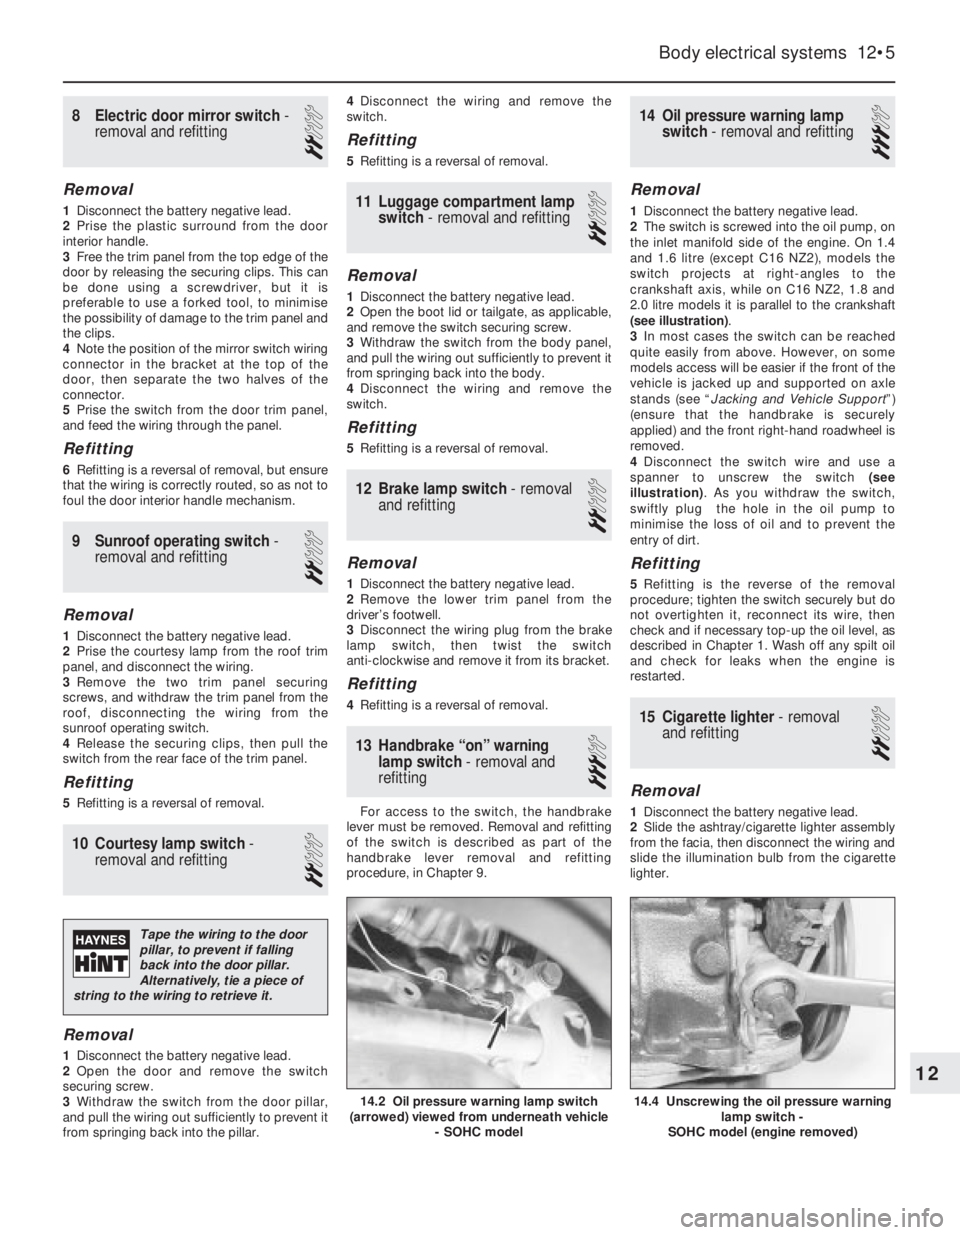
(see illustration).
3In most cases the switch can be reached
quite easily from above. However, on some
models access will be easier if the front of the
vehicle is jacked up and supported on axle
stands (see “Jacking and Vehicle Support”)
(ensure that the handbrake is securely
applied) and the front right-hand roadwheel is
removed.
4Disconnect the switch wire and use a
spanner to unscrew the switch (see
illustration). As you withdraw the switch,
swiftly plug the hole in the oil pump to
minimise the loss of oil and to prevent the
entry of dirt.
Refitting
5Refitting is the reverse of the removal
procedure; tighten the switch securely but do
not overtighten it, reconnect its wire, then
check and if necessary top-up the oil level, as
described in Chapter 1. Wash off any spilt oil
and check for leaks when the engine is
restarted.
15Cigarette lighter - removal
and refitting
2
Removal
1Disconnect the battery negative lead.
2Slide the ashtray/cigarette lighter assembly
from the facia, then disconnect the wiring and
slide the illumination bulb from the cigarette
lighter.
Body electrical systems 12•5
14.4 Unscrewing the oil pressure warning
lamp switch -
SOHC model (engine removed)14.2 Oil pressure warning lamp switch
(arrowed) viewed from underneath vehicle
- SOHC model
12
Tape the wiring to the door
pillar, to prevent if falling
back into the door pillar.
Alternatively, tie a piece of
string to the wiring to retrieve it.
Page 30 of 525
Centre console-mounted
switches
Removal
5The switches must be removed as a
complete assembly, and cannot be
dismantled. If one of the switches is faulty, the
complete assembly must be renewed.
6Remove the rear section of the centre
console, as described in Chapter 11.
7Release the securing clips, and withdraw
the switch assembly through the top of the
centre console.
Refitting
8Refitting is a reversal of removal.
Operating motors
9Remove the door window regulator, as
described in Chapter 11.
10To remove the motor assembly from the
front door window regulator, unscrew the
three motor securing nuts, and the single
screw securing the pulse pick-up unit to the
regulator assembly. Withdraw the motor,
complete with the pulse pick-up unit. Note
that if the motor or pick-up unit is/are faulty,
the two components must be renewed as an
assembly, as no spare parts are available (see
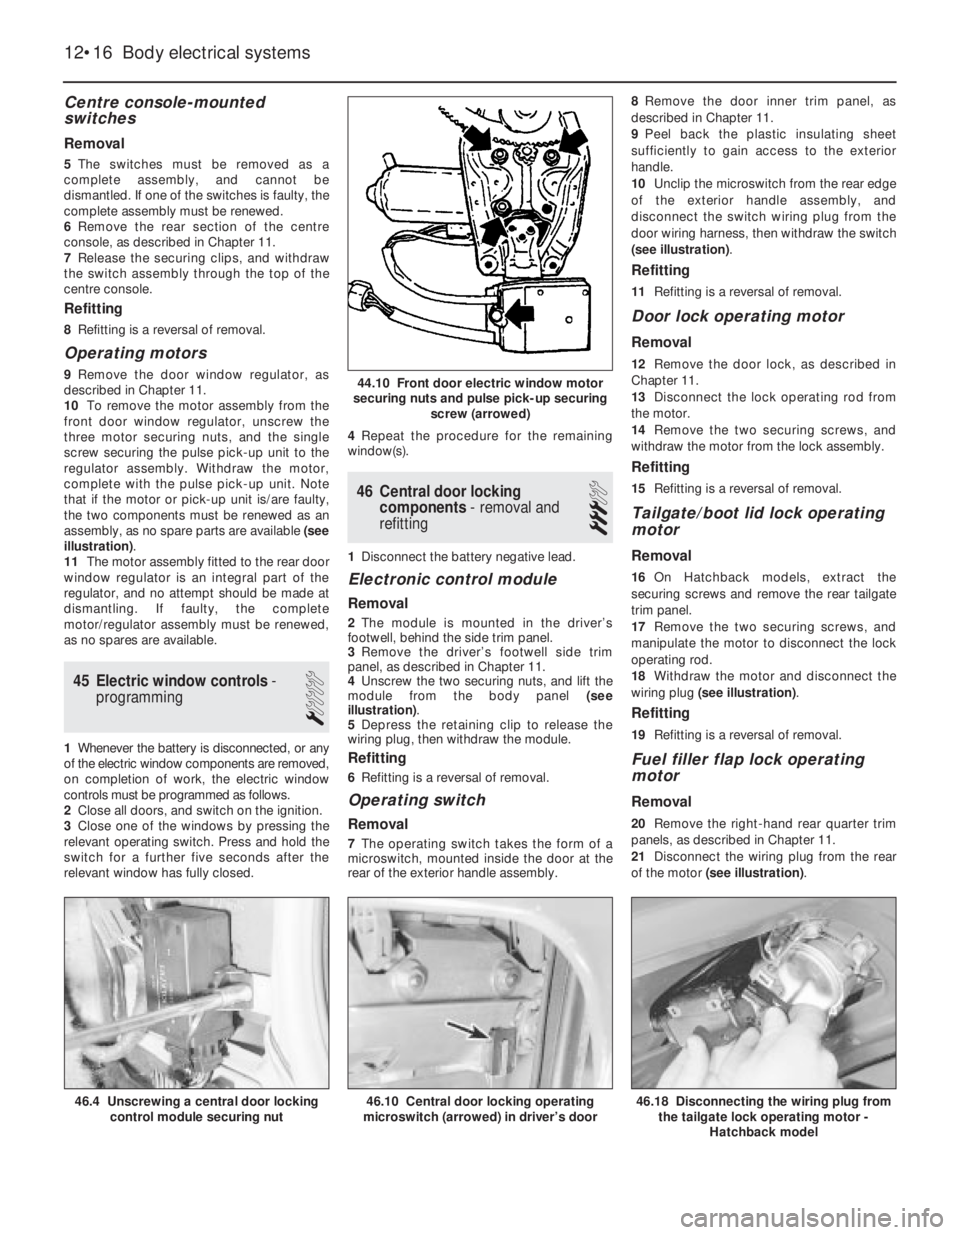
illustration).
11The motor assembly fitted to the rear door
window regulator is an integral part of the
regulator, and no attempt should be made at
dismantling. If faulty, the complete
motor/regulator assembly must be renewed,
as no spares are available.
45Electric window controls -
programming
1
1Whenever the battery is disconnected, or any
of the electric window components are removed,
on completion of work, the electric window
controls must be programmed as follows.
2Close all doors, and switch on the ignition.
3Close one of the windows by pressing the
relevant operating switch. Press and hold the
switch for a further five seconds after the
relevant window has fully closed.4Repeat the procedure for the remaining
window(s).
46Central door locking
components -removal and
refitting
3
1Disconnect the battery negative lead.
Electronic control module
Removal
2The module is mounted in the driver’s
footwell, behind the side trim panel.
3Remove the driver’s footwell side trim
panel, as described in Chapter 11.
4Unscrew the two securing nuts, and lift the
module from the body panel (see
illustration).
5Depress the retaining clip to release the
wiring plug, then withdraw the module.
Refitting
6Refitting is a reversal of removal.
Operating switch
Removal
7The operating switch takes the form of a
microswitch, mounted inside the door at the
rear of the exterior handle assembly.8Remove the door inner trim panel, as
described in Chapter 11.
9Peel back the plastic insulating sheet
sufficiently to gain access to the exterior
handle.
10Unclip the microswitch from the rear edge
of the exterior handle assembly, and
disconnect the switch wiring plug from the
door wiring harness, then withdraw the switch
(see illustration).
Refitting
11Refitting is a reversal of removal.
Door lock operating motor
Removal
12Remove the door lock, as described in
Chapter 11.
13Disconnect the lock operating rod from
the motor.
14Remove the two securing screws, and
withdraw the motor from the lock assembly.
Refitting
15Refitting is a reversal of removal.
Tailgate/boot lid lock operating
motor
Removal
16On Hatchback models, extract the
securing screws and remove the rear tailgate
trim panel.
17Remove the two securing screws, and
manipulate the motor to disconnect the lock
operating rod.
18Withdraw the motor and disconnect the
wiring plug (see illustration).
Refitting
19Refitting is a reversal of removal.
Fuel filler flap lock operating
motor
Removal
20Remove the right-hand rear quarter trim
panels, as described in Chapter 11.
21Disconnect the wiring plug from the rear
of the motor (see illustration).
12•16Body electrical systems
44.10 Front door electric window motor
securing nuts and pulse pick-up securing
screw (arrowed)
46.10 Central door locking operating
microswitch (arrowed) in driver’s door46.18 Disconnecting the wiring plug from
the tailgate lock operating motor -
Hatchback model46.4 Unscrewing a central door locking
control module securing nut
Page 33 of 525
53Anti-theft alarm - general
1Certain models are fitted with an anti-theft
alarm as standard equipment.
2The alarm system is triggered by door,
bonnet and boot lid/tailgate mounted
switches, and by ultrasonic sensors mounted
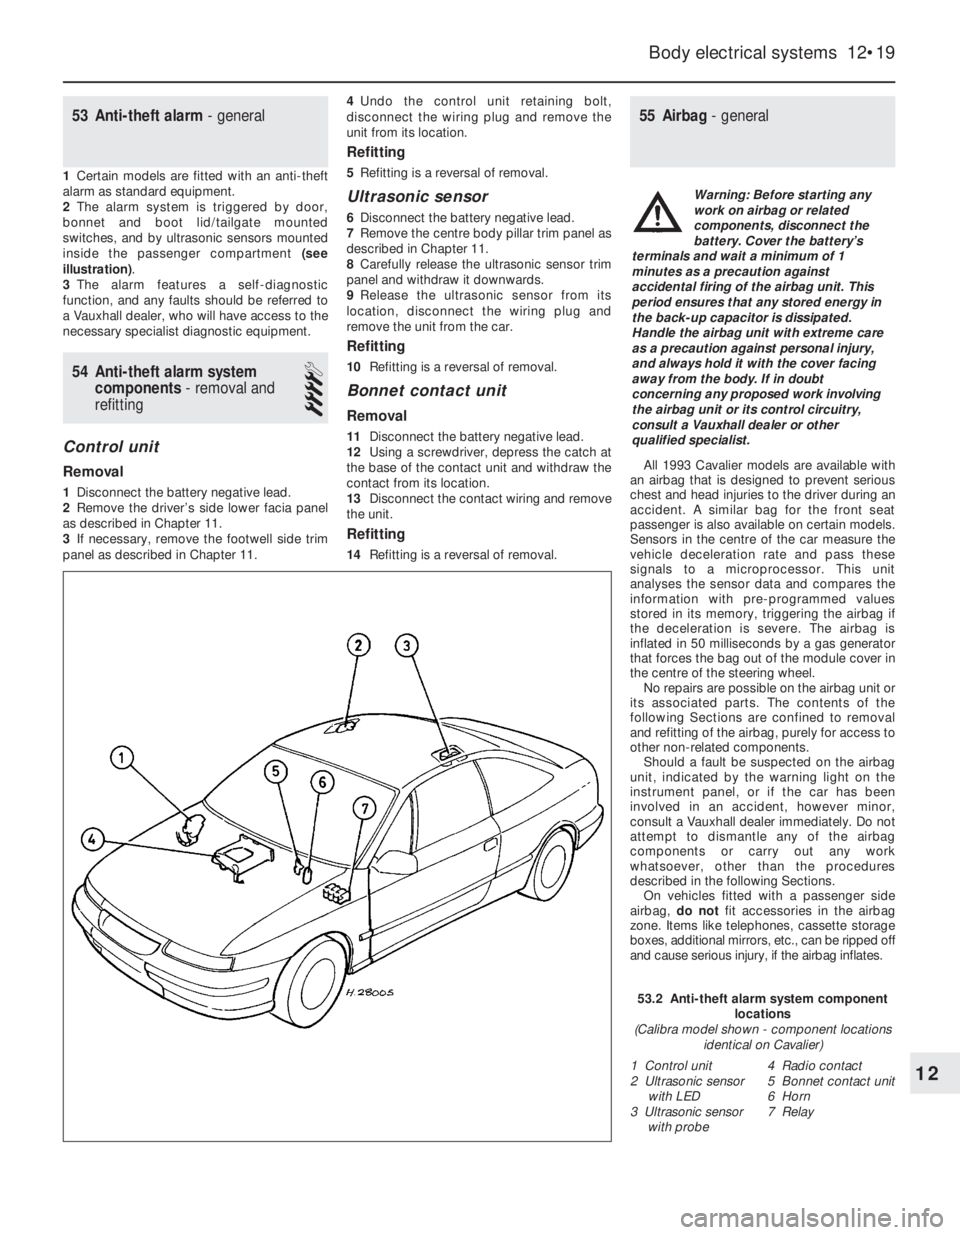
inside the passenger compartment (see
illustration).
3The alarm features a self-diagnostic
function, and any faults should be referred to
a Vauxhall dealer, who will have access to the
necessary specialist diagnostic equipment.
54Anti-theft alarm system
components -removal and
refitting
4
Control unit
Removal
1Disconnect the battery negative lead.
2Remove the driver’s side lower facia panel
as described in Chapter 11.
3If necessary, remove the footwell side trim
panel as described in Chapter 11.4Undo the control unit retaining bolt,
disconnect the wiring plug and remove the
unit from its location.
Refitting
5Refitting is a reversal of removal.
Ultrasonic sensor
6Disconnect the battery negative lead.
7Remove the centre body pillar trim panel as
described in Chapter 11.
8Carefully release the ultrasonic sensor trim
panel and withdraw it downwards.
9Release the ultrasonic sensor from its
location, disconnect the wiring plug and
remove the unit from the car.
Refitting
10Refitting is a reversal of removal.
Bonnet contact unit
Removal
11Disconnect the battery negative lead.
12Using a screwdriver, depress the catch at
the base of the contact unit and withdraw the
contact from its location.
13Disconnect the contact wiring and remove
the unit.
Refitting
14Refitting is a reversal of removal.
55Airbag - general
All 1993 Cavalier models are available with
an airbag that is designed to prevent serious
chest and head injuries to the driver during an
accident. A similar bag for the front seat
passenger is also available on certain models.
Sensors in the centre of the car measure the
vehicle deceleration rate and pass these
signals to a microprocessor. This unit
analyses the sensor data and compares the
information with pre-programmed values
stored in its memory, triggering the airbag if
the deceleration is severe. The airbag is
inflated in 50 milliseconds by a gas generator
that forces the bag out of the module cover in
the centre of the steering wheel.
No repairs are possible on the airbag unit or
its associated parts. The contents of the
following Sections are confined to removal
and refitting of the airbag, purely for access to
other non-related components.
Should a fault be suspected on the airbag
unit, indicated by the warning light on the
instrument panel, or if the car has been
involved in an accident, however minor,
consult a Vauxhall dealer immediately. Do not
attempt to dismantle any of the airbag
components or carry out any work
whatsoever, other than the procedures
described in the following Sections.
On vehicles fitted with a passenger side
airbag, do notfit accessories in the airbag
zone. Items like telephones, cassette storage
boxes, additional mirrors, etc., can be ripped off
and cause serious injury, if the airbag inflates.
Body electrical systems 12•19
12
53.2 Anti-theft alarm system component
locations
(Calibra model shown - component locations
identical on Cavalier)
1 Control unit
2 Ultrasonic sensor
with LED
3 Ultrasonic sensor
with probe4 Radio contact
5 Bonnet contact unit
6 Horn
7 Relay
Warning: Before starting any
work on airbag or related
components, disconnect the
battery. Cover the battery’s
terminals and wait a minimum of 1
minutes as a precaution against
accidental firing of the airbag unit. This
period ensures that any stored energy in
the back-up capacitor is dissipated.
Handle the airbag unit with extreme care
as a precaution against personal injury,
and always hold it with the cover facing
away from the body. If in doubt
concerning any proposed work involving
the airbag unit or its control circuitry,
consult a Vauxhall dealer or other
qualified specialist.
Page 38 of 525
12•24Wiring diagrams
K84MSTS ignition control unit247 to 256
K85Automatic transmission control unit771 to 797
K86Check control unit370 to 392
K87Relay - auxiliary cooling fan833 to 834
K88Catalytic converter temperature control unit (not UK)760 to 762
K89Relay - rear fog lamps444 to 447
K90Relay - air conditioning compressor (not UK)820 to 821
K93Relay - air conditioning compressor (not UK)821 to 822
L1Ignition coil121 to 122, 133 to 134, 174 to 175,
225 to 226, 243 to 244, 261 to 262
M1Starter motor105 to 106
M2Windscreen wiper motor501 to 504
M4Cooling fan motor113
M6Headlamp wiper motor -left525 to 527
M7Headlamp wiper motor - right529 to 531
M8Rear window wiper motor513 to 515
M13Sunroof motor692 to 694
M18Central locking motor - driver’s door607 to 610
M19Central locking motor - left rear door622 to 624
M20Central locking motor - right rear door626 to 628
M21Fuel pump163, 196, 299
M26Electric aerial motor584 to 585
M30Door mirror motor and heater - driver’s door674 to 676
M31Door mirror motor and heater - passenger door680 to 682
M32Central locking motor - passengerdoor614to617
M33Idle speed adjuster146 to 149, 183 to 184, 277 to 278
M37Central locking motor - boot lid/tailgate618 to 621
M39Headlamp aim adjustment motor -left557 to 560
M40Headlamp aim adjustment motor - right561 to 564
M41Central locking motor - fuel filler flap623 to 625
M43Ride control actuator - front left (not UK)739 to 741
M44Ride control actuator - front right (not UK)743 to 745
M45Ride control actuator -rear left (not UK)747 to 749
M46Ride control actuator - rear right (not UK)751 to 753
M47Electric window motor - front left636 to 640
M48Electric window motor - front right654 to 658
M49Electric window motor - rear left642 to 646
M50Electric window motor - rear right660 to 664
M55Washer fluid pump518 to 519
P1Fuel gauge304
P2Coolant temperature gauge306
P3Clock551
P4Fuel level sender unit304
P5Coolant temperature sensor306
P7Tachometer308
P8Oil pressure gauge341
P9Voltmeter339
P10Oil pressure sensor341
P11Airflow meter (Motronic M4.1)185 to 189
P12Coolant temperature sensor178, 272
P13Trip computer outside air temperature sensor542 to 543
P14Distance sensor (not UK)336 to 337P17ABS wheel sensor - front left707
P18ABS wheel sensor -front right710
P19ABS wheel sensor -rear left712
P20ABS wheel sensor - rear right714
P21Speedometer frequency sensor (not UK)332
P23Pressure sensor 249 to 250
P24Oil temperature sensor251
P24Automatic transmission fluid temperature sensor795
P27Brake pad wear sensor - front left375
P28Brake pad wear sensor - front right375
P29Inlet manifold temperature sensor (not UK)207 to 208
P30Coolant temperature sensor209 to 210, 150
P31Throttle position sensor (not UK)209 to 211
P32Oxygen sensor - heated (not UK)193 to 194, 291 to 292
P33Oxygen sensor157
P34Throttle position sensor158 to 160, 780
P35Crankshaft speed/position sensor189 to 191, 223 to 225,
281 to 282
P39Trailer bulb failure sensor392 to 394
P43Electronic speedometer336
P44Air mass meter (Motronic M2.5)294 to 296
P45Automatic transmission input speed sensor787 to 788
P46Knock sensor284 to 285
P47Distributor ‘Hall-effect’ sensor (Motronic M2.5)287 to 288
P48Automatic transmission distance sensor785 to 786
P50Catalytic converter temperature sensor (not UK)761 to 762
R2Carburettor preheating116, 228
R3Cigarette lighter596 to 597
R5Glow plugs (Diesel models)858 to 859
R7Mixture preheating (not UK)232
R12Automatic choke117
R15Mixture adjustment potentiometer (not UK)155 to 157
R19Cooling fan motor resistor828, 848
S1Ignition switch102 to 106, 851 to 852
S2.1Lighting switch404 to 407
S2.2Courtesy lamp switch487
S2.3Instrument illumination lamp dimmer328
S3Heater blower switch837 to 844
S4Heated rear window switch570 to 571
S5.2Dipped beam switch438, 439
S5.3Direction indicator switch480 to 482
S5.4Sidelamp switch401 to 402
S7Reversing lamp switch497
S8Brake lamp switch462
S9.2Windscreen wiper switch501 to 504
S9.5Rear window wash/wiper switch516 to 518
S10Automatic transmission switch770 to 776
S11Brake fluid level warning sensor313
S13Handbrake-on warning switch315
S14Oil pressure switch310
S15Luggage compartment lamp switch485
S17Passenger door courtesy lamp switch490 Key to wiring diagrams for 1989 models (continued)
NoDescriptionTrackNoDescriptionTrack
Page 69 of 525
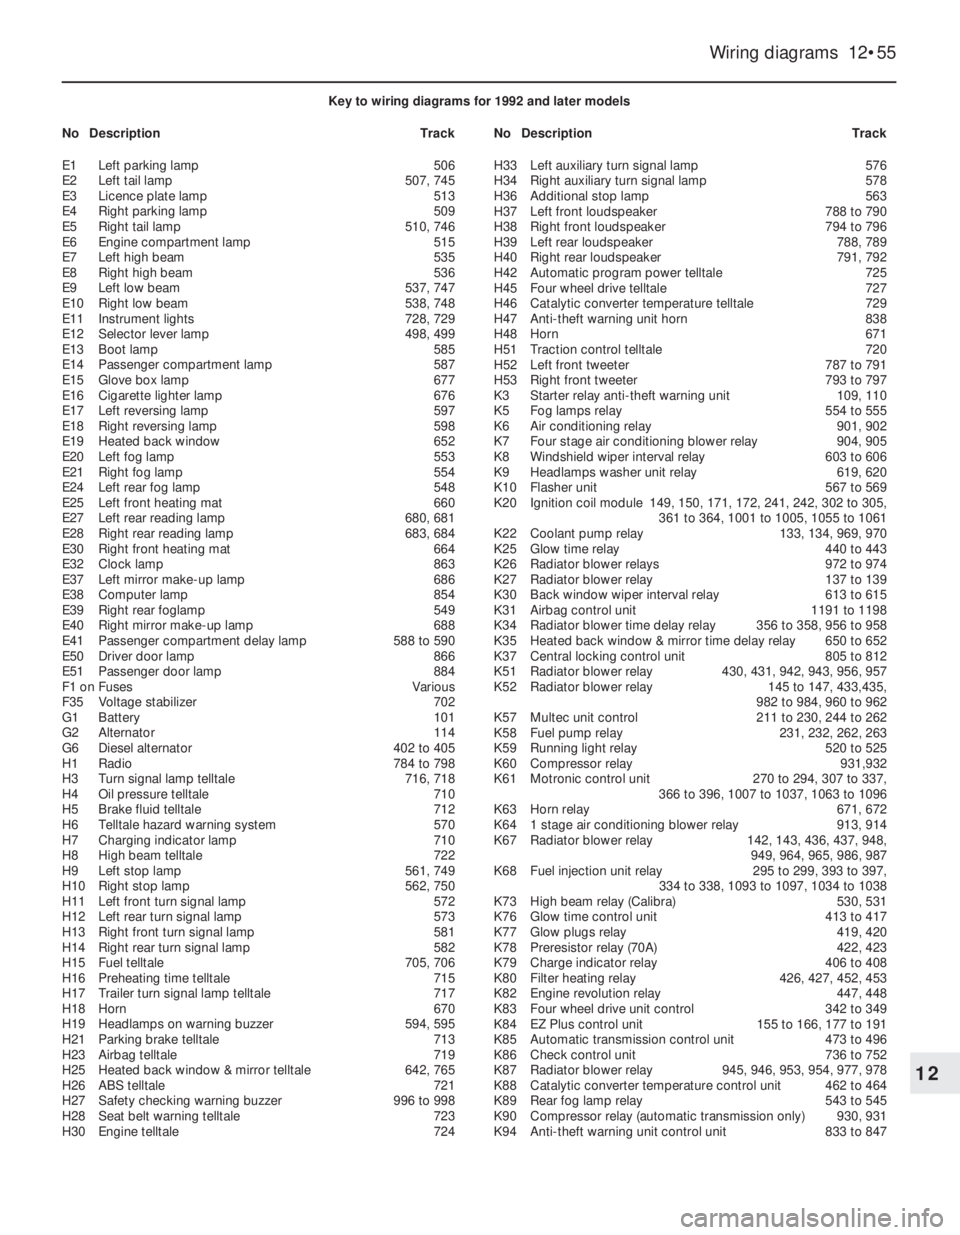
Wiring diagrams 12•55
12
Key to wiring diagrams for 1992 and later models
NoDescriptionTrackNoDescriptionTrack
E1Left parking lamp506
E2Left tail lamp507, 745
E3Licence plate lamp513
E4Right parking lamp509
E5Right tail lamp510, 746
E6Engine compartment lamp515
E7Left high beam 535
E8Right high beam536
E9Left low beam537, 747
E10Right low beam538, 748
E11Instrument lights728, 729
E12Selector lever lamp 498, 499
E13Boot lamp585
E14Passenger compartment lamp587
E15Glove box lamp677
E16Cigarette lighter lamp676
E17Left reversing lamp597
E18Right reversing lamp598
E19Heated back window652
E20Left fog lamp553
E21Right fog lamp554
E24Left rear fog lamp548
E25Left front heating mat660
E27Left rear reading lamp680, 681
E28Right rear reading lamp683, 684
E30Right front heating mat664
E32Clock lamp863
E37Left mirror make-up lamp686
E38Computer lamp854
E39Right rear foglamp549
E40Right mirror make-up lamp688
E41Passenger compartment delay lamp 588 to 590
E50Driver door lamp866
E51Passenger door lamp884
F1 onFusesVarious
F35Voltage stabilizer702
G1Battery101
G2Alternator114
G6Diesel alternator 402 to 405
H1Radio784 to 798
H3Turn signal lamp telltale716, 718
H4Oil pressure telltale710
H5Brake fluid telltale712
H6Telltale hazard warning system570
H7Charging indicator lamp710
H8High beam telltale722
H9Left stop lamp561, 749
H10Right stop lamp562, 750
H11Left front turn signal lamp572
H12Left rear turn signal lamp573
H13Right front turn signal lamp581
H14Right rear turn signal lamp582
H15Fuel telltale705, 706
H16Preheating time telltale715
H17Trailer turn signal lamp telltale717
H18Horn670
H19Headlamps on warning buzzer594, 595
H21Parking brake telltale713
H23Airbag telltale719
H25Heated back window & mirror telltale642, 765
H26ABS telltale721
H27Safety checking warning buzzer996 to 998
H28Seat belt warning telltale723
H30Engine telltale724H33Left auxiliary turn signal lamp576
H34Right auxiliary turn signal lamp578
H36Additional stop lamp563
H37Left front loudspeaker788 to 790
H38Right front loudspeaker794 to 796
H39Left rear loudspeaker788, 789
H40Right rear loudspeaker791, 792
H42Automatic program power telltale725
H45Four wheel drive telltale727
H46Catalytic converter temperature telltale729
H47Anti-theft warning unit horn838
H48Horn671
H51Traction control telltale720
H52Left front tweeter787 to 791
H53Right front tweeter793 to 797
K3Starter relay anti-theft warning unit109, 110
K5Fog lamps relay554 to 555
K6Air conditioning relay901, 902
K7Four stage air conditioning blower relay904, 905
K8Windshield wiper interval relay603 to 606
K9Headlamps washer unit relay619, 620
K10Flasher unit567 to 569
K20Ignition coil module149, 150, 171, 172, 241, 242, 302 to 305,
361 to 364, 1001 to 1005, 1055 to 1061
K22Coolant pump relay133, 134, 969, 970
K25Glow time relay440 to 443
K26Radiator blower relays972 to 974
K27Radiator blower relay137 to 139
K30Back window wiper interval relay613 to 615
K31Airbag control unit1191 to 1198
K34Radiator blower time delay relay356 to 358, 956 to 958
K35Heated back window & mirror time delay relay650 to 652
K37Central locking control unit805 to 812
K51Radiator blower relay430, 431, 942, 943, 956, 957
K52Radiator blower relay145 to 147, 433,435,
982 to 984, 960 to 962
K57Multec unit control211 to 230, 244 to 262
K58Fuel pump relay231, 232, 262, 263
K59Running light relay520 to 525
K60Compressor relay931,932
K61Motronic control unit270 to 294, 307 to 337,
366 to 396, 1007 to 1037, 1063 to 1096
K63Horn relay671, 672
K641 stage air conditioning blower relay913, 914
K67Radiator blower relay142, 143, 436, 437, 948,
949, 964, 965, 986, 987
K68Fuel injection unit relay295 to 299, 393 to 397,
334 to 338, 1093 to 1097, 1034 to 1038
K73High beam relay (Calibra)530, 531
K76Glow time control unit413 to 417
K77Glow plugs relay419, 420
K78Preresistor relay (70A)422, 423
K79Charge indicator relay406 to 408
K80Filter heating relay426, 427, 452, 453
K82Engine revolution relay447, 448
K83Four wheel drive unit control342 to 349
K84EZ Plus control unit155 to 166, 177 to 191
K85Automatic transmission control unit473 to 496
K86Check control unit736 to 752
K87Radiator blower relay945, 946, 953, 954, 977, 978
K88Catalytic converter temperature control unit462 to 464
K89Rear fog lamp relay543 to 545
K90Compressor relay (automatic transmission only)930, 931
K94Anti-theft warning unit control unit833 to 847
Page 70 of 525
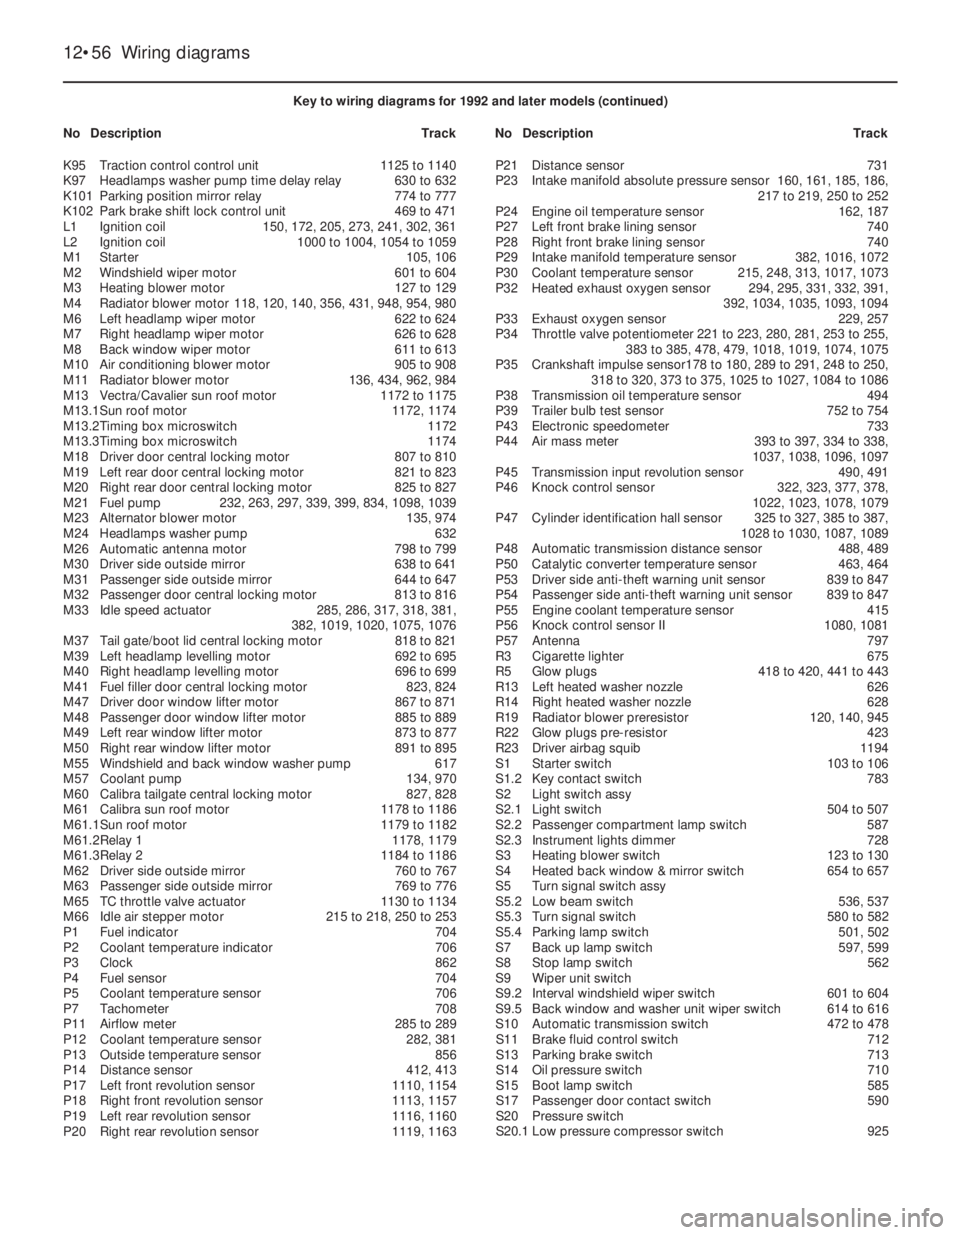
12•56Wiring diagrams
Key to wiring diagrams for 1992 and later models (continued)
NoDescriptionTrackNoDescriptionTrack
K95Traction control control unit1125 to 1140
K97Headlamps washer pump time delay relay630 to 632
K101Parking position mirror relay774 to 777
K102Park brake shift lock control unit 469 to 471
L1Ignition coil150, 172, 205, 273, 241, 302, 361
L2Ignition coil1000 to 1004, 1054 to 1059
M1Starter105, 106
M2Windshield wiper motor601 to 604
M3Heating blower motor127 to 129
M4Radiator blower motor118, 120, 140, 356, 431, 948, 954, 980
M6Left headlamp wiper motor622 to 624
M7Right headlamp wiper motor 626 to 628
M8Back window wiper motor611 to 613
M10Air conditioning blower motor905 to 908
M11Radiator blower motor136, 434, 962, 984
M13Vectra/Cavalier sun roof motor1172 to 1175
M13.1Sun roof motor1172, 1174
M13.2Timing box microswitch1172
M13.3Timing box microswitch1174
M18Driver door central locking motor807 to 810
M19Left rear door central locking motor821 to 823
M20Right rear door central locking motor825 to 827
M21Fuel pump232, 263, 297, 339, 399, 834, 1098, 1039
M23Alternator blower motor135, 974
M24Headlamps washer pump632
M26Automatic antenna motor798 to 799
M30Driver side outside mirror638 to 641
M31Passenger side outside mirror644 to 647
M32Passenger door central locking motor813 to 816
M33Idle speed actuator285, 286, 317, 318, 381,
382, 1019, 1020, 1075, 1076
M37Tail gate/boot lid central locking motor818 to 821
M39Left headlamp levelling motor 692 to 695
M40Right headlamp levelling motor696 to 699
M41Fuel filler door central locking motor823, 824
M47Driver door window lifter motor867 to 871
M48Passenger door window lifter motor885 to 889
M49Left rear window lifter motor873 to 877
M50Right rear window lifter motor891 to 895
M55Windshield and back window washer pump617
M57Coolant pump134, 970
M60Calibra tailgate central locking motor827, 828
M61Calibra sun roof motor1178 to 1186
M61.1Sun roof motor1179 to 1182
M61.2Relay 11178, 1179
M61.3Relay 21184 to 1186
M62Driver side outside mirror760 to 767
M63Passenger side outside mirror769 to 776
M65TC throttle valve actuator1130 to 1134
M66Idle air stepper motor215 to 218, 250 to 253
P1Fuel indicator704
P2Coolant temperature indicator706
P3Clock862
P4Fuel sensor704
P5Coolant temperature sensor706
P7Tachometer708
P11Airflow meter 285 to 289
P12Coolant temperature sensor282, 381
P13Outside temperature sensor856
P14Distance sensor412, 413
P17Left front revolution sensor1110, 1154
P18Right front revolution sensor1113, 1157
P19Left rear revolution sensor1116, 1160
P20Right rear revolution sensor1119, 1163P21Distance sensor731
P23Intake manifold absolute pressure sensor160, 161, 185, 186,
217 to 219, 250 to 252
P24Engine oil temperature sensor162, 187
P27Left front brake lining sensor740
P28Right front brake lining sensor740
P29Intake manifold temperature sensor382, 1016, 1072
P30Coolant temperature sensor215, 248, 313, 1017, 1073
P32Heated exhaust oxygen sensor294, 295, 331, 332, 391,
392, 1034, 1035, 1093, 1094
P33Exhaust oxygen sensor229, 257
P34Throttle valve potentiometer221 to 223, 280, 281, 253 to 255,
383 to 385, 478, 479, 1018, 1019, 1074, 1075
P35Crankshaft impulse sensor178 to 180, 289 to 291, 248 to 250,
318 to 320, 373 to 375, 1025 to 1027, 1084 to 1086
P38Transmission oil temperature sensor494
P39Trailer bulb test sensor752 to 754
P43Electronic speedometer733
P44Air mass meter393 to 397, 334 to 338,
1037, 1038, 1096, 1097
P45Transmission input revolution sensor490, 491
P46Knock control sensor322, 323, 377, 378,
1022, 1023, 1078, 1079
P47Cylinder identification hall sensor325 to 327, 385 to 387,
1028 to 1030, 1087, 1089
P48Automatic transmission distance sensor488, 489
P50Catalytic converter temperature sensor463, 464
P53Driver side anti-theft warning unit sensor839 to 847
P54Passenger side anti-theft warning unit sensor839 to 847
P55Engine coolant temperature sensor415
P56Knock control sensor II1080, 1081
P57Antenna797
R3Cigarette lighter675
R5Glow plugs418 to 420, 441 to 443
R13Left heated washer nozzle 626
R14Right heated washer nozzle628
R19Radiator blower preresistor120, 140, 945
R22Glow plugs pre-resistor423
R23Driver airbag squib1194
S1Starter switch103 to 106
S1.2Key contact switch783
S2Light switch assy
S2.1Light switch504 to 507
S2.2Passenger compartment lamp switch587
S2.3Instrument lights dimmer728
S3Heating blower switch123 to 130
S4Heated back window & mirror switch654 to 657
S5Turn signal switch assy
S5.2Low beam switch536, 537
S5.3Turn signal switch580 to 582
S5.4Parking lamp switch501, 502
S7Back up lamp switch597, 599
S8Stop lamp switch562
S9Wiper unit switch
S9.2Interval windshield wiper switch601 to 604
S9.5Back window and washer unit wiper switch614 to 616
S10Automatic transmission switch472 to 478
S11Brake fluid control switch712
S13Parking brake switch713
S14Oil pressure switch710
S15Boot lamp switch585
S17Passenger door contact switch590
S20Pressure switch
S20.1Low pressure compressor switch925
Page 104 of 525
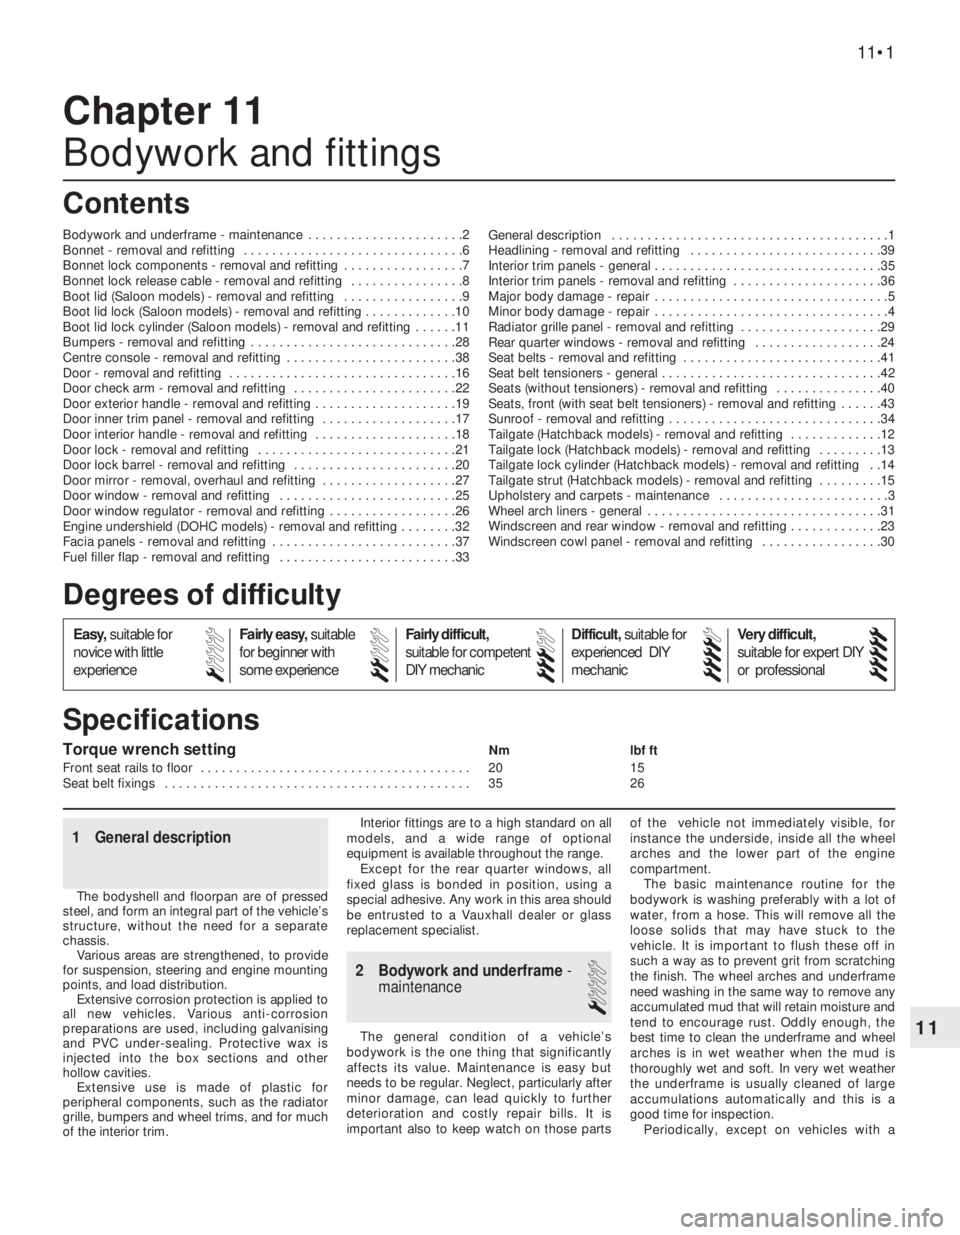
11
Torque wrench settingNm lbf ft
Front seat rails to floor . . . . . . . . . . . . . . . . . . . . . . . . . . . . . . . . . . . . . . 20 15
Seat belt fixings . . . . . . . . . . . . . . . . . . . . . . . . . . . . . . . . . . . . . . . . . . . 35 26
1 General description
The bodyshell and floorpan are of pressed
steel, and form an integral part of the vehicle’s
structure, without the need for a separate
chassis.
Various areas are strengthened, to provide
for suspension, steering and engine mounting
points, and load distribution.
Extensive corrosion protection is applied to
all new vehicles. Various anti-corrosion
preparations are used, including galvanising
and PVC under-sealing. Protective wax is
injected into the box sections and other
hollow cavities.
Extensive use is made of plastic for
peripheral components, such as the radiator
grille, bumpers and wheel trims, and for much
of the interior trim.Interior fittings are to a high standard on all
models, and a wide range of optional
equipment is available throughout the range.
Except for the rear quarter windows, all
fixed glass is bonded in position, using a
special adhesive. Any work in this area should
be entrusted to a Vauxhall dealer or glass
replacement specialist.
2 Bodywork and underframe -
maintenance
1
The general condition of a vehicle’s
bodywork is the one thing that significantly
affects its value. Maintenance is easy but
needs to be regular. Neglect, particularly after
minor damage, can lead quickly to further
deterioration and costly repair bills. It is
important also to keep watch on those partsof the vehicle not immediately visible, for
instance the underside, inside all the wheel
arches and the lower part of the engine
compartment.
The basic maintenance routine for the
bodywork is washing preferably with a lot of
water, from a hose. This will remove all the
loose solids that may have stuck to the
vehicle. It is important to flush these off in
such a way as to prevent grit from scratching
the finish. The wheel arches and underframe
need washing in the same way to remove any
accumulated mud that will retain moisture and
tend to encourage rust. Oddly enough, the
best time to clean the underframe and wheel
arches is in wet weather when the mud is
thoroughly wet and soft. In very wet weather
the underframe is usually cleaned of large
accumulations automatically and this is a
good time for inspection.
Periodically, except on vehicles with a
Chapter 11
Bodywork and fittings
Bodywork and underframe - maintenance . . . . . . . . . . . . . . . . . . . . . .2
Bonnet - removal and refitting . . . . . . . . . . . . . . . . . . . . . . . . . . . . . . .6
Bonnet lock components - removal and refitting . . . . . . . . . . . . . . . . .7
Bonnet lock release cable - removal and refitting . . . . . . . . . . . . . . . .8
Boot lid (Saloon models) - removal and refitting . . . . . . . . . . . . . . . . .9
Boot lid lock (Saloon models) - removal and refitting . . . . . . . . . . . . .10
Boot lid lock cylinder (Saloon models) - removal and refitting . . . . . .11
Bumpers - removal and refitting . . . . . . . . . . . . . . . . . . . . . . . . . . . . .28
Centre console - removal and refitting . . . . . . . . . . . . . . . . . . . . . . . .38
Door - removal and refitting . . . . . . . . . . . . . . . . . . . . . . . . . . . . . . . .16
Door check arm - removal and refitting . . . . . . . . . . . . . . . . . . . . . . .22
Door exterior handle - removal and refitting . . . . . . . . . . . . . . . . . . . .19
Door inner trim panel - removal and refitting . . . . . . . . . . . . . . . . . . .17
Door interior handle - removal and refitting . . . . . . . . . . . . . . . . . . . .18
Door lock - removal and refitting . . . . . . . . . . . . . . . . . . . . . . . . . . . .21
Door lock barrel - removal and refitting . . . . . . . . . . . . . . . . . . . . . . .20
Door mirror - removal, overhaul and refitting . . . . . . . . . . . . . . . . . . .27
Door window - removal and refitting . . . . . . . . . . . . . . . . . . . . . . . . .25
Door window regulator - removal and refitting . . . . . . . . . . . . . . . . . .26
Engine undershield (DOHC models) - removal and refitting . . . . . . . .32
Facia panels - removal and refitting . . . . . . . . . . . . . . . . . . . . . . . . . .37
Fuel filler flap - removal and refitting . . . . . . . . . . . . . . . . . . . . . . . . .33General description . . . . . . . . . . . . . . . . . . . . . . . . . . . . . . . . . . . . . . .1
Headlining - removal and refitting . . . . . . . . . . . . . . . . . . . . . . . . . . .39
Interior trim panels - general . . . . . . . . . . . . . . . . . . . . . . . . . . . . . . . .35
Interior trim panels - removal and refitting . . . . . . . . . . . . . . . . . . . . .36
Major body damage - repair . . . . . . . . . . . . . . . . . . . . . . . . . . . . . . . . .5
Minor body damage - repair . . . . . . . . . . . . . . . . . . . . . . . . . . . . . . . . .4
Radiator grille panel - removal and refitting . . . . . . . . . . . . . . . . . . . .29
Rear quarter windows - removal and refitting . . . . . . . . . . . . . . . . . .24
Seat belts - removal and refitting . . . . . . . . . . . . . . . . . . . . . . . . . . . .41
Seat belt tensioners - general . . . . . . . . . . . . . . . . . . . . . . . . . . . . . . .42
Seats (without tensioners) - removal and refitting . . . . . . . . . . . . . . .40
Seats, front (with seat belt tensioners) - removal and refitting . . . . . .43
Sunroof - removal and refitting . . . . . . . . . . . . . . . . . . . . . . . . . . . . . .34
Tailgate (Hatchback models) - removal and refitting . . . . . . . . . . . . .12
Tailgate lock (Hatchback models) - removal and refitting . . . . . . . . .13
Tailgate lock cylinder (Hatchback models) - removal and refitting . .14
Tailgate strut (Hatchback models) - removal and refitting . . . . . . . . .15
Upholstery and carpets - maintenance . . . . . . . . . . . . . . . . . . . . . . . .3
Wheel arch liners - general . . . . . . . . . . . . . . . . . . . . . . . . . . . . . . . . .31
Windscreen and rear window - removal and refitting . . . . . . . . . . . . .23
Windscreen cowl panel - removal and refitting . . . . . . . . . . . . . . . . .30
11•1
Specifications Contents
Easy,suitable for
novice with little
experienceFairly easy,suitable
for beginner with
some experienceFairly difficult,
suitable for competent
DIY mechanic
Difficult,suitable for
experienced DIY
mechanicVery difficult,
suitable for expert DIY
or professional
Degrees of difficulty
54321
Page 107 of 525
6Bonnet - removal and refitting
2
Removal
1Open the bonnet, and support it in the fully
open position.
2On models fitted with an underbonnet lamp,
disconnect the battery negative lead, then
prise the lamp from the bonnet and disconnect
the wiring. If the bonnet is to be refitted, to aid
routing of the wiring on refitting, tie a length of
string to the end of the wiring. Then withdraw
the wiring through the bonnet and untie the
string, leaving it in position in the bonnet.
3Similarly, disconnect the windscreen
washer fluid hose from the connector in the
bonnet, but tie the string to the connector, to
prevent it from slipping into an inaccessible
position in the bonnet.
4Mark the position of the hinges on the
bonnet.
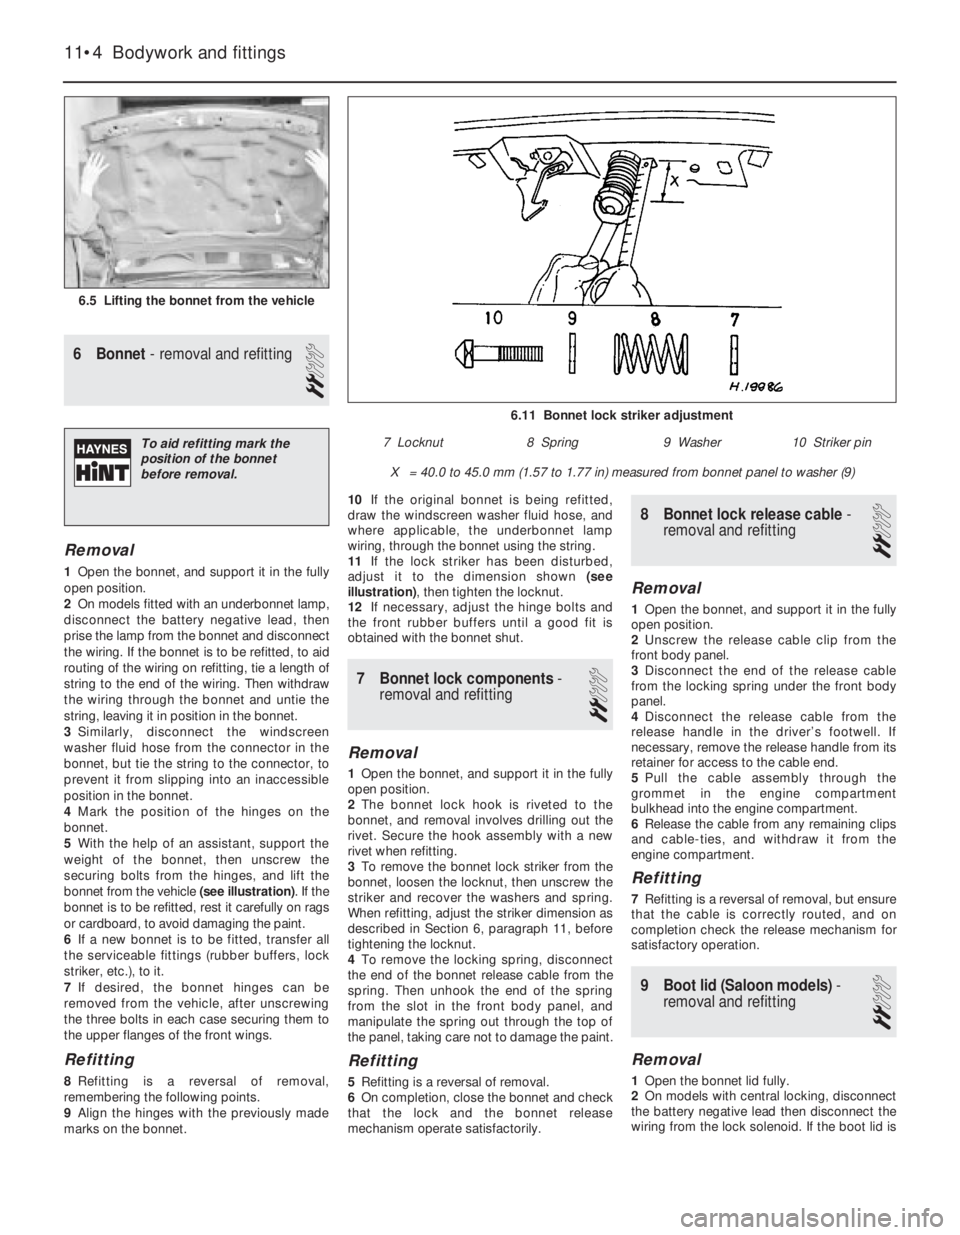
5With the help of an assistant, support the
weight of the bonnet, then unscrew the
securing bolts from the hinges, and lift the
bonnet from the vehicle (see illustration). If the
bonnet is to be refitted, rest it carefully on rags
or cardboard, to avoid damaging the paint.
6If a new bonnet is to be fitted, transfer all
the serviceable fittings (rubber buffers, lock
striker, etc.), to it.
7If desired, the bonnet hinges can be
removed from the vehicle, after unscrewing
the three bolts in each case securing them to
the upper flanges of the front wings.
Refitting
8Refitting is a reversal of removal,
remembering the following points.
9Align the hinges with the previously made
marks on the bonnet.10If the original bonnet is being refitted,
draw the windscreen washer fluid hose, and
where applicable, the underbonnet lamp
wiring, through the bonnet using the string.
11If the lock striker has been disturbed,
adjust it to the dimension shown (see
illustration), then tighten the locknut.
12If necessary, adjust the hinge bolts and
the front rubber buffers until a good fit is
obtained with the bonnet shut.
7Bonnet lock components -
removal and refitting
2
Removal
1Open the bonnet, and support it in the fully
open position.
2The bonnet lock hook is riveted to the
bonnet, and removal involves drilling out the
rivet. Secure the hook assembly with a new
rivet when refitting.
3To remove the bonnet lock striker from the
bonnet, loosen the locknut, then unscrew the
striker and recover the washers and spring.
When refitting, adjust the striker dimension as
described in Section 6, paragraph 11, before
tightening the locknut.
4To remove the locking spring, disconnect
the end of the bonnet release cable from the
spring. Then unhook the end of the spring
from the slot in the front body panel, and
manipulate the spring out through the top of
the panel, taking care not to damage the paint.
Refitting
5Refitting is a reversal of removal.
6On completion, close the bonnet and check
that the lock and the bonnet release
mechanism operate satisfactorily.
8Bonnet lock release cable -
removal and refitting
2
Removal
1Open the bonnet, and support it in the fully
open position.
2Unscrew the release cable clip from the
front body panel.
3Disconnect the end of the release cable
from the locking spring under the front body
panel.
4Disconnect the release cable from the
release handle in the driver’s footwell. If
necessary, remove the release handle from its
retainer for access to the cable end.
5Pull the cable assembly through the
grommet in the engine compartment
bulkhead into the engine compartment.
6Release the cable from any remaining clips
and cable-ties, and withdraw it from the
engine compartment.
Refitting
7Refitting is a reversal of removal, but ensure
that the cable is correctly routed, and on
completion check the release mechanism for
satisfactory operation.
9Boot lid (Saloon models) -
removal and refitting
2
Removal
1Open the bonnet lid fully.
2On models with central locking, disconnect
the battery negative lead then disconnect the
wiring from the lock solenoid. If the boot lid is
11•4Bodywork and fittings
6.5 Lifting the bonnet from the vehicle
6.11 Bonnet lock striker adjustment
X = 40.0 to 45.0 mm (1.57 to 1.77 in) measured from bonnet panel to washer (9)
7 Locknut8 Spring9 Washer10 Striker pinTo aid refitting mark the
position of the bonnet
before removal.
Page 108 of 525
to be refitted, tie a length of string to the end
of the wiring. Then feed the wiring through the
boot lid and untie the string, leaving it in
position in the boot lid to assist refitting.
3Mark the position of the hinges on the boot
lid.
4With the help of an assistant, support the
weight of the boot lid, then unscrew the
securing bolts from the hinges, and lift the
boot lid from the vehicle. If the boot lid is to be
refitted, rest it carefully on rags or cardboard,
to avoid damaging the paint.
5If a new boot lid is to be fitted, transfer all
the serviceable fittings (rubber buffers, lock
mechanism, etc.), to it.
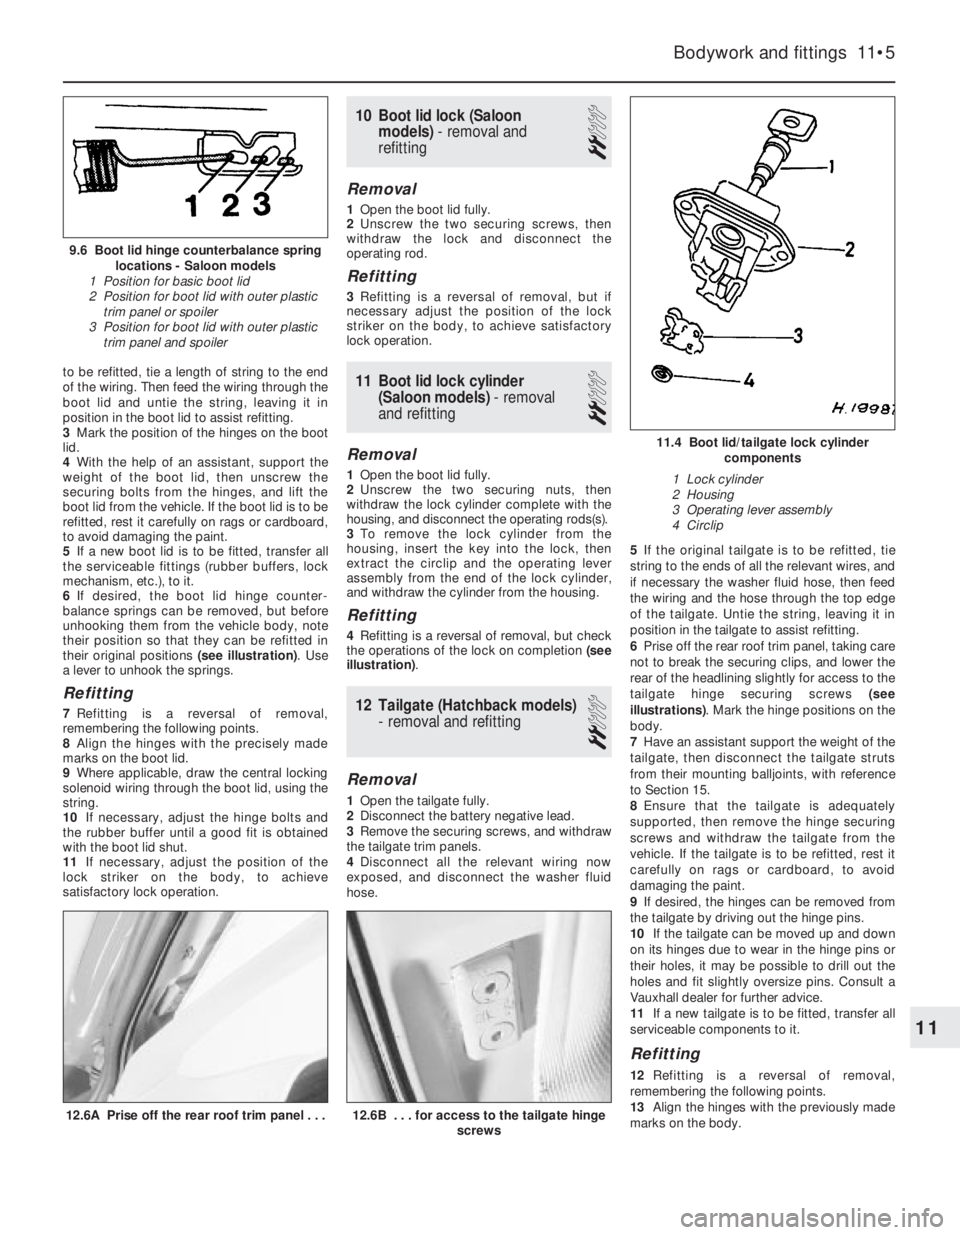
6If desired, the boot lid hinge counter-
balance springs can be removed, but before
unhooking them from the vehicle body, note
their position so that they can be refitted in
their original positions (see illustration). Use
a lever to unhook the springs.
Refitting
7Refitting is a reversal of removal,
remembering the following points.
8Align the hinges with the precisely made
marks on the boot lid.
9Where applicable, draw the central locking
solenoid wiring through the boot lid, using the
string.
10If necessary, adjust the hinge bolts and
the rubber buffer until a good fit is obtained
with the boot lid shut.
11If necessary, adjust the position of the
lock striker on the body, to achieve
satisfactory lock operation.
10Boot lid lock (Saloon
models) - removal and
refitting
2
Removal
1Open the boot lid fully.
2Unscrew the two securing screws, then
withdraw the lock and disconnect the
operating rod.
Refitting
3Refitting is a reversal of removal, but if
necessary adjust the position of the lock
striker on the body, to achieve satisfactory
lock operation.
11Boot lid lock cylinder
(Saloon models) - removal
and refitting
2
Removal
1Open the boot lid fully.
2Unscrew the two securing nuts, then
withdraw the lock cylinder complete with the
housing, and disconnect the operating rods(s).
3To remove the lock cylinder from the
housing, insert the key into the lock, then
extract the circlip and the operating lever
assembly from the end of the lock cylinder,
and withdraw the cylinder from the housing.
Refitting
4Refitting is a reversal of removal, but check
the operations of the lock on completion (see
illustration).
12Tailgate (Hatchback models)
-removal and refitting
2
Removal
1Open the tailgate fully.
2Disconnect the battery negative lead.
3Remove the securing screws, and withdraw
the tailgate trim panels.
4Disconnect all the relevant wiring now
exposed, and disconnect the washer fluid
hose.5If the original tailgate is to be refitted, tie
string to the ends of all the relevant wires, and
if necessary the washer fluid hose, then feed
the wiring and the hose through the top edge
of the tailgate. Untie the string, leaving it in
position in the tailgate to assist refitting.
6Prise off the rear roof trim panel, taking care
not to break the securing clips, and lower the
rear of the headlining slightly for access to the
tailgate hinge securing screws (see
illustrations). Mark the hinge positions on the
body.
7Have an assistant support the weight of the
tailgate, then disconnect the tailgate struts
from their mounting balljoints, with reference
to Section 15.
8Ensure that the tailgate is adequately
supported, then remove the hinge securing
screws and withdraw the tailgate from the
vehicle. If the tailgate is to be refitted, rest it
carefully on rags or cardboard, to avoid
damaging the paint.
9If desired, the hinges can be removed from
the tailgate by driving out the hinge pins.
10If the tailgate can be moved up and down
on its hinges due to wear in the hinge pins or
their holes, it may be possible to drill out the
holes and fit slightly oversize pins. Consult a
Vauxhall dealer for further advice.
11If a new tailgate is to be fitted, transfer all
serviceable components to it.
Refitting
12Refitting is a reversal of removal,
remembering the following points.
13Align the hinges with the previously made
marks on the body.
Bodywork and fittings 11•5
12.6B . . . for access to the tailgate hinge
screws12.6A Prise off the rear roof trim panel . . .
11.4 Boot lid/tailgate lock cylinder
components
1 Lock cylinder
2 Housing
3 Operating lever assembly
4 Circlip
9.6 Boot lid hinge counterbalance spring
locations - Saloon models
1 Position for basic boot lid
2 Position for boot lid with outer plastic
trim panel or spoiler
3 Position for boot lid with outer plastic
trim panel and spoiler
11
Page 137 of 525
outboard pad and anti-squeal shim that fits
between the pad and the caliper body.
7Withdraw the inboard pad and anti-squeal
shim.
Refitting
8Proceed as described in Section 4,
paragraphs 10 and 11.
9Check that the cutaway recesses in the
pistons are positioned downwards, at
approximately 23°to the horizontal. A
template made of card may be used to check
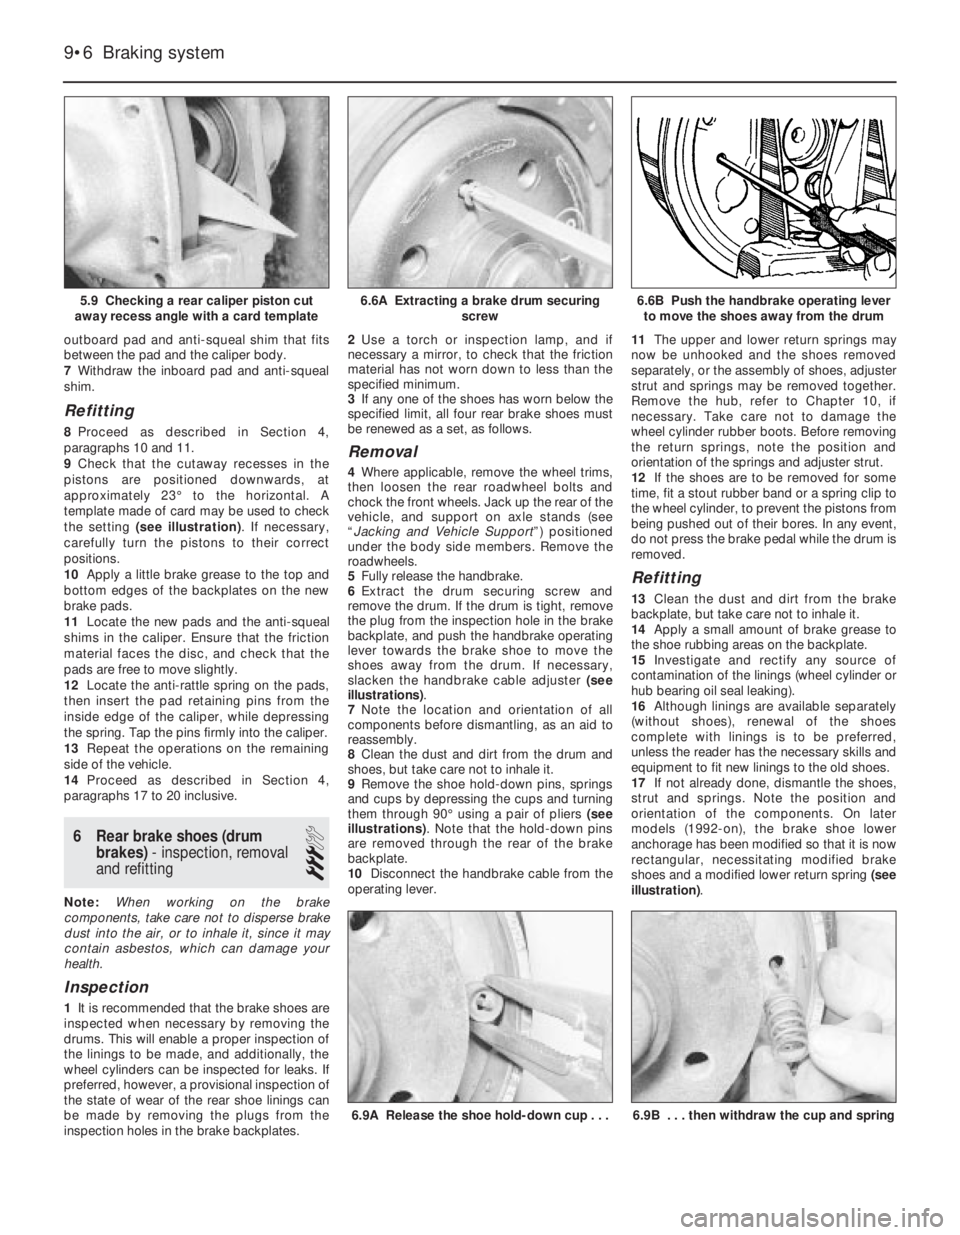
the setting (see illustration). If necessary,
carefully turn the pistons to their correct
positions.
10Apply a little brake grease to the top and
bottom edges of the backplates on the new
brake pads.
11Locate the new pads and the anti-squeal
shims in the caliper. Ensure that the friction
material faces the disc, and check that the
pads are free to move slightly.
12Locate the anti-rattle spring on the pads,
then insert the pad retaining pins from the
inside edge of the caliper, while depressing
the spring. Tap the pins firmly into the caliper.
13Repeat the operations on the remaining
side of the vehicle.
14Proceed as described in Section 4,
paragraphs 17 to 20 inclusive.
6Rear brake shoes (drum
brakes) - inspection, removal
and refitting
3
Note: When working on the brake
components, take care not to disperse brake
dust into the air, or to inhale it, since it may
contain asbestos, which can damage your
health.
Inspection
1It is recommended that the brake shoes are
inspected when necessary by removing the
drums. This will enable a proper inspection of
the linings to be made, and additionally, the
wheel cylinders can be inspected for leaks. If
preferred, however, a provisional inspection of
the state of wear of the rear shoe linings can
be made by removing the plugs from the
inspection holes in the brake backplates.2Use a torch or inspection lamp, and if
necessary a mirror, to check that the friction
material has not worn down to less than the
specified minimum.
3If any one of the shoes has worn below the
specified limit, all four rear brake shoes must
be renewed as a set, as follows.
Removal
4Where applicable, remove the wheel trims,
then loosen the rear roadwheel bolts and
chock the front wheels. Jack up the rear of the
vehicle, and support on axle stands (see
“Jacking and Vehicle Support”) positioned
under the body side members. Remove the
roadwheels.
5Fully release the handbrake.
6Extract the drum securing screw and
remove the drum. If the drum is tight, remove
the plug from the inspection hole in the brake
backplate, and push the handbrake operating
lever towards the brake shoe to move the
shoes away from the drum. If necessary,
slacken the handbrake cable adjuster (see
illustrations).
7Note the location and orientation of all
components before dismantling, as an aid to
reassembly.
8Clean the dust and dirt from the drum and
shoes, but take care not to inhale it.
9Remove the shoe hold-down pins, springs
and cups by depressing the cups and turning
them through 90°using a pair of pliers (see
illustrations). Note that the hold-down pins
are removed through the rear of the brake
backplate.
10Disconnect the handbrake cable from the
operating lever.11The upper and lower return springs may
now be unhooked and the shoes removed
separately, or the assembly of shoes, adjuster
strut and springs may be removed together.
Remove the hub, refer to Chapter 10, if
necessary. Take care not to damage the
wheel cylinder rubber boots. Before removing
the return springs, note the position and
orientation of the springs and adjuster strut.
12If the shoes are to be removed for some
time, fit a stout rubber band or a spring clip to
the wheel cylinder, to prevent the pistons from
being pushed out of their bores. In any event,
do not press the brake pedal while the drum is
removed.
Refitting
13Clean the dust and dirt from the brake
backplate, but take care not to inhale it.
14Apply a small amount of brake grease to
the shoe rubbing areas on the backplate.
15Investigate and rectify any source of
contamination of the linings (wheel cylinder or
hub bearing oil seal leaking).
16Although linings are available separately
(without shoes), renewal of the shoes
complete with linings is to be preferred,
unless the reader has the necessary skills and
equipment to fit new linings to the old shoes.
17If not already done, dismantle the shoes,
strut and springs. Note the position and
orientation of the components. On later
models (1992-on), the brake shoe lower
anchorage has been modified so that it is now
rectangular, necessitating modified brake
shoes and a modified lower return spring (see
illustration).
9•6Braking system
5.9 Checking a rear caliper piston cut
away recess angle with a card template6.6B Push the handbrake operating lever
to move the shoes away from the drum
6.9B . . . then withdraw the cup and spring6.9A Release the shoe hold-down cup . . .
6.6A Extracting a brake drum securing
screw