ECU OPEL COMBO 2017 Manual user
[x] Cancel search | Manufacturer: OPEL, Model Year: 2017, Model line: COMBO, Model: OPEL COMBO 2017Pages: 195, PDF Size: 4.71 MB
Page 45 of 195

Seats, restraints439Warning
When folding the seat use caution
- beware of moving parts. Ensure
the seat is secure when
completely folded.
9 Warning
No person is allowed to occupy a
rear seat when the seat in front is
in the folded position. Risk of
injury.
Unfolding the seats
1. Ensure that the seat belts are unfastened and that they do not
obstruct the unfolding
manoeuvre.
2. Remove the flexible cord and lower the seat assembly to the
floor, ensuring the rear support is
located on the anchor point and
securely latched into position.
3. Raise the backrest and adjust the
head restraint.
Note
The backrest is properly engaged
when the red mark on the release
lever is no longer visible.9 Warning
When unfolding the seat, ensure
that the seat is securely locked in
position before driving. Failure to
do so may result in personal injury in the event of hard braking or a
collision.
Removing the seats
Depending on version, the load
compartment area can be increased by removing the third row seats.
9 Warning
Removable rear seats are heavy!
Do not attempt to remove without assistance.
● Press release buttons and pull the rear seat head restraints
upwards to remove them 3 35.
● Ensure that the seat belts are unfastened and that they do not
obstruct the unfolding
manoeuvre.
● Remove the load compartment cover if necessary 3 62.
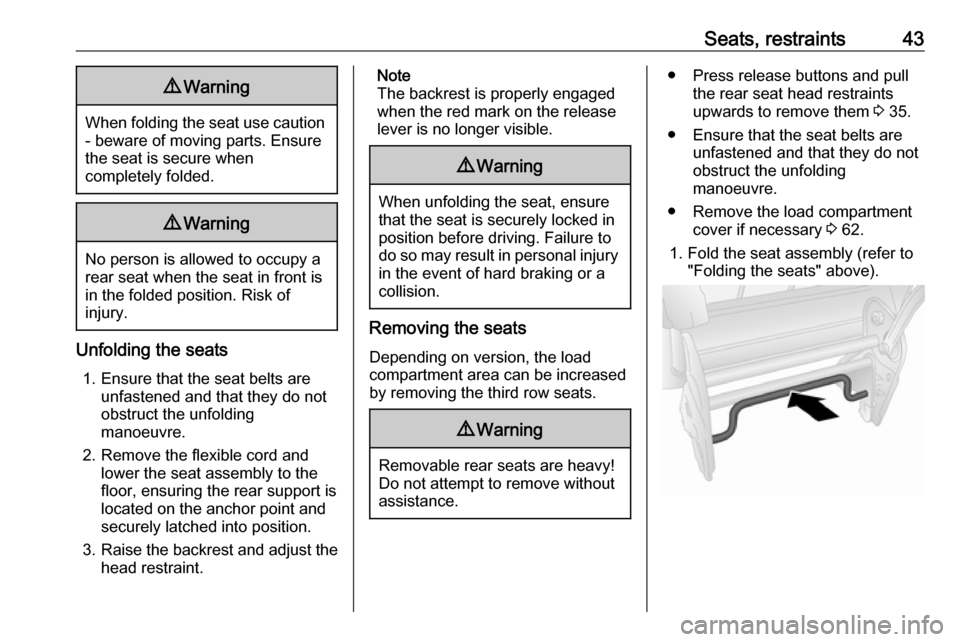
1. Fold the seat assembly (refer to "Folding the seats" above).
Page 46 of 195

44Seats, restraints2.Push the lower lever to disengage
the locks and remove the seat
assembly from the floor anchor
points.
3. Store head restraints on the rear of the seat frame.
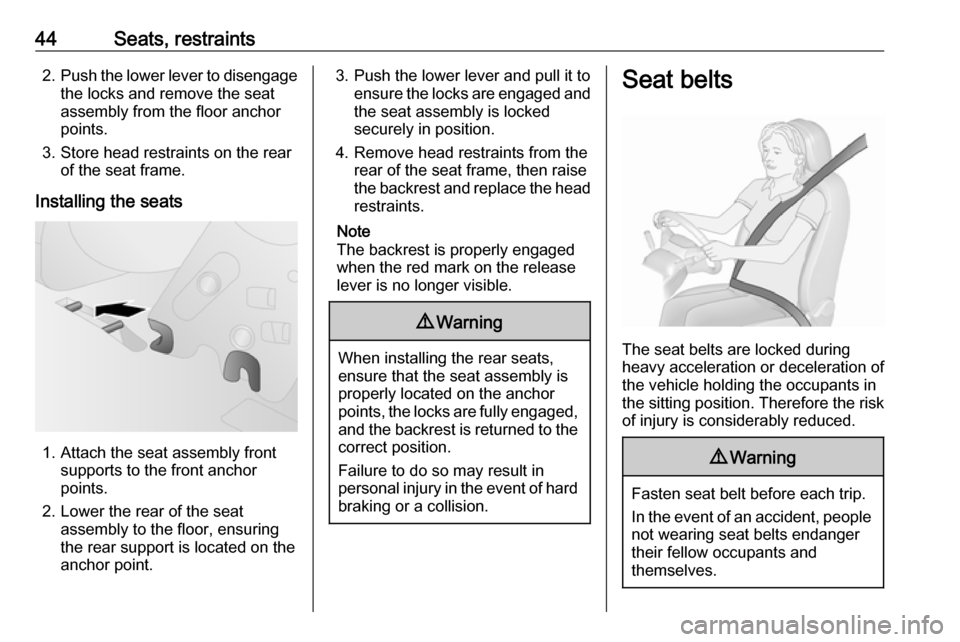
Installing the seats
1. Attach the seat assembly front supports to the front anchor
points.
2. Lower the rear of the seat assembly to the floor, ensuring
the rear support is located on the
anchor point.
3. Push the lower lever and pull it to ensure the locks are engaged andthe seat assembly is locked
securely in position.
4. Remove head restraints from the rear of the seat frame, then raise
the backrest and replace the head
restraints.
Note
The backrest is properly engaged
when the red mark on the release
lever is no longer visible.9 Warning
When installing the rear seats,
ensure that the seat assembly is
properly located on the anchor
points, the locks are fully engaged, and the backrest is returned to the
correct position.
Failure to do so may result in
personal injury in the event of hard braking or a collision.
Seat belts
The seat belts are locked during
heavy acceleration or deceleration of
the vehicle holding the occupants in
the sitting position. Therefore the risk
of injury is considerably reduced.
9 Warning
Fasten seat belt before each trip.
In the event of an accident, people
not wearing seat belts endanger their fellow occupants and
themselves.
Page 52 of 195

50Seats, restraintsна сидінні з УВІМКНЕНОЮ
ПОДУШКОЮ БЕЗПЕКИ, інакше це
може призвести до СМЕРТІ чи
СЕРЙОЗНОГО ТРАВМУВАННЯ
ДИТИНИ.
HU: SOHA ne használjon hátrafelé
néző biztonsági gyerekülést előlről
AKTÍV LÉGZSÁKKAL védett ülésen,
mert a GYERMEK HALÁLÁT vagy
KOMOLY SÉRÜLÉSÉT okozhatja.
HR: NIKADA nemojte koristiti sustav
zadržavanja za djecu okrenut prema
natrag na sjedalu s AKTIVNIM
ZRAČNIM JASTUKOM ispred njega,
to bi moglo dovesti do SMRTI ili
OZBILJNJIH OZLJEDA za DIJETE.
SL: NIKOLI ne nameščajte otroškega
varnostnega sedeža, obrnjenega v
nasprotni smeri vožnje, na sedež z
AKTIVNO ČELNO ZRAČNO
BLAZINO, saj pri tem obstaja
nevarnost RESNIH ali SMRTNIH
POŠKODB za OTROKA.
SR: NIKADA ne koristiti bezbednosni
sistem za decu u kome su deca
okrenuta unazad na sedištu sa
AKTIVNIM VAZDUŠNIMJASTUKOM ispred sedišta zato što
DETE može da NASTRADA ili da se
TEŠKO POVREDI.
MK: НИКОГАШ не користете детско
седиште свртено наназад на
седиште заштитено со АКТИВНО
ВОЗДУШНО ПЕРНИЧЕ пред него,
затоа што детето може ДА ЗАГИНЕ
или да биде ТЕШКО ПОВРЕДЕНО.
BG: НИКОГА не използвайте
детска седалка, гледаща назад,
върху седалка, която е защитена
чрез АКТИВНА ВЪЗДУШНА
ВЪЗГЛАВНИЦА пред нея - може да
се стигне до СМЪРТ или
СЕРИОЗНО НАРАНЯВАНЕ на
ДЕТЕТО.
RO: Nu utilizaţi NICIODATĂ un scaun
pentru copil îndreptat spre partea din
spate a maşinii pe un scaun protejat
de un AIRBAG ACTIV în faţa sa;
acest lucru poate duce la DECESUL
sau VĂTĂMAREA GRAVĂ a
COPILULUI.
CS: NIKDY nepoužívejte dětský
zádržný systém instalovaný proti
směru jízdy na sedadle, které je
chráněno před sedadlem AKTIVNÍMAIRBAGEM. Mohlo by dojít k
VÁŽNÉMU PORANĚNÍ nebo ÚMRTÍ
DÍTĚTE.
SK: NIKDY nepoužívajte detskú
sedačku otočenú vzad na sedadle
chránenom AKTÍVNYM AIRBAGOM,
pretože môže dôjsť k SMRTI alebo
VÁŽNYM ZRANENIAM DIEŤAŤA.
LT: JOKIU BŪDU nemontuokite atgal
atgręžtos vaiko tvirtinimo sistemos
sėdynėje, prieš kurią įrengta AKTYVI
ORO PAGALVĖ, nes VAIKAS GALI
ŽŪTI arba RIMTAI SUSIŽALOTI.
LV: NEKĀDĀ GADĪJUMĀ
neizmantojiet uz aizmuguri vērstu bērnu sēdeklīti sēdvietā, kas tiek
aizsargāta ar tās priekšā uzstādītu
AKTĪVU DROŠĪBAS SPILVENU, jo pretējā gadījumā BĒRNS var gūt
SMAGAS TRAUMAS vai IET BOJĀ.
ET: ÄRGE kasutage tahapoole
suunatud lapseturvaistet istmel, mille
ees on AKTIIVSE TURVAPADJAGA
kaitstud iste, sest see võib
põhjustada LAPSE SURMA või
TÕSISE VIGASTUSE.
Page 53 of 195

Seats, restraints51MT: QATT tuża trażżin għat-tfal li
jħares lejn in-naħa ta’ wara fuq sit
protett b’AIRBAG ATTIV quddiemu;
dan jista’ jikkawża l-MEWT jew
ĠRIEĦI SERJI lit-TFAL.
Beyond the warning required by ECE
R94.02, for safety reasons never use
a forward-facing child restraint
system on the front passenger seat
with active front airbag.
The airbag label may be located on
both sides of the front passenger sun
visor.9 Danger
Do not use a child restraint system
on the passenger seat with active
front airbag.
Airbag deactivation 3 52.
Front airbag system
The front airbag system consists of
one airbag in the steering wheel and
one in the instrument panel on the
front passenger side. These can be
identified by the word AIRBAG.
Additionally, there may be a warning
label on the passenger's sun visor.
Child restraint systems 3 54.
Airbag deactivation 3 52.
The front airbag system is triggered in
the event of a front-end impact of a
certain severity. The ignition must be
switched on.
The inflated airbags cushion the
impact, thereby reducing the risk of
injury to the upper body and head of
the front seat occupants
considerably.9 Warning
Optimum protection is only
provided when the seat is in the
proper position.
Seat position 3 36.
Keep the area in which the airbag
inflates clear of obstructions.
Fasten the seat belt correctly and
engage securely. Only then is the
airbag able to protect.
Page 56 of 195

54Seats, restraintsChild restraintsChild restraint systems
We recommend the Opel child
restraint system which is tailored
specifically to the vehicle.
When a child restraint system is being
used, pay attention to the following
usage and installation instructions
and also those supplied with the child restraint system.
Always comply with local or national
regulations. In some countries, the
use of child restraint systems is
forbidden on certain seats.9 Warning
When using a child restraint
system on the front passenger
seat, the airbag systems for the
front passenger seat must be
deactivated; if not, the triggering of the airbags poses a risk of fatal
injury to the child.
This is especially the case if rear-
facing child restraint systems are
used on the front passenger seat.
Airbag deactivation 3 52.
Airbag label 3 47.
Selecting the right system The rear seats are the most
convenient location to fasten a child
restraint system.
Children should travel facing
rearwards in the vehicle as long as
possible. This makes sure that the
child's backbone, which is still very
weak, is under less strain in the event of an accident.
Suitable are restraint systems that
comply with valid UN ECE
regulations. Check local laws and
regulations for mandatory use of child restraint systems.
Ensure that the child restraint system
to be installed is compatible with the
vehicle type.
Ensure that the mounting location of
the child restraint system within the
vehicle is correct.
Allow children to enter and exit the
vehicle only on the side facing away
from the traffic.When the child restraint system is not in use, secure the seat with a seat beltor remove it from the vehicle.
Note
Do not affix anything on the child
restraint systems and do not cover
them with any other materials.
A child restraint system which has
been subjected to stress in an
accident must be replaced.
Page 57 of 195

Seats, restraints55Child restraint installation locations
Permissible options for fitting a child restraint system
Weight and age class
Front passenger seatSecond rowThird rowactivated airbagdeactivated airbagoutboard seatcentre seatGroup 0: up to 10 kg
or approx. 10 monthsXU 1U,
or approx. 6 to 12 yearsXXUUX1:When securing with a three-point seat belt, move seat height adjustment to uppermost position and ensure that the
seat belt runs forwards from the upper anchorage point. Adjust seat backrest inclination as far as necessary to a
vertical position to ensure that the belt is tight on the buckle side.<:Vehicle seat available with ISOFIX attachments. When attaching using ISOFIX, only the ISOFIX child restraint
systems permitted for the vehicle may be used.U:Universal suitability in conjunction with three-point seat belt.X:No child restraint system permitted in this weight class.
Page 65 of 195

Storage63Removing
Open the load compartment cover.
Pull the release lever and lift cover
from retainers.
Installing
Insert either side of the load
compartment cover in the recess, pull
the release lever. Insert the load
compartment cover and engage.
Rear parcel shelf
The rear parcel shelf consists of two
parts - a front part and rear part. The front part can be opened or closed,
allowing for greater flexibility in the
load compartment.
Do not place any excessively heavy
or sharp-edged objects on the rear
parcel shelf.9 Warning
Always make sure that the load in
the vehicle is securely stowed.
Otherwise objects can be thrown
around inside the vehicle and
cause personal injury or damage
to the load or car.The rear parcel shelf can be installed
in two positions, i.e. the upper
position
Page 66 of 195

64Storageor the lower position. In the lowerposition, the maximum load
permissible is 70 kg.
Removing
If the rear seats are in the folded
position, remove the parcel shelf and
store it horizontally between the back
of the front seats and the folded rear
seats.Caution
For safety reasons, do not place
loads on the folded rear seats.
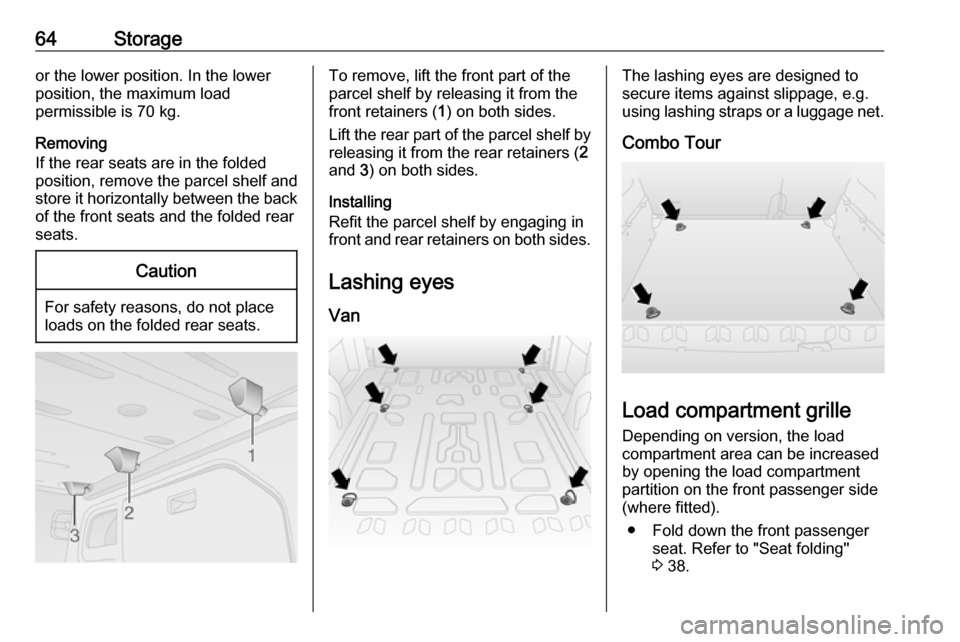
To remove, lift the front part of the
parcel shelf by releasing it from the
front retainers ( 1) on both sides.
Lift the rear part of the parcel shelf by releasing it from the rear retainers ( 2
and 3) on both sides.
Installing
Refit the parcel shelf by engaging in
front and rear retainers on both sides.
Lashing eyes
VanThe lashing eyes are designed to
secure items against slippage, e.g.
using lashing straps or a luggage net.
Combo Tour
Load compartment grille Depending on version, the load
compartment area can be increased
by opening the load compartment
partition on the front passenger side
(where fitted).
● Fold down the front passenger seat. Refer to "Seat folding"
3 38.
Page 67 of 195

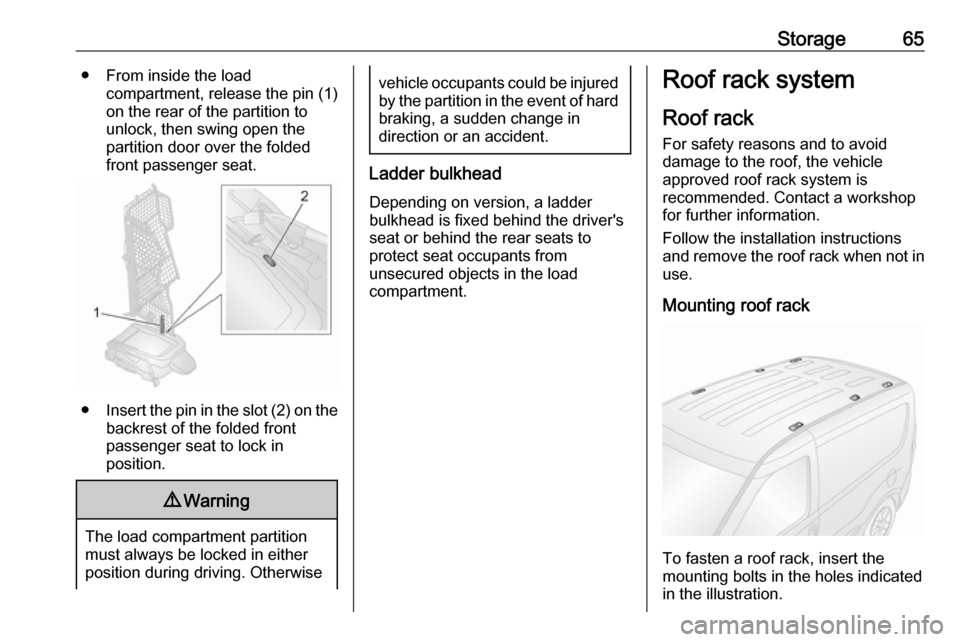
Storage65● From inside the loadcompartment, release the pin (1)
on the rear of the partition to
unlock, then swing open the
partition door over the folded
front passenger seat.
● Insert the pin in the slot (2) on the
backrest of the folded front
passenger seat to lock in
position.
9 Warning
The load compartment partition
must always be locked in either
position during driving. Otherwise
vehicle occupants could be injured by the partition in the event of hardbraking, a sudden change in
direction or an accident.
Ladder bulkhead
Depending on version, a ladder
bulkhead is fixed behind the driver's
seat or behind the rear seats to
protect seat occupants from
unsecured objects in the load
compartment.
Roof rack system
Roof rack
For safety reasons and to avoid
damage to the roof, the vehicle
approved roof rack system is
recommended. Contact a workshop
for further information.
Follow the installation instructions
and remove the roof rack when not in use.
Mounting roof rack
To fasten a roof rack, insert the
mounting bolts in the holes indicated
in the illustration.
Page 68 of 195

66StorageNote
Roof racks are not permitted on high
roof variants (H2).
Vehicle dimensions 3 183.Loading information
● Heavy objects in the load compartment should be evenlydistributed and placed as far
forward as possible. If objects
can be stacked, the heavier
objects should be placed at the
bottom.
● Secure objects with lashing straps attached to lashing eyes
3 64.
● Secure loose objects in load compartment to prevent themfrom sliding.
● When transporting objects in the load compartment, the backrestsof the rear seats must not be tiltedforwards or folded down.
● Do not allow the load to protrude above the upper edge of the
backrests.
● Do not place any objects on the extendable load compartment
cover 3 62 or the instrument
panel, and do not cover the
sensor on top of the instrument
panel 3 107.● The load must not obstruct the
operation of the pedals, parking
brake and gear selector lever, or
hinder the freedom of movement of the driver. Do not place any
unsecured objects in the interior.
● Do not drive with an open load compartment.9Warning
Always make sure that the load in
the vehicle is securely stowed.
Otherwise objects can be thrown
around inside the vehicle and
cause personal injury or damage
to the load or vehicle.
● The payload is the difference between the permitted gross
vehicle weight (see identification
plate 3 175) and the EC kerb
weight.
To calculate the payload, enter
the data for your vehicle in the
weights table at the front of this
manual.
The EC kerb weight includes
weights for the driver (68 kg),