OPEL COMBO D 2018 Manual user
COMBO D 2018
OPEL
OPEL
https://www.carmanualsonline.info/img/37/18809/w960_18809-0.png
OPEL COMBO D 2018 Manual user
Trending: width, bonnet, USB port, brake pads, garage door opener, fuel fill door release, charging
Page 151 of 203
Vehicle care149Wiper blade on tailgate
Lift wiper arm, press retaining clips to
detach wiper blade.
Attach the wiper blade to the wiper
arm and push until it engages.
Lower wiper arm carefully.
Bulb replacement
Switch off the ignition and switch off
the relevant switch or close the doors.
Only hold a new bulb at the base! Do not touch the bulb glass with bare
hands.
Use only the same bulb type for
replacement.
Replace headlight bulbs from within
the engine compartment.
Bulb check
After a bulb replacement, switch on
the ignition, operate and check the
lights.Halogen headlights
Headlights have separate systems for low beam/sidelight 1 (outer bulb),
high beam/daytime running light 2
(inner bulb).
To access bulbs, pull off protective
covers.
Low beam 1. Remove protective cover.
2. Detach connector from bulb.
3. Disengage wire clip and remove bulb from reflector.
Page 152 of 203
150Vehicle care
4.Insert new bulb in reflector so that
the locating tab of the bulb aligns
with the reflector recess.
5. Attach connector to bulb.
6. Engage wire clip.
7. Install protective cover.
High beam 1. Remove protective cover.
2. Detach connector from bulb.
3. Disengage wire clip and remove bulb from reflector.4.Insert new bulb in reflector so that
the bulb aligns with the reflector
recess.
5. Engage wire clip and attach connector onto bulb.
6. Install protective cover.
Sidelight 1. Remove protective cover. Withdraw bulb holder from
reflector by turning anticlockwise.2. Remove bulb from socket, insert new bulb.
3. Insert bulb holder in reflector. 4. Rotate clockwise to engage.
5. Install protective cover.
Daytime running light 1. Remove protective cover.
Page 153 of 203
Vehicle care151
2. Withdraw bulb holder fromreflector by turning anticlockwise.
3. Remove bulb from socket, insert new bulb.
4. Insert bulb holder in reflector. 5. Rotate clockwise to engage.
6. Install protective cover.
Front turn signal light 1. Remove protective cover.2. Withdraw bulb holder from reflector by turning anticlockwise.
3. Push bulb into holder slightly, rotate anticlockwise, remove and
renew bulb.
4. Insert bulb holder in reflector.
5. Rotate clockwise to engage.
6. Install protective cover.
Fog lights
Have bulbs replaced by a workshop.
Tail lights
1. Remove the three retaining screws.
2. Remove lamp assembly from vehicle.
3. Disengage connector plug from bulb holder.
Page 154 of 203
152Vehicle care
4.Unscrew the four retaining screws
using a screwdriver. Turn bulb
holder for reverse light
anticlockwise and replace bulb.
5. Remove bulb holder and seal from lamp assembly.
6. Push bulb into socket slightly, rotate anticlockwise, remove and
renew bulb.Brake light ( 1)
Turn signal light ( 2)
Tail light ( 3)
Tail light/fog light ( 4)
7. Install seal on bulb holder ensuring it is fitted correctly.
Install bulb holder in lamp
assembly ensuring that it
engages correctly. Tighten the
four retaining screws using a
screwdriver.
8. Install reverse light bulb holder and turn clockwise to tighten.
9. Engage connector plug.
10. Insert lamp assembly in body, ensuring correct positioning.
Tighten the three retaining
screws.
11. Switch on ignition, operate and check all lights.
Side turn signal lights
Have bulbs replaced by a workshop.
Centre high-mounted brakelight
Have bulbs replaced by a workshop.
Page 155 of 203
Vehicle care153Number plate light
Tailgate
1. Insert screwdriver as indicated by
the arrows, press to the side and
release the bulb housing.
2. Turn the bulb holder anticlockwise
to remove from the bulb housing.
Remove the bulb by pulling.
3. Replace the bulb.
4. Insert bulb holder in bulb housing and rotate clockwise
5. Install the bulb housing ensuring it
engages correctly.
Rear doors
1. Insert screwdriver as indicated by
the arrows, press to the left and
release the bulb housing.
2. Press bulb slightly towards spring
clip and remove.
3. Replace the bulb.
4. Install the bulb housing ensuring it
engages correctly.
Page 156 of 203
154Vehicle careInterior lightsFront and rear courtesy light
1. Remove lens using a flat blade screwdriver.
2. Open the rear cover. 3. Renew bulb.
4. Close rear cover.
5. Reinstall lens.
Front courtesy light, reading lights
1. Remove lens using a flat blade screwdriver.
2. Open the rear cover. 3. Renew bulbs.
4. Close rear cover.
5. Reinstall lens.
Removable rear courtesy light
1. Press the button at the top of the lamp assembly to release it.
Page 157 of 203
Vehicle care1552.Prise the lamp assembly out at the
points illustrated.
3. Renew bulb, ensuring it engages correctly.
4. Reinstall lamp assembly.
Instrument panel illumination
Have bulbs replaced by a workshop.Electrical system
Fuses
Data on the replacement fuse must match the data on the defective fuse.
There are two fuse boxes in the
vehicle:
● on the right of the engine compartment, next to the vehicle
battery
● in left-hand drive vehicles; on the
left-hand side of the instrument panel or, in right-hand drive
vehicles; on the right-hand side
of the instrument panel, behind a
cover
Before replacing a fuse, turn off the
respective switch and the ignition.
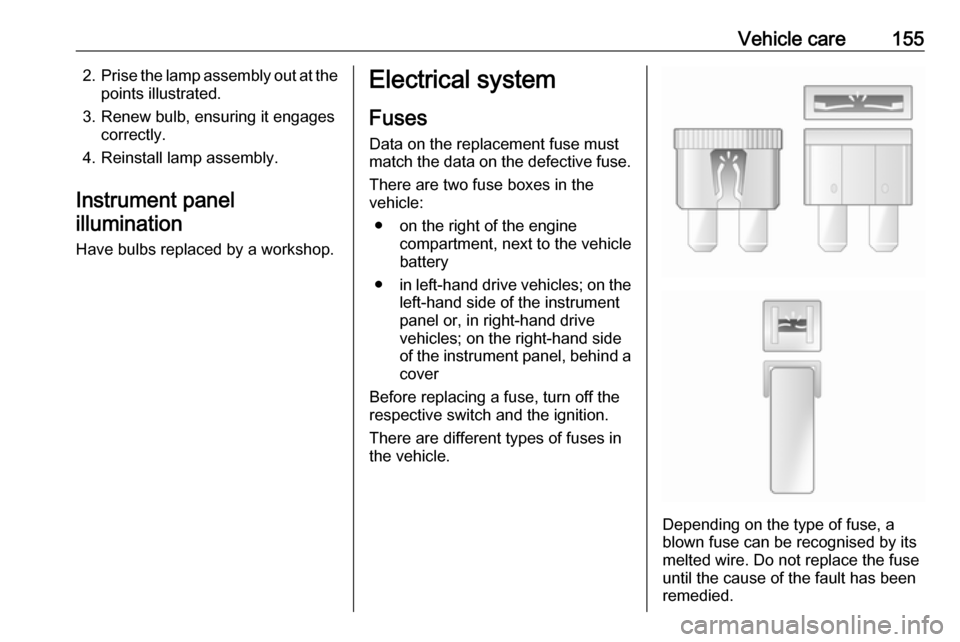
There are different types of fuses in
the vehicle.
Depending on the type of fuse, a
blown fuse can be recognised by its
melted wire. Do not replace the fuse until the cause of the fault has been
remedied.
Page 158 of 203
156Vehicle careIt is advisable to carry a full set of
fuses.
Some functions are protected by
several fuses. Fuses may also be
inserted without existence of a
function.
Note
Not all fuse box descriptions in this
Owner's Manual may apply to your
vehicle. Refer to the fuse box label,
where fitted.
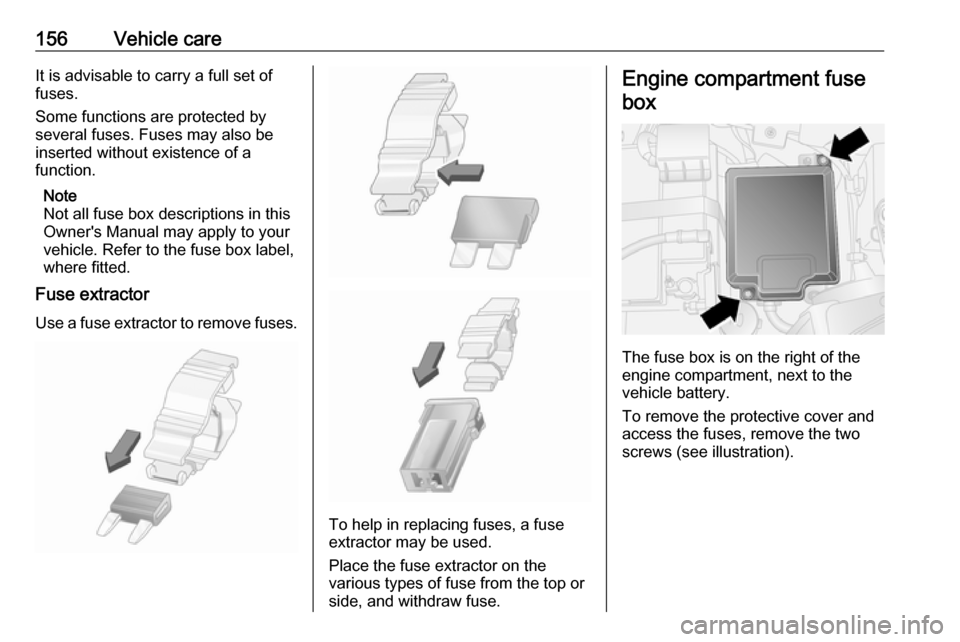
Fuse extractor
Use a fuse extractor to remove fuses.
To help in replacing fuses, a fuse
extractor may be used.
Place the fuse extractor on the
various types of fuse from the top or
side, and withdraw fuse.
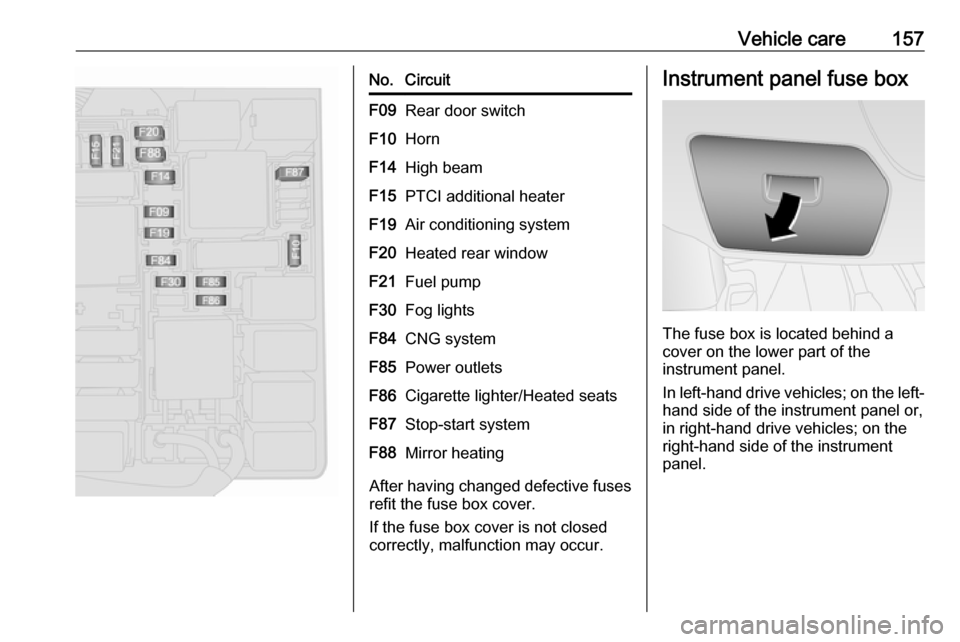
Engine compartment fuse
box
The fuse box is on the right of the
engine compartment, next to the
vehicle battery.
To remove the protective cover and
access the fuses, remove the two
screws (see illustration).
Page 159 of 203
Vehicle care157No.CircuitF09Rear door switchF10HornF14High beamF15PTCI additional heaterF19Air conditioning systemF20Heated rear windowF21Fuel pumpF30Fog lightsF84CNG systemF85Power outletsF86Cigarette lighter/Heated seatsF87Stop-start systemF88Mirror heating
After having changed defective fuses
refit the fuse box cover.
If the fuse box cover is not closed
correctly, malfunction may occur.
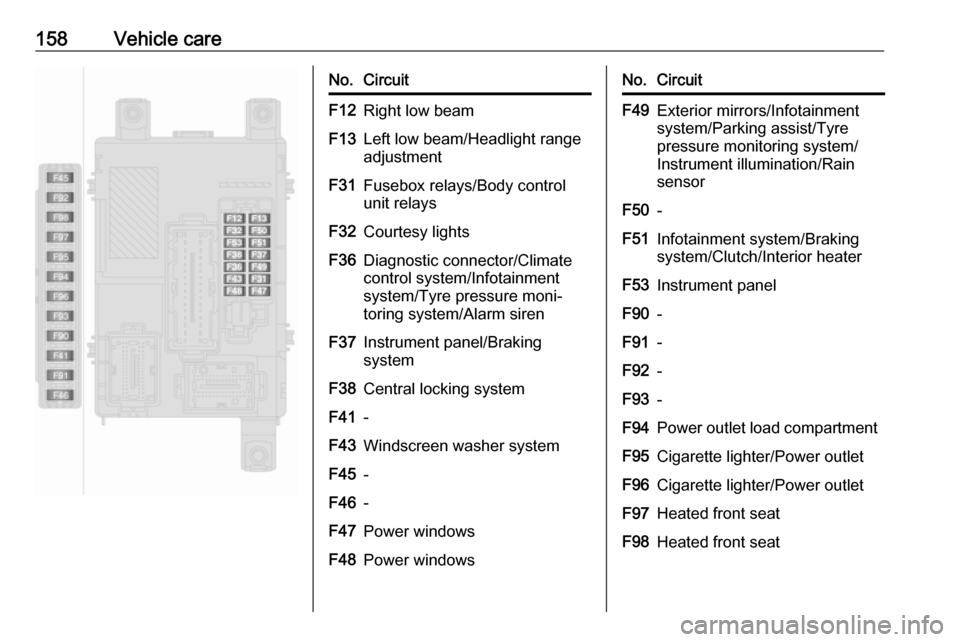
Instrument panel fuse box
The fuse box is located behind a
cover on the lower part of the
instrument panel.
In left-hand drive vehicles; on the left-
hand side of the instrument panel or,
in right-hand drive vehicles; on the
right-hand side of the instrument
panel.
Page 160 of 203
158Vehicle careNo.CircuitF12Right low beamF13Left low beam/Headlight range
adjustmentF31Fusebox relays/Body control
unit relaysF32Courtesy lightsF36Diagnostic connector/Climate
control system/Infotainment
system/Tyre pressure moni‐
toring system/Alarm sirenF37Instrument panel/Braking
systemF38Central locking systemF41-F43Windscreen washer systemF45-F46-F47Power windowsF48Power windowsNo.CircuitF49Exterior mirrors/Infotainment
system/Parking assist/Tyre
pressure monitoring system/
Instrument illumination/Rain
sensorF50-F51Infotainment system/Braking
system/Clutch/Interior heaterF53Instrument panelF90-F91-F92-F93-F94Power outlet load compartmentF95Cigarette lighter/Power outletF96Cigarette lighter/Power outletF97Heated front seatF98Heated front seat
Trending: jack points, oil additives, key battery, glove box, deactivate airbag, airbag off, service schedule


