ECO mode OPEL CORSA E 2018 Manual user
[x] Cancel search | Manufacturer: OPEL, Model Year: 2018, Model line: CORSA E, Model: OPEL CORSA E 2018Pages: 271, PDF Size: 7.99 MB
Page 5 of 271

Introduction3Vehicle specific dataPlease enter your vehicle's data on
the previous page to keep it easily
accessible. This information is
available in the sections "Service and
maintenance" and "Technical data"
as well as on the identification plate.
Introduction
Your vehicle is a designed
combination of advanced technology, safety, environmental friendliness
and economy.
This Owner's Manual provides you
with all the necessary information to
enable you to drive your vehicle
safely and efficiently.
Make sure your passengers are
aware of the possible risk of accident
and injury which may result from
improper use of the vehicle.
You must always comply with the
specific laws and regulations of the
country that you are in. These laws
may differ from the information in this Owner's Manual.
Disregarding the description given in
this manual may affect your warranty.When this Owner's Manual refers to a
workshop visit, we recommend your
Opel Service Partner.
For gas vehicles we recommend an
Opel Repairer authorised for
servicing gas vehicles.
All Opel Service Partners provide
first-class service at reasonable
prices. Experienced mechanics
trained by Opel work according to
specific Opel instructions.
The customer literature pack should
always be kept ready to hand in the
vehicle.
Using this manual ● This manual describes all options
and features available for this
model. Certain descriptions,
including those for display and
menu functions, may not apply to
your vehicle due to model
variant, country specifications,
special equipment or
accessories.
● The "In brief" section will give you
an initial overview.● The table of contents at the beginning of this manual and
within each section shows where the information is located.
● The index will enable you to search for specific information.
● This Owner's Manual depicts left-
hand drive vehicles. Operation is similar for right-hand drive
vehicles.
● The Owner's Manual uses the engine identifier code. The
corresponding sales designation
and engineering code can be
found in the section "Technical
data".
● Directional data, e.g. left or right, or front or back, always relate to
the direction of travel.
● Displays may not support your specific language.
● Display messages and interior labelling are written in bold
letters.
Page 13 of 271

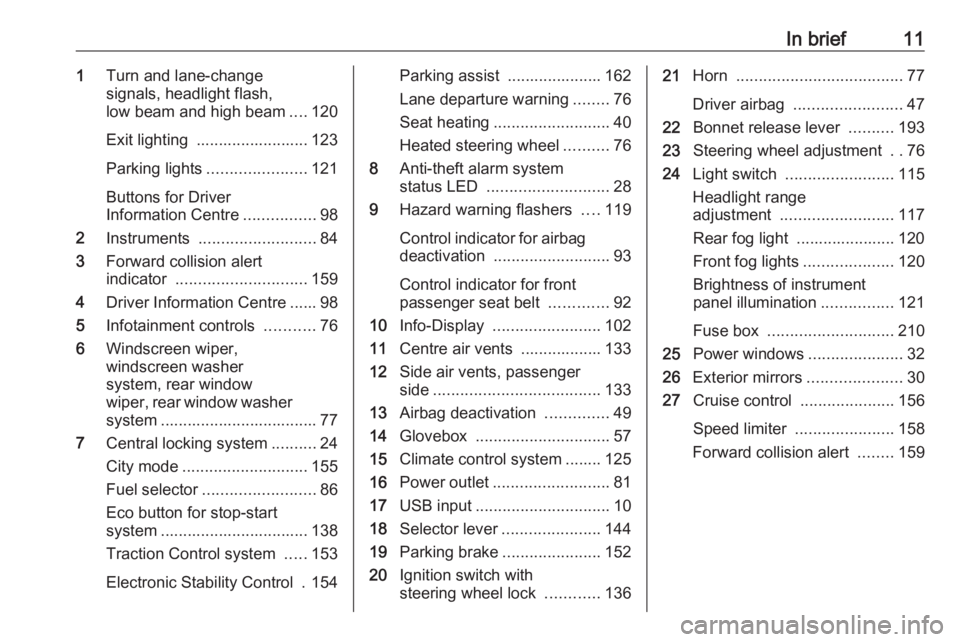
In brief111Turn and lane-change
signals, headlight flash,
low beam and high beam ....120
Exit lighting ......................... 123
Parking lights ...................... 121
Buttons for Driver
Information Centre ................98
2 Instruments .......................... 84
3 Forward collision alert
indicator ............................. 159
4 Driver Information Centre ...... 98
5 Infotainment controls ...........76
6 Windscreen wiper,
windscreen washer
system, rear window
wiper, rear window washer
system ................................... 77
7 Central locking system ..........24
City mode ............................ 155
Fuel selector ......................... 86
Eco button for stop-start
system ................................. 138
Traction Control system .....153
Electronic Stability Control . 154Parking assist ..................... 162
Lane departure warning ........76
Seat heating .......................... 40
Heated steering wheel ..........76
8 Anti-theft alarm system
status LED ........................... 28
9 Hazard warning flashers ....119
Control indicator for airbag deactivation .......................... 93
Control indicator for front
passenger seat belt .............92
10 Info-Display ........................ 102
11 Centre air vents .................. 133
12 Side air vents, passenger
side ..................................... 133
13 Airbag deactivation ..............49
14 Glovebox .............................. 57
15 Climate control system ........ 125
16 Power outlet .......................... 81
17 USB input .............................. 10
18 Selector lever ...................... 144
19 Parking brake ......................152
20 Ignition switch with
steering wheel lock ............13621Horn ..................................... 77
Driver airbag ........................ 47
22 Bonnet release lever ..........193
23 Steering wheel adjustment ..76
24 Light switch ........................ 115
Headlight range
adjustment ......................... 117
Rear fog light ...................... 120
Front fog lights ....................120
Brightness of instrument
panel illumination ................121
Fuse box ............................ 210
25 Power windows .....................32
26 Exterior mirrors .....................30
27 Cruise control .....................156
Speed limiter ...................... 158
Forward collision alert ........159
Page 15 of 271

In brief131Turn and lane-change
signals, headlight flash,
low beam and high beam ....120
Exit lighting ......................... 123
Parking lights ...................... 121
Buttons for Driver
Information Centre ................98
2 Instruments .......................... 84
3 Forward collision alert
indicator ............................. 159
4 Driver Information Centre ...... 98
5 Infotainment controls ...........76
6 Windscreen wiper,
windscreen washer
system, rear window
wiper, rear window washer
system ................................... 77
7 Central locking system ..........24
City mode ............................ 155
Fuel selector ......................... 86
Eco button for stop-start
system ................................. 138
Traction Control system .....153
Electronic Stability Control . 154Parking assist ..................... 162
Lane departure warning ........76
Seat heating .......................... 40
Heated steering wheel ..........76
8 Anti-theft alarm system
status LED ........................... 28
9 Hazard warning flashers ....119
Control indicator for airbag deactivation .......................... 93
Control indicator for front
passenger seat belt .............92
10 Colour-Info-Display ............102
Graphic-Info-Display ...........103
11 Centre air vents .................. 133
12 Side air vents, passenger
side ..................................... 133
13 Airbag deactivation ..............49
14 Glovebox .............................. 57
15 Climate control system ........ 125
16 Power outlet .......................... 81
17 USB input .............................. 10
18 Selector lever ...................... 144
19 Parking brake ......................15220Ignition switch with
steering wheel lock ............136
21 Horn ..................................... 77
Driver airbag ........................ 47
22 Bonnet release lever ..........193
23 Steering wheel adjustment ..76
24 Light switch ........................ 115
Headlight range
adjustment ......................... 117
Rear fog light ...................... 120
Front fog lights ....................120
Brightness of instrument panel illumination ................121
Fuse box ............................ 210
25 Power windows .....................32
26 Exterior mirrors .....................30
27 Cruise control .....................156
Speed limiter ...................... 158
Forward collision alert ........159
Page 74 of 271

72StorageWarning triangle
The warning triangle is stowed in the
load compartment below the tailgate.
First aid kit
Stow the first-aid kit in the
compartment in the left wall of the
load compartment.
To open the compartment, disengage cover and open it.
Roof rack system
Roof rack For safety reasons and to avoid
damage to the roof, the vehicle
approved roof rack system is
recommended. For further
information contact your workshop.
Follow the installation instructions
and remove the roof rack when not in
use.Fitting on model without sunroof
Push covers for concealing roof rack
mounts down and push backwards
with a valve cap key 3 212.
Page 84 of 271

82Instruments and controlsWith ignition off, the power outlet is
deactivated. Additionally, the power
outlet is deactivated in the event of
low vehicle battery voltage.
Electrical accessories that are
connected must comply with the
electromagnetic compatibility
requirements laid down in
DIN VDE 40 839.
Do not connect any current-delivering
accessories, e.g. electrical charging devices or batteries.
Do not damage the outlet by using
unsuitable plugs.
Stop-start system 3 138.
Inductive charging9 Warning
Inductive charging can affect the
operation of implanted
pacemakers or other medical
devices. If applicable, seek
medical advice before using the
inductive charging device.
9 Warning
Remove any metal objects from
the charging device before
charging a mobile phone, as these
objects could become very hot.
To charge a device, the ignition must
be switched on.
LED status on the charging device
(see arrow):
● Illuminates green: Mobile phone with inductive
charging functionality was
recognised.
● Illuminates yellow: Metall objects have been
detected in the charging area. Remove objects to allow
charging.
Mobile phone was not placed
properly.
PMA or Qi compatible mobile phones can be charged inductively.
A back cover with an integrated coil (e.g. Samsung 4 and 5) or a jacket
(e.g. some iPhone models) may be
required to charge a mobile phone.
The mobile phone must be smaller
than 8 cm in width and 15 cm in length
to fit into the charging device.
Protective cover for the mobile phone could have impact on the inductive
charging.
Page 87 of 271

Instruments and controls85Uplevel display
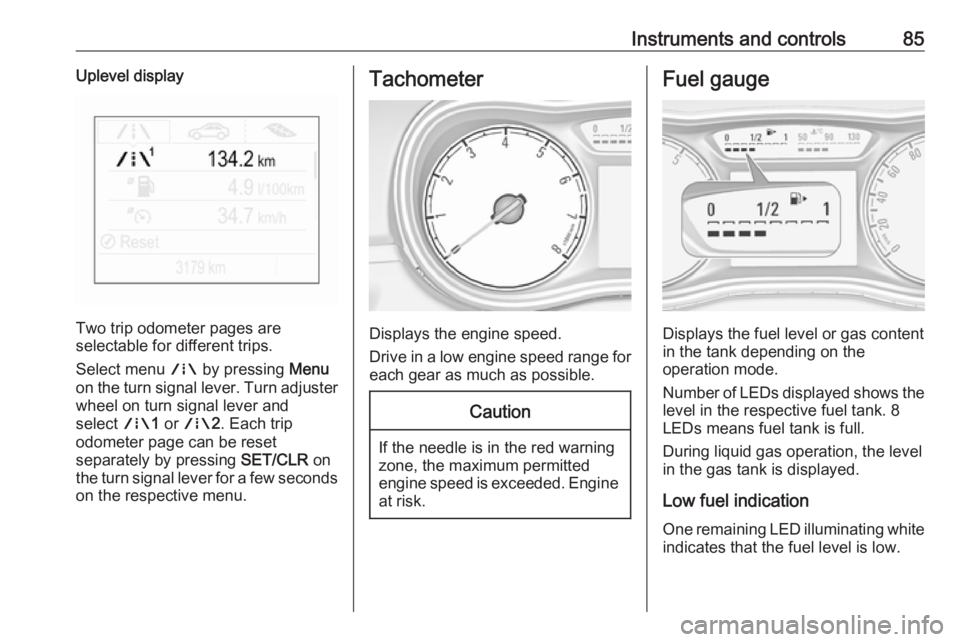
Two trip odometer pages are
selectable for different trips.
Select menu ; by pressing Menu
on the turn signal lever. Turn adjuster wheel on turn signal lever and
select ;1 or ; 2. Each trip
odometer page can be reset
separately by pressing SET/CLR on
the turn signal lever for a few seconds
on the respective menu.
Tachometer
Displays the engine speed.
Drive in a low engine speed range for each gear as much as possible.
Caution
If the needle is in the red warning
zone, the maximum permitted
engine speed is exceeded. Engine at risk.
Fuel gauge
Displays the fuel level or gas content
in the tank depending on the
operation mode.
Number of LEDs displayed shows the level in the respective fuel tank. 8
LEDs means fuel tank is full.
During liquid gas operation, the level
in the gas tank is displayed.
Low fuel indication
One remaining LED illuminating white indicates that the fuel level is low.
Page 88 of 271

86Instruments and controlsIf the LED changes to red and Y
illuminates yellow, refuel the tank soon.
If the LED illuminates red and Y
flashes yellow, refuel immediately.
Never run the fuel tank dry.
The arrow indicates the vehicle side
where the fuel filler flap is located.
Because of the fuel remaining in the
tank, the top-up quantity may be less
than the specified tank capacity.
During liquid gas operation, the
system automatically switches over to
petrol operation when gas tanks are
empty 3 86.
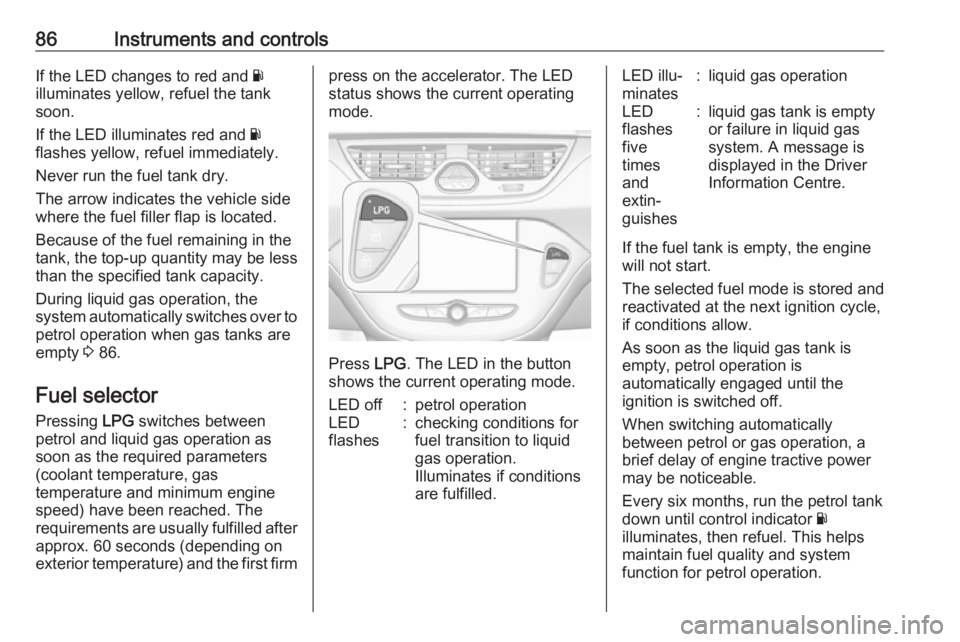
Fuel selector Pressing LPG switches between
petrol and liquid gas operation as soon as the required parameters
(coolant temperature, gas
temperature and minimum engine
speed) have been reached. The
requirements are usually fulfilled after
approx. 60 seconds (depending on
exterior temperature) and the first firmpress on the accelerator. The LED
status shows the current operating
mode.
Press LPG. The LED in the button
shows the current operating mode.
LED off:petrol operationLED
flashes:checking conditions for
fuel transition to liquid
gas operation.
Illuminates if conditions
are fulfilled.LED illu‐
minates:liquid gas operationLED
flashes
five
times
and
extin‐
guishes:liquid gas tank is empty
or failure in liquid gas
system. A message is
displayed in the Driver
Information Centre.
If the fuel tank is empty, the engine
will not start.
The selected fuel mode is stored and reactivated at the next ignition cycle,
if conditions allow.
As soon as the liquid gas tank is
empty, petrol operation is
automatically engaged until the
ignition is switched off.
When switching automatically
between petrol or gas operation, a
brief delay of engine tractive power
may be noticeable.
Every six months, run the petrol tank
down until control indicator Y
illuminates, then refuel. This helps
maintain fuel quality and system
function for petrol operation.
Page 96 of 271

94Instruments and controlsBrake and clutch systemR illuminates red.
The brake and clutch fluid level is too
low, when manual parking brake is
not applied 3 197.9 Warning
Stop. Do not continue your
journey. Consult a workshop.
Illuminates when the manual parking
brake is applied and ignition is
switched on 3 152.
Operate pedal - illuminates or flashes yellow.
Illuminates
Clutch pedal must be depressed to
start the engine in Autostop mode.
Stop-start system 3 138.
Flashes
Clutch pedal must to be depressed to start the engine with the key 3 19,
3 137.
On some versions, the Driver
Information Display indicates a
message to operate the clutch pedal
3 104.
Antilock brake system
(ABS)
u illuminates yellow.
Illuminates for a few seconds after the ignition is switched on. The system is
ready for operation when the control
indicator extinguishes.
If the control indicator does not go out after a few seconds, or if it illuminates while driving, there is a fault in the
ABS. The brake system remains
operational but without ABS
regulation.
Antilock brake system 3 151.
Gear shifting R with the number of a higher gear is
indicated, when upshifting is
recommended for fuel saving
reasons.Power steering
c illuminates yellow.
Illuminates with power steering disabled
Failure in the power steering system.
Consult a workshop.
Illumination of c and b
simultaneously
Power steering system must be
calibrated, system calibration 3 155.
Lane departure warning
) illuminates green or flashes yellow.
Illuminates green
System is switched on and ready to
operate.
Flashes yellow
System recognises an unintended
lane change.
Lane departure warning 3 179.
Page 100 of 271

98Instruments and controlsInformation displaysDriver Information Centre The Driver Information Centre is
located in the instrument cluster.
Depending on the version and
equipment, the Driver Information
Centre is available as Midlevel
display or Uplevel display.
The following menus are selectable in
the Driver Information Centre using
the buttons on the turn signal lever:
● vehicle information and settings
● trip/fuel information
● economic information
The following indications appear if
required:
● warning messages 3 104
● gear shift indication 3 94
● drive mode indication 3 143,
3 148
● tyre pressure warning 3 215
● seat belt reminder indication 3 92● Autostop indication 3 138
● service information 3 93
Midlevel display
Main menus are: ● trip/fuel information, see description below
● vehicle information, see description below
Some of the displayed functions differ
when the vehicle is being driven or at a standstill. Some functions are only
available when the vehicle is being
driven.
Uplevel display
Main menus are:
● trip/fuel information menu, displayed by ;, see
description below
● vehicle information menu, displayed by ?, see
description below
● eco information menu, displayed by @ , see description below
Note
Some systems override the main
menu tabs. The currently active tab
is indicated by a small arrow head.
Page 102 of 271

100Instruments and controlsOn vehicles with LPG engines:
Average consumption is indicated for
the currently selected mode, LPG or
petrol.
Average vehicle speed
Display of average speed. The
measurement can be reset at any
time.
To reset, press SET/CLR for a few
seconds while viewing this page.
The information of trip page 1 and 2
can be reset separately while the
respective display is active.
Instantaneous fuel economy
Display of the instantaneous
consumption.
On vehicles with LPG engines:
Instantaneous consumption is
indicated for the currently selected mode, LPG or petrol.
Fuel range
Range is calculated from current fuel
tank level and current consumption.
The display shows average values.
After refuelling, the range is updated
automatically after a brief delay.When the fuel level in the tank is low,
a message appears on the display
and control indicator Y in the fuel
gauge illuminates.
When the tank must be refuelled
immediately, a warning message
appears and remains on the display.
Additionally, control indicator Y
flashes in the fuel gauge 3 96.
Fuel range, LPG version
Display of the approximate total fuel
range for each fuel tank (LPG and
petrol). A low fuel level in either tank
is indicated by Low in the respective
section.
Timer
To start or stop the timer, press
SET/CLR . To reset, press SET/CLR
for a few seconds.
Outside temperature
Display of current outside
temperature.
Vehicle information menu ?
Possible pages are: ● unit
● speed warning
● remaining engine oil life indication
● tyre pressure
● tyre loading
● outside temperature
● following distance
● traffic sign assistant
● language
Selection and indication is different
between Midlevel display and Uplevel
display.