lights OPEL CORSA F 2020 Manual user
[x] Cancel search | Manufacturer: OPEL, Model Year: 2020, Model line: CORSA F, Model: OPEL CORSA F 2020Pages: 229, PDF Size: 21.14 MB
Page 148 of 229
146Driving and operatingSide blind spot alertSide blind zone alert assist helps to
avoid crashes due to unintentional
lane departures when an object is
detected within a specified blind spot zone.
The system displays a visual alert in
each exterior mirror, when detecting
objects that may not be visible in the
interior and exterior mirrors.
Side blind spot alert uses some of the
advanced parking assist sensors
which are located in the front and rear bumper on both sides of the vehicle.9 Warning
Side blind zone assistant system
is only a lane changing aid and does not replace driver vision.
Side blind zone assistant does not detect:
● Vehicles outside the side blind zones which may be rapidly
approaching.
● Pedestrians or animals.
● Non-moving objects, e.g. stationary vehicles, street
lights, road signs, etc.
Failure to use proper care when changing lanes may result in
damage to the vehicle, injury, or
death. Always check the outside
and rearview mirrors, glance over
your shoulder, and use the turn
signal before changing lanes.
Activation
The system can be activated via the
vehicle settings menu in the Info
Display.
Info Display 3 75.
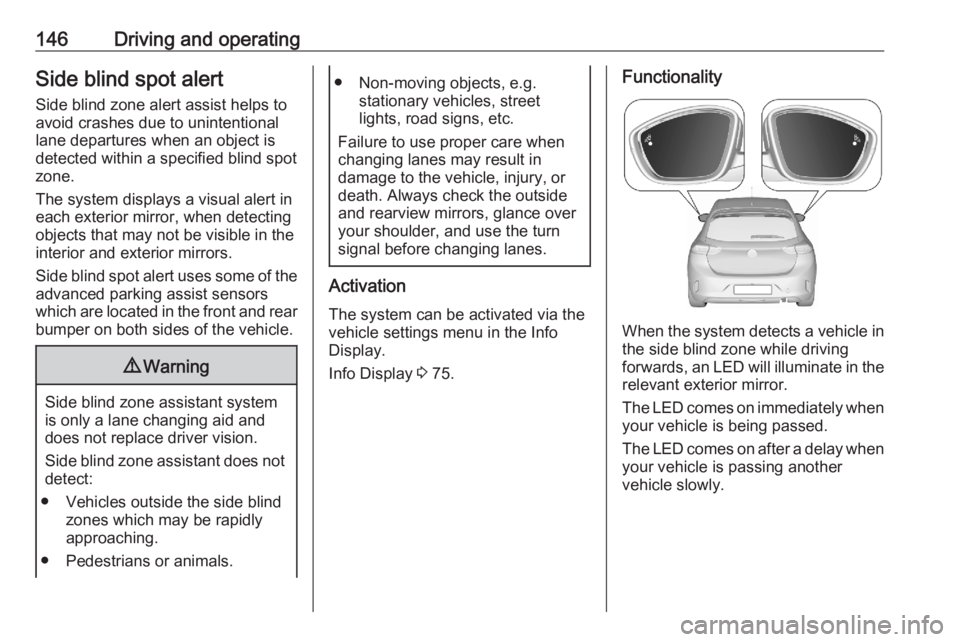
Functionality
When the system detects a vehicle in
the side blind zone while driving
forwards, an LED will illuminate in the
relevant exterior mirror.
The LED comes on immediately when your vehicle is being passed.
The LED comes on after a delay when
your vehicle is passing another
vehicle slowly.
Page 150 of 229
148Driving and operatingActive side blind spot detection
operates when the vehicle speed is
between 65 and 140 km/h.
Functionality
When steering towards the detected
vehicle is attemped, the driver will
then notice a turning movement of the
steering wheel towards the opposite
side. Turn steering wheel in the same direction if the system does not steer
sufficiently.
The system also intervenes even if
the turn lights have been activated.
Panoramic view system
This system allows views of the
vehicle's surroundings to be
displayed as a nearly 180° picture in
the Info Display, like a bird's eye view.
The system uses: ● rear camera, installed in the rear bumper
● ultrasonic parking sensors in the rear bumper
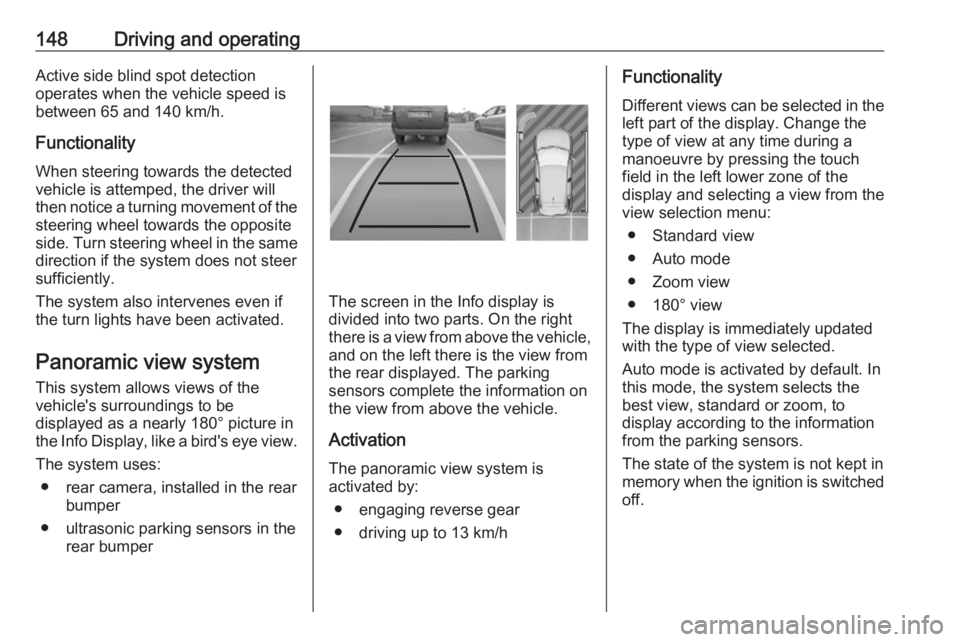
The screen in the Info display is
divided into two parts. On the right
there is a view from above the vehicle,
and on the left there is the view from
the rear displayed. The parking
sensors complete the information on
the view from above the vehicle.
Activation
The panoramic view system is
activated by:
● engaging reverse gear
● driving up to 13 km/h
Functionality
Different views can be selected in the left part of the display. Change the
type of view at any time during a
manoeuvre by pressing the touch
field in the left lower zone of the
display and selecting a view from the
view selection menu:
● Standard view
● Auto mode
● Zoom view
● 180° view
The display is immediately updated
with the type of view selected.
Auto mode is activated by default. In
this mode, the system selects the
best view, standard or zoom, to
display according to the information
from the parking sensors.
The state of the system is not kept in
memory when the ignition is switched
off.
Page 152 of 229
150Driving and operatingDeactivation
Panoramic view system is
deactivated when:
● towing an electrically connected trailer, bicycle carrier, etc.
● a certain forward speed is exceeded or if reverse gear is not
engaged for 7 seconds
● by pressing the icon q in the left
upper corner of the touch screen
General information9 Warning
The panoramic view system does
not replace driver vision. It will not display children, pedestrians,
cyclists, crossing traffic, animals,
or any other objects outside of the camera view area, e. g. below the
bumper, or underneath the
vehicle.
Do not drive or park the vehicle
using only the panoramic view
system.
Always check the surrounding of
the vehicle before driving.
Displayed images may be further
or closer than they appear. The
area displayed is limited and
objects that are close to either
edge of the bumper or under the
bumper are not displayed on the
screen.
System limitations
Caution
For optimal operation of the
system, it is important to keep the
lense of the camera in the tailgate between the number plate lightsand the lense in the front grill
below the emblem always clean.
Rinse the lenses with water and
wipe with a soft cloth.
Do not clean the lenses with a
steam-jet or high-pressure jet
cleaner.
The panoramic view system may not
operate properly when:
● The surrounding is dark.
● The sun or the beam of headlights is shining directly into
the camera lenses.
● Weather limits visibility, such as fog, rain, or snow.
● The camera lenses are blocked by snow, ice, slush, mud, dirt.
● The vehicle had an accident. ● There are extreme temperature changes.
Rear view camera The rear view camera assists the
driver when reversing by displaying a
view of the area behind the vehicle.
The view of the camera is displayed
in the Info Display.9 Warning
The rear view camera does not
replace driver vision. Note that
objects that are outside the
Page 153 of 229
Driving and operating151camera's field of view and the
parking assist sensors, e.g. below
the bumper or underneath the
vehicle, are not displayed.
Do not reverse or park the vehicle using only the rear view camera.
Always check the surrounding of
the vehicle before driving.
Switching on
Rear view camera is automatically
activated when reverse gear is
engaged.
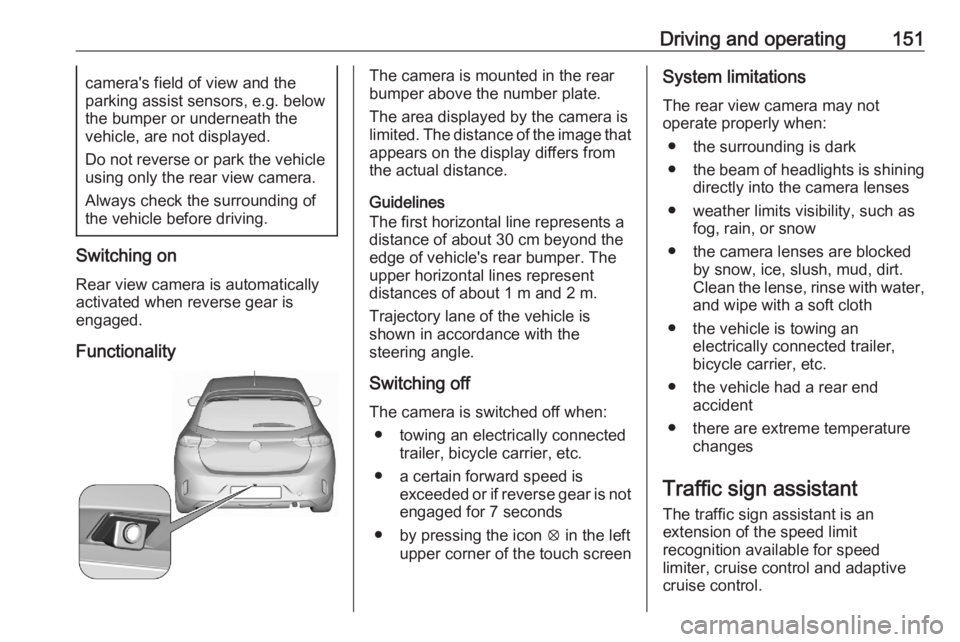
Functionality
The camera is mounted in the rear
bumper above the number plate.
The area displayed by the camera is
limited. The distance of the image that
appears on the display differs from
the actual distance.
Guidelines
The first horizontal line represents a
distance of about 30 cm beyond the
edge of vehicle's rear bumper. The
upper horizontal lines represent
distances of about 1 m and 2 m.
Trajectory lane of the vehicle is
shown in accordance with the
steering angle.
Switching off
The camera is switched off when: ● towing an electrically connected trailer, bicycle carrier, etc.
● a certain forward speed is exceeded or if reverse gear is not
engaged for 7 seconds
● by pressing the icon q in the left
upper corner of the touch screenSystem limitations
The rear view camera may not
operate properly when:
● the surrounding is dark
● the beam of headlights is shining
directly into the camera lenses
● weather limits visibility, such as fog, rain, or snow
● the camera lenses are blocked by snow, ice, slush, mud, dirt.Clean the lense, rinse with water,
and wipe with a soft cloth
● the vehicle is towing an electrically connected trailer,
bicycle carrier, etc.
● the vehicle had a rear end accident
● there are extreme temperature changes
Traffic sign assistant
The traffic sign assistant is an
extension of the speed limit
recognition available for speed
limiter, cruise control and adaptive
cruise control.
Page 154 of 229

152Driving and operating
The system recognises the traffic
signs above and displays them in the
Driver Information Centre.
9 Warning
The actual traffic sign always
takes priority over the traffic sign displayed in the Driver Information Centre.
If the vehicle enters a road of whichthe entry is prohibited, the no entry
traffic symbol and a warning message are displayed in the Driver
Information Centre. If the system
detects one of the other traffic signs,
the respective traffic sign is displayed
in the Driver Information Centre.
Speed limiter 3 122
Cruise control 3 120
Adaptive cruise control 3 124
Lane keep assist
Lane keep assist supports the driver
to avoid unintended leaving of the
lane. The front camera observes road
edges, as well as the lane markings
between which the vehicle is driving.
If the vehicle approaches a road edge or a lane marking, the steering wheel
is gently turned to position so that the
vehicle turns back into the lane. The
driver will then notice a turning
movement of the steering wheel. Turn steering wheel in same direction, if
the system does not steer sufficiently.
Turn steering wheel gently into
opposite direction, if lane change is
intended.
When the system steers to correct the trajectory of the vehicle, L flashes
yellow in the instrument cluster.
Unintended lane departure is not
assumed by the system when the turn lights are operated and during few
seconds after turn lights have been
switched off.Note
The system may be switched off if it
detects lanes which are too narrow,
too wide or too curved.
Following preconditions have to be
fulfilled:
● vehicle speed must be between 65 km/h and 180 km/h
● the driver must hold the steering wheel
● the turn lights are not activated
● the electronic stability control is activated and not in operation
● the vehicle is not connected to a trailer or an electric bicycle carrier
● normal driving behaviour (system
detects dynamic driving style, i.e. pressure on the brake or
accelerator pedal)
● roads with good lane markings ● no spare wheel is used
● the driver is not taking the hands off the steering wheel for a longer
time period
● the vehicle is not driven in a tight
corner
Page 155 of 229

Driving and operating153Activation
If the system is activated, the LED in
the button j is not illuminated. To
activate the system when the system
is deactivated, press j.
The system is operational at vehicle
speeds between 65 km/h and
180 km/h and if lane markings are
detectable. The driver must hold the
steering wheel. The electronic
stability control system must be
activated.
The control indicator L flashes
yellow during trajectory correction.
If the driver wishes to maintain the
trajectory of the vehicle, he can
interrupt the correction by keeping a
firm grip on the steering wheel, e.g.
during an avoiding manoeuvre. The
correction is interrupted if the turn
lights are operated. If the vehicle is
equipped with active side blind spot detection, the interruption of the lane
correction might be cancelled.
Side blind zone assistant 3 146.
There is no correction triggered when
the turn lights are operated and
during few seconds after turn lights
have been switched off.
If the system detects that the driver is not holding the steering wheel
permanently, it interrupts the
correction. A warning message in the
Driver Information Centre
accompanied by a warning chime
alerts the driver when immediate
driver´s action is required.Deactivation
To deactivate the system, press and
hold j. Deactivation of the system is
confirmed by the illuminated LED in
the button and L illuminates yellow
in the instrument cluster.
Fault
In the event of a fault, L and C
appear in the instrument panel,
accompanied by a display message
and a warning chime. Contact a
dealer or a qualified workshop to have the system checked.
System limitations The system performance may be
affected by:
● a dirty or foggy windscreen or if the windscreen is affected by
foreign objects, e.g. stickers
● close vehicles ahead
● banked roads
● winding or hilly roads
● road edges
● sudden lighting changes
Page 160 of 229
158Driving and operatingPetrol and diesel refuelling
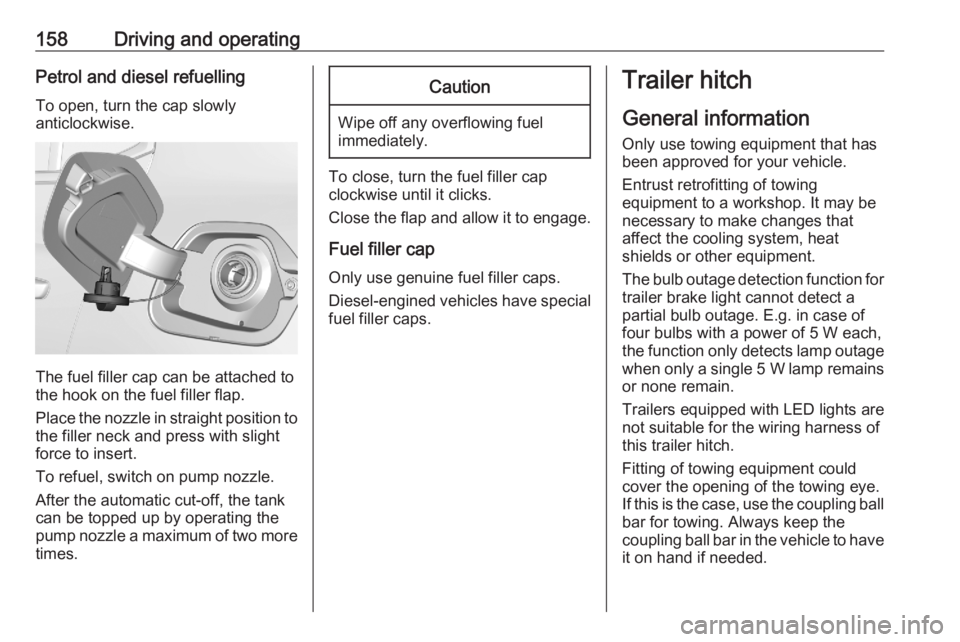
To open, turn the cap slowly
anticlockwise.
The fuel filler cap can be attached to
the hook on the fuel filler flap.
Place the nozzle in straight position to the filler neck and press with slight
force to insert.
To refuel, switch on pump nozzle.
After the automatic cut-off, the tank can be topped up by operating the
pump nozzle a maximum of two more
times.
Caution
Wipe off any overflowing fuel
immediately.
To close, turn the fuel filler cap
clockwise until it clicks.
Close the flap and allow it to engage.
Fuel filler cap
Only use genuine fuel filler caps.
Diesel-engined vehicles have special fuel filler caps.
Trailer hitch
General information
Only use towing equipment that has
been approved for your vehicle.
Entrust retrofitting of towing
equipment to a workshop. It may be
necessary to make changes that
affect the cooling system, heat
shields or other equipment.
The bulb outage detection function for
trailer brake light cannot detect a
partial bulb outage. E.g. in case of
four bulbs with a power of 5 W each,
the function only detects lamp outage when only a single 5 W lamp remains
or none remain.
Trailers equipped with LED lights are
not suitable for the wiring harness of
this trailer hitch.
Fitting of towing equipment could
cover the opening of the towing eye.
If this is the case, use the coupling ball
bar for towing. Always keep the
coupling ball bar in the vehicle to have it on hand if needed.
Page 163 of 229
Vehicle care161Vehicle careGeneral Information...................161
Accessories and vehicle modifications .......................... 161
Vehicle storage ........................162
End-of-life vehicle recovery .....162
Vehicle checks ........................... 163
Performing work ......................163
Bonnet ..................................... 163
Engine oil ................................. 164
Engine coolant ......................... 165
Washer fluid ............................ 165
Brakes ..................................... 166
Brake fluid ............................... 166
Vehicle battery ......................... 166
Diesel fuel system bleeding .....168
Wiper blade replacement ........168
Bulb replacement .......................169
Halogen headlights ..................169
LED headlights ........................ 171
Front fog lights ......................... 171
Front turn lights .......................171
Tail lights ................................. 172
Number plate light ...................174
Interior lights ............................ 174Electrical system........................174
Fuses ....................................... 174
Engine compartment fuse box . 175
Instrument panel fuse box .......176
Vehicle tools .............................. 178
Tools ........................................ 178
Wheels and tyres .......................179
Winter tyres ............................. 179
Tyre designations ....................179
Tyre pressure .......................... 179
Tyre deflation detection system .................................... 180
Tread depth ............................. 181
Changing tyre and wheel size . 182
Wheel covers ........................... 182
Tyre chains .............................. 182
Tyre repair kit .......................... 183
Wheel changing .......................186
Spare wheel ............................ 187
Jump starting ............................. 191
Towing ....................................... 192
Towing the vehicle ...................192
Towing another vehicle ...........193
Appearance care .......................194
Exterior care ............................ 194
Interior care ............................. 196
Floor mats ............................... 196General Information
Accessories and vehicle modifications
We recommend the use of genuine parts and accessories and factory
approved parts specific for your
vehicle type. We cannot assess or
guarantee reliability of other products - even if they have a regulatory or
otherwise granted approval.
Any modification, conversion or other
changes made to standard vehicle
specifications (including, without
limitation, software modifications,
modifications of the electronic control units) may invalidate the warranty
offered by Opel. Furthermore, such
changes may affect driver assistance
systems, may impact fuel
consumption, CO 2 emissions and
other emissions of the vehicle and
cause the vehicle to no longer
conform to the operating permit,
impacting the validity of your vehicle
registration.
Page 170 of 229
168Vehicle care● See the Owner's Manual forfurther information.
● Explosive gas may be present in the vicinity of the vehicle battery.
Power saving mode This mode deactivates electrical
consumers to avoid excessive
discharging of the vehicle battery.
These consumers, such as the
Infotainment system, windscreen
wipers, low beam headlights,
courtesy light, etc. can be used for a
total maximum time of about
40 minutes after ignition is switched
off.
Changing into power saving mode
When power saving mode is
activated, a message appears in the
Driver Information Centre.
An active telephone call using the
hands-free option will be maintained
for around 10 minutes longer.Deactivating power saving mode
Power saving mode is deactivated
automatically when the engine is
restarted. Run the engine for a
sufficient charge:
● for less than 10 minutes to use the consumers for approx.
5 minutes
● for more than 10 minutes to use the consumers for up to approx.
30 minutes
Heating functionalities Note
Individual heating functionalities,
such as heated seats or heated
steering wheel, may be temporarily
unavailable in the event of electrical
loading constraints. Functions will
be resumed after some minutes.Diesel fuel system bleeding
If the tank has been run dry, the diesel
fuel system must be bled. Refuel at
least five lieter diesel. Switch on the
ignition for about 60 seconds and switch off again. Then crank the
engine. If the engine does not start
directly, repeat this process a few
times. If the engine then fails to start,
seek the assistance of a workshop.
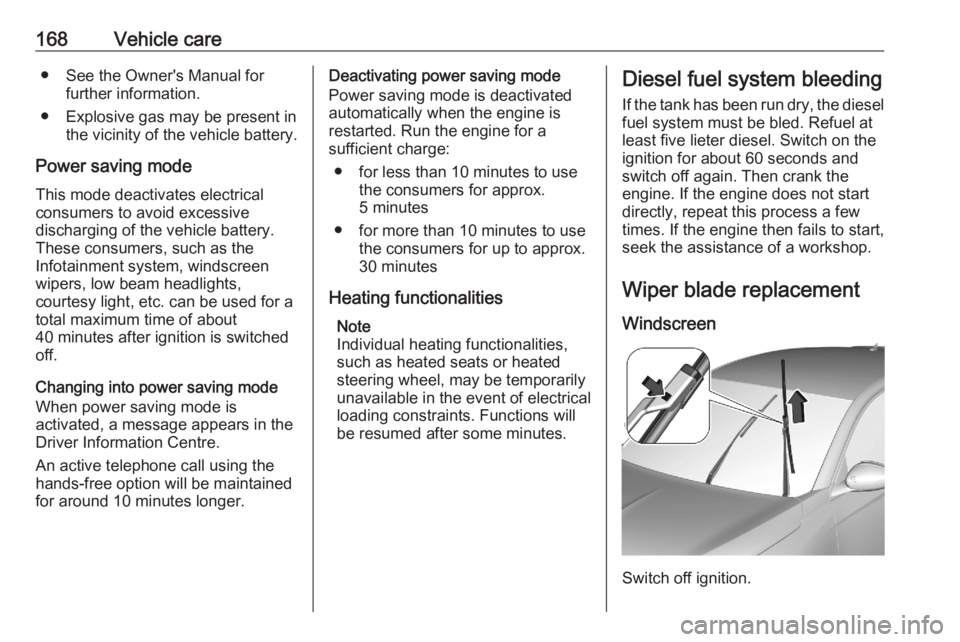
Wiper blade replacementWindscreen
Switch off ignition.
Page 171 of 229
Vehicle care169Within one minute after switching off
ignition, operate the wiper lever to
position the wiper blades vertically on
the windscreen.
Lift the wiper arm until it stays in the
raised position, press button to
disengage the wiper blade and
remove.
Attach the new wiper blade to the wiper arm and push until it engages.
Lower wiper arm carefully.
To return the wiper arms to their
original position, switch on the ignition and operate the wiper lever.
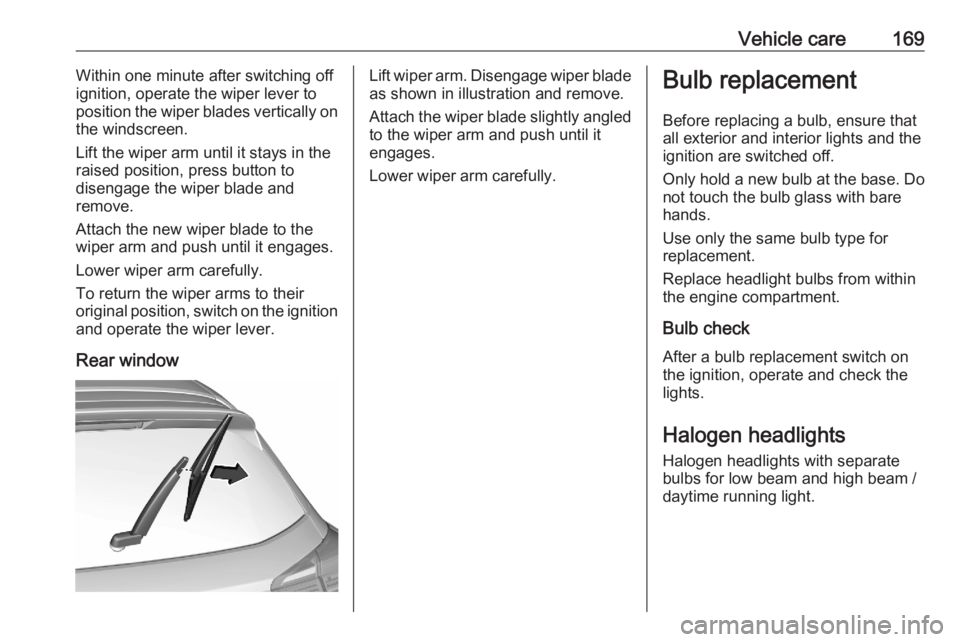
Rear windowLift wiper arm. Disengage wiper blade as shown in illustration and remove.
Attach the wiper blade slightly angled
to the wiper arm and push until it
engages.
Lower wiper arm carefully.Bulb replacement
Before replacing a bulb, ensure thatall exterior and interior lights and the
ignition are switched off.
Only hold a new bulb at the base. Do
not touch the bulb glass with bare
hands.
Use only the same bulb type for
replacement.
Replace headlight bulbs from within the engine compartment.
Bulb check After a bulb replacement switch on
the ignition, operate and check the
lights.
Halogen headlights Halogen headlights with separate
bulbs for low beam and high beam /
daytime running light.