light OPEL CROSSLAND X 2018 Manual user
[x] Cancel search | Manufacturer: OPEL, Model Year: 2018, Model line: CROSSLAND X, Model: OPEL CROSSLAND X 2018Pages: 257, PDF Size: 7.81 MB
Page 47 of 257
Seats, restraints45● Sit with shoulders as far backagainst the backrest as possible.
Set the backrest rake so that it is possible to easily reach the
steering wheel with arms slightly
bent. Maintain contact between
shoulders and the backrest when turning the steering wheel. Do
not angle the backrest too far
back. We recommend a
maximum rake of approx. 25°.
● Adjust seat and steering wheel in
a way that the wrist rests on top
of the steering wheel while the
arm is fully extended and
shoulders on the backrest.
● Adjust the steering wheel 3 75.
● Adjust the head restraint 3 43.
● Adjust the thigh support so that there is a space approx. two
fingers wide between the edge of the seat and the hollow of the
knee.
● Adjust the lumbar support so that
it supports the natural shape of
the spine.Seat adjustment
Drive only with engaged seats and
backrests.
Longitudinal adjustment
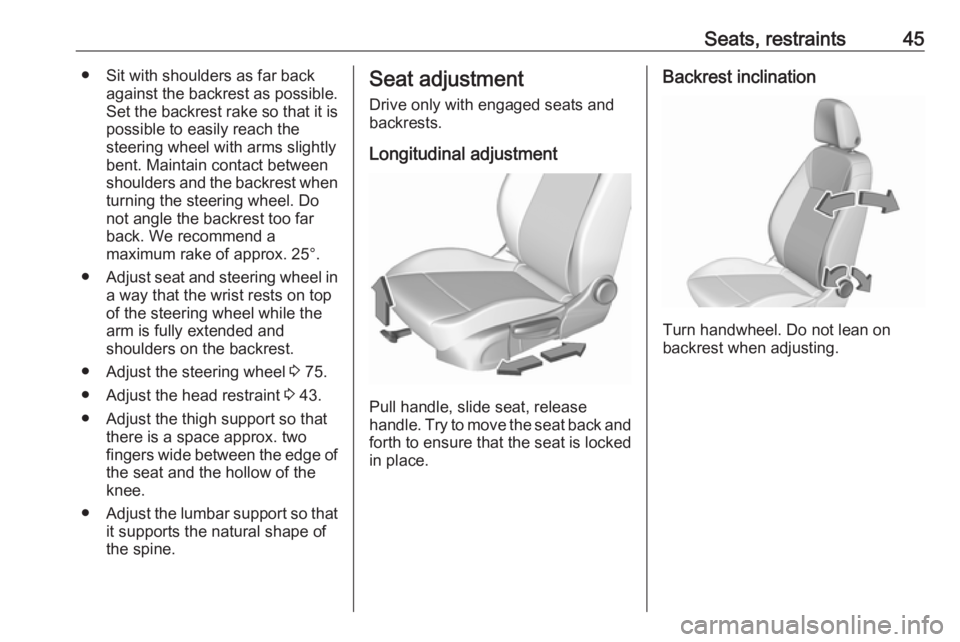
Pull handle, slide seat, release
handle. Try to move the seat back and forth to ensure that the seat is locked
in place.
Backrest inclination
Turn handwheel. Do not lean on
backrest when adjusting.
Page 58 of 257

56Seats, restraintsThe side airbag system consists of anairbag in each front seat backrest.
This can be identified by the word
AIRBAG .
The side airbag system is triggered in
the event of a side impact of a certain severity. The ignition must be
switched on.
The inflated airbags cushion the
impact, thereby reducing the risk of
injury to the upper body and pelvis in
the event of a side-on collision
considerably.
9 Warning
Keep the area in which the airbag
inflates clear of obstructions.
Note
Only use protective seat covers that have been approved for the vehicle.Be careful not to cover the airbags.
Curtain airbag system
The curtain airbag system consists of an airbag in the roof frame on each
side. This can be identified by the
word AIRBAG on the roof pillars.
The curtain airbag system is triggered
in the event of a side-on impact of a
certain severity. The ignition must be
switched on.
The inflated airbags cushion the
impact, thereby reducing the risk of
injury to the head in the event of a
side-on impact considerably.
9 Warning
Keep the area in which the airbag
inflates clear of obstructions.
The hooks on the handles in the
roof frame are only suitable for
hanging up light articles of
clothing, without coat hangers. Do not keep any items in these
clothes.
Page 71 of 257
Storage69The armrest can also be folded down
from the rear by pulling the loop.
Suitable for loading long, narrow
objects.
Ensure that the armrest engages
after folding up.
Load compartment cover Do not place any objects on the cover.
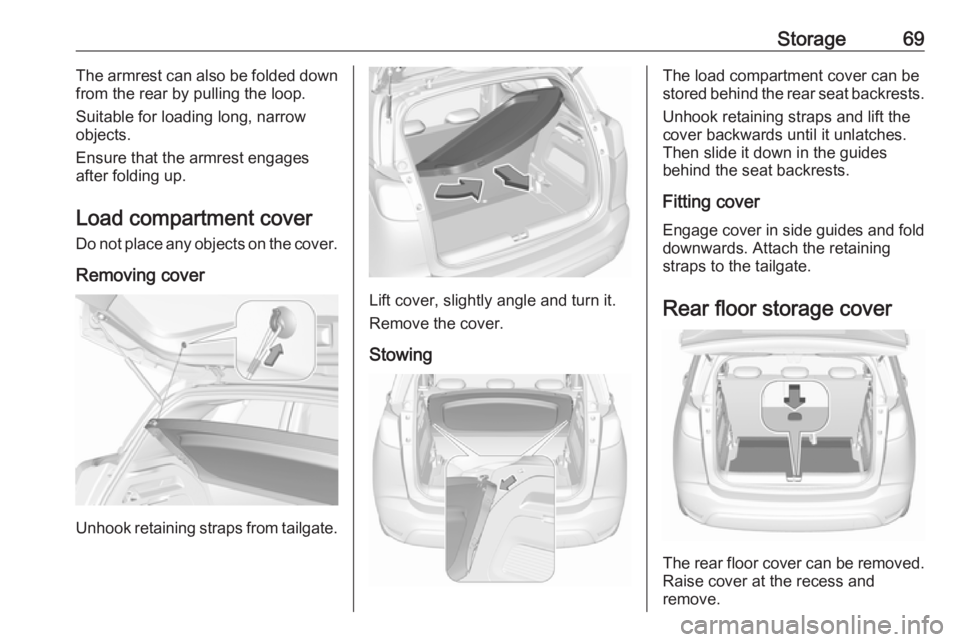
Removing cover
Unhook retaining straps from tailgate.
Lift cover, slightly angle and turn it.
Remove the cover.
Stowing
The load compartment cover can be
stored behind the rear seat backrests.
Unhook retaining straps and lift the
cover backwards until it unlatches.
Then slide it down in the guides
behind the seat backrests.
Fitting cover Engage cover in side guides and fold downwards. Attach the retainingstraps to the tailgate.
Rear floor storage cover
The rear floor cover can be removed.
Raise cover at the recess and
remove.
Page 76 of 257
74Instruments and controlsInstruments and
controlsControls ....................................... 75
Steering wheel adjustment ........75
Steering wheel controls .............75
Heated steering wheel ...............75
Horn ........................................... 76
Windscreen wiper/washer .........76
Rear window wiper/washer .......78
Outside temperature ..................78
Clock ......................................... 79
Power outlets ............................. 79
Inductive charging .....................80
Cigarette lighter ......................... 81
Ashtrays .................................... 81
Warning lights, gauges and indi‐ cators ........................................... 82
Instrument cluster ......................82
Speedometer ............................. 85
Odometer .................................. 86
Trip odometer ............................ 86
Tachometer ............................... 86
Fuel gauge ................................ 87
Fuel selector .............................. 87
Engine coolant temperature gauge ....................................... 88Engine oil level monitor.............89
Service display .......................... 89
Control indicators ......................90
Turn signal ................................. 90
Seat belt reminder .....................90
Airbag and belt tensioners .........91
Airbag deactivation ....................91
Charging system .......................91
Malfunction indicator light ..........91
Service vehicle soon .................92
Stop engine ............................... 92
System check ............................ 92
Brake and clutch system ...........92
Antilock brake system (ABS) .....92
Gear shifting .............................. 93
Lane departure warning ............93
Electronic Stability Control and Traction Control system ...........93
Electronic Stability Control and Traction Control system off ......93
Engine coolant temperature ......93
Preheating ................................. 94
Diesel particle filter ....................94
AdBlue ....................................... 94
Deflation detection system ........94
Engine oil pressure ....................94
Low fuel ..................................... 95
Autostop .................................... 95
Exterior light .............................. 95
High beam ................................. 95High beam assist.......................95
Low beam .................................. 95
Fog light ..................................... 95
Rear fog light ............................. 95
Rain sensor ............................... 95
Cruise control ............................ 95
Speed limiter ............................. 96
Traffic sign assistant ..................96
Door open .................................. 96
Information displays .....................96
Driver Information Centre ..........96
Info display ................................ 98
Head-up display ......................100
Vehicle messages ......................102
Warning chimes .......................102
Battery voltage ........................ 102
Vehicle personalisation ..............103
Telematics service .....................106
OnStar ..................................... 106
Page 83 of 257

Instruments and controls813. Wait three seconds after the LEDhas extinguished and place the
mobile phone on the charging
device again.
4. Ensure that the mobile phone is located at the right bottom corner
of the charging device.
Cigarette lighter
The cigarette lighter is located is
located behind the storage cover
below the climate controls. Press cover to open.
Press in cigarette lighter. It switches
off automatically once the element is
glowing. Pull out lighter.
AshtraysCaution
To be used only for ash and not for combustible rubbish.
A portable ashtray can be placed in
the cupholders.
Page 84 of 257

82Instruments and controlsWarning lights, gauges
and indicators
Instrument cluster
Depending on the version, two
instrument clusters are available:
Page 87 of 257
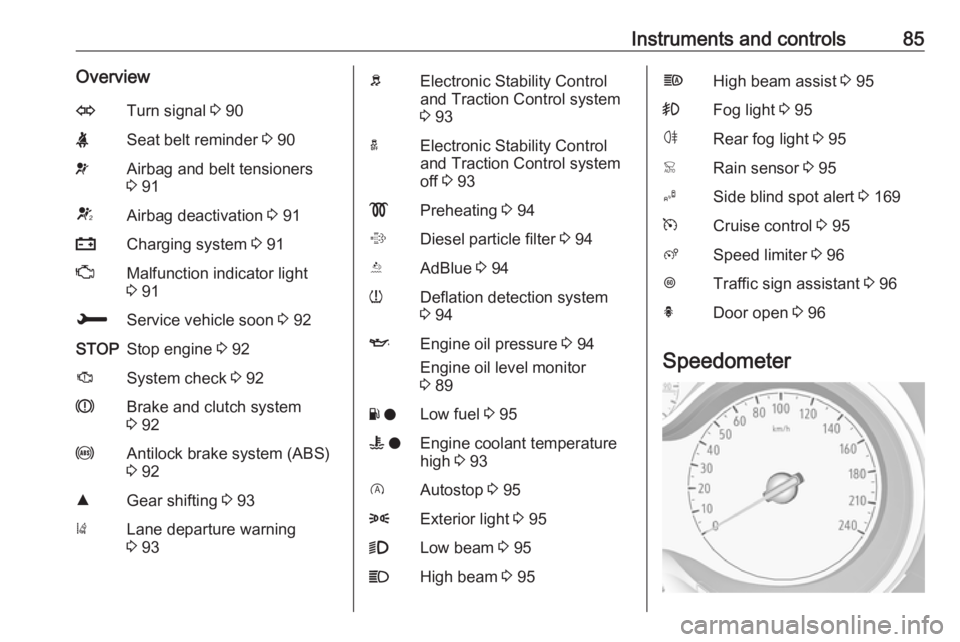
Instruments and controls85OverviewOTurn signal 3 90XSeat belt reminder 3 90vAirbag and belt tensioners
3 91VAirbag deactivation 3 91pCharging system 3 91ZMalfunction indicator light
3 91HService vehicle soon 3 92STOPStop engine 3 92JSystem check 3 92RBrake and clutch system
3 92uAntilock brake system (ABS)
3 92RGear shifting 3 93)Lane departure warning
3 93bElectronic Stability Control
and Traction Control system
3 93aElectronic Stability Control
and Traction Control system
off 3 93!Preheating 3 94%Diesel particle filter 3 94YAdBlue 3 94wDeflation detection system
3 94IEngine oil pressure 3 94
Engine oil level monitor
3 89Y oLow fuel 3 95W oEngine coolant temperature
high 3 93DAutostop 3 958Exterior light 3 959Low beam 3 95CHigh beam 3 95fHigh beam assist 3 95>Fog light 3 95øRear fog light 3 95
Page 90 of 257
88Instruments and controlsEvery six months, run the petrol tank
down until control indicator Y
illuminates, then refuel. This helps
maintain fuel quality and system
function for petrol operation.
Fill the tank completely at regular
intervals to prevent corrosion in the
tank.
Faults and remedies
If gas mode is not possible, check the following:
● Is there enough liquid gas present?
● Is there enough petrol present for
starting?
Due to extreme temperatures in
combination with the gas
composition, it may take slightly
longer before the system switches
from petrol to gas mode.
In extreme situations, the system may
also switch back to petrol mode if the
minimum requirements are not
fulfilled. If conditions allow, it may be
possible to manually switch back to
liquid gas operation.Seek the assistance of a workshop in
the event of all other faults.Caution
Repairs and adjustments may only be made by trained specialists in
order to maintain the safety and
warranty on the LPG system.
Liquid gas is given a particular odour
(odorised) so that any leaks can be
detected easily.
9 Warning
If you smell gas in the vehicle or in
the immediate vicinity, switch to petrol mode immediately. No
smoking. No naked flames or
ignition sources.
If the gas odour persists, do not start
the engine. Have the cause of the
fault remedied by a workshop.
When using underground car parks,
follow the instructions of the operator
and local laws.
Note
In the event of an accident, switch off
the ignition and lights.
Fuel for liquid gas operation 3 178.
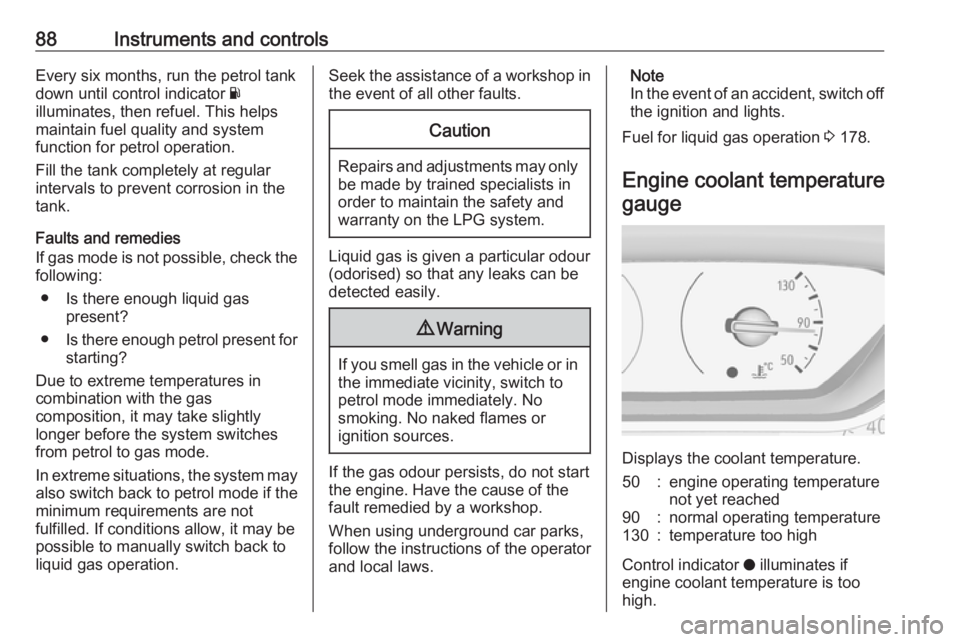
Engine coolant temperature gauge
Displays the coolant temperature.
50:engine operating temperature
not yet reached90:normal operating temperature130:temperature too high
Control indicator o illuminates if
engine coolant temperature is too
high.
Page 91 of 257
Instruments and controls89Caution
If engine coolant temperature is
too high, stop vehicle, switch off
engine. Danger to engine. Check
coolant level.
Engine oil level monitor
The state of the engine oil level is
displayed in the Driver Information
Centre for a few seconds following
the service information after switching
on the ignition.
A proper state of oil level is indicated
by the message Oil level correct.
If oil level is low, I flashes and Oil
level incorrect is indicated,
accompanied by the H indicator.
Confirm oil level by using the oil
dipstick and top up engine oil
respectively. Engine oil 3 188.
A fault of measurment is indicated by
the message Oil level measurment
invalid . Check oil level manually by
using the dipstick.
Service display
The service system informs when to
change the engine oil and filter or a
vehicle service is required. Based on
driving conditions, the interval at
which an engine oil and filter change
is required can vary considerably.
Service information 3 224
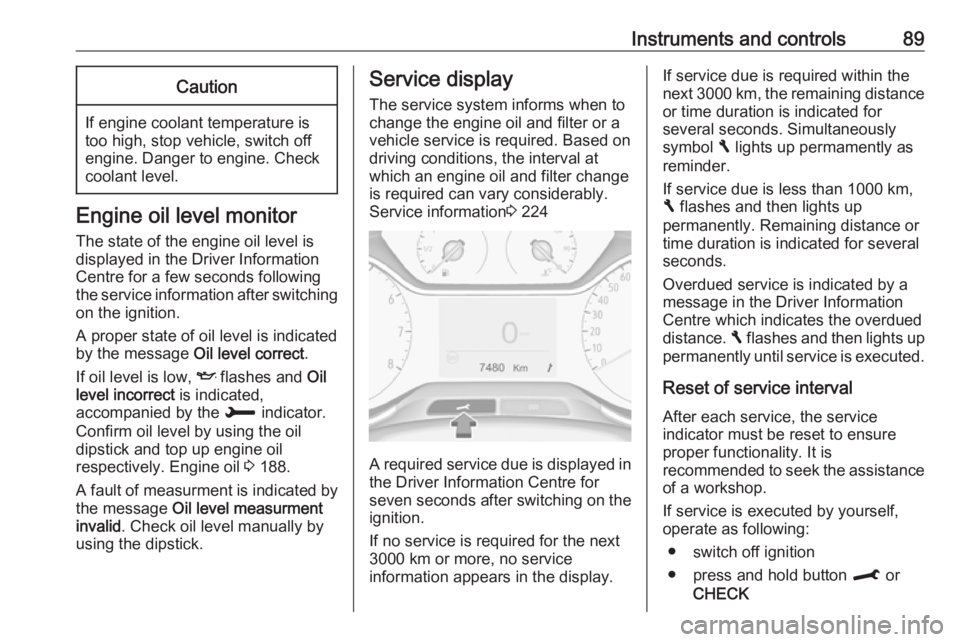
A required service due is displayed in
the Driver Information Centre forseven seconds after switching on the
ignition.
If no service is required for the next
3000 km or more, no service
information appears in the display.
If service due is required within the
next 3000 km, the remaining distance or time duration is indicated for
several seconds. Simultaneously
symbol F lights up permamently as
reminder.
If service due is less than 1000 km,
F flashes and then lights up
permanently. Remaining distance or
time duration is indicated for several
seconds.
Overdued service is indicated by a
message in the Driver Information
Centre which indicates the overdued
distance. F flashes and then lights up
permanently until service is executed.
Reset of service interval After each service, the service
indicator must be reset to ensure
proper functionality. It is
recommended to seek the assistance
of a workshop.
If service is executed by yourself,
operate as following:
● switch off ignition
● press and hold button M or
CHECK
Page 92 of 257
90Instruments and controls● switch on ignition; the distanceindication begins a countdown
● when the display indicates =0,
release the button. Symbol F
disappears
Retrieving service information To retrieve the status of the service
information at any time press button
M or CHECK . The service
information is displayed for a few
seconds.
Service information 3 224.
Control indicators The control indicators described are
not present in all vehicles. The
description applies to all instrument
versions. Depending on the
equipment, the position of the control
indicators may vary. When the
ignition is switched on, most control
indicators will illuminate briefly as a
functionality test.
The control indicator colours mean:red:danger, important reminderyellow:warning, information, faultgreen:confirmation of activationblue:confirmation of activationwhite:confirmation of activation
See all control indicators on different
instrument clusters 3 82.
Turn signal
O illuminates or flashes green.
Illuminates briefly
The parking lights are switched on.
Flashes
A turn signal or the hazard warning flashers are activated.
Rapid flashing: failure of a turn signal light or associated fuse, failure of turn
signal light on trailer.
Bulb replacement 3 192, Fuses
3 200.
Turn signals 3 115.
Seat belt reminder
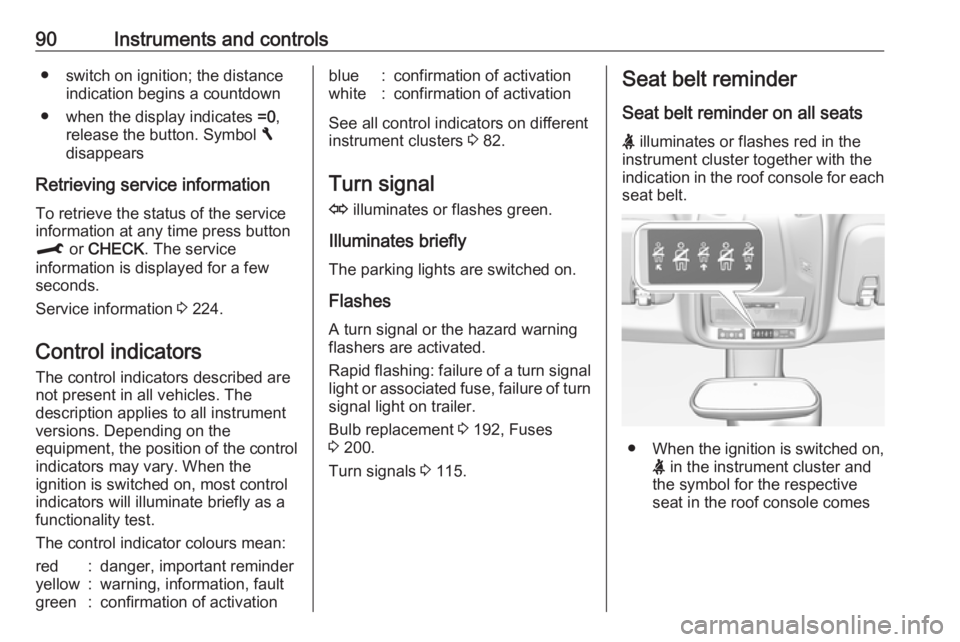
Seat belt reminder on all seats X illuminates or flashes red in the
instrument cluster together with the
indication in the roof console for each
seat belt.
● When the ignition is switched on,
X in the instrument cluster and
the symbol for the respective
seat in the roof console comes