ECU OPEL CROSSLAND X 2019 Manual user
[x] Cancel search | Manufacturer: OPEL, Model Year: 2019, Model line: CROSSLAND X, Model: OPEL CROSSLAND X 2019Pages: 263, PDF Size: 8.11 MB
Page 209 of 263
Vehicle care207No.Circuit1Heated rear window2Heated exterior mirrors3Front power window4Driver's door control unit5Rear power window6Heated seats7–8Infotainment9–10Power outlet rear11–12–Vehicle tools
Tools
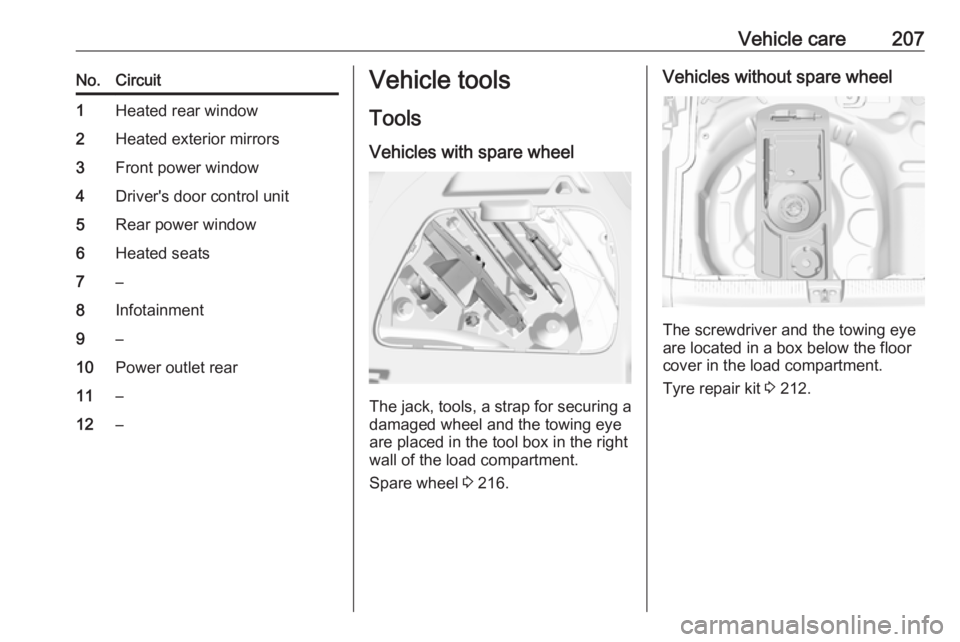
Vehicles with spare wheel
The jack, tools, a strap for securing a damaged wheel and the towing eye
are placed in the tool box in the right
wall of the load compartment.
Spare wheel 3 216.
Vehicles without spare wheel
The screwdriver and the towing eye
are located in a box below the floor
cover in the load compartment.
Tyre repair kit 3 212.
Page 219 of 263
Vehicle care217Caution
If driving with a temporary spare
wheel, active emergency braking
has to deactivated.
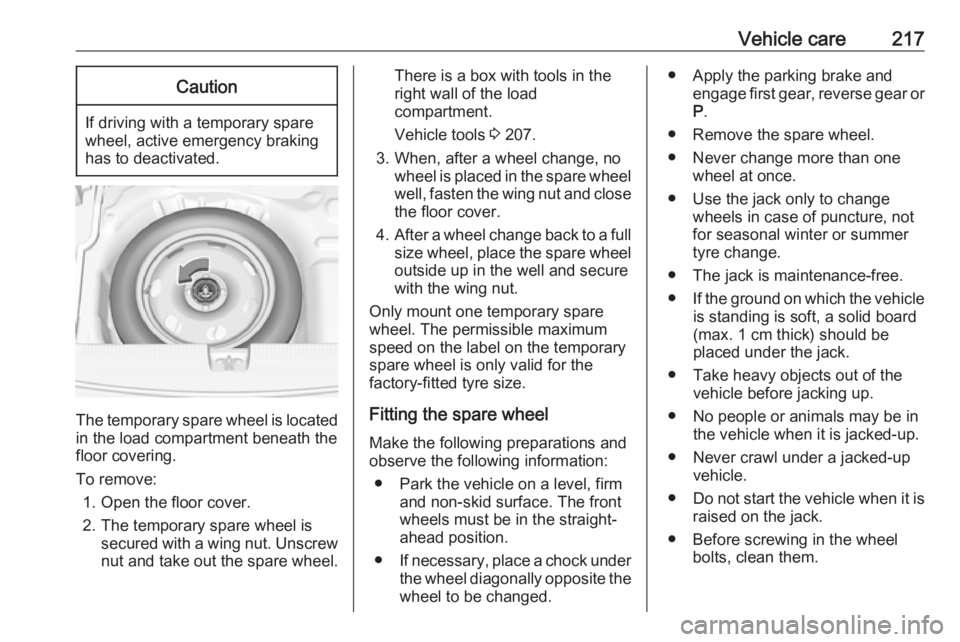
The temporary spare wheel is located in the load compartment beneath the
floor covering.
To remove: 1. Open the floor cover.
2. The temporary spare wheel is secured with a wing nut. Unscrew
nut and take out the spare wheel.
There is a box with tools in the
right wall of the load
compartment.
Vehicle tools 3 207.
3. When, after a wheel change, no wheel is placed in the spare wheel
well, fasten the wing nut and close the floor cover.
4. After a wheel change back to a full
size wheel, place the spare wheel
outside up in the well and secure
with the wing nut.
Only mount one temporary spare
wheel. The permissible maximum
speed on the label on the temporary
spare wheel is only valid for the
factory-fitted tyre size.
Fitting the spare wheel
Make the following preparations and
observe the following information:
● Park the vehicle on a level, firm and non-skid surface. The front
wheels must be in the straight- ahead position.
● If necessary, place a chock under
the wheel diagonally opposite the
wheel to be changed.● Apply the parking brake and engage first gear, reverse gear or
P .
● Remove the spare wheel.
● Never change more than one wheel at once.
● Use the jack only to change wheels in case of puncture, not
for seasonal winter or summer
tyre change.
● The jack is maintenance-free.
● If the ground on which the vehicle
is standing is soft, a solid board
(max. 1 cm thick) should be
placed under the jack.
● Take heavy objects out of the vehicle before jacking up.
● No people or animals may be in the vehicle when it is jacked-up.
● Never crawl under a jacked-up vehicle.
● Do not start the vehicle when it is
raised on the jack.
● Before screwing in the wheel bolts, clean them.
Page 220 of 263
218Vehicle care9Warning
Do not grease wheel bolts.
9Warning
Ensure to use always the correct
wheel bolts if changing the
wheels. When installing the spare
wheel, the bolts for alloy wheels can also be used.
● Note that the spare wheel is secured by the conical contact ofeach bolt if the wheel bolts for the
alloy wheels are used. In this
case, the washers do not come
into contact with the spare wheel.
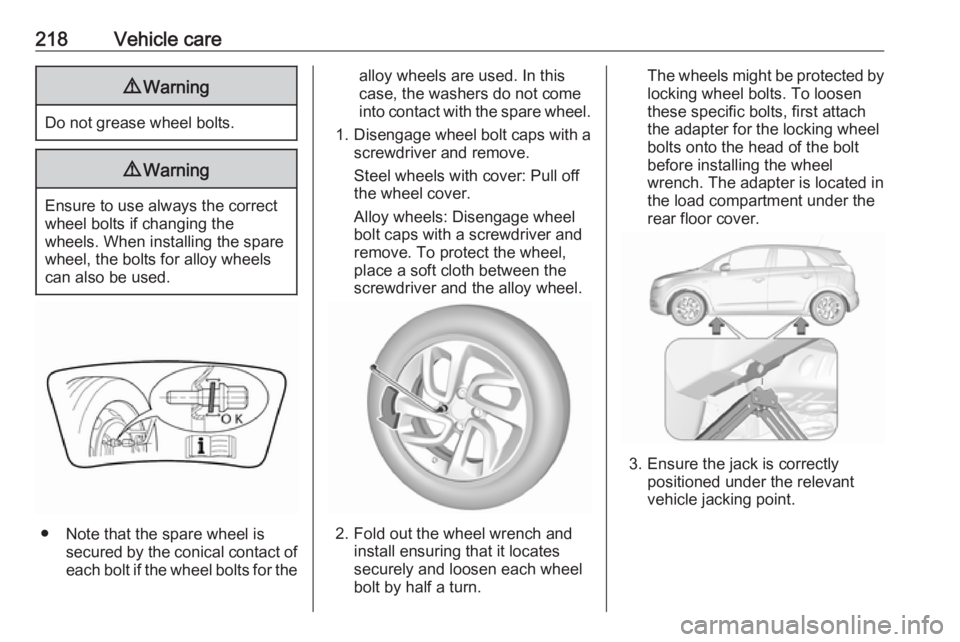
1. Disengage wheel bolt caps with a
screwdriver and remove.
Steel wheels with cover: Pull off
the wheel cover.
Alloy wheels: Disengage wheel
bolt caps with a screwdriver and
remove. To protect the wheel,
place a soft cloth between the
screwdriver and the alloy wheel.
2. Fold out the wheel wrench and install ensuring that it locates
securely and loosen each wheel
bolt by half a turn.
The wheels might be protected by
locking wheel bolts. To loosen
these specific bolts, first attach
the adapter for the locking wheel
bolts onto the head of the bolt
before installing the wheel
wrench. The adapter is located in
the load compartment under the
rear floor cover.
3. Ensure the jack is correctly positioned under the relevant
vehicle jacking point.
Page 221 of 263
Vehicle care219
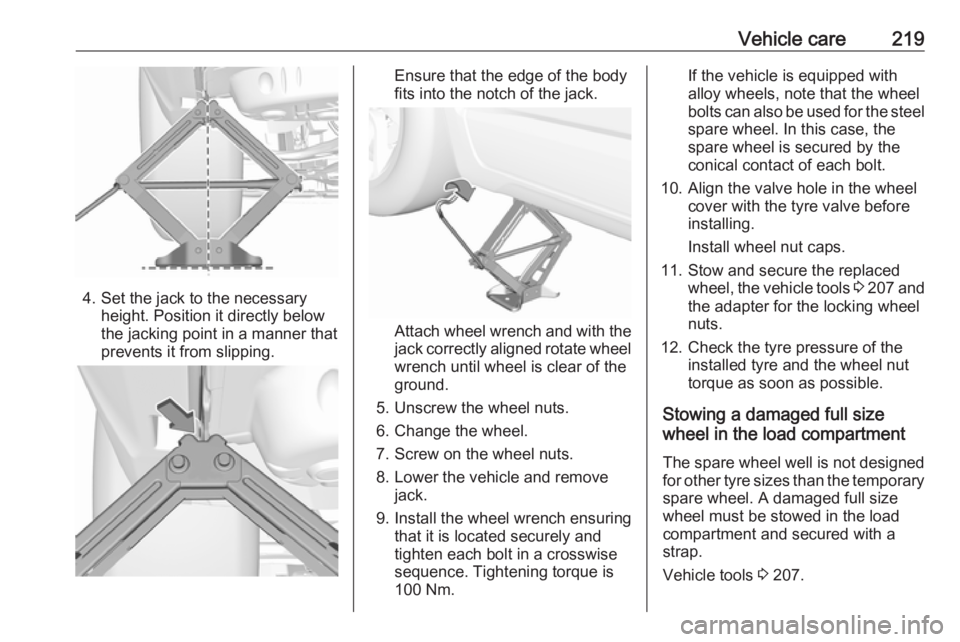
4. Set the jack to the necessaryheight. Position it directly below
the jacking point in a manner that
prevents it from slipping.
Ensure that the edge of the body
fits into the notch of the jack.
Attach wheel wrench and with the
jack correctly aligned rotate wheel wrench until wheel is clear of the
ground.
5. Unscrew the wheel nuts. 6. Change the wheel.
7. Screw on the wheel nuts.
8. Lower the vehicle and remove jack.
9. Install the wheel wrench ensuring that it is located securely and
tighten each bolt in a crosswise
sequence. Tightening torque is
100 Nm.
If the vehicle is equipped with
alloy wheels, note that the wheel
bolts can also be used for the steel spare wheel. In this case, the
spare wheel is secured by the
conical contact of each bolt.
10. Align the valve hole in the wheel cover with the tyre valve before
installing.
Install wheel nut caps.
11. Stow and secure the replaced wheel, the vehicle tools 3 207 and
the adapter for the locking wheel
nuts.
12. Check the tyre pressure of the installed tyre and the wheel nut
torque as soon as possible.
Stowing a damaged full size
wheel in the load compartment
The spare wheel well is not designed
for other tyre sizes than the temporary spare wheel. A damaged full size
wheel must be stowed in the load
compartment and secured with a
strap.
Vehicle tools 3 207.
Page 222 of 263
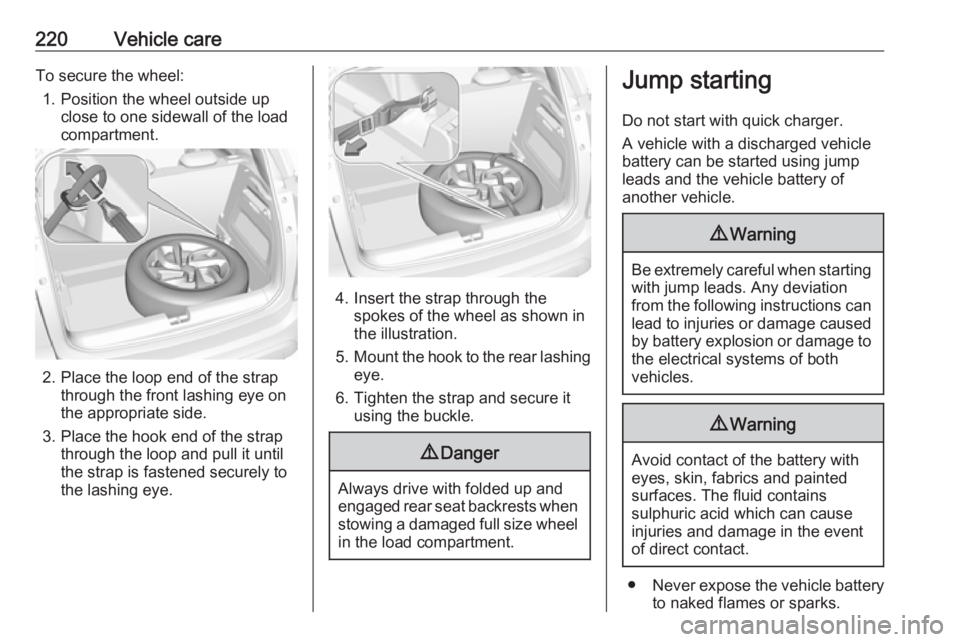
220Vehicle careTo secure the wheel:1. Position the wheel outside up close to one sidewall of the load
compartment.
2. Place the loop end of the strap through the front lashing eye on
the appropriate side.
3. Place the hook end of the strap through the loop and pull it until
the strap is fastened securely to
the lashing eye.
4. Insert the strap through the spokes of the wheel as shown in
the illustration.
5. Mount the hook to the rear lashing
eye.
6. Tighten the strap and secure it using the buckle.
9 Danger
Always drive with folded up and
engaged rear seat backrests when stowing a damaged full size wheel
in the load compartment.
Jump starting
Do not start with quick charger.
A vehicle with a discharged vehicle
battery can be started using jump
leads and the vehicle battery of
another vehicle.9 Warning
Be extremely careful when starting
with jump leads. Any deviation
from the following instructions can
lead to injuries or damage caused
by battery explosion or damage to the electrical systems of both
vehicles.
9 Warning
Avoid contact of the battery with
eyes, skin, fabrics and painted
surfaces. The fluid contains
sulphuric acid which can cause
injuries and damage in the event
of direct contact.
● Never expose the vehicle battery
to naked flames or sparks.
Page 251 of 263
Customer information249Permission to use, copy, modify, and
distribute this software for any
purpose with or without fee is hereby
granted, provided that the above
copyright notice and this permission
notice appear in all copies.
The software is provided "as is",
without warranty of any kind, express
or implied, including but not limited to
the warranties of merchantability,
fitness for a particular purpose and
noninfringement of third party rights.
In no event shall the authors or
copyright holders be liable for any
claim, damages or other liability,
whether in an action of contract, tort
or otherwise, arising from, out of or in connection with the software or the
use or other dealings in the software.
Except as contained in this notice, the name of a copyright holder shall not
be used in advertising or otherwise to
promote the sale, use or other
dealings in this Software without prior
written authorization of the copyright
holder.unzip
This is version 2005-Feb-10 of the
Info-ZIP copyright and license. The
definitive version of this document
should be available at ftp://ftp.info-
zip.org/pub/infozip/license.html
indefinitely.
Copyright (c) 1990-2005 Info-ZIP. All
rights reserved.
For the purposes of this copyright and
license, “Info-ZIP” is defined as the
following set of individuals:
Mark Adler, John Bush, Karl Davis,
Harald Denker, Jean-Michel Dubois,
Jean-loup Gailly, Hunter Goatley, Ed
Gordon, Ian Gorman, Chris Herborth, Dirk Haase, Greg Hartwig, Robert
Heath, Jonathan Hudson, Paul
Kienitz, David Kirschbaum, Johnny
Lee, Onno van der Linden, Igor
Mandrichenko, Steve P. Miller, Sergio Monesi, Keith Owens, George
Petrov, Greg Roelofs, Kai Uwe
Rommel, Steve Salisbury, Dave
Smith, Steven M. Schweda, Christian
Spieler, Cosmin Truta, Antoine
Verheijen, Paul von Behren, Rich
Wales, Mike White.This software is provided “as is,”
without warranty of any kind, express or implied. In no event shall Info-ZIP
or its contributors be held liable for
any direct, indirect, incidental, special
or consequential damages arising out
of the use of or inability to use this
software.
Permission is granted to anyone to
use this software for any purpose,
including commercial applications,
and to alter it and redistribute it freely,
subject to the following restrictions:
1. Redistributions of source code must retain the above copyright
notice, definition, disclaimer, and
this list of conditions.
2. Redistributions in binary form (compiled executables) must
reproduce the above copyright
notice, definition, disclaimer, and
this list of conditions in
documentation and/or other
materials provided with the
distribution. The sole exception to this condition is redistribution of a
standard UnZipSFX binary
(including SFXWiz) as part of a
self-extracting archive; that is
Page 262 of 263
260VValet mode ................................... 97
Vehicle battery ........................... 192
Vehicle checks............................ 189
Vehicle data ................................ 235
Vehicle data recording and privacy ..................................... 251
Vehicle dimensions .................... 242
Vehicle Identification Number ....233
Vehicle jack ................................ 207
Vehicle messages .....................101
Vehicle personalisation .............102
Vehicle security ............................ 31
Vehicle specific data ......................3
Vehicle storage ........................... 188
Vehicle tools ............................... 207
Vehicle unlocking ........................... 6
Vehicle weight ........................... 241
Ventilation ................................... 119
W Warning chimes .........................101
Warning lights ............................... 84
Warning triangle .......................... 69
Washer and wiper systems .........14
Washer fluid ............................... 191
Wheel changing .........................215
Wheel covers ............................. 211
Wheels and tyres .......................208
Windows ....................................... 36Windscreen................................... 36
Windscreen wiper and washer ....74
Winter tyres ............................... 208
Wiper blade replacement ..........194