ECO mode OPEL CROSSLAND X 2019 Manual user
[x] Cancel search | Manufacturer: OPEL, Model Year: 2019, Model line: CROSSLAND X, Model: OPEL CROSSLAND X 2019Pages: 263, PDF Size: 8.11 MB
Page 5 of 263
Introduction3Vehicle specific dataPlease enter your vehicle's data on
the previous page to keep it easily
accessible. This information is
available in the sections "Service and
maintenance" and "Technical data"
as well as on the identification plate.
Introduction
Your vehicle is a designed
combination of advanced technology, safety, environmental friendliness
and economy.
This Owner's Manual provides you
with all the necessary information to
enable you to drive your vehicle
safely and efficiently.
Make sure your passengers are
aware of the possible risk of accident
and injury which may result from
improper use of the vehicle.
You must always comply with the
specific laws and regulations of the
country that you are in. These laws
may differ from the information in this Owner's Manual.
Disregarding the description given in
this manual may affect your warranty.When this Owner's Manual refers to a
workshop visit, we recommend your
Opel Service Partner. For gas
vehicles, we recommend an Opel
Repairer authorised for servicing gas
vehicles.
All Opel Service Partners provide first-class service at reasonable
prices. Experienced mechanics
trained by Opel work according to
specific Opel instructions.
The customer literature pack should
always be kept ready to hand in the
vehicle.
Using this manual ● This manual describes all options
and features available for this
model. Certain descriptions,
including those for display and
menu functions, may not apply to
your vehicle due to model
variant, country specifications,
special equipment or
accessories.
● The "In brief" section will give you
an initial overview.● The table of contents at the beginning of this manual and
within each section shows where the information is located.
● The index will enable you to search for specific information.
● This Owner's Manual depicts left-
hand drive vehicles. Operation is similar for right-hand drive
vehicles.
● The Owner's Manual uses the engine identifier code. The
corresponding sales designation
and engineering code can be
found in the section "Technical
data".
● Directional data, e.g. left or right, or front or back, always relate to
the direction of travel.
● Displays may not support your specific language.
● Display messages and interior labelling are written in bold
letters.
Page 43 of 263
Keys, doors and windows411. Turn key in ignition switch toposition 1.
2. Press N twice gently to the first
detent at the rear, the sunblind
opens slightly.
3. Immediately press N twice gently
to the first detent at the front, the
sunblind closes slightly.
After step 3 the sunblind is in
initialising mode without safety
function.
4. Press N gently to the first detent
at the rear until the sunblind is
completely opened.
5. Press N gently to the first detent
at the front until the sunblind is
completely closed.
After this procedure, the sunblind is
initialised with safety function
activated.
When N is pressed firmly to the
second detent during initialising, the
procedure is cancelled.
Page 76 of 263
74Instruments and controlsThe recommended grip areas of the
steering wheel are heated quicker
and to a higher temperature than the
other areas.
Heating is operational when the
engine is running and during an
Autostop.
Stop-start system 3 137.
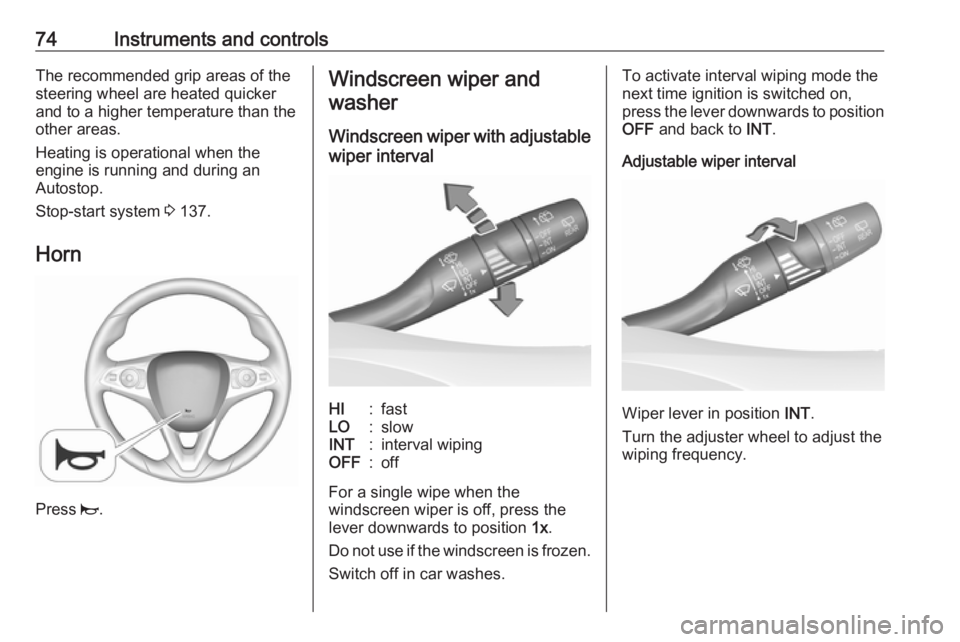
Horn
Press j.
Windscreen wiper and
washer
Windscreen wiper with adjustable
wiper intervalHI:fastLO:slowINT:interval wipingOFF:off
For a single wipe when the
windscreen wiper is off, press the
lever downwards to position 1x.
Do not use if the windscreen is frozen.
Switch off in car washes.
To activate interval wiping mode the
next time ignition is switched on,
press the lever downwards to position
OFF and back to INT.
Adjustable wiper interval
Wiper lever in position INT.
Turn the adjuster wheel to adjust the
wiping frequency.
Page 80 of 263
78Instruments and controlsNote
The sockets must always be kept
clean and dry.
Inductive charging9 Warning
Inductive charging can affect the
operation of implanted
pacemakers or other medical
devices. If applicable, seek
medical advice before using the
inductive charging device.
9 Warning
Remove any metal objects from
the charging device before
charging a mobile device, as these objects could become very hot.
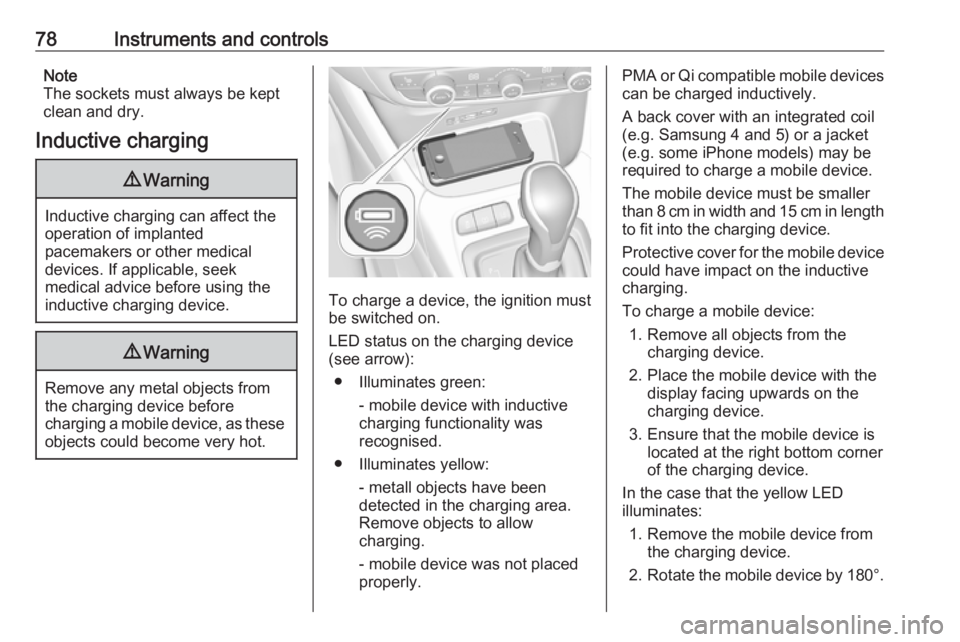
To charge a device, the ignition must
be switched on.
LED status on the charging device (see arrow):
● Illuminates green: - mobile device with inductivecharging functionality was
recognised.
● Illuminates yellow: - metall objects have been
detected in the charging area.
Remove objects to allow
charging.
- mobile device was not placed
properly.
PMA or Qi compatible mobile devices can be charged inductively.
A back cover with an integrated coil (e.g. Samsung 4 and 5) or a jacket
(e.g. some iPhone models) may be
required to charge a mobile device.
The mobile device must be smaller
than 8 cm in width and 15 cm in length
to fit into the charging device.
Protective cover for the mobile device could have impact on the inductive
charging.
To charge a mobile device: 1. Remove all objects from the charging device.
2. Place the mobile device with the display facing upwards on the
charging device.
3. Ensure that the mobile device is located at the right bottom corner
of the charging device.
In the case that the yellow LED
illuminates:
1. Remove the mobile device from the charging device.
2. Rotate the mobile device by 180°.
Page 87 of 263
Instruments and controls85Fuel gauge
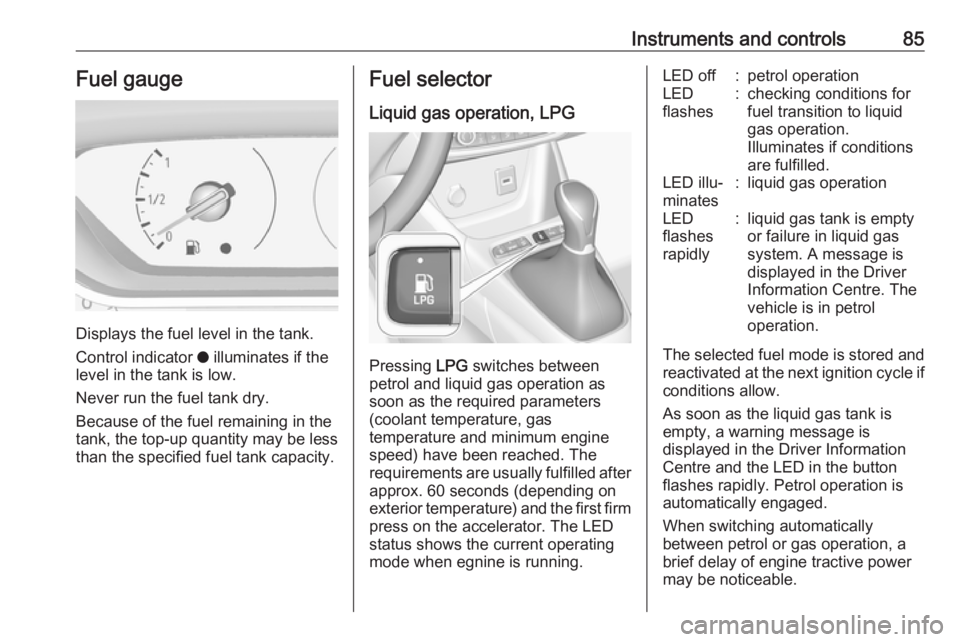
Displays the fuel level in the tank.
Control indicator o illuminates if the
level in the tank is low.
Never run the fuel tank dry.
Because of the fuel remaining in the
tank, the top-up quantity may be less
than the specified fuel tank capacity.
Fuel selector
Liquid gas operation, LPG
Pressing LPG switches between
petrol and liquid gas operation as
soon as the required parameters (coolant temperature, gas
temperature and minimum engine
speed) have been reached. The
requirements are usually fulfilled after
approx. 60 seconds (depending on
exterior temperature) and the first firm
press on the accelerator. The LED
status shows the current operating
mode when egnine is running.
LED off:petrol operationLED
flashes:checking conditions for
fuel transition to liquid
gas operation.
Illuminates if conditions
are fulfilled.LED illu‐
minates:liquid gas operationLED
flashes
rapidly:liquid gas tank is empty
or failure in liquid gas
system. A message is
displayed in the Driver
Information Centre. The
vehicle is in petrol
operation.
The selected fuel mode is stored and reactivated at the next ignition cycle if
conditions allow.
As soon as the liquid gas tank is
empty, a warning message is
displayed in the Driver Information
Centre and the LED in the button
flashes rapidly. Petrol operation is
automatically engaged.
When switching automatically
between petrol or gas operation, a
brief delay of engine tractive power
may be noticeable.
Page 99 of 263
Instruments and controls97When the level in the fuel tank is low,
a message appears on the display
and the control indicator o in the fuel
gauge illuminates 3 93.
Instantaneous Fuel Consumption
Display of the instantaneous
consumption.
Trip 1 page:
Average speed
Display of average speed. The
measurement can be reset at any
time.
Average fuel consumption
Display of average consumption. The measurement can be reset at any
time and starts with a default value.
Distance travelled
Displays the current distance for trip
1 since the reset.
The values of trip 1 page can be reset
by pressing SET/CLR for a few
seconds.
Trip 2 page:
Average speedDisplay of average speed. The
measurement can be reset at any
time.
Average fuel consumption
Display of average consumption. The measurement can be reset at any
time and starts with a default value.
Distance travelled
Displays the current distance for trip
2 since a certain reset.
The values of trip 2 page can be reset
by pressing SET/CLR for a few
seconds.
Digital speed page
Digital display of the instantaneous
speed.
Stop and Start time counter
A time counter calculates the time
spent in STOP mode during a
journey. It resets to zero every time
the ignition is switched on.
Compass page
Displays the geographic direction of
driving.Blank page
No trip/fuel information is displayed.
AdBlue Press M or CHECK repeatedly until
the AdBlue menu is shown.
AdBlue range
Indicates an estimate of the AdBlue
level. A message indicates whether
the level is sufficient or low.
3 141.
Info Display The Info Display is located in the
instrument panel near the instrument
cluster.
Depending on the vehicle
configuration the vehicle has a
● Graphic Info Display
or
● 7'' Colour Info Display with
touchscreen functionality
or
● 8'' Colour Info Display with
touchscreen functionality
Page 126 of 263
124Climate controlClimate setting menu can also be
displayed
● by selecting Climate on the
7'' Colour Info Display or
● by pressing Í and then selecting
Climate from the menu on the
8'' Colour Info Display.
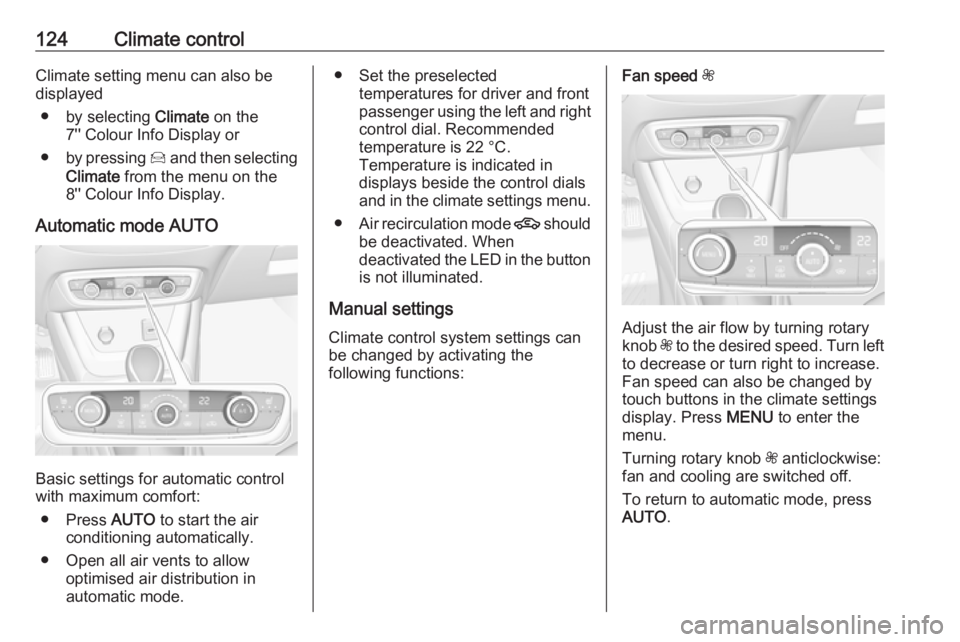
Automatic mode AUTO
Basic settings for automatic control
with maximum comfort:
● Press AUTO to start the air
conditioning automatically.
● Open all air vents to allow optimised air distribution in
automatic mode.
● Set the preselected temperatures for driver and front
passenger using the left and right
control dial. Recommended
temperature is 22 °C.
Temperature is indicated in
displays beside the control dials
and in the climate settings menu.
● Air recirculation mode 4 should
be deactivated. When
deactivated the LED in the button is not illuminated.
Manual settings
Climate control system settings can
be changed by activating the
following functions:Fan speed Z
Adjust the air flow by turning rotary
knob Z to the desired speed. Turn left
to decrease or turn right to increase.
Fan speed can also be changed by
touch buttons in the climate settings
display. Press MENU to enter the
menu.
Turning rotary knob Z anticlockwise:
fan and cooling are switched off.
To return to automatic mode, press
AUTO .
Page 135 of 263
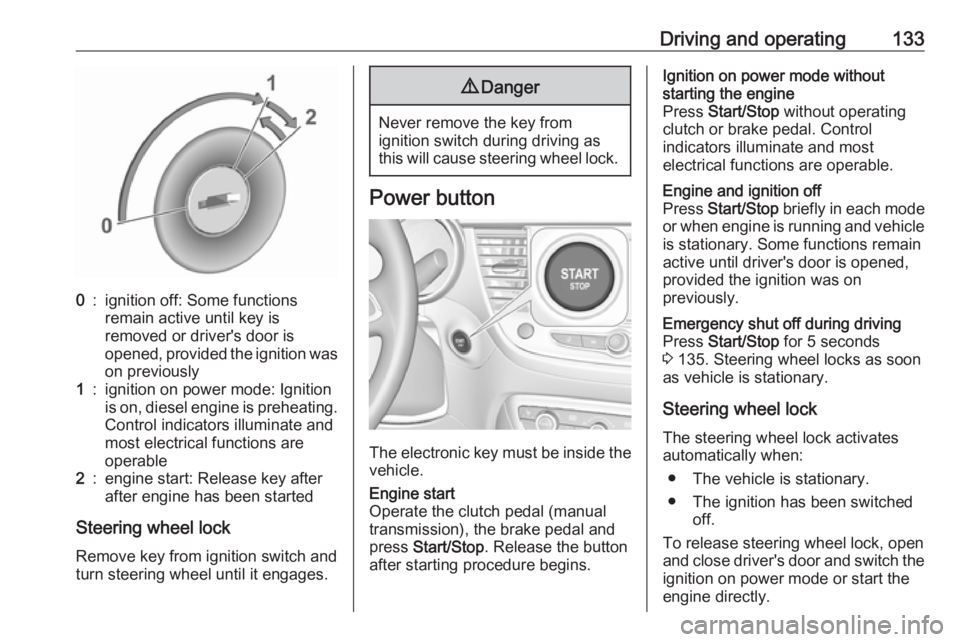
Driving and operating1330:ignition off: Some functions
remain active until key is
removed or driver's door is
opened, provided the ignition was
on previously1:ignition on power mode: Ignition
is on, diesel engine is preheating. Control indicators illuminate and
most electrical functions are
operable2:engine start: Release key after
after engine has been started
Steering wheel lock
Remove key from ignition switch and
turn steering wheel until it engages.
9 Danger
Never remove the key from
ignition switch during driving as
this will cause steering wheel lock.
Power button
The electronic key must be inside the
vehicle.
Engine start
Operate the clutch pedal (manual
transmission), the brake pedal and
press Start/Stop . Release the button
after starting procedure begins.Ignition on power mode without
starting the engine
Press Start/Stop without operating
clutch or brake pedal. Control
indicators illuminate and most
electrical functions are operable.Engine and ignition off
Press Start/Stop briefly in each mode
or when engine is running and vehicle
is stationary. Some functions remain
active until driver's door is opened,
provided the ignition was on
previously.Emergency shut off during driving
Press Start/Stop for 5 seconds
3 135. Steering wheel locks as soon
as vehicle is stationary.
Steering wheel lock
The steering wheel lock activates
automatically when:
● The vehicle is stationary.
● The ignition has been switched off.
To release steering wheel lock, open
and close driver's door and switch the ignition on power mode or start the
engine directly.
Page 140 of 263
138Driving and operating● The engine exhaust temperatureis not too high, e.g. after driving
with high engine load.
● The ambient temperature is not too low or too high.
● The climate control system allows an Autostop.
● The brake vacuum is sufficient.
● The self-cleaning function of the exhaust filter is not active.
● The vehicle was driven at least at
walking speed since the last
Autostop.
Otherwise an Autostop will be
inhibited.
Note
The Autostop may be inhibited for
several hours after a battery
replacement or reconnection.
Certain settings of the climate control
system may inhibit an Autostop. See
Climate control chapter for more
details 3 120.
If an autostop is temporarily not
available, D flashes green 3 93.
Immediately after driving at a higher
speed an Autostop may be inhibited.New vehicle running-in 3 132.
Vehicle battery discharge protection
To ensure reliable engine restarts, several vehicle battery discharge
protection features are implemented
as part of the stop-start system.
Power saving measures
During an Autostop, several electrical
features such as auxiliary electric
heater or rear window heating are
disabled or switched to a power
saving mode. The fan speed of the
climate control system is reduced to save power.
Restart of the engine by the driver
Vehicles with manual transmissionConventional restart
All engines have conventional restart.
Depress the clutch pedal without
depressing the brake pedal to restart
the engine.
On engines with late restart a
conventional restart is only possible
without depressed brake pedal.Restart of the engine by the stop-
start system
The selector lever must be in neutral to enable an automatic restart.
If one of the following conditions occurs during an Autostop, the
engine will be restarted automatically
by the stop-start system:
● The stop-start system is manually deactivated.
● The driver's seat belt is unfastened or the driver's door is
opened.
● The engine temperature is too low.
● The charging level of the vehicle battery is below a defined level.
● The brake vacuum is not sufficient.
● The climate control system requests an engine start.
● The air conditioning is manually switched on.
If an electrical accessory, e.g. a
portable CD player, is connected to
the power outlet, a brief power drop
during the restart might be noticeable.
Page 147 of 263

Driving and operating145Engine brakingTo utilise the engine braking effect,
select a lower gear in good time when
driving downhill, see manual mode.
Rocking the vehicle Rocking the vehicle is only
permissible if the vehicle is stuck in
sand, mud or snow. Move the selector
lever between D and R in a repeat
pattern. Do not race the engine and
avoid sudden acceleration.
Parking Apply the parking brake and engageP .Manual mode
Move selector lever out of position D
towards the left in position M.
Tap selector lever upwards + to shift
to a higher gear.
Tap the selector lever downwards - to
shift to a lower gear.
If a higher gear is selected when
vehicle speed is too low, or a lower
gear when vehicle speed is too high,
the shift is not executed. This can
cause a message in the Driver
Information Centre.
In manual mode, no automatic
shifting to a higher gear takes place
at high engine revolutions.
Gear shift indication
R with the number of a higher gear is
indicated, when upshifting is
recommended for fuel saving
reasons.
Shift indication appears only in
manual mode.
Electronic driving programmes
● Following a cold start, the operating temperature
programme increases engine
speed to quickly bring the
catalytic converter to the required
temperature.
● Special programmes automatically adapt the shifting
points when driving up inclines or
down hills.
● In snowy or icy conditions or on other slippery surfaces, the
electronic transmission control