headlamp OPEL GT 2012 Owners Manual
[x] Cancel search | Manufacturer: OPEL, Model Year: 2012, Model line: GT, Model: OPEL GT 2012Pages: 190, PDF Size: 2.46 MB
Page 13 of 190

In brief13
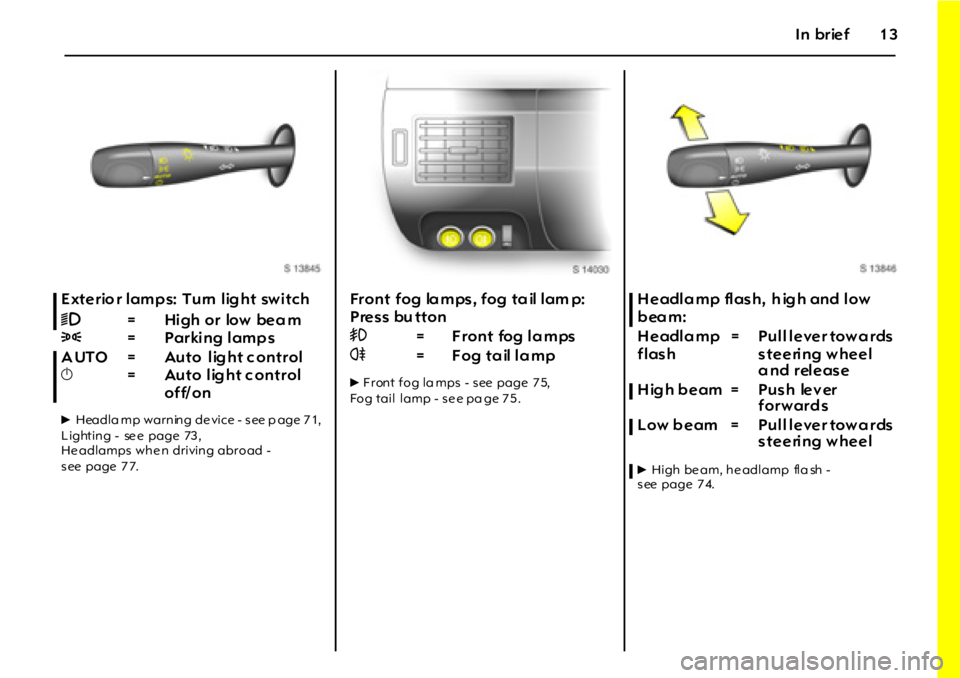
Exterio r lamps: Turn light switch
6Headla mp warning de vice - s ee p age 7 1,
L ighting - se e page 73 ,
He adlamps whe n driving abroad -
s ee page 7 7.
Front fog lamps, fog tail lam p:
Press bu tton
6F ront fog la mps - s ee page 7 5,
Fog tail lamp - s e e pa ge 7 5 .
H e adl a mp fl as h, h ig h and l ow
beam:
6High be am, he adlamp fla sh -
s ee page 7 4.
9=High or low beam
8=Parking lamps
A UTO = Auto lig ht c ontrol
X= Auto lig ht c ontrol
off/ on>=Front fog lamps
r=Fog tail lampHeadlamp
flash= Pull lever towards
steering wheel
and release
H ig h b eam = Push lev er
forwards
Low beam = Pull lever towards
steering wheel
Page 74 of 190

74 Ligh ting
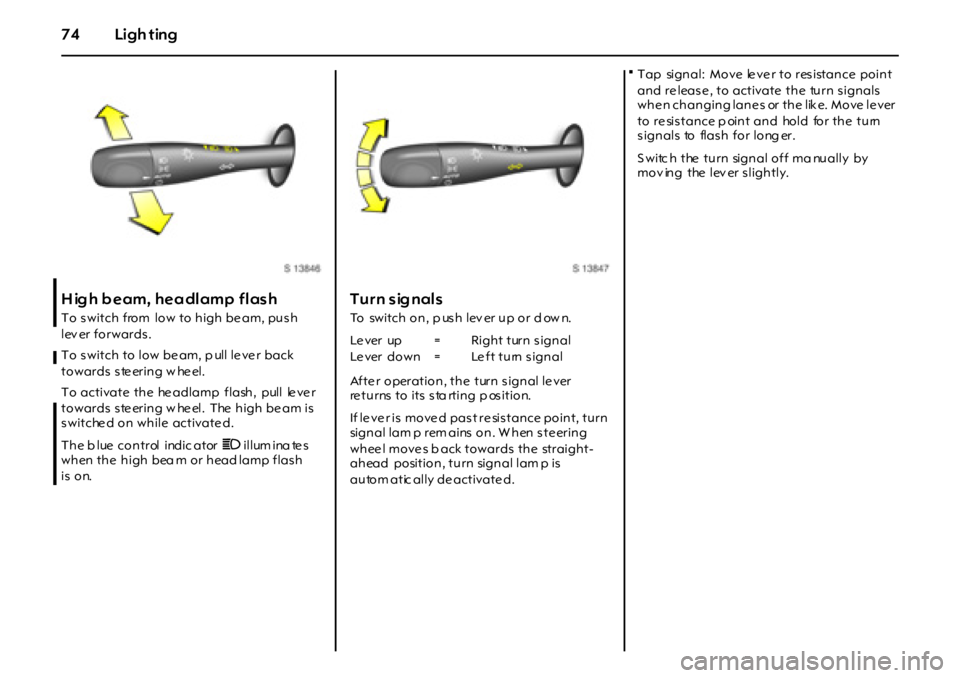
High beam, headlamp flash
To s witch from low to high be am, pus h
lev er forwards.
To s witch to low be am, p ull le ve r back
towards steering w heel.
To activate the he adlamp flash, pull le ve r
towards steering w heel. The high beam is
s witche d on while activate d.
The b lue control indic ator
C illum ina te s
when the high bea m or head lamp flas h
is on.
Turn sig nals
To switch on, p us h lev er up or d ow n.
Afte r operation, the turn signal le ver
returns to its sta rting p osition.
If le ve r is move d pas t re sis tance point, turn
signal lam p rem ains on. W hen s te ering
whee l move s b ack towards the straight-
ahead position, turn signal lam p is
autom atic ally de activate d. Tap signal: Move le ve r to res istance point
and re leas e , to activate the turn s ignals
whe n changing lane s or the lik e. Move le ver
to re sistance p oint and hold for the turn
s ignals to flas h for long er.
S witc h the turn signal off ma nually by
mov ing the lev er s lightly.
Le ver up = Right turn signal
Le ver down = Le ft turn signal
Page 77 of 190

77Lightin g
Ci gare tte lig ht er illumina tion
Co m es on w h en t h e i g n i t i o n i s sw it c he d o n.
L uggage com part me nt lighti ng
Com es on when the lug gage compa rtm ent
is opene d. Battery discharg e protection
To preve nt the ba tte ry from b ecoming
discharged, the courtesy lamps, reading
lamps and luggage compa rtm ent lighting
switch off automatically 20 minutes afte r
the ignition is switched off.
La m p c o v er s
The inside of the la mp cove rs may mist
up briefly in poor, wet and cold we ather
conditions , in heav y rain or afte r was hing.
The mis t dis appea rs q uick ly by itse lf; to
he lp, s witch on the la mps.
Headlamps when driving abroad
The as ymm etrical dippe d b eam exte nds
visibility at the e dge of the road at the
passenger’s sid e.
This c aus e s glare for oncoming tra ffic if the
vehicle is driven in countries where traffic
drives on the opp osite side of the road.
Consult a work shop.
Page 147 of 190

14 7Self-help, vehicle care
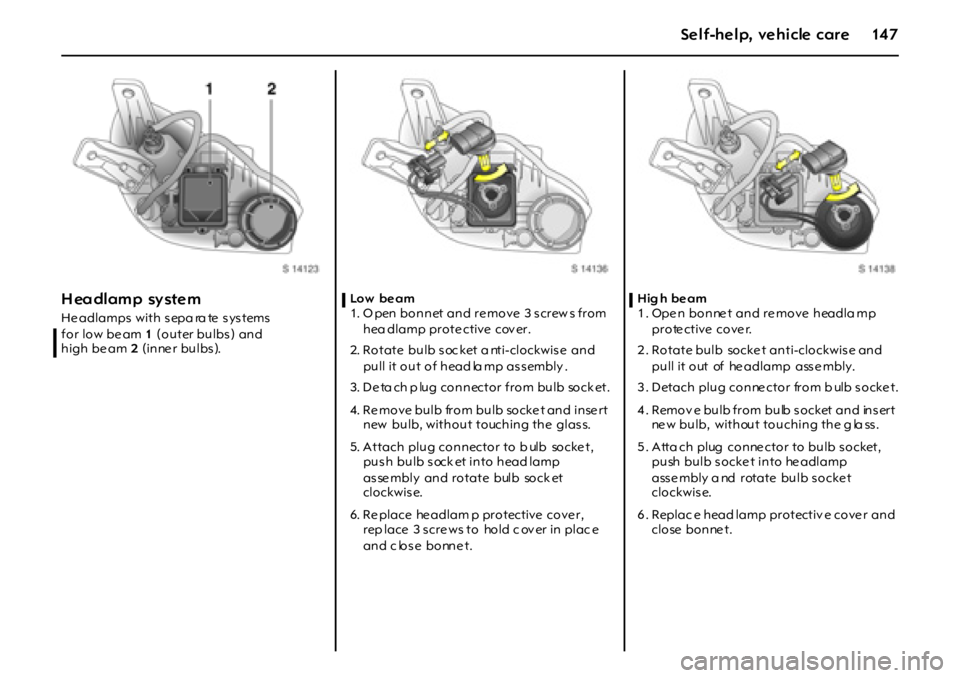
H ea dl am p sy st e m
Headlamps with sepa ra te systems
for low be am 1 (outer bulbs ) and
high be am 2 (inne r bulbs).Lo w b e a m
1. O pen bonnet and re move 3 s crew s from
hea dlamp protective cov er.
2. Rotate bulb soc ket a nti-clockwise and
pull it out of head la mp as s embly .
3. De ta ch p lug connector from bulb sock et.
4. Re move bulb from bulb socke t and inse rt
new bulb, without touching the glass.
5. Attach plug connector to b ulb socke t,
push bulb sock et into head lamp
as se mbly and rotate bulb sock et
clockwis e.
6. Re place he adlam p protective cove r,
rep lace 3 scre ws to hold c ov er in plac e
and c los e bonne t.Hig h beam
1. Open bonnet and remove headla mp
pro te ctive co ve r.
2. Rotate bulb socke t anti-clockwise and
pull it out of he adlamp ass e mbly.
3 . Detach plug conne ctor from b ulb s ocke t.
4 . Remov e bulb from bulb s ocket and ins ert
ne w bulb, without touching the g la ss.
5. Atta ch plug conne ctor to bulb socket,
push bulb s ocke t into he adlamp
asse mbly a nd rotate bulb socke t
clockwis e.
6 . Replac e head lamp protectiv e cove r and
close bonnet.
Page 169 of 190

16 9 Service, maintenance
Servi ce operations
by y ear 1)
km ( x 1000)1)
miles ( x 1000)1)
1)Wh ic h e v e r o cc u r s fi rs t.
⊕Add it iona l o per at ions.
o Und er extreme o peratin g cond itions a nd if req uired by country-sp ecific co nditio ns, the in terva ls are red uced.
15
101
30
2045
302
60
4075
503
90
60
Corrosion p rote ction: check and record in Serv ic e and Warranty Book let Annually
Front and rear wheel b ra kes: check visually Every 2 yea rs/60 000 k m/40 000 miles
o
⊕Annual se rvice che ck if annual m ile age ex cee ds 20 0 0 0 km Annually
E ngine , transm iss ion, A/C compre ss or: chec k for leak s Annually
Steering system boots, trac k rods, final drive: visual check Annually
Track rod end and supporting ball joint: che ck Annually
⊕Brake and clutch fluid: change Eve ry 2 y ears
W hee l faste ning: loose n and tighten to torque
Tyre condition a nd pres sure s: check, correctEvery 2 yea rs/60 000 k m/40 000 miles
⊕Annual se rvice che ck if annual m ile age ex cee ds 20 0 0 0 km Annually
F irs t aid kit, tyre rep air kit and las hing ey es : v is ual che ck Eve ry 2 y ears
Headlamp aiming: check, a djust Every 2 yea rs/60 000 k m/40 000 miles
Door hing es , door s top , lock c ylind er, lock strike r, bonnet c atch, tailgate
hinges and check links: lubricate Every 2 yea rs/60 000 k m/40 000 miles
o
⊕F old ing roof: lubricate (in dusty conditions ) Annually
Test drive, final check
Se rvice inte rval dis play and oil life m onitor: re se t - if ap plicablexxxxxx