automatic transmission fluid OPEL GT-R 1973 Service Manual
[x] Cancel search | Manufacturer: OPEL, Model Year: 1973, Model line: GT-R, Model: OPEL GT-R 1973Pages: 625, PDF Size: 17.22 MB
Page 17 of 625
IoC-91973 OPEL SERVICE MANUAL
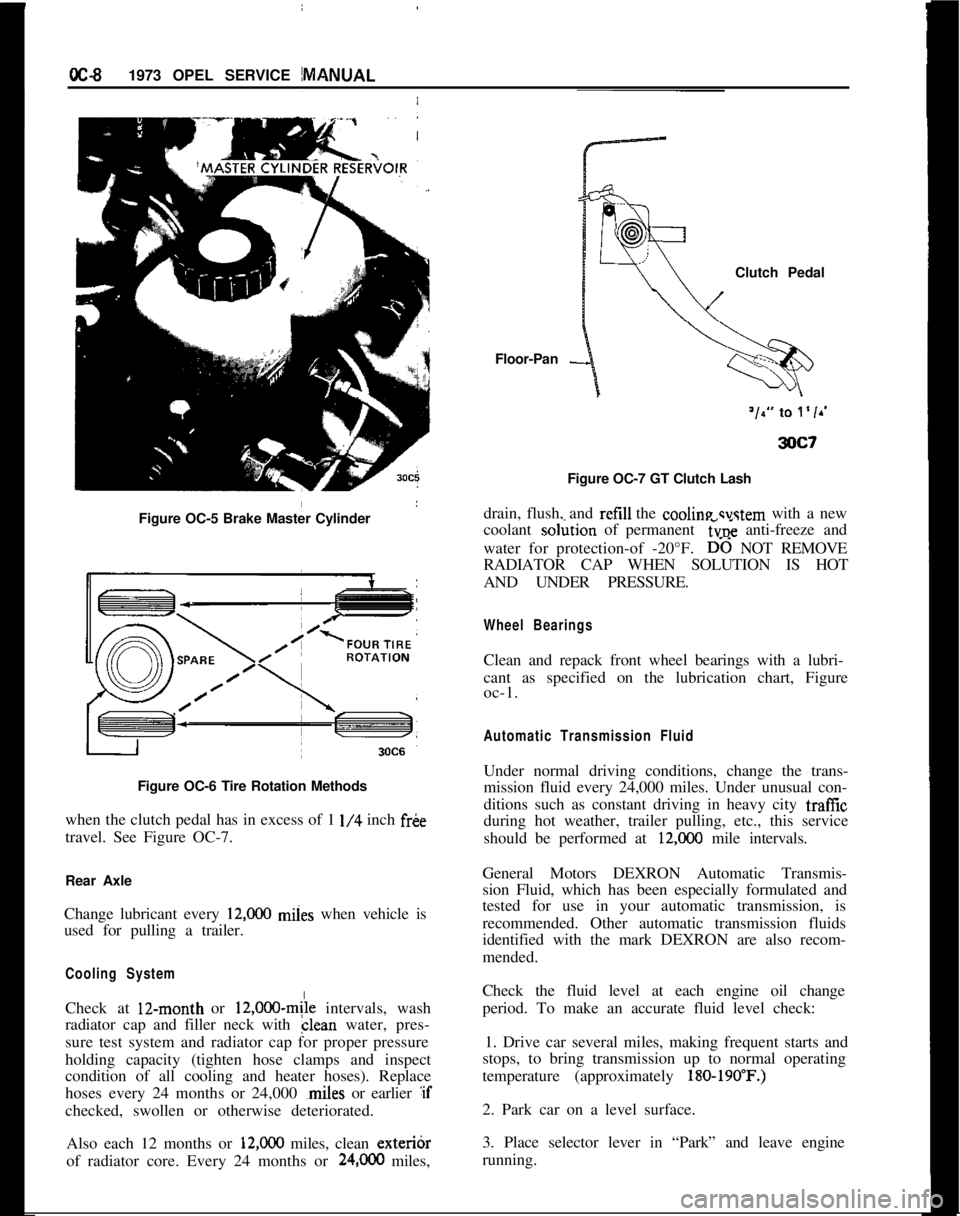
Figure OC-5 Brake Master Cylinder
I
Figure OC-6 Tire Rotation Methods
when the clutch pedal has in excess of 1
l/4 inch fr&
travel. See Figure OC-7.
Rear Axle
Change lubricant every
12,ooO miies when vehicle is
used for pulling a trailer.
Cooling SystemCheck at 12-month or
12,000~mile intervals, wash
radiator cap and filler neck with clean water, pres-
sure test system and radiator cap for proper pressure
holding capacity (tighten hose clamps and inspect
condition of all cooling and heater hoses). Replace
hoses every 24 months or 24,000 ,miles or earlier :if
checked, swollen or otherwise deteriorated.
Also each 12 months or
12,ooO miles, clean exteribr
of radiator core. Every 24 months or
24,OCO miles,Floor-Pan
-Clutch Pedal
Figure OC-7 GT Clutch Lash
drain, flush, and refill the cooline svstem with a new
coolant so&ion of permanent
6~; anti-freeze and
water for protection-of -20°F.
D-6 NOT REMOVE
RADIATOR CAP WHEN SOLUTION IS HOT
AND UNDER PRESSURE.
Wheel BearingsClean and repack front wheel bearings with a lubri-
cant as specified on the lubrication chart, Figure
oc-1.
Automatic Transmission FluidUnder normal driving conditions, change the trans-
mission fluid every 24,000 miles. Under unusual con-
ditions such as constant driving in heavy city traffic
during hot weather, trailer pulling, etc., this service
should be performed at
12,COO mile intervals.
General Motors DEXRON Automatic Transmis-
sion Fluid, which has been especially formulated and
tested for use in your automatic transmission, is
recommended. Other automatic transmission fluids
identified with the mark DEXRON are also recom-
mended.
Check the fluid level at each engine oil change
period. To make an accurate fluid level check:
1. Drive car several miles, making frequent starts and
stops, to bring transmission up to normal operating
temperature (approximately
180-190’F.)2. Park car on a level surface.
3. Place selector lever in “Park” and leave engine
running.
Page 18 of 625
LUBRICATION AND MAINTENANCE OC-9
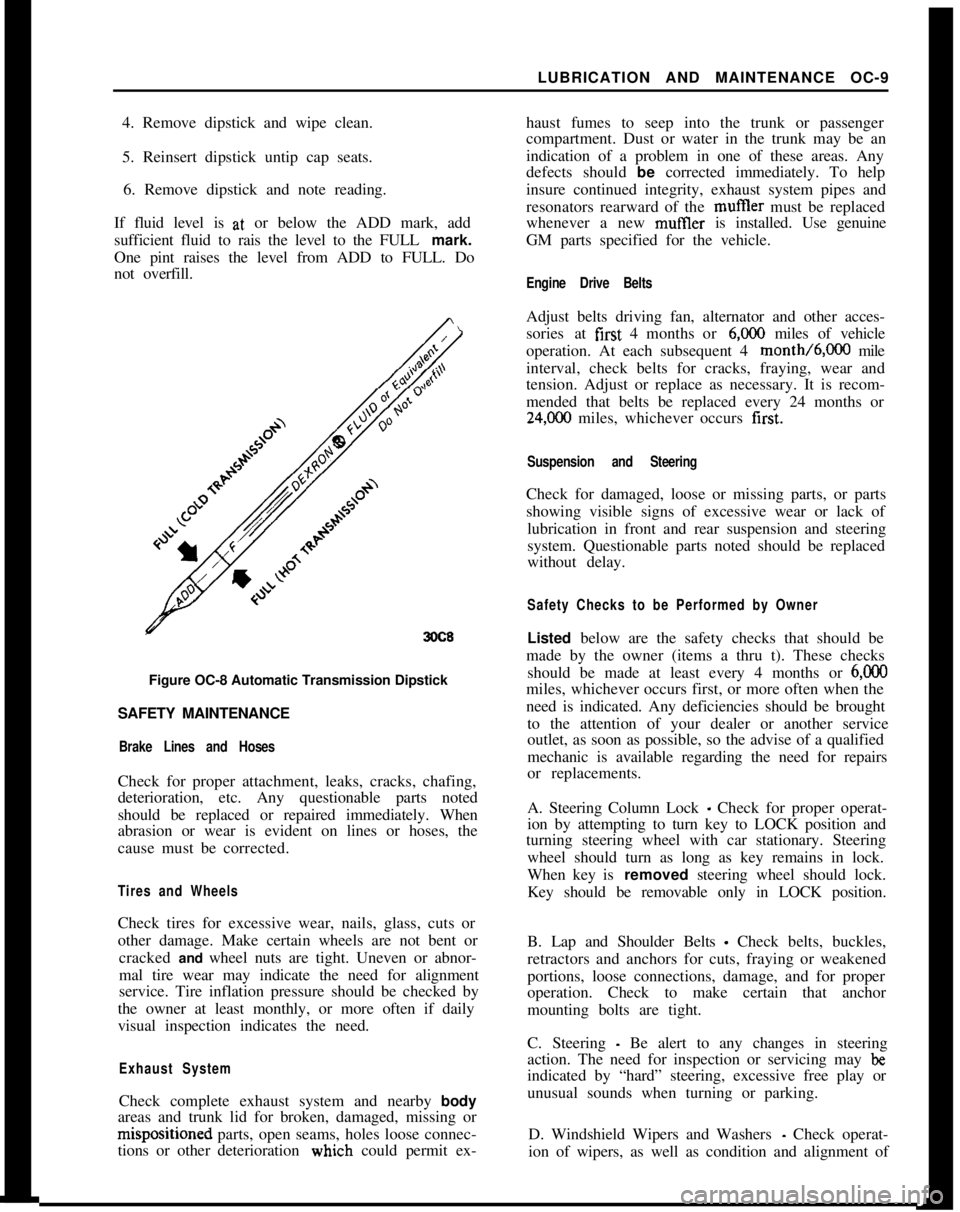
4. Remove dipstick and wipe clean.
5. Reinsert dipstick untip cap seats.
6. Remove dipstick and note reading.
If fluid level is at, or below the ADD mark, add
sufficient fluid to rais the level to the FULL mark.
One pint raises the level from ADD to FULL. Do
not overfill.
3OC8Figure OC-8 Automatic Transmission Dipstick
SAFETY MAINTENANCE
Brake Lines and HosesCheck for proper attachment, leaks, cracks, chafing,
deterioration, etc. Any questionable parts noted
should be replaced or repaired immediately. When
abrasion or wear is evident on lines or hoses, the
cause must be corrected.
Tires and WheelsCheck tires for excessive wear, nails, glass, cuts or
other damage. Make certain wheels are not bent or
cracked and wheel nuts are tight. Uneven or abnor-
mal tire wear may indicate the need for alignment
service. Tire inflation pressure should be checked by
the owner at least monthly, or more often if daily
visual inspection indicates the need.
Exhaust SystemCheck complete exhaust system and nearby body
areas and trunk lid for broken, damaged, missing orm&positioned parts, open seams, holes loose connec-
tions or other deterioration wiuch could permit ex-haust fumes to seep into the trunk or passenger
compartment. Dust or water in the trunk may be an
indication of a problem in one of these areas. Any
defects should be corrected immediately. To help
insure continued integrity, exhaust system pipes and
resonators rearward of the muftler must be replaced
whenever a new mufIler is installed. Use genuine
GM parts specified for the vehicle.
Engine Drive BeltsAdjust belts driving fan, alternator and other acces-
sories at first 4 months or
6,ooO miles of vehicle
operation. At each subsequent 4 month/6,000 mile
interval, check belts for cracks, fraying, wear and
tension. Adjust or replace as necessary. It is recom-
mended that belts be replaced every 24 months or
24,C00 miles, whichever occurs first.
Suspension and SteeringCheck for damaged, loose or missing parts, or parts
showing visible signs of excessive wear or lack of
lubrication in front and rear suspension and steering
system. Questionable parts noted should be replaced
without delay.
Safety Checks to be Performed by OwnerListed below are the safety checks that should be
made by the owner (items a thru t). These checks
should be made at least every 4 months or
6,ooOmiles, whichever occurs first, or more often when the
need is indicated. Any deficiencies should be brought
to the attention of your dealer or another service
outlet, as soon as possible, so the advise of a qualified
mechanic is available regarding the need for repairs
or replacements.
A. Steering Column Lock
_ Check for proper operat-
ion by attempting to turn key to LOCK position and
turning steering wheel with car stationary. Steering
wheel should turn as long as key remains in lock.
When key is removed steering wheel should lock.
Key should be removable only in LOCK position.
B. Lap and Shoulder Belts
- Check belts, buckles,
retractors and anchors for cuts, fraying or weakened
portions, loose connections, damage, and for proper
operation. Check to make certain that anchor
mounting bolts are tight.
C. Steering
- Be alert to any changes in steering
action. The need for inspection or servicing may
beindicated by “hard” steering, excessive free play or
unusual sounds when turning or parking.
D. Windshield Wipers and Washers
- Check operat-
ion of wipers, as well as condition and alignment of
Page 19 of 625
CC-10 1973 OPEL SERVICE MANUAL
wiper blades. Check amount and direction of fluid
sprayed by washers during use.,
E. Defrosters - Check performance by moving con-
trols to “DEF” and noting
am$nmt of air directed
against the windshield.
I
F. Wheel Alignment and
Balabce - In addition to
abnormal tire wear, the need fbr wheel alignment
service may be indicated by a pull to the right or
!eftwhen driving on a straight and level road. The need
for wheel balancing is usually
iddicated by a vibra-
tion of the steering wheel or
se;+ tihile driving at
normal highway speeds.I
IG. Brakes
- Be alert to illumiriation of the brake
warning light or changes in braking action,
SUCK as
repeated pulling to one side, unusual sounds when
braking or increased brake pedal travel. Any of thesecould indicate the need for
brakk system inspection
and/or service.
H. Parking Brake and Transmission “PARK”
Mechanism
- Check parking brake holding ability by
parking on a fairly steep hill and restraining the vehi-
cle with the parking brake only.
eon cars with auto-
matic transmissions, check the holding ability of the
“PARK” mechanism by releasing all brakes after
the transmission selector lever hak been placed in the“P” position.
I. Glass
- Check for broken, scrritched, dirty or da-
maged glass on vehicle that
coulld obscure vision’or
become an injury hazard.
J. Lights and Buzzers
- Check all instrument panel
illuminating and warning lights,’ seat belt reminder
light and buzzer, ignition key
b&er, interior lights,
license plate lights, side marker! lights, headlamps,
parking lamps, tail lamps, brake lights, turn signals,
backup lamps, and hazard warding flashers. Have
someone observe operation of
&ach exterior light
while you activate the controls: The operation of
instrument panel warning lights is covered in the
“Starting and Operating“ section of your
Own&%
Manual.K. Transmission Shift Indicator
‘- Check to be sure
automatic transmission shift
indiCator accurately i”-
dicates the shift position selected.
I
CAUTION: Before making thk check below,I
be sure to have a clear dist&e ahead and:
behind the car, set the parking brake and
firmly apply the foot brake.
Do not depress
accelerator pedal. Be prepared to
turn off ’
ignition switch
immediat+y if engine
should start.L. Starter Safety Switch (Automatic Transmissibn
Cars)
- Check starter safety switch by placing the
transmission in each of the driving gears while
at-tempting to start the engine. The starter should oper-ate only in the Park (“P”) or Neutral (“N”)
positions.
M. Horn
- Blow the horn occasionally to be sure thatit works. (Ignition switch must be in the “ON” posi-
tion.)
N. Seat Back Latches
- Check to see that seat back
latches are holding by pulling forward on the top of
each folding seat back.
0. Rearview Mirrors and Sun Visors
- Check that
friction joints are properly adjusted so mirrors and
sun visors stay in the selected position.
P. Door Latches
- Check for positive closing, latch-
ing and locking.
Q. Hood Latches - Check to make sure hood closesfirmly by pressing on the hood at the latching point
after each closing. Check also for broken, damaged
or missing parts which might prevent secure latch-
ing.R. Fluid Leaks
- Check for fuel, water, oil or other
fluid leaks by observing the ground beneath the vehi-cle after it has been parked for a while. If gasoline
fumes or fluid are noticed at any time, the cause
should be determined and corrected without delay
because of the possibility of fire.
S. Exhaust System
- Be alert to any change in the
sound of the exhaust system or a smell of fumes
which may indicate a leak.
Head Restraints
- Check that no head restraint
components are missing, damaged or loose. (Does
not apply to GT Models).
Disc BrakesCheck brake pads and condition of rotors while
wheels are removed during tire rotation. (Note belowregarding more frequent checks also applies to disc
brakes.)
Parking and Drum BrakesCheck drum
brake linings and other internal brake
components at each wheel (drums, wheel cylinders,
etc.). Parking brake adjustment also should be
checked whenever drum brake linings are checked.
NOTE: More frequent checks should be
made if driving conditions a.nd habits result
in frequent brake application. When brakes
require relining, it is recommended thatyou use those genuine General Motors
parts specified for your car,and Delco fluid
as required.
Page 401 of 625
7C- 401973 OPEL SERVICE MANUAL
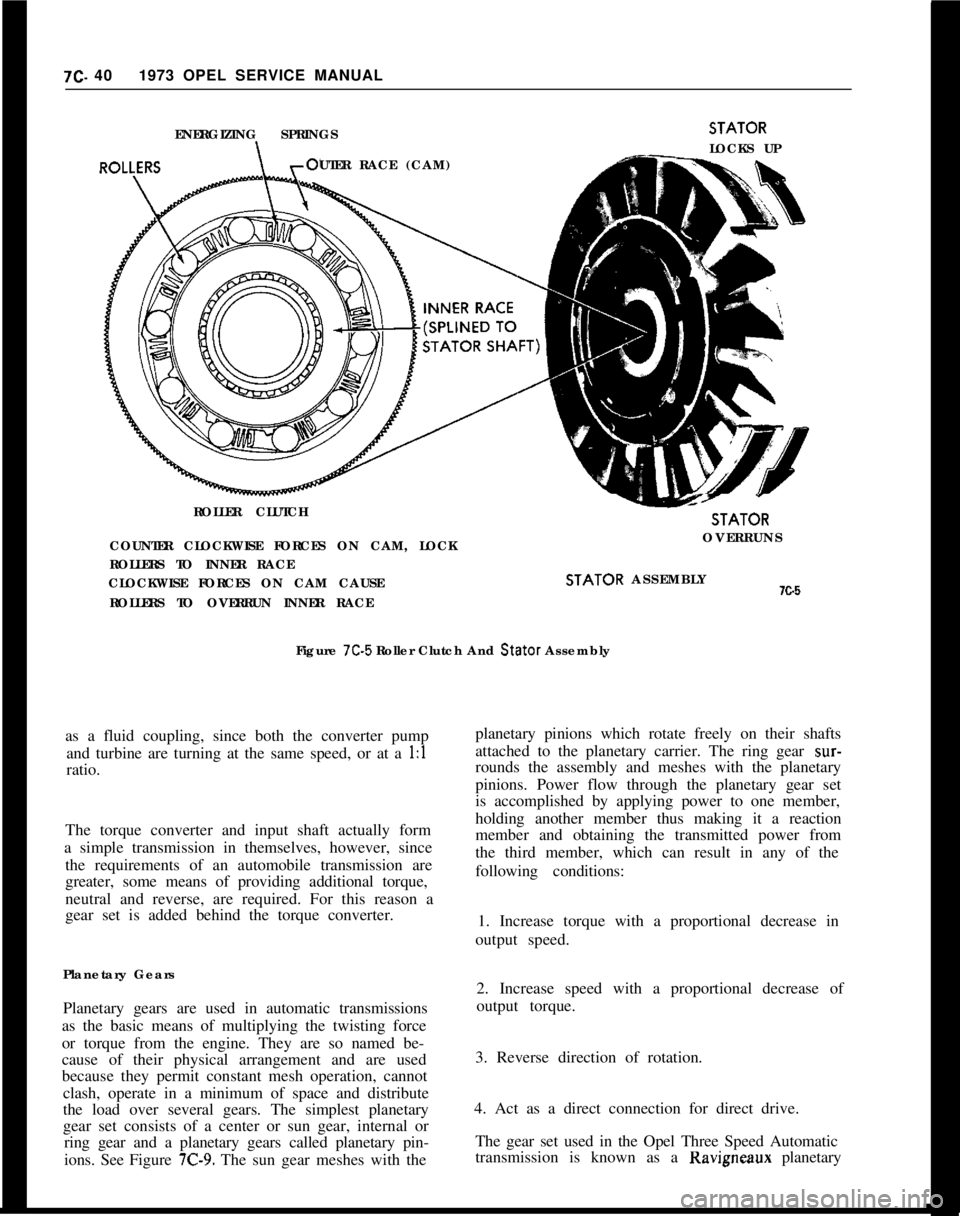
ENERGIZING SPRINGS
UTER RACE (CAM)
ROLLER CLUTCHSTATOR
LOCKS UPSTATOR
COUNTER CLOCKWISE FORCES ON CAM, LOCKOVERRUNS
ROLLERS TO INNER RACE
CLOCKWISE FORCES ON CAM CAUSESTATOR ASSEMBLYx.5
ROLLERS TO OVERRUN INNER RACE
Figure 7C-5 Roller Clutch And Stator Assembly
as a fluid coupling, since both the converter pump
and turbine are turning at the same speed, or at a 1:l
ratio.
The torque converter and input shaft actually form
a simple transmission in themselves, however, since
the requirements of an automobile transmission are
greater, some means of providing additional torque,
neutral and reverse, are required. For this reason a
gear set is added behind the torque converter.
Planetary Gears
Planetary gears are used in automatic transmissions
as the basic means of multiplying the twisting force
or torque from the engine. They are so named be-
cause of their physical arrangement and are used
because they permit constant mesh operation, cannot
clash, operate in a minimum of space and distribute
the load over several gears. The simplest planetary
gear set consists of a center or sun gear, internal or
ring gear and a planetary gears called planetary pin-
ions. See Figure
7C-9. The sun gear meshes with theplanetary pinions which rotate freely on their shafts
attached to the planetary carrier. The ring gear
sur-rounds the assembly and meshes with the planetary
pinions. Power flow through the planetary gear set
is accomplished by applying power to one member,
holding another member thus making it a reaction
member and obtaining the transmitted power from
the third member, which can result in any of the
following conditions:
1. Increase torque with a proportional decrease in
output speed.
2. Increase speed with a proportional decrease of
output torque.
3. Reverse direction of rotation.
4. Act as a direct connection for direct drive.
The gear set used in the Opel Three Speed Automatic
transmission is known as a Ravigneaux planetary
Page 409 of 625
7C- 481973 OPEL SERVICE MANUAL
INPUT SUNRING
GEAR ASSY.GEARPLANETARY
CARRIERASSY.REACTION SUNtow
GEAR 8 DRUMBAND
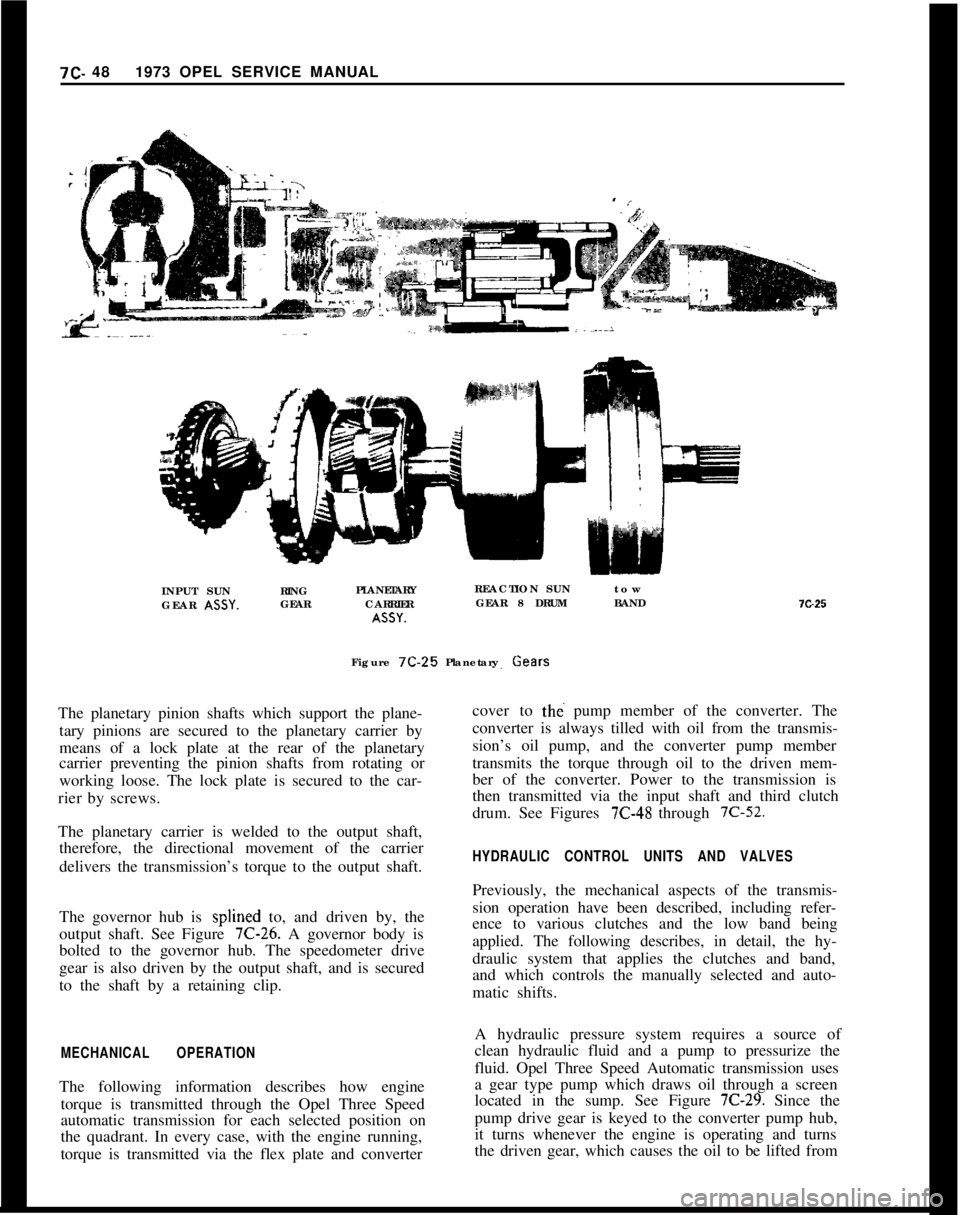
Figure 7C-25Planetary Gears
The planetary pinion shafts which support the plane-
tary pinions are secured to the planetary carrier by
means of a lock plate at the rear of the planetary
carrier preventing the pinion shafts from rotating or
working loose. The lock plate is secured to the car-
rier by screws.
The planetary carrier is welded to the output shaft,
therefore, the directional movement of the carrier
delivers the transmission’s torque to the output shaft.
The governor hub is splined to, and driven by, the
output shaft. See Figure 7C-26. A governor body is
bolted to the governor hub. The speedometer drive
gear is also driven by the output shaft, and is secured
to the shaft by a retaining clip.
MECHANICAL OPERATIONThe following information describes how engine
torque is transmitted through the Opel Three Speed
automatic transmission for each selected position on
the quadrant. In every case, with the engine running,
torque is transmitted via the flex plate and converter7G25
cover to
tht? pump member of the converter. The
converter is always tilled with oil from the transmis-
sion’s oil pump, and the converter pump member
transmits the torque through oil to the driven mem-
ber of the converter. Power to the transmission is
then transmitted via the input shaft and third clutch
drum. See Figures
7C-48 through 7C-52.
HYDRAULIC CONTROL UNITS AND VALVESPreviously, the mechanical aspects of the transmis-
sion operation have been described, including refer-
ence to various clutches and the low band being
applied. The following describes, in detail, the hy-
draulic system that applies the clutches and band,
and which controls the manually selected and auto-
matic shifts.
A hydraulic pressure system requires a source of
clean hydraulic fluid and a pump to pressurize the
fluid. Opel Three Speed Automatic transmission uses
a gear type pump which draws oil through a screen
located in the sump. See Figure
7C-29. Since the
pump drive gear is keyed to the converter pump hub,
it turns whenever the engine is operating and turns
the driven gear, which causes the oil to be lifted from
Page 456 of 625
AUTOMATIC TRANSMISSION 7C- 95
12. Place suitable jack under transmission and
remove transmission support bolts.
13. Lower transmission enough to remove detent
cable and modulator vacuum line.
14. Remove speedometer cable.
15. Remove selector lever.
16. Mark flywheel and converter for reassembly in
same position, and remove converter to flywheel
bolts. See Figure 7C-106.17. Remove converter housing to engine bolts and
tiller tube.
18. Pry transmission loose from engine.
19. Keep rear of transmission lower than front to
prevent converter from falling and install converter
holding fixture J-21366. Lower transmission and
move to bench.
Installation. Opel 1900 and Manta1. Assemble transmission to suitable jack and raise
transmission into position. Rotate converter to per-
mit coupling of fly wheel and converter with original
relationship. Remove J-21366.
2. Install tiller tube and converter housing to engine
block bolts. Torque to 35 lb. ft. DO NOT over
torque.
3. Install flywheel to converter bolts. Torque to 30 lb.
ft.4. Install detent cable to transmission.
5. Connect oil cooler lines.
6. Install lower bolt on starter. Torque to 40 lb. ft.
7. Connect shift linkage to transmission.
8. Connect modulator line.
9. Connect speedometer cable.
10. Install transmission support.
11. Install drive shaft. Torque U-Bolts to 18 lb. ft.
12. Install flywheel cover pan. Torque to 15 lb. ft.
13. Install engine support brackets.
14. Reconnect exhaust system.15. Attach stabilizer supports and tighten stabilizer
bolts in lower control arms.
16. Lower car.
17. Install starter bolts. Torque to 40 lb. ft.
18. Reconnect battery.
19. Fill transmission with fluid as described in
Specifications. Check selector lever and detent cable
adjustment.
Removal GT1. Disconnect battery.
2. Remove dipstick.
3. Pull throttle control rod off ball pin.
4. Remove screws from fan shroud.
5. Raise car and provide support for front and rear.
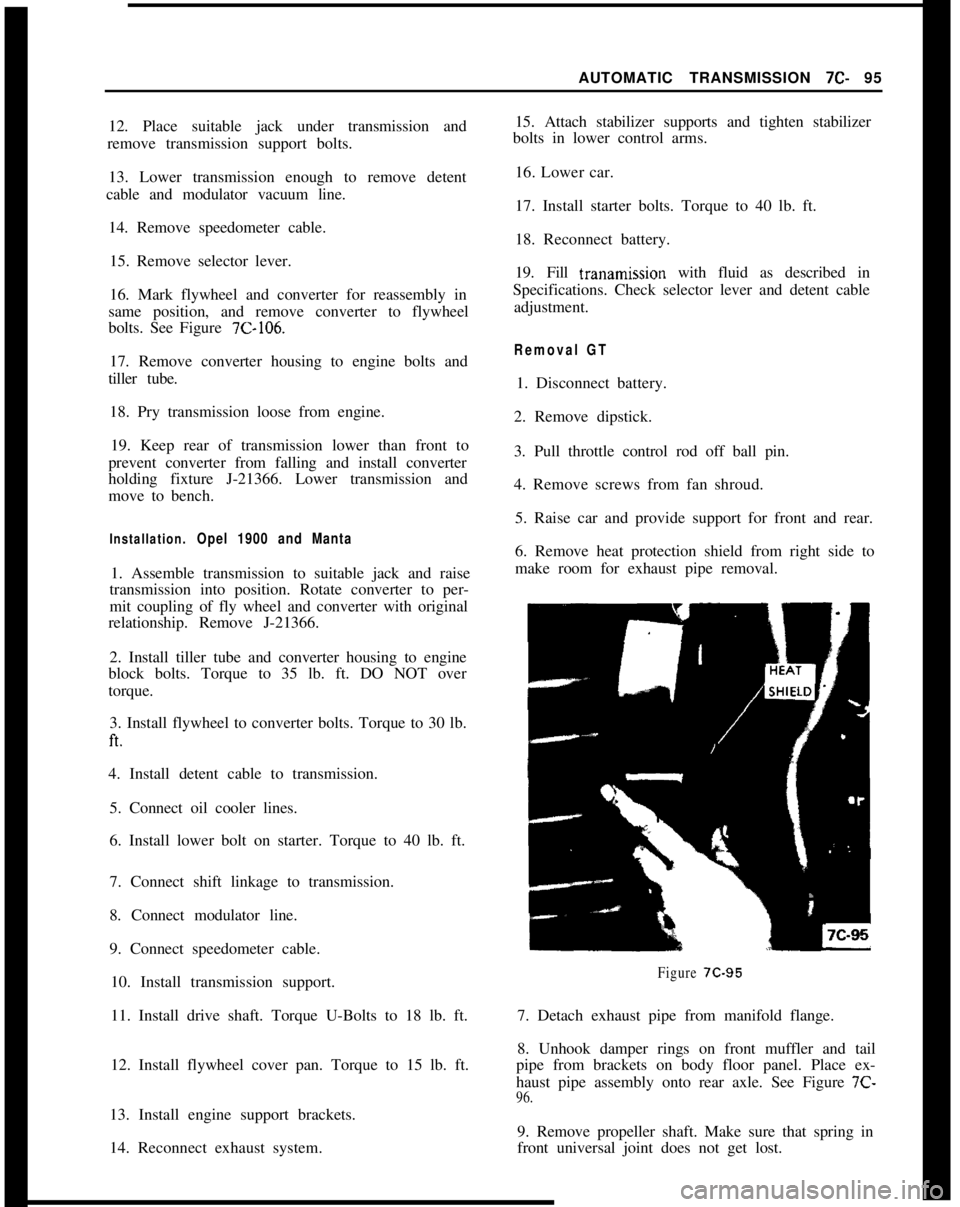
6. Remove heat protection shield from right side to
make room for exhaust pipe removal.
Figure 7C-957. Detach exhaust pipe from manifold flange.
8. Unhook damper rings on front muffler and tail
pipe from brackets on body floor panel. Place ex-
haust pipe assembly onto rear axle. See Figure 7C-
96.9. Remove propeller shaft. Make sure that spring in
front universal joint does not get lost.
Page 470 of 625

AUTOMATIC TRANSMISSION 7C-109
Figure 7C-149
21. Using a drift on tap, press out oil pump bushing
with arbor press. Use rag or cloth to protect oil pumpface.22. Install new oil pump hub bushing with arbor
press using tool J-23130-1. See Figure
7C-149. Clean
pump body, including all holes and pockets
thoroughly. With oil pump shaft hole “A” facing
downward, scribe an aligning mark on oil pump
shaft inner diameter at the center of the oil groove
to the right of hole “A”. Scribe mark on outer edge
of bushing through the centers of the small and large
drilled holes “B”. Place bushing into oil pump shaft
with small hole up, and align scribe marks on bush-
ing with those made in oil pump shaft. Use arbor
press to drive bushing into oil pump shaft until
seated in the bore. Care must be taken so that bush-
ing is pressed in straight, using the scribe marks as
a guide until firmly seated.
23. Inspect and thoroughly clean the pressure regula-
tor and priming valve assemblies. Immerse all valves
in transmission fluid before installing in bores.
24. Install pressure regulator valve in oil pump body
bore. See Figure
7C-150.25. Install pressure regulator valve, two spring seats,
spring, boost valve and sleeve in oil pump body bore.
26. Depress pressure regulator boost valve sleeve un-
til backend lines up with pin hole and insert pin to
XWP$.27. Install priming valve assembly from front face of
pump. Priming valve retainer should be pressed in
flush with surface of oil pump body. See Figure 7C-
151.28. Inspect oil pump hub oil seal rings. Replace if
damaged or side wear is noted. See Figure
7C-152.29. Inspect reverse clutch piston for damage, Re-
place if necessary.
Figure
7C-150
Page 474 of 625

AUTOMATIC TRANSMISSION 7C-113
12. Inspect the piston return springs. Evidence of
extreme heat or burning in the area of the clutch may
have caused the springs to take a heat set and would
justify replacement of the springs.
Figure 7C-16313. Inspect second clutch hub bushing for scoring or
wear.14. If necessary, remove second clutch hub bushing
using remover and installer J-23130-6 with driver
handle J-8092. See Figure 7C-164.
P-J-6092
SECOND CLUTCH
DRUM
iJ:23130-6Figure
7C-16415. Clean in solvent to remove any foreign matter.
Install new second clutch hub bushing using tool
J-23 130-6 and driver handle J-8092. Bushing must be
driven in until tool bottoms on bench. See Figure 7C-
164.16. To install second clutch piston into second clutch
drum, use installer tool J-23080 so as not to damage
lip seal. See Figure 7C-165. Use liberal amount of
transmission fluid for ease of installation and to pre-
vent seal damage.
SECOND CLUTCHDRUM
J-23,060Figure
7C-16517. Remove second clutch piston and seal installer
J-23080.18. Install 22 springs and retaining seat on second
clutch piston.
19. Using spring compressor tool J-2590-12 with
adapter J-21420-1 on retaining seat, compress sec-
ond clutch piston return springs. Care should be
taken so that retainer does not catch in snap ring
groove and damage retainer.
20. Install snap ring with snap ring pliers such as
J-
8059.21. Install bronze thrust washer so that the tang seats
in the slot of the second clutch hub. Secure with
petroleum jelly (unmedicated).
22. Inspect condition of composition and steel plates.
Do not diagnose a composition drive plate by co/or.
A. Dry composition plates with compressed air and
inspect the composition surface for:
1. Pitting and flaking
2. Wear
3. Glazing
Page 478 of 625

AUTOMATIC TRANSMISSION 7C-117WIRE CRIMPED
INTO COPPERTUBING
Figure 7C-178
19. Inspect condition of the third clutch composition
and steel plates. Do not diagnose a composition
drive plate by color,A. Dry composition plates with compressed air and
inspect the composition surface for:
1. Pitting and flaking
2. Wear
3. Glazing
4. Cracking
5. Charring
6. Chips or metal particles imbedded in lining
If a composition drive plate exhibits any of the above
conditions, replacement is required.
B. Wipe steel plates dry and check for heat discolora-
tion. If the surface is smooth and an even color smear
is indicated, the plates should be reused. If severe
heat spot discoloration or surface
scutXng is in-
dicated, the plates must be replaced.
20. Install third clutch plates into third clutch drum
beginning with a steel plate, composition plate, steel
plate, composition plate, etc. Use a liberal amount of
transmission fluid.
21. Inspect thrust washer and needle thrust bearing
for damage. Replace if necessary.
22. Install thrust washer and bearing onto input
shaft. Secure with petroleum jelly (unmedicated).23. Inspect sprag assembly for wear, damage orsprags that freely fall out of cage. Inspect input sun
gear for chipped or nicked teeth or abnormal wear.
Replace part if necessary.
24. Install sprag onto third clutch hub with groove
on sprag cage outer diameter toward input sun gear.
See Figure
7C-179.Figure 7C-179
25. Install sprag race and retainer assembly over
sprag assembly. Holding input sun gear with left
hand, sprag race and retainer assembly should “lock
up” when turned with right hand in a clockwise
direction and should rotate freely when turned coun-
terclockwise. See Figure
7C-180.Figure 7C-180
Page 492 of 625

AUTOMATIC TRANSMISSION 7C-1314. Bolt extension housing to rear of case. Torque to
20-30 Ibs. ft. See Figure
7C-221.
Figure 7C-22
1
Installation of Speedometer Driven Gear1. Install speedometer driven gear and housing into
extension housing. See Figure
7C-222.Figure 7C-222
2. Install speedometer driven gear housing retainer
into slot provided in speedometer driven gear hous-
ing. Bolt retainer to extension housing. Torque to
6-Slbs. ft. See Figure
7C-223.
installation of Detent Valve, Modulator Valve,
Modulator Assembly1. inspect detent valve sleeve oil seal and replace if
necessary.Figure 7C-223
2. Install detent valve, sleeve, spring, and spring seat
into case bore using liberal amount of transmission
fluid.
3. Depress detent valve spring and insert spring pin
to secure detent valve assembly. Detent valve sleeve
must be installed with slots facing oil pan. Care
should be taken so that spring pin is inserted into the
groove provided in sleeve and not into one of the oil
passage slots in the sleeve.
4. Install modulator valve and sleeve into case with
small end of modulator valve first.
5. Using new modulator assembly gasket, install
plunger and thread modulator into case and tighten
to
12-15 Ibs. ft. using tool J-23100. See Figure 7C-
224.
Installation and Adjustment of ServoAdjustment of servo can be performed with trans-
mission in vehicle.
1. Install servo apply rod, spring and piston into case,
using liberal amount of transmission fluid.
2. Compress servo piston spring using compressor
tool J-23075, lightly tapping servo piston while com-
pressing until piston is seated to avoid damage to the
oil seal ring.
3. Install servo retaining ring. See Figure
7C-225.Remove compressor tool J-23075.