heater OPEL GT-R 1973 Service Manual
[x] Cancel search | Manufacturer: OPEL, Model Year: 1973, Model line: GT-R, Model: OPEL GT-R 1973Pages: 625, PDF Size: 17.22 MB
Page 5 of 625
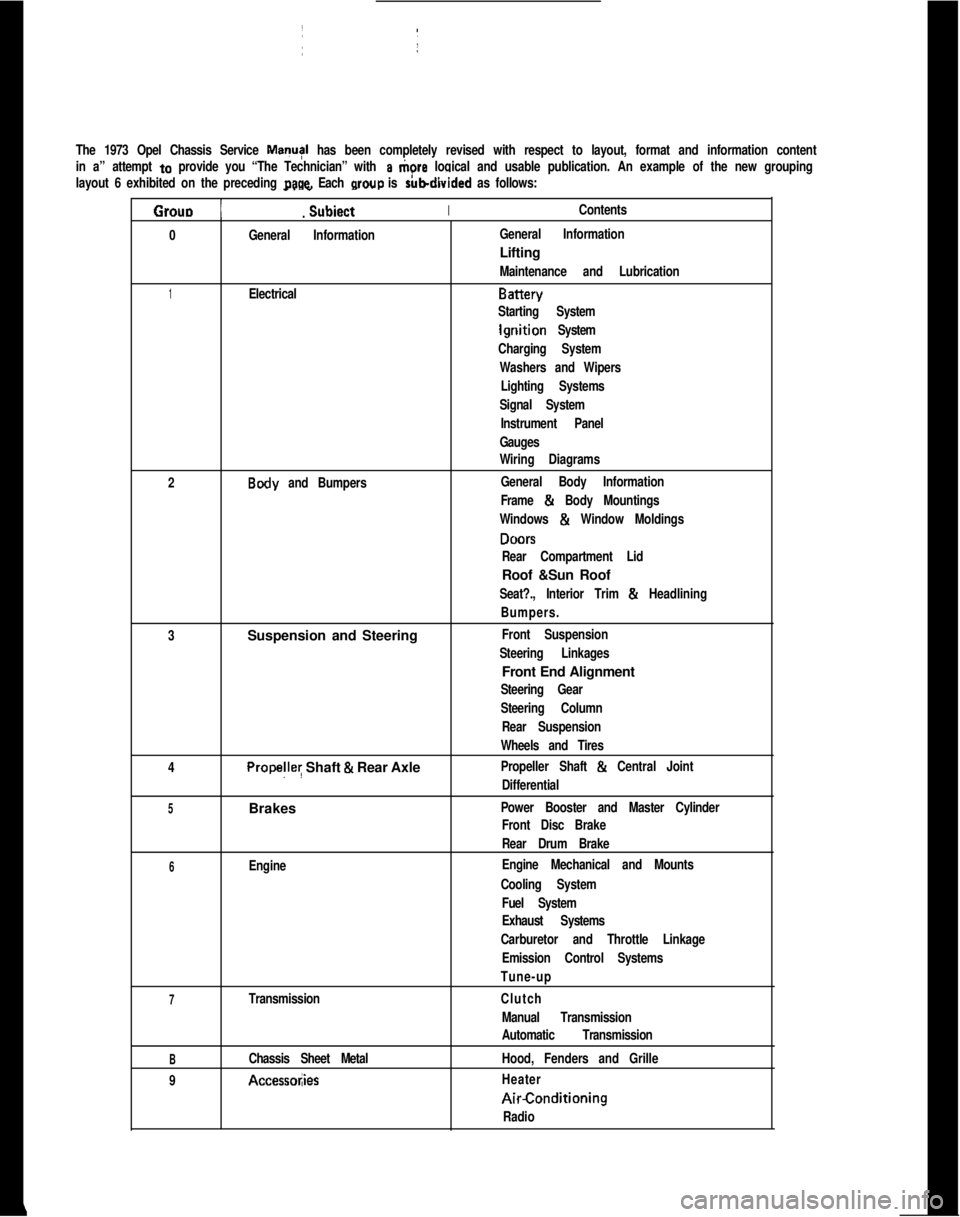
The 1973 Opel Chassis Service MayI has been completely revised with respect to layout, format and information content
in a” attempt
to provide you “The Technician” with a tiore logical and usable publication. An example of the new grouping
layout 6 exhibited on the preceding
page. Each wow is rubdivided as follows:
Grouo 1
_. _
Subiect IIContents.
0
General InformationIGeneral InformationLifting
Maintenance and Lubrication
1ElectricalBattery
Starting System
lgriition System
Charging System
Washers and Wipers
Lighting Systems
Signal SystemI
Instrument Panel
Gauges
Wiring Diagrams
2
Body and Bumpers:General Body InformationI
Frame & Body Mountings
Windows
& Window Moldings
DONS
Rear Compartment LidRoof &Sun Roof
Seat?., Interior Trim & Headlining
Bumpers.
3Suspension and Steering
Front Suspension
Steering Linkages1Front End Alignment
Steering Gear
Steering Column
Rear Suspension
Wheels and Tires
4
Propelley Shaft & Rear AxlePropeller Shaft & Central Joint
Differential
5Brakes ~Power Booster and Master Cylinder
Front Disc BrakeI
Rear Drum Brake
6EngineEngine Mechanical and Mounts
Cooling System
Fuel System
Exhaust Systems
Carburetor and Throttle Linkage
Emission Control Systems
Tune-up
7TransmissionClutch
Manual Transmission
Automatic Transmission
BChassis Sheet MetalHood, Fenders and Grille
9
Accessol;iesHeaterAirConditioning
Radio
Page 17 of 625
IoC-91973 OPEL SERVICE MANUAL
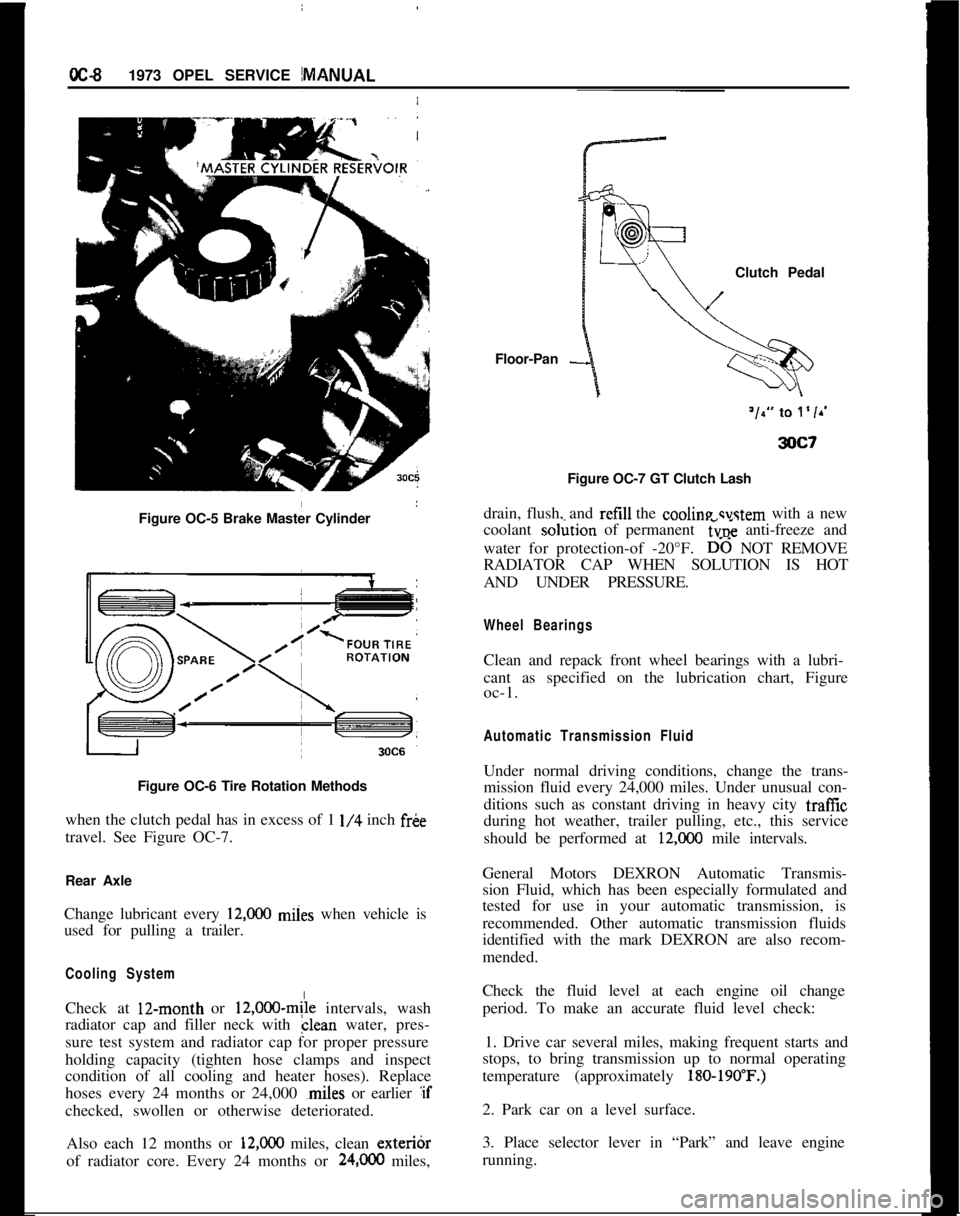
Figure OC-5 Brake Master Cylinder
I
Figure OC-6 Tire Rotation Methods
when the clutch pedal has in excess of 1
l/4 inch fr&
travel. See Figure OC-7.
Rear Axle
Change lubricant every
12,ooO miies when vehicle is
used for pulling a trailer.
Cooling SystemCheck at 12-month or
12,000~mile intervals, wash
radiator cap and filler neck with clean water, pres-
sure test system and radiator cap for proper pressure
holding capacity (tighten hose clamps and inspect
condition of all cooling and heater hoses). Replace
hoses every 24 months or 24,000 ,miles or earlier :if
checked, swollen or otherwise deteriorated.
Also each 12 months or
12,ooO miles, clean exteribr
of radiator core. Every 24 months or
24,OCO miles,Floor-Pan
-Clutch Pedal
Figure OC-7 GT Clutch Lash
drain, flush, and refill the cooline svstem with a new
coolant so&ion of permanent
6~; anti-freeze and
water for protection-of -20°F.
D-6 NOT REMOVE
RADIATOR CAP WHEN SOLUTION IS HOT
AND UNDER PRESSURE.
Wheel BearingsClean and repack front wheel bearings with a lubri-
cant as specified on the lubrication chart, Figure
oc-1.
Automatic Transmission FluidUnder normal driving conditions, change the trans-
mission fluid every 24,000 miles. Under unusual con-
ditions such as constant driving in heavy city traffic
during hot weather, trailer pulling, etc., this service
should be performed at
12,COO mile intervals.
General Motors DEXRON Automatic Transmis-
sion Fluid, which has been especially formulated and
tested for use in your automatic transmission, is
recommended. Other automatic transmission fluids
identified with the mark DEXRON are also recom-
mended.
Check the fluid level at each engine oil change
period. To make an accurate fluid level check:
1. Drive car several miles, making frequent starts and
stops, to bring transmission up to normal operating
temperature (approximately
180-190’F.)2. Park car on a level surface.
3. Place selector lever in “Park” and leave engine
running.
Page 68 of 625

LIGHTING SYSTEMSlF-472. Install switch in panel.
3. Replace instrument cluster cover.
EXTERIOR LIGHTSModels 51-53-54
Headlamp Sealed Beam Unit Removal1. Remove two screws on headlight ring.
2. Remove four screws holding headlight retainer to
body. See Figure lF-3.
Figure 1 F-l Removing Headlight Switch
I
3.
Rep& two (2) plugs over screws and replace
heater control knobs.
FOG LIGHT OR HEATED REAR GLASS SWITCHRemoval I
1. Removd instrument cluster cover. See Section H.
I
2. Press
ddwn retaining clip and pull switch out. See
Figure lF-2.
Figure 1 F-3 - Removing Headlight Retainer
- Models
51-53-54
3. Disconnect wiring connectors,
4. Remove headlight from inside engine compart-
ment.
Figure 1Fi2 - Removal of Fog Light or Heated Rear
Glass Switch
3. Removelwires from switch.
Installation/
1. Connect;wire to switch,
Installation1. Plug in wiring connector on sealed beam and re-
place four (4) headlight retaining screws.
2. Replace headlight ring.
Models 57-57R
Removal
I. Disconnect wiring connector.
2. Remove four screws holding headlight retainer
from inside engine compartment.
Page 79 of 625
1 H- 581973 OPEL SERVICE MANUAL
/-FOG LIGHT SWITCH IRALLYEi
\HEADLIGHT HIGH BEAM INDICATOR
-HAZARD WARNINGFLASHERINDICATORSYSTEM WARN,NGLlGHT
LWINDSHIELD WIPER SWlTCH -1 LFUEL&,UGELHEATER-DEFROSTER CONTROL
CHARGING INDICATOR LlGHTHEATER’ TEMPERATURE CONTROLHEATED REAR GLASS SWITCH1
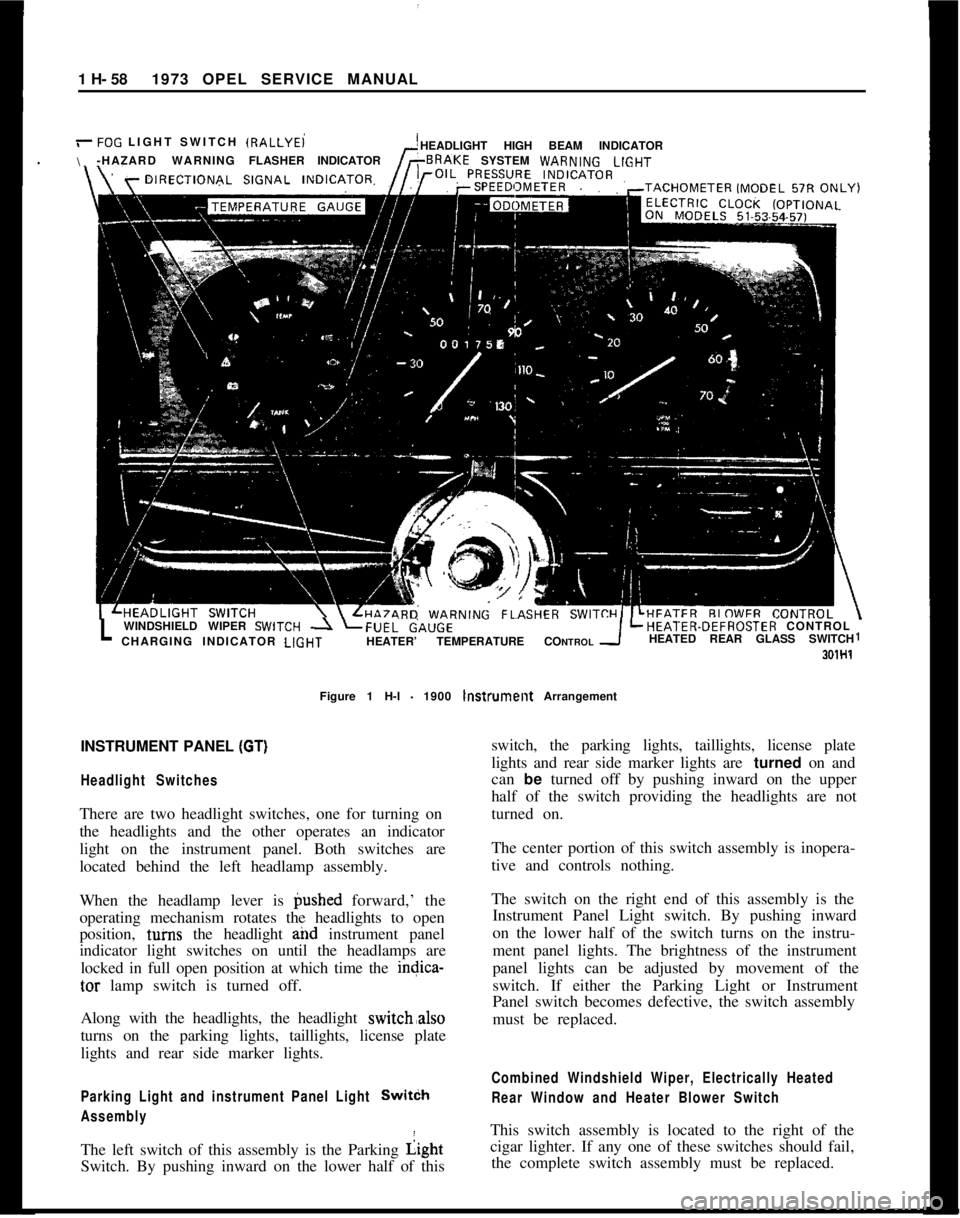
301H1Figure 1 H-l
- 1900 lnstrumellt Arrangement
INSTRUMENT PANEL
(GT)I
Headlight SwitchesThere are two headlight switches, one for turning on
the headlights and the other operates an indicator
light on the instrument panel. Both switches are
located behind the left headlamp assembly.
When the headlamp lever is @shed forward,’ the
operating mechanism rotates the headlights to open
position, tuins the headlight and instrument panel
indicator light switches on until the headlamps are
locked in full open position at which time the indica-
tar lamp switch is turned off.
Along with the headlights, the headlight switch,also
turns on the parking lights, taillights, license plate
lights and rear side marker lights.
Parking Light and instrument Panel Light SwitCh
AssemblyThe left switch of this assembly is the Parking Light
Switch. By pushing inward on the lower half of thisswitch, the parking lights, taillights, license plate
lights and rear side marker lights are turned on and
can be turned off by pushing inward on the upper
half of the switch providing the headlights are not
turned on.
The center portion of this switch assembly is inopera-
tive and controls nothing.
The switch on the right end of this assembly is the
Instrument Panel Light switch. By pushing inward
on the lower half of the switch turns on the instru-
ment panel lights. The brightness of the instrument
panel lights can be adjusted by movement of the
switch. If either the Parking Light or Instrument
Panel switch becomes defective, the switch assembly
must be replaced.
Combined Windshield Wiper, Electrically Heated
Rear Window and Heater Blower SwitchThis switch assembly is located to the right of the
cigar lighter. If any one of these switches should fail,
the complete switch assembly must be replaced.
Page 80 of 625

/
I
IINSTRUMENT PANELlH- 59
Figure 1 H-2
- GT Instrument and Switch Arrangement
The Wihdshield Wipers have two-speed operation.
By pushing the lower half of the switch inward to the
first stop, the wipers will operate at half speed and
by deprbssing to the second stop will provide full
speed oieration. When the switch is returned to the
off posit/on, the wiper blades automatically return to
their park position.
I
The El
this optlpn. The engine must be running before
suffi-cient current can be generated to energize this circuit
even th6ugh the switch is depressed to the “ON”
position! When the window is being heated, a warm-
ing light’on the instrument panel will glow. This light
is locate? below the left ventilation inlet.
The
Heiter Blower Switch is a three position switch.
By depressing the lower half of the switch to the first
stop,
th& blower will operate at low speed. Whendepressdd to the second stop, the blower will operate
at high ipeed.
Four Way Hezrerd Warning Flasher SwitchThe
hazard warning flasher switch is located below
the heater controls in the center console. By
depress-ing the lower half of the switch, all four turn- signal
lamps flash at the same time. Although this system
makes use of the regulat turn signal system, it has a
separate feed wire to the switch which allows for its
operation even with the ignition switch and doors
locked. No vehicle should be driven with this system
in operation because of its universal meaning “This
Vehicle Is Not Moving”. To turn the system off,
simply depress the upper half of the switch.
MAJOR REPAIR
Removal of Instrument Cluster Housing Assembly.Opel 1900 Manta
Before starting any instrument panel repair, always
disconnect battery ground cable first.
I
Page 81 of 625

/
I1 H- 601973 OPEL SEW& MANUAL
1. Remove headlight switch button by depressing
retaining clip on shaft and pulling back on switch
knob. See Figure lH-3.
Figure 1 H-5
- Removing Cluster Screws
Figure lH-3
- Removing Headlight Switch Knob,
2. Remove two (2) plugs on cluster panel. See FigurelH-4.301H6
-Figure 1 H-4 Removing Plugs
3. Remove two (2) sheet metal screws behind plugs
on cluster. See Figure lH-5.
4. Pull off heater control knobs toward front.
j5. On top, carefully pull instrument ‘trim plate
:to-wards steering wheel and remove plate.
6. Remove two screws for lower housing
attach&t.See Figure lH-6.Figure 1 H-6 Lower Housing Attaching Screws
7. Disconnect speed0 cable at cluster by turning cou-
pling counterclockwise.
8. If equipped, pull heated rear window or fog lamp
switch out of instrument housing and disconnect
wires from switches.
9. Pull cluster right and left sides partially out and
disconnect wires on back of cluster. See Figure lH-7.
Installation
1.
P&e instrument cluster in position and connect
wires on back of cluster.
2. Pull fog light or heated back glass switch wires
into opening, if equipped, and connect wires and
replace switch.
3. Connect two screws on lower housing attachment.
Page 82 of 625

I
I
IINSTRUMENT PANELlH- 61Figwe 1 H-7
- Disconnecting Cluster Wires
4. Install instrument cluster trim plate and replace
two screw and plugs.
5. Con&t speed0 cable by turning coupling clock-
wise. 1
6. Install light
.switch button and heater control
knobs. I
I
7. Con+ct battery cable.
Removidg Windshield Wiper Switch - Opel 1900Manta I
1.
Rem* instrument cluster trim plate.
2. Corndress retaining clips and remove switch. See
Figure iH-8.
I
Figure lH-8 . Removing Windshield Wiper Switch3. Disconnect wiring connector.
Installation1. Connect wiring to switch.
2. Snap switch back into panel.
3. Replace instrument cluster trim plate.
Removing Instrument Cluster Bulbs - Opel 1900.
Manta1. Remove instrument cluster assembly.
2. Replace bulbs from back ofcluster. See Figure
lH-
9.Figure lH-9 Removing Instrument
Clu’ster Bulbs
Installation1. Replace bulbs in cluster.
2. Replace instrument cluster assembly.
Removing and Installing Ignition SwitchRefer to Group 3, Section F.
Removal of Instrument Cluster Housing Assembly.
GTDisconnect battery before making any electrical re-
pairs.
1. Disconnect battery cable.
2. Remove right access cover and remove screw. See
Figure lH-10.
Page 88 of 625
I
GAUGES1 I- 67I
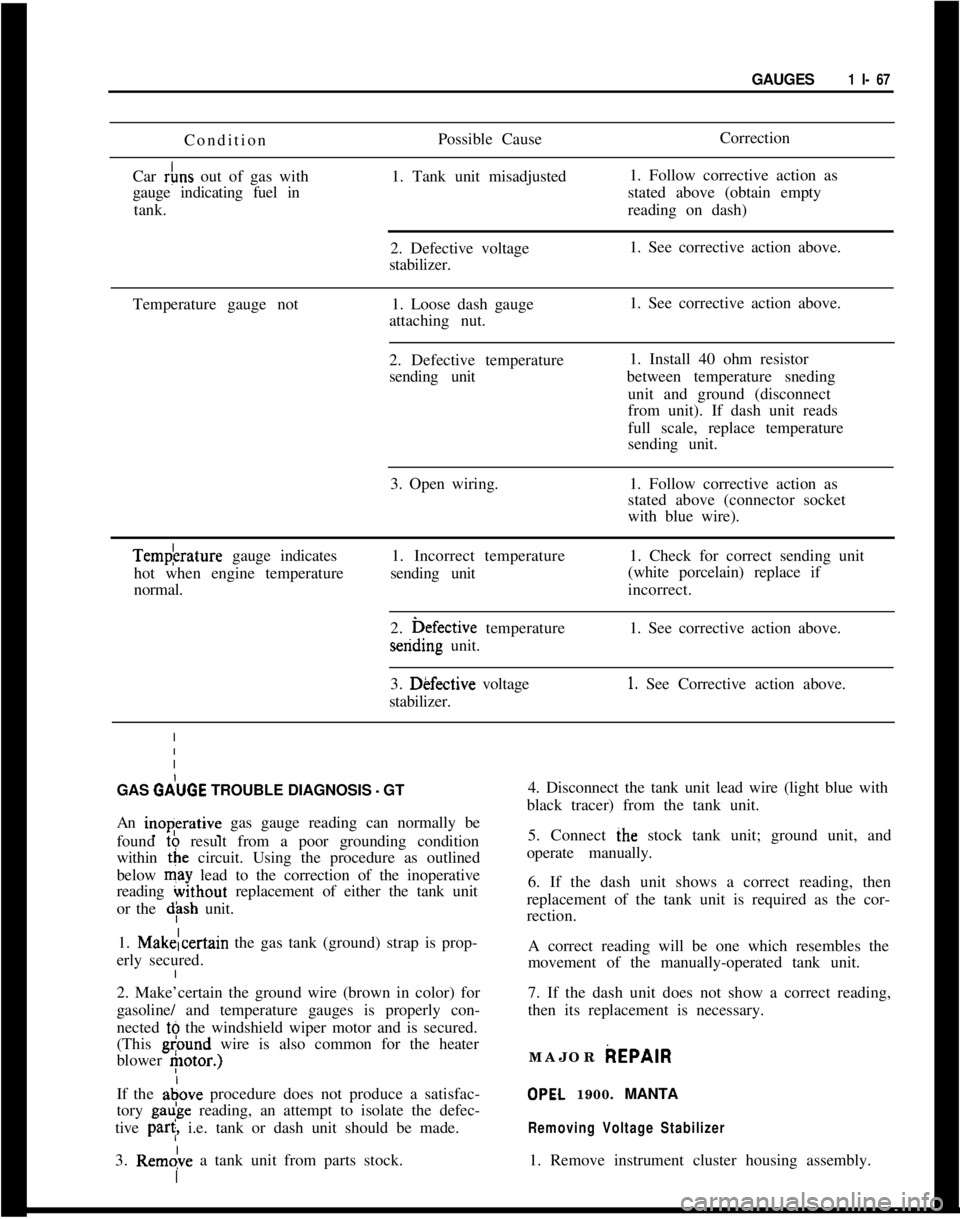
I Condition
Car
&s out of gas with
gauge indicating fuel in
tank. 1
I
I
I
I
IPossible Cause
1. Tank unit misadjusted
2. Defective voltage
stabilizer.Correction
1. Follow corrective action as
stated above (obtain empty
reading on dash)
1. See corrective action above.
Temperature gauge not1. Loose dash gauge1. See corrective action above.
Iattaching nut.
I
I
I2. Defective temperature1. Install 40 ohm resistor
Isending unitbetween temperature sneding
Iunit and ground (disconnect
I
from unit). If dash unit reads
I
full scale, replace temperature
Isending unit.
I
I
I3. Open wiring.1. Follow corrective action as
Istated above (connector socket
Iwith blue wire).Tempkrature gauge indicates
hot when engine temperature1. Incorrect temperature1. Check for correct sending unit
sending unit
normal.(white porcelain) replace if
incorrect.
2. i>efective temperaturesending unit.1. See corrective action above.
3. Dkfective voltage
stabilizer.
1. See Corrective action above.
GAS
GdUGE TROUBLE DIAGNOSIS - GT4. Disconnect the tank unit lead wire (light blue with
black tracer) from the tank unit.
An inoperative gas gauge reading can normally be
found to result from a poor grounding condition
within the circuit. Using the procedure as outlined
below may lead to the correction of the inoperative
reading without replacement of either the tank unit
or the
dph unit.5. Connect ihe stock tank unit; ground unit, and
operate manually.
6. If the dash unit shows a correct reading, then
replacement of the tank unit is required as the cor-
rection.
1. Makelcertain the gas tank (ground) strap is prop-
erly secured.A correct reading will be one which resembles the
movement of the manually-operated tank unit.
2. Make’certain the ground wire (brown in color) for
gasoline/ and temperature gauges is properly con-
nected tb the windshield wiper motor and is secured.
(This
gl?ound wire is also common for the heater
blower
etor.)7. If the dash unit does not show a correct reading,
then its replacement is necessary.
If the adove procedure does not produce a satisfac-
tory gaube reading, an attempt to isolate the defec-
tive
par<, i.e. tank or dash unit should be made.
3. Rem&e a tank unit from parts stock.MAJOR
AEPAIR
OPEL 1900. MANTA
Removing Voltage Stabilizer1. Remove instrument cluster housing assembly.
Page 297 of 625
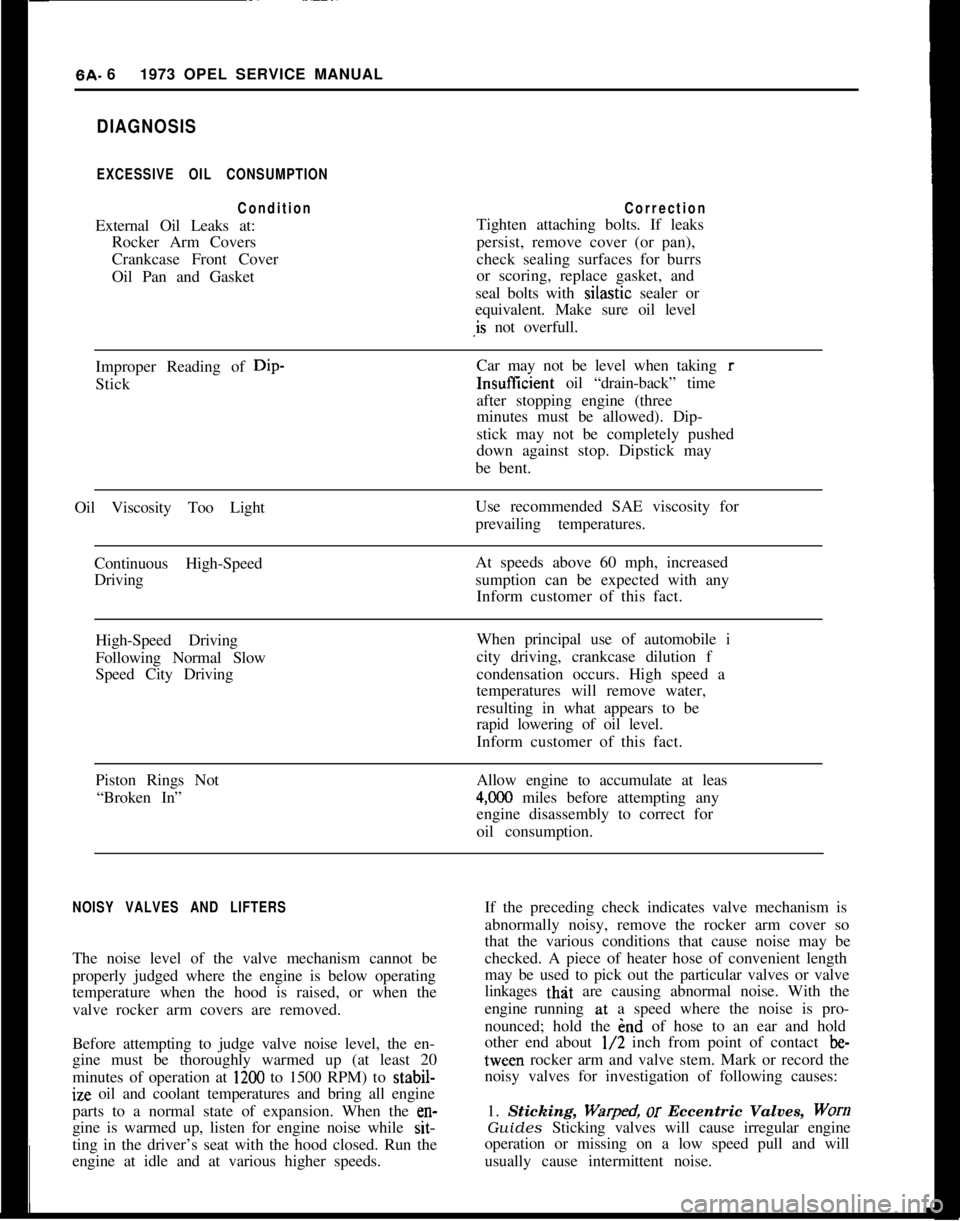
6A. 61973 OPEL SERVICE MANUALDIAGNOSIS
EXCESSIVE OIL CONSUMPTION
ConditionCorrectionExternal Oil Leaks at:Tighten attaching bolts. If leaks
Rocker Arm Coverspersist, remove cover (or pan),
Crankcase Front Covercheck sealing surfaces for burrs
Oil Pan and Gasketor scoring, replace gasket, and
seal bolts with silastic sealer or
equivalent. Make sure oil level
,is not overfull.
Improper Reading of Dip-Car may not be level when taking r
StickInsuffIcient oil “drain-back” time
after stopping engine (three
minutes must be allowed). Dip-
stick may not be completely pushed
down against stop. Dipstick may
be bent.
Oil Viscosity Too LightUse recommended SAE viscosity for
prevailing temperatures.
Continuous High-SpeedAt speeds above 60 mph, increased
Drivingsumption can be expected with any
Inform customer of this fact.
High-Speed DrivingWhen principal use of automobile i
Following Normal Slowcity driving, crankcase dilution f
Speed City Drivingcondensation occurs. High speed a
temperatures will remove water,
resulting in what appears to be
rapid lowering of oil level.
Inform customer of this fact.
Piston Rings NotAllow engine to accumulate at leas
“Broken In”
4,OCO miles before attempting any
engine disassembly to correct for
oil consumption.
NOISY VALVES AND LIFTERSIf the preceding check indicates valve mechanism is
abnormally noisy, remove the rocker arm cover so
that the various conditions that cause noise may be
The noise level of the valve mechanism cannot bechecked. A piece of heater hose of convenient length
properly judged where the engine is below operatingmay be used to pick out the particular valves or valve
temperature when the hood is raised, or when thelinkages
thit are causing abnormal noise. With the
valve rocker arm covers are removed.engine running at a speed where the noise is pro-
nounced; hold the end of hose to an ear and hold
Before attempting to judge valve noise level, the en-other end about
l/2 inch from point of contact be-
gine must be thoroughly warmed up (at least 20tween rocker arm and valve stem. Mark or record the
minutes of operation at
1200 to 1500 RPM) to stabil-noisy valves for investigation of following causes:ize oil and coolant temperatures and bring all engine
parts to a normal state of expansion. When the
en-1. Sticking, Warped, or Eccentric Valves, Worngine is warmed up, listen for engine noise while
sit-Guides Sticking valves will cause irregular engine
ting in the driver’s seat with the hood closed. Run theoperation or missing on a low speed pull and will
engine at idle and at various higher speeds.usually cause intermittent noise.
Page 299 of 625
6A- 8 1973 OPEL SERVICE MANUAL
Actual adjustment is made by backing off adjusting
nut at the rocker arm until clearance exists between the valve stem, rocker arm, and lifter. Then slowly
tighten adjusting nut until clearance is eliminated.
When clearance is eliminated, turn adjusting nut one
full turn (clockwise). This positions the hydraulic
piston of the hydraulic lifter mid-point in its total
available travel, and no further adjustment is re-
quired.
MAJOR REPAIR
ENGINE ASSEMBLY REMOVAL AND
INSTALLATION
Removal (Opel 1900 and Manta)’
The engine assembly on the Opel 1900 and Manta
can be removed together with the transmission
through the top of the engine compartment.
1. Remove hood (scribe hood hinge to hood mount-
ing location).
2. Disconnect battery negative cable.
3. Drain coolant at lower radiator hose.
4. Remove upper and lower radiator hoses.
5. Remove radiator and fan
shrbud.
6. Disconnect heater hoses.
7. Disconnect brake booster
vacuum hose.
8. Remove air cleaner.
9. Disconnect electrical connections and accelerator
linkage. 10. Remove console.
11. Remove shift lever boot, plate, and shift lever.
12. Raise car on hoist.
13. Disconnect fuel line at pump.
14. Remove front stone shield.
15. Disconnect speedo-cable, back-up light switch,
and clutch cable.
16. Remove drive shaft. I
17. Disconnect exhaust pipe
ar$l bell housing sup-
port.
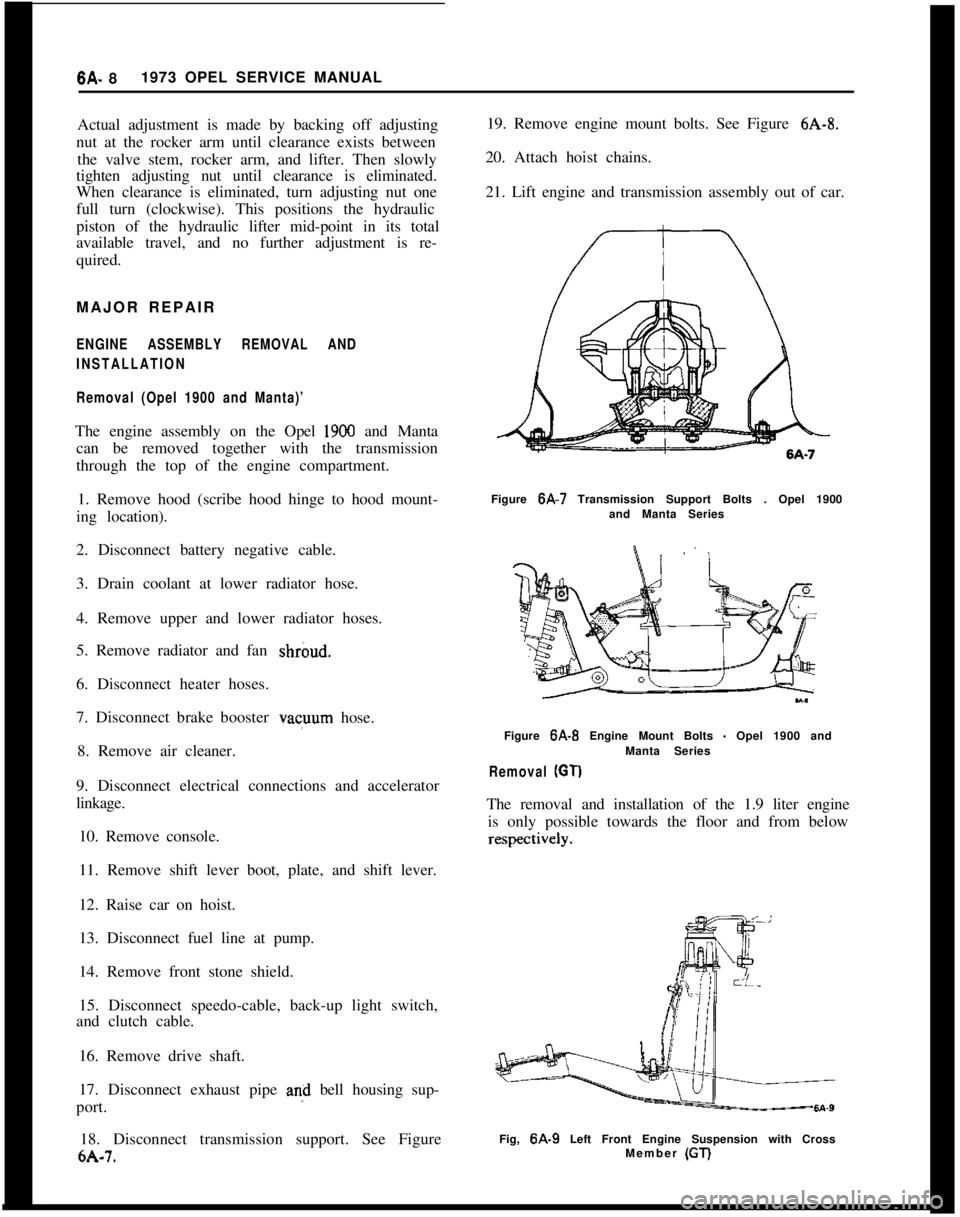
18. Disconnect transmission support. See Figure
6A-7. 19. Remove engine mount bolts. See Figure
6A-8.
20. Attach hoist chains.
21. Lift engine and transmission assembly out of car.
Figure 6A-7 Transmission Support Bolts . Opel 1900
and Manta Series
Figure
6A-B Engine Mount Bolts - Opel 1900 and
Manta Series
Removal (GT)
The removal and installation of the 1.9 liter engine is only possible towards the floor and from below
Fig, 6A-9 Left Front Engine Suspension with Cross
Member (GT)