trailer OPEL INSIGNIA 2014 Manual user
[x] Cancel search | Manufacturer: OPEL, Model Year: 2014, Model line: INSIGNIA, Model: OPEL INSIGNIA 2014Pages: 321, PDF Size: 8.95 MB
Page 34 of 321
32Keys, doors and windows
Adjust reduced opening height in
intermediate mode
1. Turn operation mode switch to 3/4 .
2. Open power tailgate with any operation switch.
3. Stop movement at the desired height by pressing any operation
switch. If required, manually move
the stopped tailgate to the desired position.
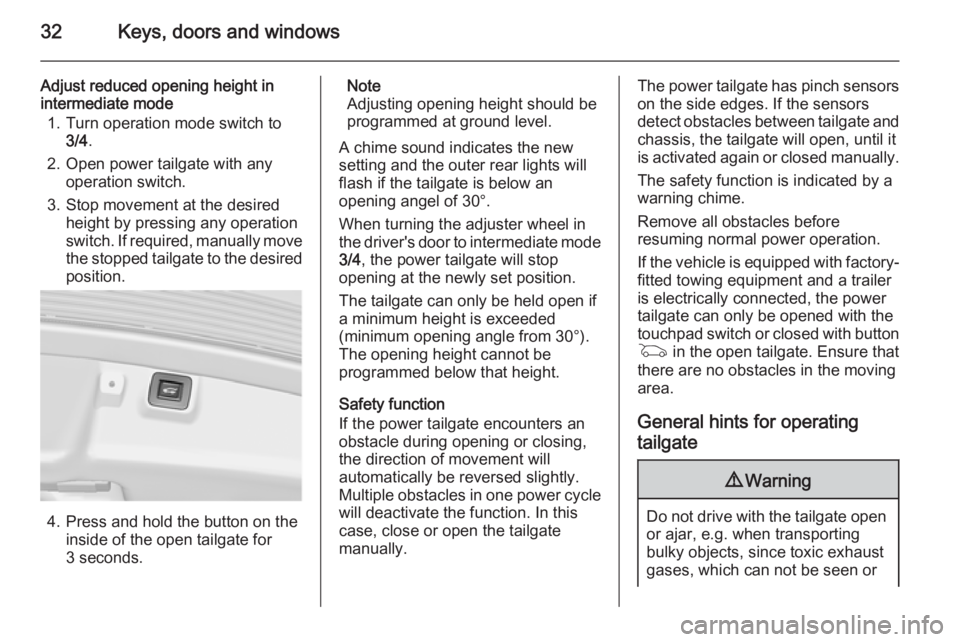
4. Press and hold the button on the
inside of the open tailgate for
3 seconds.
Note
Adjusting opening height should be
programmed at ground level.
A chime sound indicates the new
setting and the outer rear lights will
flash if the tailgate is below an
opening angel of 30°.
When turning the adjuster wheel in
the driver's door to intermediate mode 3/4 , the power tailgate will stop
opening at the newly set position.
The tailgate can only be held open if a minimum height is exceeded
(minimum opening angle from 30°).
The opening height cannot be
programmed below that height.
Safety function
If the power tailgate encounters an
obstacle during opening or closing,
the direction of movement will
automatically be reversed slightly.
Multiple obstacles in one power cycle
will deactivate the function. In this
case, close or open the tailgate
manually.The power tailgate has pinch sensors
on the side edges. If the sensors
detect obstacles between tailgate and chassis, the tailgate will open, until it
is activated again or closed manually.
The safety function is indicated by a
warning chime.
Remove all obstacles before
resuming normal power operation.
If the vehicle is equipped with factory- fitted towing equipment and a trailer
is electrically connected, the power
tailgate can only be opened with the
touchpad switch or closed with button
G in the open tailgate. Ensure that
there are no obstacles in the moving
area.
General hints for operating
tailgate9 Warning
Do not drive with the tailgate open
or ajar, e.g. when transporting
bulky objects, since toxic exhaust
gases, which can not be seen or
Page 40 of 321

38Keys, doors and windows
This function can be activated or
deactivated in the Vehicle
personalisation.
Select the relevant setting in Settings,
I Vehicle in the Colour-Info-Display.
Colour-Info-Display 3 114.
Vehicle personalisation 3 118.
The settings are automatically stored
for the key being used 3 23.
Heated mirrors
Operated by pressing the Ü button.
The LED in the button indicates
activation.
Heating works with the engine
running and is switched off
automatically after a short time.
Automatic dimming Dazzling by following vehicles at nightis automatically reduced by dimming
both exterior mirrors.
Parking assist
For mirrors with position memory, the exterior mirror on the passenger side
is automatically aimed at the rear
tyres as a parking aid when reverse
gear is selected, except during trailer
operation.
Position memory 3 50.
Activation or deactivation of this
function can be changed in the menu Settings in the Info-Display. Vehicle
personalisation 3 118.Interior mirrors
Manual anti-dazzle
To reduce dazzle, adjust the lever on the underside of the mirror housing.
Page 102 of 321
100Instruments and controlsControl indicators
The control indicators described are
not present in all vehicles. The
description applies to all instrument
versions. Depending on the
equipment, the position of the control indicators may vary. When the
ignition is switched on, most control
indicators will illuminate briefly as a functionality test.
The control indicator colours mean:red=danger, important
reminderyellow=warning, information, faultgreen=confirmation of activationblue=confirmation of activationwhite=confirmation of activation
See all control indicators on different
instrument clusters 3 91.
Turn signal
O illuminates or flashes green.
Illuminates briefly
The parking lights are switched on.
Flashes
A turn signal or the hazard warningflashers are activated.
Rapid flashing: failure of a turn signal
light or associated fuse, failure of turn
signal light on trailer.
Bulb replacement 3 222, Fuses
3 232.
Turn signals 3 128.
Seat belt reminder Seat belt reminder on frontseats X for driver's seat illuminates or
flashes red in the instrument cluster.
k for front passenger seat illuminates
or flashes red in the centre console,
when seat is occupied.
Illuminates
After the ignition has been switched
on until the seat belt has been
fastened.Flashes
After having started the engine for a
maximum of 100 seconds until the
seat belt has been fastened.
Seat belt status on rear seats,
base level instrument cluster
X flashes or illuminates in the Driver
Information Centre.
Illuminates
After the ignition has been switched
on when the seat belt has been
fastened.
Flashes
After starting off when the seat belt is unfastened.
Fastening the seat belt 3 55.
Seat belt status on rear seats,
midlevel and uplevel instrument cluster X illuminates red or green or grey in
the instrument cluster, after the
ignition has been switched on.
Page 119 of 321
Instruments and controls117
■ Ride control systems
■ Driver assistance systems
■ Cruise control
■ Speed limiter
■ Adaptive cruise control
■ Forward collision alert
■ Collision imminent braking system
■ Parking assist systems
■ Lighting, bulb replacement
■ Adaptive forward lighting
■ Wiper/washer system
■ Doors, windows
■ Side blind spot alert
■ Traffic sign assistant
■ Lane departure warning
■ Load compartment, boot lid
■ Radio remote control
■ Electronic key system
■ Keyless starting
■ Seat belts
■ Airbag systems
■ Engine and transmission
■ Tyre pressure■ Diesel particle filter
■ Vehicle battery status
Messages in the
Colour-Info-Display
Some important messages may
appear additionally in the
Colour-Info-Display. Press the
multifunction knob to confirm a
message. Some messages only pop
up for a few seconds.
Warning chimes
When starting the engine or
whilst driving Only one warning chime will sound at
a time.
The warning chime regarding not
fastened seat belts has priority over
any other warning chime.
■ If seat belt is not fastened.
■ If a door or the tailgate is not fully closed when starting off.
■ If a certain speed is exceeded with parking brake applied.■ If adaptive cruise controldeactivates automatically.
■ If approaching a vehicle ahead too closely.
■ If a programmed speed or speed limit is exceeded.
■ If a warning message appears in the Driver Information Centre.
■ If the electronic key is not in the passenger compartment.
■ If the parking assist detects an object.
■ If an unintended lane change occurs.
■ If the diesel particle filter has reached the maximum filling level.
When the vehicle is parked and/ or the driver's door is opened ■ When the key is in the ignition switch.
■ With exterior lights on.
■ If the trailer hitch is not engaged.
Page 130 of 321
128Lighting
Fault in Adaptive forward
lighting system When the system detects a failure in
the Adaptive forward lighting system,
the system moves to a preset position to avoid dazzling of oncoming traffic.
If this is not possible, the affected
headlight will be automatically
switched off. In any case, one
headlight will stay on. A warning is
displayed in the Driver Information
Centre.
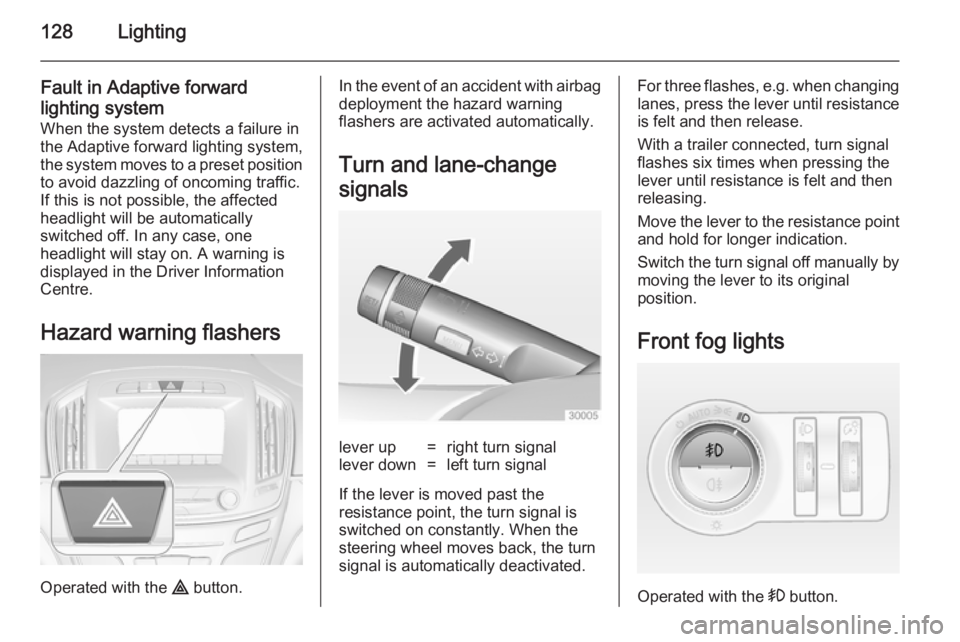
Hazard warning flashers
Operated with the ¨ button.
In the event of an accident with airbag
deployment the hazard warning
flashers are activated automatically.
Turn and lane-change
signalslever up=right turn signallever down=left turn signal
If the lever is moved past the
resistance point, the turn signal is
switched on constantly. When the
steering wheel moves back, the turn
signal is automatically deactivated.
For three flashes, e.g. when changing lanes, press the lever until resistance
is felt and then release.
With a trailer connected, turn signal
flashes six times when pressing the
lever until resistance is felt and then
releasing.
Move the lever to the resistance point
and hold for longer indication.
Switch the turn signal off manually by moving the lever to its original
position.
Front fog lights
Operated with the > button.
Page 150 of 321
148Driving and operatingDriving and operatingDriving hints............................... 148
Starting and operating ...............149
Engine exhaust .......................... 156
Automatic transmission .............. 157
Manual transmission ..................162
Drive systems ............................ 163
Brakes ........................................ 163
Ride control systems .................166
Driver assistance systems .........171
Fuel ............................................ 202
Trailer hitch ................................ 209Driving hints
Control of the vehicleNever coast with engine not
running (except during Autostop)
Many systems will not function in this
situation (e.g. brake servo unit, power steering). Driving in this manner is a
danger to yourself and others. All
systems function during an Autostop,
but there will be a controlled reduction
in power steering assist and vehicle
speed is reduced.
Stop-start system 3 153.
Pedals
To ensure the pedal travel is
uninhibited, there must be no mats in the area of the pedals.Steering
If power steering assist is lost
because the engine stops or due to a
system malfunction, the vehicle can
be steered but may require increased
effort.
Control indicator c 3 103.Caution
Vehicles equipped with hydraulic
power steering:
If the steering wheel is turned until it reaches the end of its travel, and
is held in that position for more
than 15 seconds, damage may occur to the power steering
system and there may be loss of
power steering assist.
Page 166 of 321
164Driving and operating
Fault9Warning
If there is a fault in the ABS, the
wheels may be liable to lock due
to braking that is heavier than
normal. The advantages of ABS are no longer available. During
hard braking, the vehicle can no longer be steered and may
swerve.
Have the cause of the fault remedied
by a workshop.
Parking brake
Manual parking brake
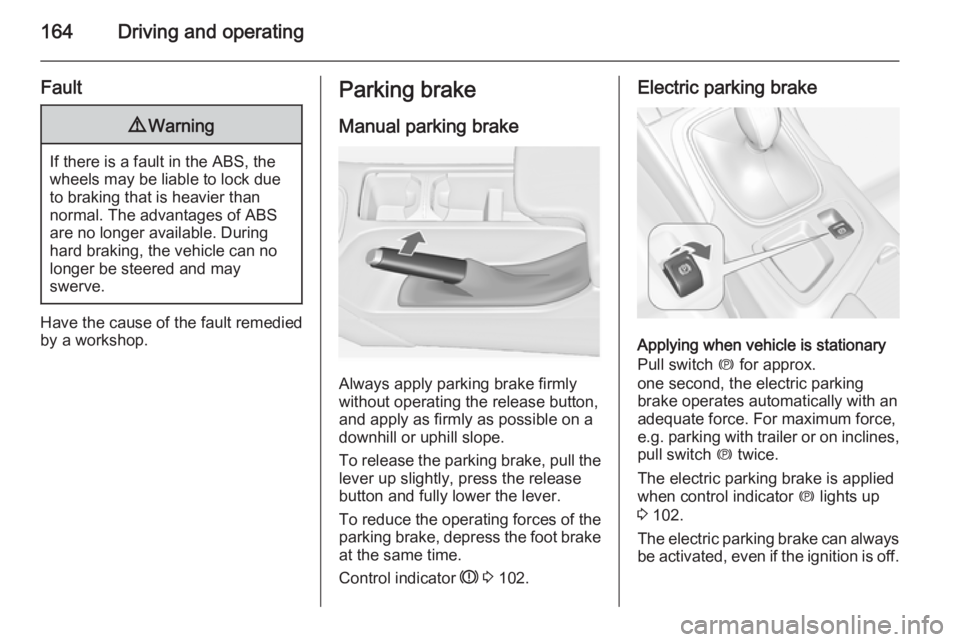
Always apply parking brake firmly
without operating the release button,
and apply as firmly as possible on a
downhill or uphill slope.
To release the parking brake, pull the lever up slightly, press the release
button and fully lower the lever.
To reduce the operating forces of the
parking brake, depress the foot brake
at the same time.
Control indicator R 3 102.
Electric parking brake
Applying when vehicle is stationary
Pull switch m for approx.
one second, the electric parking
brake operates automatically with an adequate force. For maximum force,
e.g. parking with trailer or on inclines,
pull switch m twice.
The electric parking brake is applied
when control indicator m lights up
3 102.
The electric parking brake can always
be activated, even if the ignition is off.
Page 182 of 321
180Driving and operating
brake the vehicle in time to avoid a
collision with a much slower vehicle or after a lane change. This is
particularly true if driving fast or if the
visibility is reduced due to weather
conditions.
While entering or exiting a motorway,
adaptive cruise control may lose the
vehicle ahead and accelerate up to
the set speed. For this reason,
decrease the set speed before the
exit or before the entry.
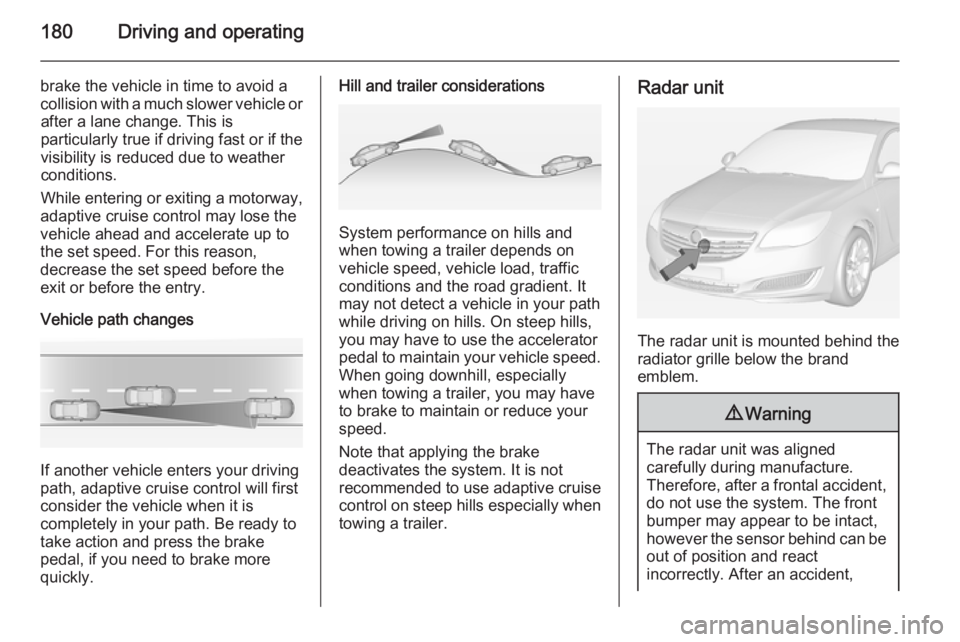
Vehicle path changes
If another vehicle enters your driving
path, adaptive cruise control will first
consider the vehicle when it is
completely in your path. Be ready to
take action and press the brake
pedal, if you need to brake more
quickly.
Hill and trailer considerations
System performance on hills and
when towing a trailer depends on
vehicle speed, vehicle load, traffic
conditions and the road gradient. It
may not detect a vehicle in your path
while driving on hills. On steep hills,
you may have to use the accelerator
pedal to maintain your vehicle speed.
When going downhill, especially
when towing a trailer, you may have
to brake to maintain or reduce your
speed.
Note that applying the brake
deactivates the system. It is not
recommended to use adaptive cruise
control on steep hills especially when towing a trailer.
Radar unit
The radar unit is mounted behind the
radiator grille below the brand
emblem.
9 Warning
The radar unit was aligned
carefully during manufacture.
Therefore, after a frontal accident, do not use the system. The front
bumper may appear to be intact,
however the sensor behind can be
out of position and react
incorrectly. After an accident,
Page 195 of 321
Driving and operating193
exterior mirror and extends rearwardsby approx. 3 metres. The height of the
zone is approx. between 0.5 metres
and 2 metres off the ground.
The system is deactivated if the
vehicle is towing a trailer.
Side blind spot alert is designed to ignore stationary objects such as
guardrails, posts, curbs, walls and
beams. Parked vehicles or oncoming vehicles are not detected.
Fault Occasional missed alerts can occurunder normal circumstances and will
increase in wet conditions.
Side blind spot alert does not operate when the left or right corners of the
rear bumper are covered with mud,
dirt, snow, ice, slush, or in heavy
rainstorms. Cleaning instructions
3 257.
In the event of a fault in the system or if the system does not work due to
temporary conditions, a message is
displayed in the Driver Information
Centre (DIC). Seek the assistance of
a workshop.Lane change alert
Additional to the side blind spot alert
3 191, lane change alert recognizes
rapidly approaching vehicles from
behind on parallel lanes next to your
vehicle.
If the vehicle is equipped with lane
change alert, side blind spot alert is
always included.
The system alerts visually in each
exterior mirror when detecting rapidly approaching vehicles from behind.
The radar distance sensors are
located in the rear bumper.9 Warning
Lane change alert does not
replace driver vision.
Before changing a lane, always
check all mirrors, look over the
shoulder and use the turn signal.
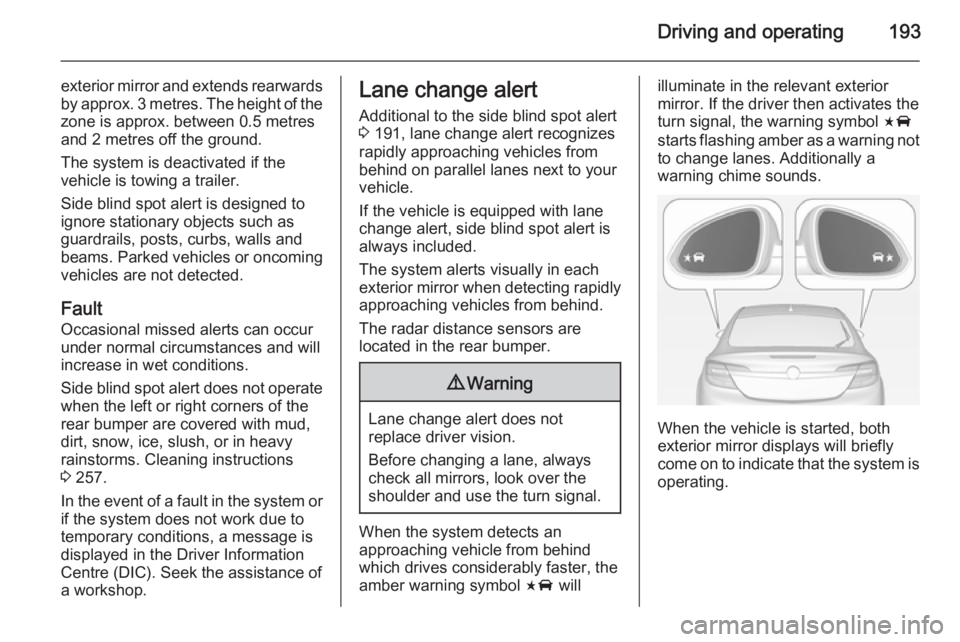
When the system detects an
approaching vehicle from behind
which drives considerably faster, the
amber warning symbol F will
illuminate in the relevant exterior
mirror. If the driver then activates the
turn signal, the warning symbol F
starts flashing amber as a warning not to change lanes. Additionally a
warning chime sounds.
When the vehicle is started, both
exterior mirror displays will briefly come on to indicate that the system is operating.
Page 196 of 321
194Driving and operating
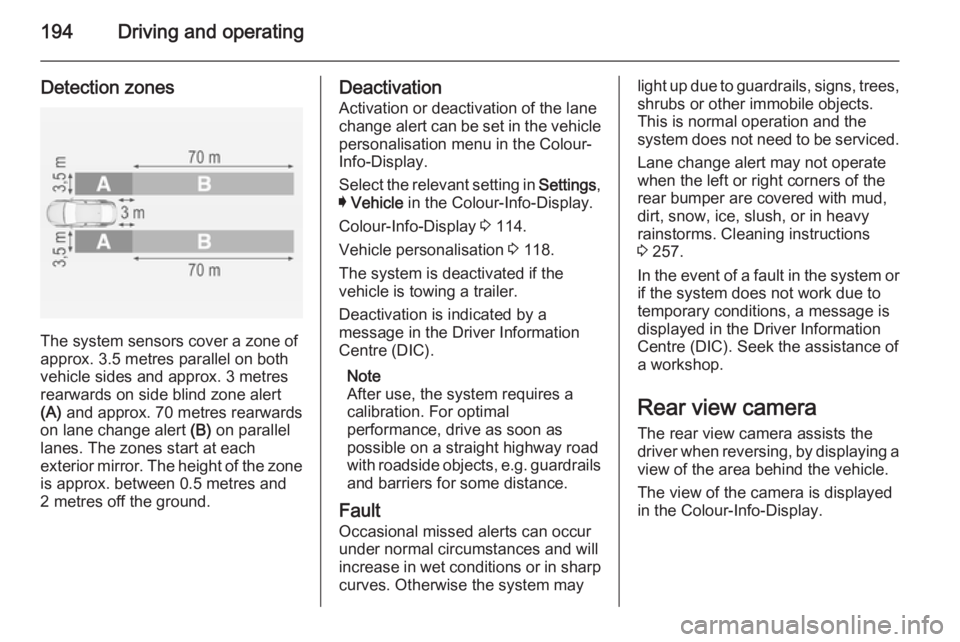
Detection zones
The system sensors cover a zone of
approx. 3.5 metres parallel on both
vehicle sides and approx. 3 metres
rearwards on side blind zone alert
(A) and approx. 70 metres rearwards
on lane change alert (B) on parallel
lanes. The zones start at each
exterior mirror. The height of the zone
is approx. between 0.5 metres and
2 metres off the ground.
Deactivation
Activation or deactivation of the lane
change alert can be set in the vehicle personalisation menu in the Colour-
Info-Display.
Select the relevant setting in Settings,
I Vehicle in the Colour-Info-Display.
Colour-Info-Display 3 114.
Vehicle personalisation 3 118.
The system is deactivated if the
vehicle is towing a trailer.
Deactivation is indicated by a
message in the Driver Information
Centre (DIC).
Note
After use, the system requires a
calibration. For optimal
performance, drive as soon as
possible on a straight highway road
with roadside objects, e.g. guardrails
and barriers for some distance.
Fault Occasional missed alerts can occurunder normal circumstances and will
increase in wet conditions or in sharp
curves. Otherwise the system maylight up due to guardrails, signs, trees,
shrubs or other immobile objects.
This is normal operation and the
system does not need to be serviced.
Lane change alert may not operate
when the left or right corners of the
rear bumper are covered with mud,
dirt, snow, ice, slush, or in heavy
rainstorms. Cleaning instructions
3 257.
In the event of a fault in the system or if the system does not work due to
temporary conditions, a message is
displayed in the Driver Information
Centre (DIC). Seek the assistance of
a workshop.
Rear view camera
The rear view camera assists the
driver when reversing, by displaying a view of the area behind the vehicle.
The view of the camera is displayed
in the Colour-Info-Display.