height OPEL INSIGNIA BREAK 2020 Manual user
[x] Cancel search | Manufacturer: OPEL, Model Year: 2020, Model line: INSIGNIA BREAK, Model: OPEL INSIGNIA BREAK 2020Pages: 315, PDF Size: 9.45 MB
Page 123 of 315

Instruments and controls121The image can temporarily light up
depending on angel and position of
sunlight.
Adjust rotation Select Options /% in the Driver
Information Center main menu.
Select submenu page
Head-Up Display . Press é on the
steering wheel to open adjustment dialogue. Press ä or å to turn
projection clockwise or counter-
clockwise. Press è to leave
adjustment dialogue.
Switching off Hold down & to turn the head-up
display off.
Language
Preferred language can be set in vehicle personalisation menu 3 123.
Units Units can be changed in the settings
menu of the Driver Information Centre
3 111.Care of head-up display
Clean the inside of the windscreen as
needed to remove any dirt or film that
could reduce the sharpness or clarity
of the head-up image.
Clean the head-up display lens in the instrument panel with a soft cloth
sprayed with glass cleaner. Wipe the
lens gently, then dry it.
System limitations Head-up display may not operate
properly when:
● The lens in the instrument panel is covered by objects or
windscreen and lens are not
clean.
● Display brightness is too dim or bright.
● Image is not adjusted to the proper height.
● The driver wears polarised sunglasses.
If the head-up image is not correct for other reasons, contact a workshop.
The windscreen is part of the head-up display system.Windscreen replacement 3 41.
Page 210 of 315

208Driving and operatingDetection zones
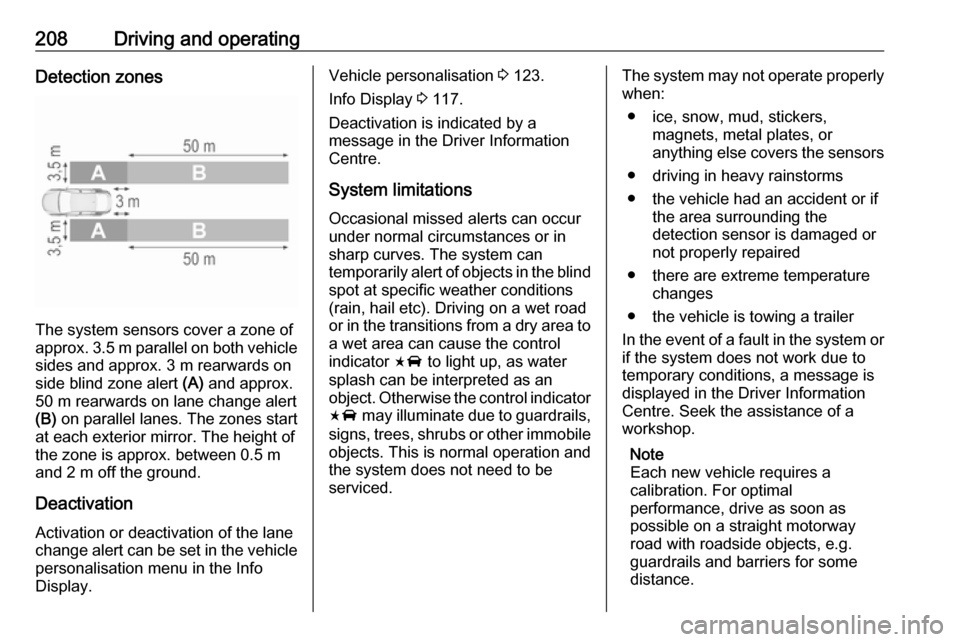
The system sensors cover a zone of
approx. 3.5 m parallel on both vehicle
sides and approx. 3 m rearwards on
side blind zone alert (A) and approx.
50 m rearwards on lane change alert (B) on parallel lanes. The zones start
at each exterior mirror. The height of
the zone is approx. between 0.5 m
and 2 m off the ground.
Deactivation Activation or deactivation of the lane
change alert can be set in the vehicle personalisation menu in the Info
Display.
Vehicle personalisation 3 123.
Info Display 3 117.
Deactivation is indicated by a
message in the Driver Information
Centre.
System limitations
Occasional missed alerts can occur
under normal circumstances or in
sharp curves. The system can
temporarily alert of objects in the blind spot at specific weather conditions
(rain, hail etc). Driving on a wet road
or in the transitions from a dry area to a wet area can cause the control
indicator F to light up, as water
splash can be interpreted as an object. Otherwise the control indicator
F may illuminate due to guardrails,
signs, trees, shrubs or other immobile
objects. This is normal operation and
the system does not need to be
serviced.The system may not operate properly
when:
● ice, snow, mud, stickers, magnets, metal plates, or
anything else covers the sensors
● driving in heavy rainstorms
● the vehicle had an accident or if the area surrounding the
detection sensor is damaged or
not properly repaired
● there are extreme temperature changes
● the vehicle is towing a trailer
In the event of a fault in the system or if the system does not work due to
temporary conditions, a message is
displayed in the Driver Information
Centre. Seek the assistance of a
workshop.
Note
Each new vehicle requires a
calibration. For optimal
performance, drive as soon as
possible on a straight motorway road with roadside objects, e.g.
guardrails and barriers for some
distance.
Page 233 of 315

Vehicle care231Vehicle checks
Performing work9 Warning
Only perform engine compartment
checks when the ignition is off.
The cooling fan may start
operating even if the ignition is off.
9 Danger
The ignition system uses
extremely high voltage. Do not
touch.
Bonnet
Opening
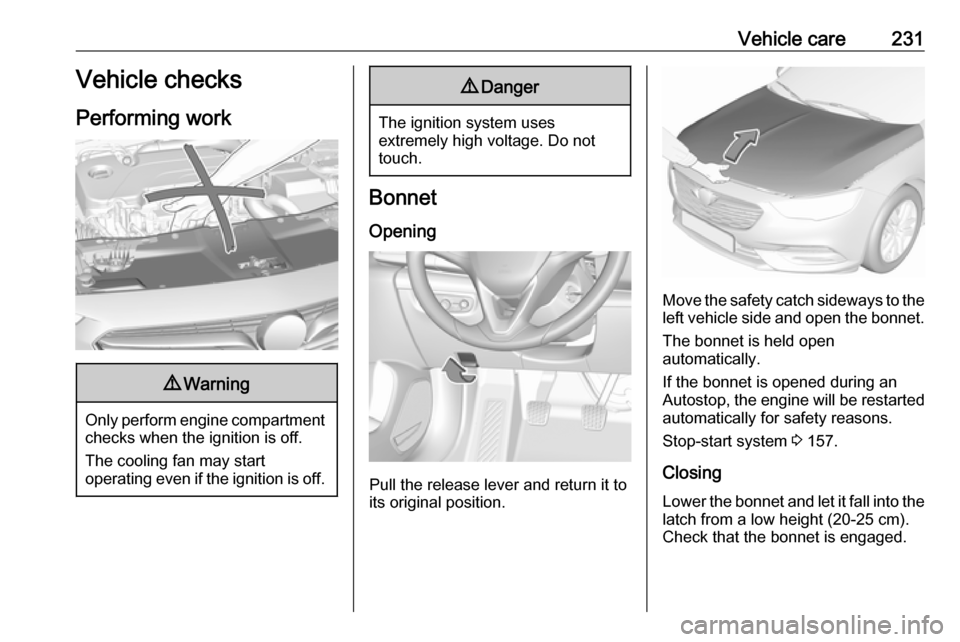
Pull the release lever and return it to
its original position.
Move the safety catch sideways to the left vehicle side and open the bonnet.
The bonnet is held open
automatically.
If the bonnet is opened during an
Autostop, the engine will be restarted automatically for safety reasons.
Stop-start system 3 157.
Closing Lower the bonnet and let it fall into the
latch from a low height (20-25 cm).
Check that the bonnet is engaged.
Page 257 of 315

Vehicle care255GSi with Michelin Pilot Super Sport or
Pilot Sport 4 S tyres
This model is factory-fitted with high
performance sports tyres, which have
a reduced performance at low
temperature.9 Danger
Use winter tyres at temperatures
below 0 °C, otherwise damage of
the high performance sports tyres
is possible.
Tyre designations
E.g. 215/60 R 16 95 V
215:tyre width, mm60:cross-section ratio (tyre height
to tyre width), %R:belt type: RadialRF:type: RunFlat16:wheel diameter, inches95:load index e.g. 95 is equivalent
to 690 kgV:speed code letter
Speed code letter:
Q:up to 160 km/hS:up to 180 km/hT:up to 190 km/hH:up to 210 km/hV:up to 240 km/hW:up to 270 km/h
Choose a tyre appropriate for the
maximum speed of this vehicle. Refer
to the EEC Certificate of Conformity
provided with the vehicle or other
national registration documents.
Optional equipment could reduce the
maximum speed of the vehicle.
Directional tyres
Directional tyres should be mounted
so that they rotate in the correct
direction. The proper rotation
direction is indicated by a symbol (e.g. an arrow) on the sidewall.
Tyre pressure
Check the pressure of cold tyres at
least every 14 days and before any
long journey. Do not forget the spare
wheel.
This also applies to vehicles with tyre pressure monitoring system.
Tyre pressure 3 293.
The tyre pressure information label
on the left door frame indicates the
original equipment tyres and the
correspondent tyre pressures.
The tyre pressure data refers to cold
tyres. It applies to summer and winter tyres.
Always inflate the spare tyre to the
pressure specified for full load.
The ECO tyre pressure serves to
achieve the smallest amount of fuel
consumption possible.
Make sure tyre loading setting
matches the current tyre pressure.
Tyre loading 3 256.
Page 270 of 315

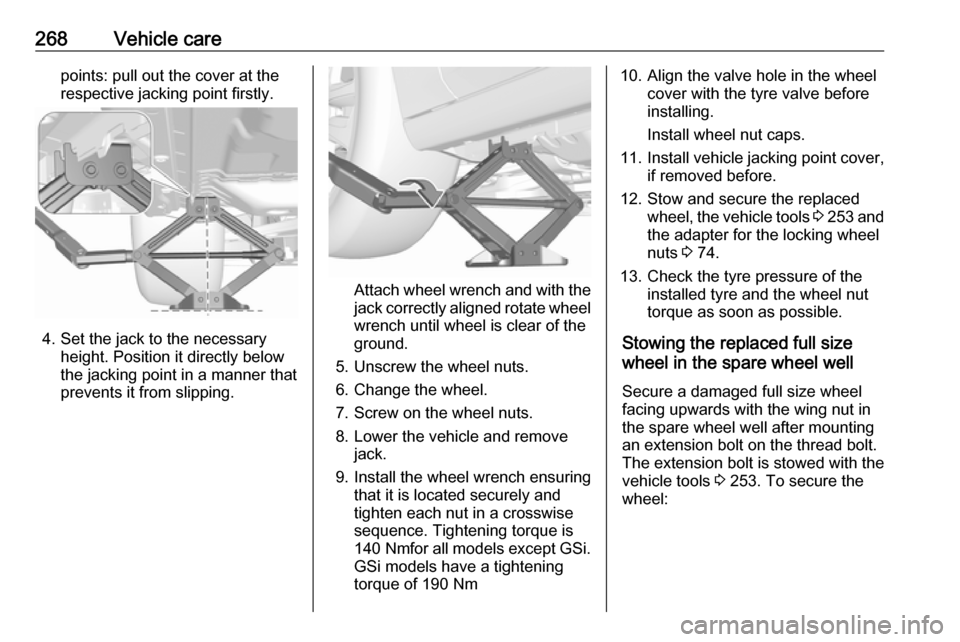
268Vehicle carepoints: pull out the cover at the
respective jacking point firstly.
4. Set the jack to the necessary height. Position it directly below
the jacking point in a manner that
prevents it from slipping.
Attach wheel wrench and with the
jack correctly aligned rotate wheel wrench until wheel is clear of the
ground.
5. Unscrew the wheel nuts. 6. Change the wheel.
7. Screw on the wheel nuts.
8. Lower the vehicle and remove jack.
9. Install the wheel wrench ensuring that it is located securely and
tighten each nut in a crosswise
sequence. Tightening torque is
140 Nm for all models except GSi.
GSi models have a tightening
torque of 190 Nm
10. Align the valve hole in the wheel cover with the tyre valve before
installing.
Install wheel nut caps.
11. Install vehicle jacking point cover,
if removed before.
12. Stow and secure the replaced wheel, the vehicle tools 3 253 and
the adapter for the locking wheel
nuts 3 74.
13. Check the tyre pressure of the installed tyre and the wheel nut
torque as soon as possible.
Stowing the replaced full size
wheel in the spare wheel well
Secure a damaged full size wheel facing upwards with the wing nut in
the spare wheel well after mounting
an extension bolt on the thread bolt.
The extension bolt is stowed with the
vehicle tools 3 253. To secure the
wheel:
Page 293 of 315
![OPEL INSIGNIA BREAK 2020 Manual user Technical data291Vehicle dimensionsGrand SportSports Tourer, Country TourerLength min.-max. [mm]4897-49104986-50045)Width with folded exterior mirrors [mm]19411941Width with unfolded exterior mirrors OPEL INSIGNIA BREAK 2020 Manual user Technical data291Vehicle dimensionsGrand SportSports Tourer, Country TourerLength min.-max. [mm]4897-49104986-50045)Width with folded exterior mirrors [mm]19411941Width with unfolded exterior mirrors](/img/37/18874/w960_18874-292.png)
Technical data291Vehicle dimensionsGrand SportSports Tourer, Country TourerLength min.-max. [mm]4897-49104986-50045)Width with folded exterior mirrors [mm]19411941Width with unfolded exterior mirrors [mm]20932093Height (without antenna) [mm]1425-1485 6)1450-1550 6)Vehicle height - Rear compartment open [mm]21282065-2088 5)Length of load compartment floor [mm]11331178Length of load compartment with folded rear seats [mm]19372005Load compartment width [mm]10301030Load compartment height [mm]497384Wheelbase [mm]28292829Turning circle diameter [m]11.7511.755)
Minimum length for standard version, maximum length for Country Tourer version.
6) Depending on body- and equipment variants.