engine OPEL INSIGNIA BREAK 2020 Manual user
[x] Cancel search | Manufacturer: OPEL, Model Year: 2020, Model line: INSIGNIA BREAK, Model: OPEL INSIGNIA BREAK 2020Pages: 315, PDF Size: 9.45 MB
Page 163 of 315

Driving and operating161Automatic cleaning processThe exhaust filter system filters soot
particles out of the exhaust gases.
The system includes a self-cleaning
function that runs automatically
during driving without any notification.
The filter is cleaned by periodically
burning off the soot particles at high
temperature. This process takes
place automatically under set driving
conditions and may take up to
25 minutes. Typically it needs
between 7 and 12 minutes. Autostop
is not available and fuel consumption may be higher during this period. The
emission of smells and smoke during
this process is normal.
System requires cleaning Under certain conditions, e.g. driving
short distances, the system cannot
clean itself automatically.
If cleaning of the filter is required and if previous driving conditions did not
enable automatic cleaning, it will be
indicated by a warning message in
the Driver Information Centre.A warning message appears when
exhaust filter is full. Start cleaning
process as soon as possible.
A warning message also appears
when exhaust filter has reached the
maximum filling level. Start cleaning
process immediately to avoid
damage to the engine.
Activate self-cleaning process
Cleaning process is completed more
quickly at high engine speeds and loads. Therefore, drive in lower gears
than normal, and use manual gear
selection on vehicles with automatic
transmission. Usage of electrical
consumers like air conditioning and
heated windows to increase engine
load supports cleaning process.Caution
If possible, do not interrupt
cleaning process. Drive until
cleaning is completed to avoid the
need for service or repair by a
workshop.
Vehicles with petrol engine
To activate cleaning process,
continue driving, keep engine speed
above 2500 rpm. Shift down if
necessary.
Drive dynamically at different engine
speeds. Use engine brake for
deceleration, if possible.
Keep on driving until self-cleaning
operation is complete and the display
message disappears.Vehicles with diesel engine
To activate cleaning process,
continue driving, keep engine speed
above 2000 rpm, ideally and
continuously around 2500 rpm. Shift
down if necessary.
Keep on driving until self-cleaning
operation is complete and the display message disappears.
Page 164 of 315

162Driving and operatingCleaning process not possible
If cleaning is not possible for any
reason, control indicator Z
illuminates and a warning message
appears in the Driver Information
Centre. Engine power may be
reduced. Seek the assistance of a
workshop immediately.
Catalytic converter
The catalytic converter reduces the
amount of harmful substances in the
exhaust gases.Caution
Fuel grades other than those listed on pages 3 221, 3 286 could
damage the catalytic converter or
electronic components.
Unburnt petrol will overheat and
damage the catalytic converter.
Therefore avoid excessive use of the starter, running the fuel tank
dry and starting the engine by
pushing or towing.
In the event of misfiring, uneven
engine running, a reduction in engine performance or other unusual
problems, have the cause of the fault
rectified by a workshop as soon as
possible. In an emergency, driving
can be continued for a short period,
keeping vehicle speed and engine
speed low.
AdBlue
General information
The selective catalytic reduction
(BlueInjection) is a method to
substantially reduce the nitrogen
oxides in the exhaust emission. This
is achieved by injecting a Diesel
Exhaust Fluid (DEF) into the exhaust
system. The ammonia released by
the fluid reacts with nitrous gases
(NO x) from the exhaust and turns it
into nitrogen and water.
The designation of this fluid is
AdBlue ®
. It is a non-toxic, non-
flammable, colourless and odourless
fluid which consists of 32% urea and
68% water.9 Warning
Avoid contact of your eyes or skin
with AdBlue.
In case of eye or skin contact,
rinse off with water.
Caution
Avoid contact of the paintwork with AdBlue.
In case of contact, rinse off with water.
AdBlue freezes at a temperature of
approx. -11 °C. As the vehicle is
equipped with an AdBlue pre-heater,
the emissions reduction at low
temperatures is ensured. The AdBlue
pre-heater works automatically.
The typical AdBlue consumption is
approx. 2 l per 1000 km , but can also
be higher depending on driving
behaviour (e.g. high load or towing).
AdBlue tank The AdBlue tank level can be found in the display menu.
Page 165 of 315

Driving and operating163Level warnings
Depending on the calculated range of AdBlue, different messages are
displayed in the Driver Information Centre. The messages and the
restrictions are a legal requirement.
The first possible warning is AdBlue
Range: 2400 km .
This warning will show up once briefly with the calculated range. Driving is
possible without any restrictions.
The next warning level is entered with
a range below 1750 km. The
message with the current range will
always be displayed when ignition is
switched on and needs to be
confirmed 3 111 . Refill AdBlue before
entering the next warning level.
At an AdBlue range below 900 km,
the following warning messages are
alternately displayed and cannot be
dismissed:
● AdBlue Low Refill Now
● Engine Restart Prevented in
900 km .
Additionally, control indicator Y
flashes continuously.Note
In case of high AdBlue consumption, the Driver Information Centre may
display this warning without the
previous warning stages.
The last warning level is entered
when the AdBlue tank is empty.
Restart of the engine is not possible.
The following warning messages are
alternately displayed and cannot be
dismissed:
● AdBlue Empty Refill Now
● Engine Will Not Restart .
Additionally, control indicator Y
flashes continuously.
With active prevention of an engine
start, the following message will be
displayed:
Refill AdBlue To Start Vehicle .
The tank must be refilled completely
with AdBlue, otherwise restarting of
the engine is not possible 3 291.High emission warnings
If the exhaust emission rises above a certain value, warnings similar to the
range warnings will be displayed in
the Driver Information Centre.
Requests to have the exhaust system checked and finally the
announcement of the prevention of
an engine restart are displayed.
These restrictions are a legal
requirement.
Consult a workshop for assistance.
Refilling AdBlueCaution
Only use AdBlue that complies
with European standards
DIN 70 070 and ISO 22241-1.
Do not use additives.
Do not dilute AdBlue.
Otherwise the selective catalytic
reduction system could be
damaged.
Page 166 of 315

164Driving and operatingNote
Whenever a filling pump with a
nozzle for passenger cars is not
available at a filling station, use only
AdBlue bottles or canisters with a
sealed refill adapter for refilling, to
prevent splashback and overspill,
and in order to ensure that the fumes
from the tank are captured and do
not emerge. AdBlue in bottles or
canisters is available in many filling
stations and can be purchased e.g. at Opel dealers and other retail
outlets.
Since AdBlue has a limited
durability, check the date of expiry
before refilling.
Note
When unscrewing the protective cap from the filler neck, ammonia fumesmay emerge. Do not inhale as the
fumes have a pungent smell. The
fumes are not harmful by inhalation.
The AdBlue tank should be filled
completely. This must be done if the
warning message regarding
prevention of an engine restart is
already displayed.The vehicle must be parked on a level surface.
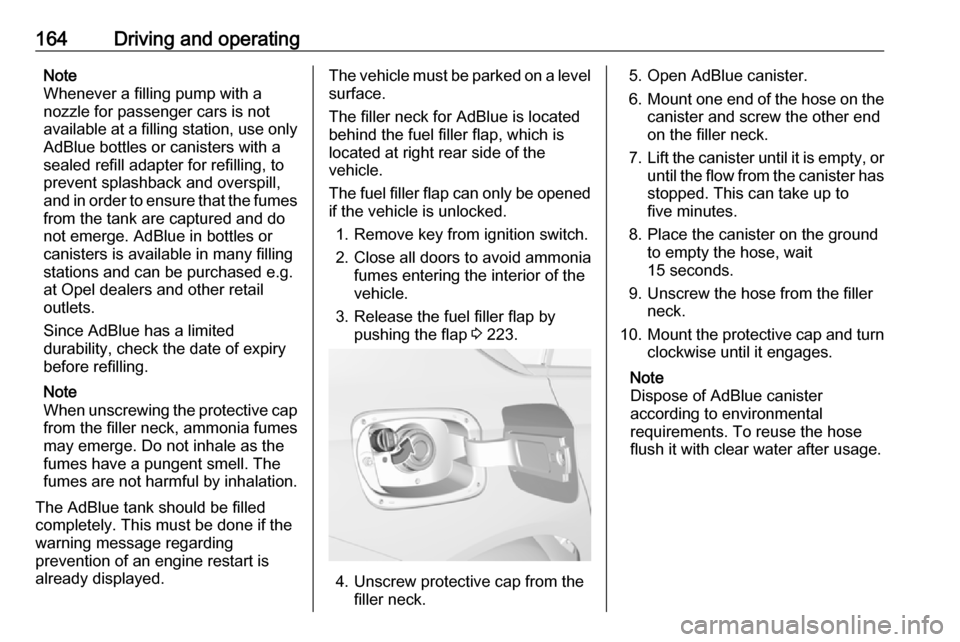
The filler neck for AdBlue is located
behind the fuel filler flap, which is
located at right rear side of the
vehicle.
The fuel filler flap can only be opened
if the vehicle is unlocked.
1. Remove key from ignition switch.
2. Close all doors to avoid ammonia fumes entering the interior of the
vehicle.
3. Release the fuel filler flap by pushing the flap 3 223.
4. Unscrew protective cap from the
filler neck.
5. Open AdBlue canister.
6. Mount one end of the hose on the
canister and screw the other end
on the filler neck.
7. Lift the canister until it is empty, or
until the flow from the canister has stopped. This can take up to
five minutes.
8. Place the canister on the ground to empty the hose, wait
15 seconds.
9. Unscrew the hose from the filler neck.
10. Mount the protective cap and turn
clockwise until it engages.
Note
Dispose of AdBlue canister
according to environmental
requirements. To reuse the hose
flush it with clear water after usage.
Page 168 of 315

166Driving and operating
The selector lever is locked in P and
can only be moved when the ignition
is on, the release button on the
selector lever is pushed and the brake
pedal is applied.
Without brake pedal applied, control
indicator j illuminates.
If the selector lever is not in P when
the ignition is switched off, control
indicator j flashes.
To engage P or R, press the release
button.
The engine can only be started with lever in position P or N. When position
N is selected, press brake pedal or
apply parking brake before starting.
Do not accelerate while engaging a
gear. Never depress the accelerator
pedal and brake pedal at the same
time.
When a gear is engaged, the vehicle
begins to creep when the brake is
released.
Engine braking To utilise the engine braking effect,
select a lower gear in good time when
driving downhill, see manual mode.
Rocking the vehicle
Rocking the vehicle is only
permissible if the vehicle is stuck in
sand, mud or snow. Move the selector lever between D and R in a repeat
pattern. Do not race the engine and
avoid sudden acceleration.
Parking
Apply the parking brake and engage
P .
The ignition key can only be removed
when the selector lever is in position
P .Manual mode
Selector lever
Move selector lever out of position D
towards the left in position M.
Manual mode M can be activated
from position D in each driving
situation and speed.
Move selector lever to the front + to
shift to a higher gear.
Move selector lever to the rear - to
shift to a lower gear.
The selected gear is indicated in the instrument cluster.
Page 169 of 315

Driving and operating167Steering wheel paddles
Move selector lever out of position D
towards the left in position M.
Manual mode M can be activated
from position D in each driving
situation and speed.
Pull steering wheel paddles to select
gears manually.
Pull right paddle + to shift to a higher
gear.
Pull left paddle - to shift to a lower
gear.
Multiple pulls allow gears to be
skipped.
The selected gear is indicated in the
instrument cluster.
Temporary manual mode in drive
mode D
Manual paddle shifting is also
possible in automatic mode D. Upon
completion of manual shifting
operation, transmission changes to
automatic mode D after a defined
time.
To interrupt manual mode and return
to D, do one of the following:
● Press + paddle for 1 second.
● Move selector lever towards the left to manual mode and back to
position D.
If the vehicle is at a standstill and
engine is idling, the transmission will
remain in temporary manual mode. It
changes to automatic mode when
accelerator pedal is operated for a
defined time, and no paddle shifting
at the steering wheel is performed.
General
If a higher gear is selected when
vehicle speed is too low, or a lower
gear when vehicle speed is too high,the shift is not executed. This can
cause a message in the Driver
Information Centre.
In manual mode, no automatic
shifting to a higher gear takes place
at high engine revolutions, except
activating the kickdown function.
Gear shift indication
The symbol R or S with a number
beside it is indicated when gear
shifting is recommended for fuel
saving reasons.
Shift indication appears only in
manual mode.
Electronic driving programmes
● When SPORT mode is engaged,
the vehicle shifts at higher engine speeds (unless cruise control is
on).
SPORT mode 3 176.
Page 170 of 315

168Driving and operating● Special programmesautomatically adapt the shiftingpoints when driving up inclines or
down hills.
● In snowy or icy conditions or on other slippery surfaces, the
electronic transmission control
enables the driver to manually
select first, second or third gear
for starting off.
Kickdown Pressing down the accelerator pedal
beyond the kickdown detent will lead to maximum acceleration
independent of the selected driving
mode. The transmission shifts to a
lower gear depending on engine
speed and shifts to a higher gear at
high engine revolutions.
Overheat protection
In the event of transmission-
overheating due to high outside
temperatures or sporty driving style,
the torque and the maximum speed of the engine can be temporarily
reduced.Fault
In the event of a fault a vehicle
message is displayed in the Driver
Information Centre.
Vehicle messages 3 122.
6-gear automatic transmission:
electronic transmission control
enables only fourth gear; 8-gear
automatic transmission: electronic
transmission control enables only
third gear. The transmission no
longer shifts automatically.
Have the cause of the fault remedied
by a workshop.
Interruption of power supply
In the event of an interruption of
power supply, the selector lever
cannot be moved out of the P
position.
The ignition key cannot be removed from the ignition switch.
If the vehicle battery is discharged,
start the vehicle using jump leads
3 269.
If the vehicle battery is not the cause
of the fault, release the selector lever.1. Apply parking brake.
2. Release the selector lever trim from the centre console. Poke
with a finger into the leather
socket beside the selector lever
and pull the trim up carefully, there
is a cable attached to it. Slide trim slightly forward as it is hinged on
its rear side. Tilt loose trim to the
left side to aviod tensioning the
cable.
Page 171 of 315

Driving and operating169
3. Insert a small stick (e.g. a pen orscrewdriver) into the opening near
the selector lever. Push down the
stick vertically and move the
selector lever out of P. If this
position is engaged again, the
selector lever will be locked again.
Have the cause of the power
supply interruption remedied by a
workshop.
4. Mount the selector lever trim onto
the centre console and refit.
Manual transmission
To engage reverse, depress the
clutch pedal and then press the
release button on the selector lever
and engage the gear.
If the gear does not engage, set the
lever to neutral, release the clutch
pedal and depress again; then repeat
gear selection.
Do not slip the clutch unnecessarily.
When operating, depress the clutch
pedal completely. Do not use the
pedal as a foot rest.
When clutch slip is detected for a specific time, the engine power will be reduced. A warning is displayed in the
Driver Information Centre. Release
the clutch.Caution
It is not advisable to drive with the hand resting on the selector lever.
Gear shift indication 3 108.
Stop-start system 3 157.
Page 172 of 315

170Driving and operatingDrive systems
All-wheel drive
The All-wheel drive system enhances
driving characteristics and stability,
and helps to achieve the best
possible driveability regardless of
ground surface. The system is always
active and cannot be deactivated.
The torque is distributed steplessly
between the wheels of the front and
rear axle up to a torque split of 50%
to 50%. Depending on the driving
conditions, i.e. steady state driving,
All wheel drive system transfers a
minimum amount of torque for fuel
efficiency. Additionally the torque
vectoring between the rear wheels is
distributed depending on the vehicle
dynamic and surface.
This is possible because the All wheel drive system operates with two
clutches, one on each side.
For optimum system performance,
the vehicle's tyres should not have
varying degrees of wear.If a service message is displayed in
the Driver Information Centre, the
system may have limited functionality
(or be completely disabled in some
cases, i.e. the vehicle switches to
Front-wheel drive). Seek the
assistance of a workshop.
Towing the vehicle 3 271.Brakes
The brake system comprises two independent brake circuits.
If a brake circuit fails, the vehicle can
still be braked using the other brake
circuit. However, braking effect is
achieved only when the brake pedal
is depressed firmly. Considerably
more force is needed for this. The braking distance is extended. Seek
the assistance of a workshop before
continuing the journey.
When the engine is not running, the
support of the brake servo unit
disappears once the brake pedal has
been depressed once or twice.
Braking effect is not reduced, but
braking requires significantly greater
force. It is especially important to bear this in mind when being towed.
Control indicator R 3 107.
Active emergency braking 3 194.
Antilock brake system Antilock brake system (ABS)
prevents the wheels from locking.
Page 173 of 315

Driving and operating171ABS starts to regulate brake pressure
as soon as a wheel shows a tendency to lock. The vehicle remains
steerable, even during hard braking.
ABS control is made apparent
through a pulse in the brake pedal
and the noise of the regulation
process.
For optimum braking, keep the brake
pedal fully depressed throughout the
braking process, despite the fact that
the pedal is pulsating. Do not reduce
the pressure on the pedal.
After starting off, the system performs a self-test which may be audible.
Control indicator u 3 107.
Adaptive brake light During full braking, all three brake
lights flash for the duration of ABS
control.
Fault9 Warning
If there is a fault in the ABS, the
wheels may be liable to lock due
to braking that is heavier than
normal. The advantages of ABS are no longer available. During
hard braking, the vehicle can no longer be steered and may
swerve.
Have the cause of the fault remedied
by a workshop.
Parking brake
9 Warning
Before leaving the vehicle, check
parking brake status. Control
indicator j illuminate constantly
when electric parking brake is
applied.
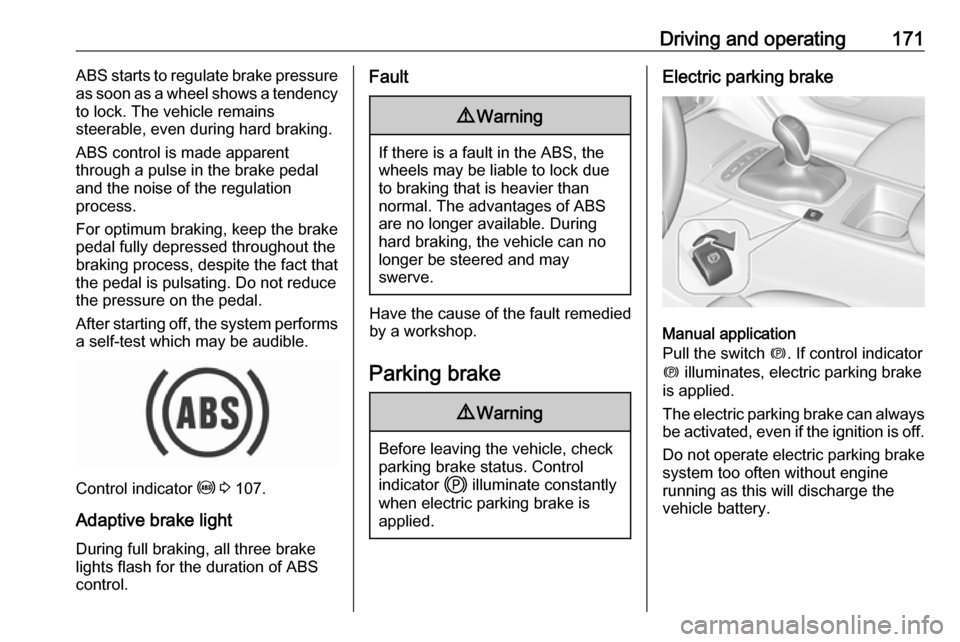
Electric parking brake
Manual application
Pull the switch m. If control indicator
m illuminates, electric parking brake
is applied.
The electric parking brake can always
be activated, even if the ignition is off.
Do not operate electric parking brake
system too often without engine
running as this will discharge the
vehicle battery.