body OPEL KARL 2019 Owner's Manual
[x] Cancel search | Manufacturer: OPEL, Model Year: 2019, Model line: KARL, Model: OPEL KARL 2019Pages: 191, PDF Size: 5.51 MB
Page 10 of 191
8In briefHead restraint adjustment
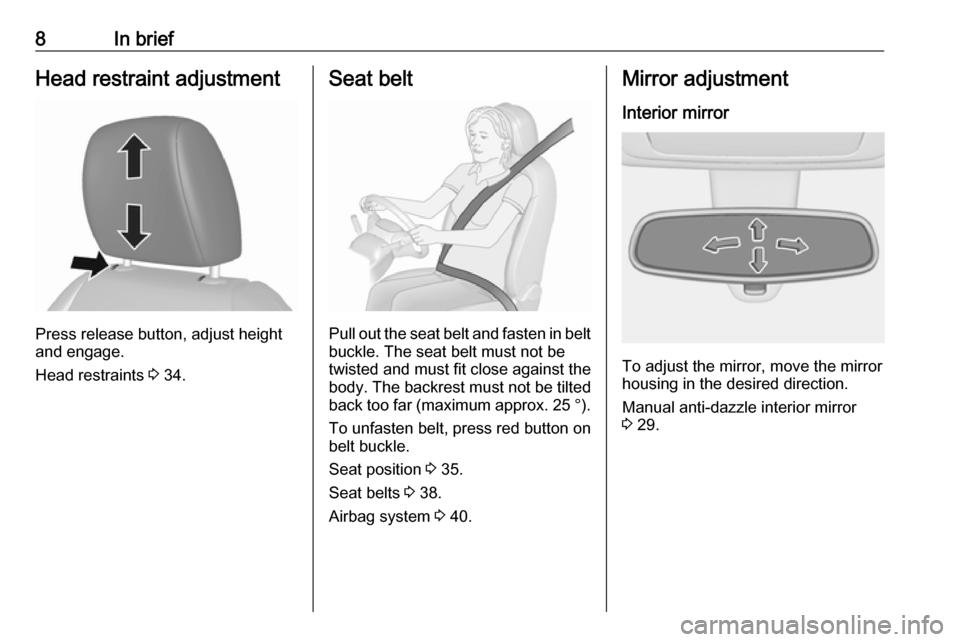
Press release button, adjust height
and engage.
Head restraints 3 34.
Seat belt
Pull out the seat belt and fasten in belt
buckle. The seat belt must not be
twisted and must fit close against the
body. The backrest must not be tilted back too far (maximum approx. 25 ° ).
To unfasten belt, press red button on belt buckle.
Seat position 3 35.
Seat belts 3 38.
Airbag system 3 40.
Mirror adjustment
Interior mirror
To adjust the mirror, move the mirror
housing in the desired direction.
Manual anti-dazzle interior mirror
3 29.
Page 40 of 191
38Seats, restraintsSeat belts
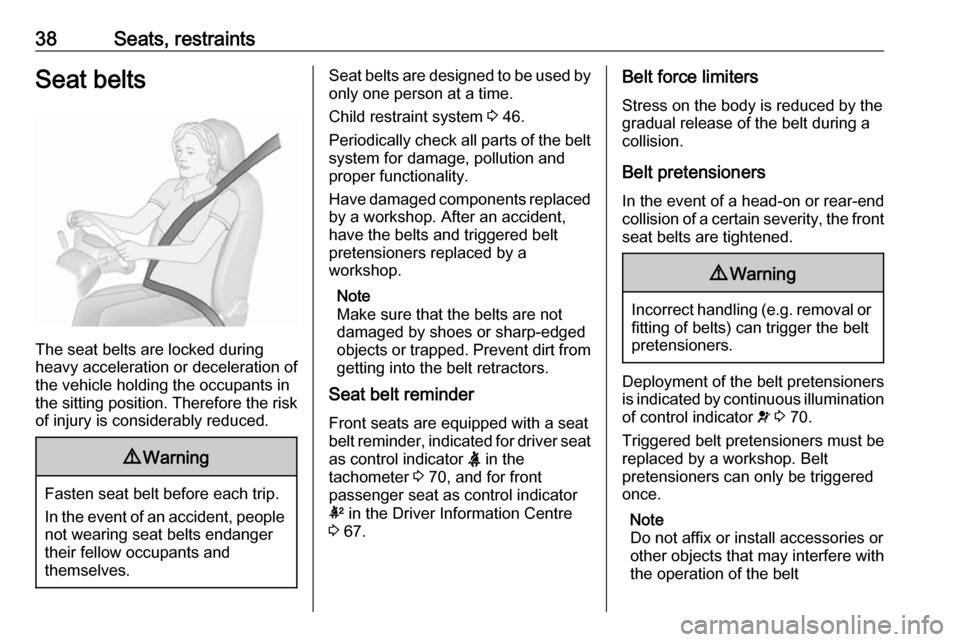
The seat belts are locked during
heavy acceleration or deceleration of
the vehicle holding the occupants in
the sitting position. Therefore the risk
of injury is considerably reduced.
9 Warning
Fasten seat belt before each trip.
In the event of an accident, people
not wearing seat belts endanger their fellow occupants and
themselves.
Seat belts are designed to be used by only one person at a time.
Child restraint system 3 46.
Periodically check all parts of the belt
system for damage, pollution and
proper functionality.
Have damaged components replaced by a workshop. After an accident,
have the belts and triggered belt
pretensioners replaced by a
workshop.
Note
Make sure that the belts are not
damaged by shoes or sharp-edged objects or trapped. Prevent dirt from getting into the belt retractors.
Seat belt reminder
Front seats are equipped with a seat
belt reminder, indicated for driver seat
as control indicator X in the
tachometer 3 70, and for front
passenger seat as control indicator
k in the Driver Information Centre
3 67.Belt force limiters
Stress on the body is reduced by the
gradual release of the belt during a
collision.
Belt pretensioners
In the event of a head-on or rear-end
collision of a certain severity, the front
seat belts are tightened.9 Warning
Incorrect handling (e.g. removal or
fitting of belts) can trigger the belt
pretensioners.
Deployment of the belt pretensioners
is indicated by continuous illumination
of control indicator v 3 70.
Triggered belt pretensioners must be replaced by a workshop. Belt
pretensioners can only be triggered
once.
Note
Do not affix or install accessories or
other objects that may interfere with
the operation of the belt
Page 41 of 191
Seats, restraints39pretensioners. Do not make anymodifications to belt pretensioner
components as this will invalidate
the operating permit of your vehicle.
Three-point seat belt
Fasten
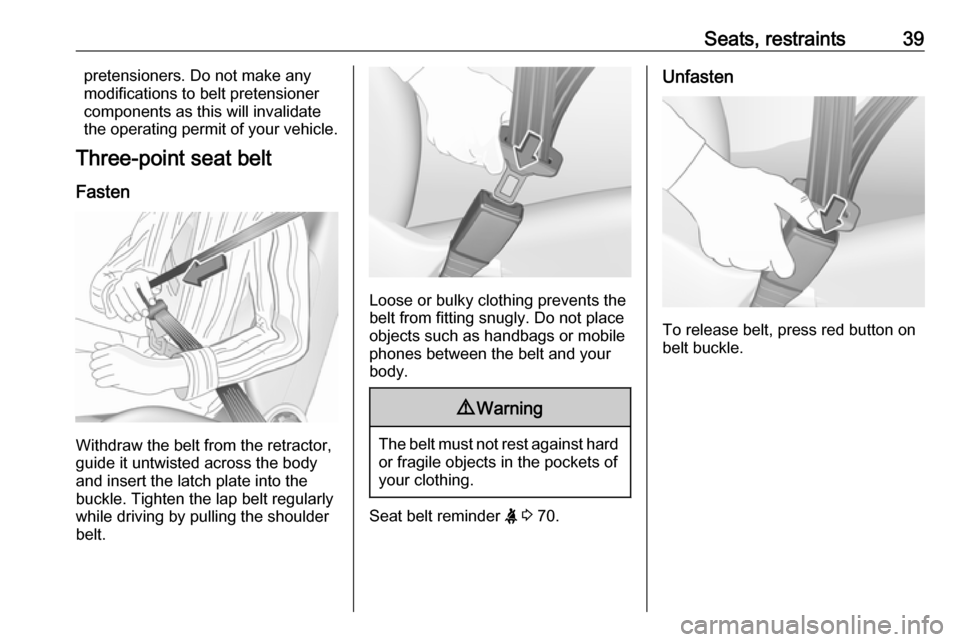
Withdraw the belt from the retractor,
guide it untwisted across the body
and insert the latch plate into the
buckle. Tighten the lap belt regularly
while driving by pulling the shoulder
belt.
Loose or bulky clothing prevents the
belt from fitting snugly. Do not place
objects such as handbags or mobile
phones between the belt and your body.
9 Warning
The belt must not rest against hard
or fragile objects in the pockets of
your clothing.
Seat belt reminder X 3 70.
Unfasten
To release belt, press red button on
belt buckle.
Page 46 of 191
44Seats, restraintsThe inflated airbags cushion the
impact, thereby reducing the risk of
injury to the upper body and head of
the front seat occupants
considerably.9 Warning
Optimum protection is only
provided when the seat is in the
proper position.
Seat position 3 35.
Keep the area in which the airbag
inflates clear of obstructions.
Fit the seat belt correctly and
engage securely. Only then is the
airbag able to protect.
Side airbag system
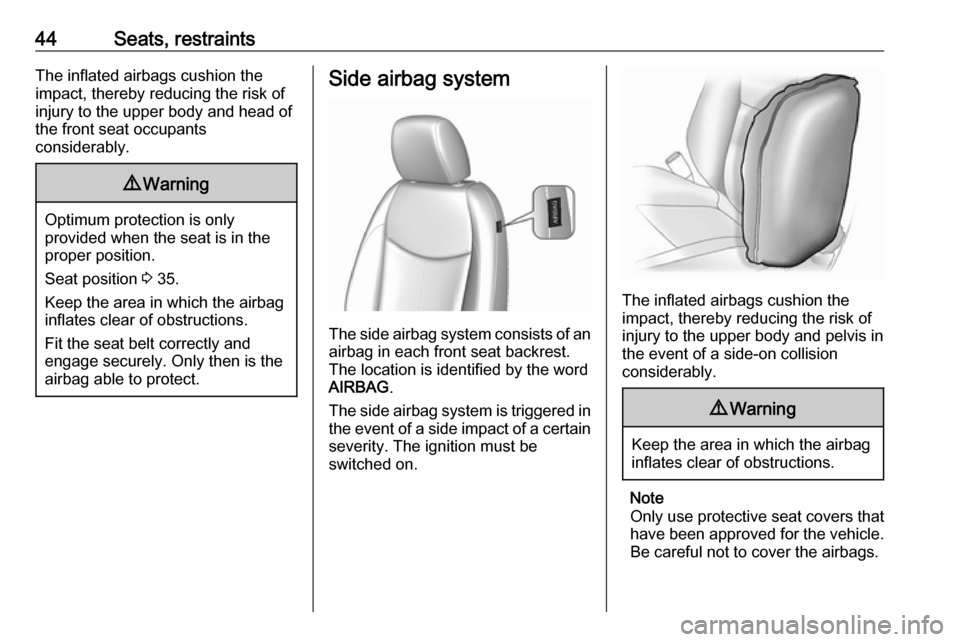
The side airbag system consists of an
airbag in each front seat backrest.
The location is identified by the word
AIRBAG .
The side airbag system is triggered in the event of a side impact of a certain
severity. The ignition must be
switched on.
The inflated airbags cushion the
impact, thereby reducing the risk of
injury to the upper body and pelvis in
the event of a side-on collision
considerably.
9 Warning
Keep the area in which the airbag
inflates clear of obstructions.
Note
Only use protective seat covers that
have been approved for the vehicle.Be careful not to cover the airbags.
Page 129 of 191

Vehicle care127Caution
When transporting the vehicle on
a train or on a recovery vehicle, the
mud flaps might be damaged.
Vehicle storage
Storage for a long period of time
If the vehicle is to be stored for several months:
● Wash and wax the vehicle.
● Have the wax in the engine compartment and underbody
checked.
● Clean and preserve the rubber seals.
● Fill up fuel tank completely.
● Change the engine oil.
● Drain the washer fluid reservoir.
● Check the coolant antifreeze and
corrosion protection.
● Adjust tyre pressure to the value specified for full load.
● Park the vehicle in a dry, wellventilated place. Engage first or
reverse gear. Prevent the vehicle from rolling.
● Do not apply the parking brake.
● Open the bonnet, close all doors and lock the vehicle.
● Disconnect the clamp from the negative terminal of the vehicle
battery. Beware that all systems are not functional, e.g. anti-theft
alarm system.
Putting back into operation When the vehicle is to be put back into
operation:
● Connect the clamp to the negative terminal of the vehicle
battery. Activate the electronics
of the power windows.
● Check tyre pressure.
● Fill up the washer fluid reservoir.
● Check the engine oil level.
● Check the coolant level.
● Fit the number plate if necessary.End-of-life vehicle recovery
Information on end-of-life vehicle
recovery centres and the recycling of
end-of-life vehicles is available on our
website. Only entrust this work to an
authorised recycling centre.
Gas vehicles must be recycled by a
service centre authorised for gas
vehicles.
Page 140 of 191
138Vehicle care6.Insert bulb holder into the tail light
assembly and screw into place.
Connect wiring plug. Install tail
light assembly in body and tighten
screws. Close covers and
engage.
7. Switch on ignition, operate and check all lights.
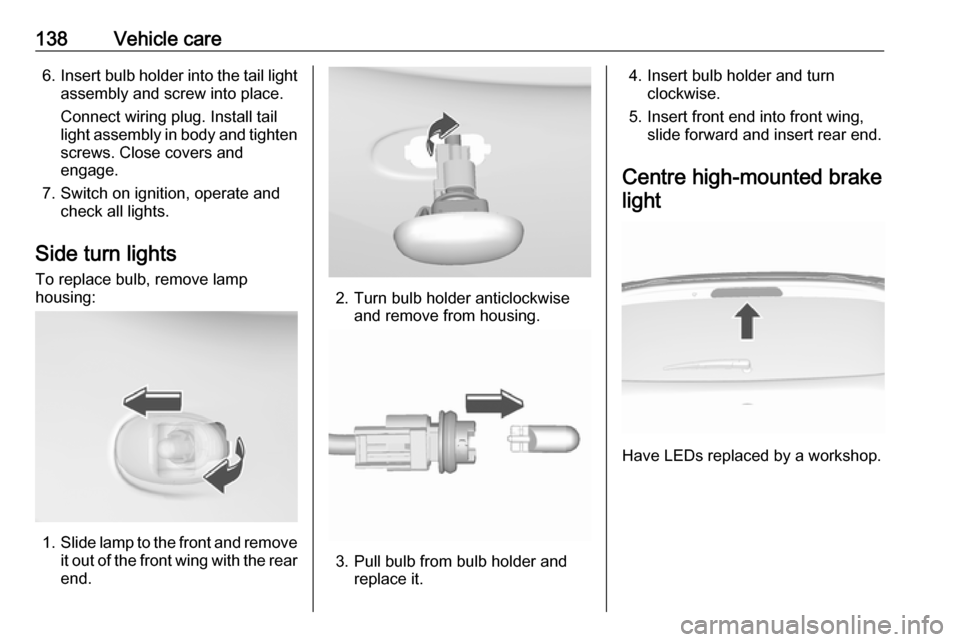
Side turn lights To replace bulb, remove lamp
housing:
1. Slide lamp to the front and remove
it out of the front wing with the rear
end.
2. Turn bulb holder anticlockwise and remove from housing.
3. Pull bulb from bulb holder andreplace it.
4. Insert bulb holder and turn clockwise.
5. Insert front end into front wing, slide forward and insert rear end.
Centre high-mounted brake light
Have LEDs replaced by a workshop.
Page 144 of 191

142Vehicle careNo.Circuit1Tailgate2Transmission output speed
sensor3Heated rear window4Heated exterior mirror5Sunroof6Transmission control module7Engine control module8–9ABS10Body control module, voltage11Rear view camera12–13–14Engine control module/Trans‐
mission control module15Injection system/Starter16Fuel pumpNo.Circuit17Engine control module118Engine control module219Injection system/Ignition20Air conditioning system21Battery sensor22Electric steering column lock23Cooling fan low24–25Exterior mirror switch26Engine control module27Fuel system28–29Seat occupancy recognition30Headlight range adjustment31Horn32Front fog light33High beam leftNo.Circuit34High beam right35–36Rear wiper37Cornering light left38Washer system39Cornering light right40–41–42Starter 243Instrument panel44DC-DC converter45Starter 146ABS47Cooling fan high48Front wiper49Body control module/Retained
power off
Page 146 of 191

144Vehicle careNo.Circuit17–18Instrument cluster19–20Headlight range adjustment21Power windows, front22Power windows, rear23–24–25Auxiliary power outlet26Sunroof27Central gateway module28Body control module 829Body control module 730Body control module 631Body control module 532Body control module 433Body control module 3No.Circuit34Body control module 235Body control module 136–37Steering wheel control LED38–39Logistic/DC transformer40Power window, driver41Blower42Seat heating, front43Air conditioning module44Heated steering wheel45–Vehicle tools
Tools
Vehicles without spare
The vehicle tools are in the
compartment under the floor cover in
the load compartment.
Page 157 of 191
Vehicle care155●Do not start the vehicle when it is
raised on the jack.
● Clean wheel nuts and thread with
a clean cloth before mounting the
wheel.9 Warning
Do not grease wheel bolt, wheel
nut and wheel nut cone.
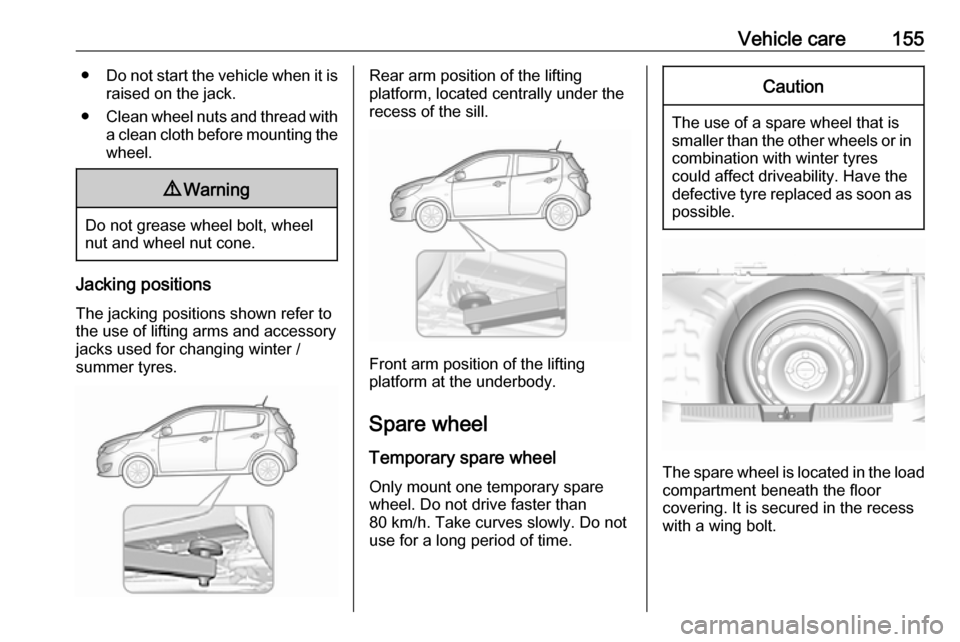
Jacking positions
The jacking positions shown refer to
the use of lifting arms and accessory
jacks used for changing winter /
summer tyres.
Rear arm position of the lifting
platform, located centrally under the
recess of the sill.
Front arm position of the lifting
platform at the underbody.
Spare wheel Temporary spare wheel
Only mount one temporary spare
wheel. Do not drive faster than
80 km/h. Take curves slowly. Do not
use for a long period of time.
Caution
The use of a spare wheel that is smaller than the other wheels or in combination with winter tyres
could affect driveability. Have the defective tyre replaced as soon as
possible.
The spare wheel is located in the load
compartment beneath the floor
covering. It is secured in the recess
with a wing bolt.
Page 164 of 191

162Vehicle careIf using a car wash, comply with the
car wash manufacturer's instructions. The windscreen wiper and rear
window wiper must be switched off.
Remove antenna and external
accessories such as roof racks etc.
If you wash your vehicle by hand,
make sure that the insides of the
wheel housings are also thoroughly
rinsed out.
Clean edges and folds on opened
doors and the bonnet as well as the
areas they cover.
Clean bright metal mouldings with a
cleaning solution approved for
aluminium to avoid damages.Caution
Always use a cleaning agent with
a pH value of four to nine.
Do not use cleaning agents on hot surfaces.
Have the door hinges of all doors
greased by a workshop.
Do not clean the engine compartment with a steam-jet or high-pressure jet
cleaner.
Thoroughly rinse and leather-off the vehicle. Rinse leather frequently. Use
separate leathers for painted and
glass surfaces: remnants of wax on
the windows will impair vision.
Do not use hard objects to remove
spots of tar. Use tar removal spray on
painted surfaces.
Exterior lights
Headlight and other light covers are
made of plastic. Do not use any
abrasive or caustic agents, do not use
an ice scraper, and do not clean them
dry.
Polishing and waxing
Wax painted parts of the vehicle
regularly (at the latest when water no longer beads). Otherwise, the
paintwork will dry out.
Polishing is necessary only if the paint
has become dull or if solid deposits
have become attached to it.
Paintwork polish with silicone forms a
protective film, making waxing
unnecessary.Unpainted plastic body parts must not
be treated with wax or polishing
agents.
Windows and windscreen wiper
blades
Switch off wipers before handling in
their areas.
Use a soft lint-free cloth or chamois leather together with window cleaner
and insect remover.
When cleaning the rear window from
inside, always wipe in parallel to the
heating element to prevent damage.
For mechanical removal of ice, use a
sharp-edged ice scraper. Press the
scraper firmly against the glass so
that no dirt can get under it and
scratch the glass.
Clean smearing wiper blades with a
soft cloth and window cleaner.