screen OPEL MOKKA X 2017 User Guide
[x] Cancel search | Manufacturer: OPEL, Model Year: 2017, Model line: MOKKA X, Model: OPEL MOKKA X 2017Pages: 247, PDF Size: 6.59 MB
Page 103 of 247

Instruments and controls101functions to be displayed in the Info
page by turning the adjuster wheel and confirm by pressing SET/CLR.
Selected pages have a 9 in a
checkbox. Non-viewable functions
have a blank checkbox. See Info
Menu above.
Speed warning
The speed warning function alerts the driver when a set speed is exceeded.
To set the speed warning, press
SET/CLR while the page is displayed.
Turn the adjuster wheel to select and
adjust the value. Press SET/CLR to
set the speed. Once the speed is set, this feature can be turned off by
pressing SET/CLR while viewing this
page. If the selected speed limit is
exceeded, a pop-up warning is
displayed with a chime.
Tyre Load
The tyre pressure category according
to the actual tyre inflation pressure
can be selected 3 197. Turn the
adjuster wheel to select a category Light ,Eco or Max .
Press SET/CLR to confirm category.
Info display
The Info-Display is located in the
instrument panel near the instrument
cluster.
Depending on the vehicle
configuration the vehicle has a
● Graphic-Info-Display
or
● 7'' Colour-Info-Display with
touchscreen functionality
or
● 8'' Colour-Info-Display with
touchscreen functionalityThe Info displays can indicate:
● time 3 81
● outside temperature 3 80
● date 3 81
● Infotainment system, see description in the Infotainment
manual
● indication of rear view camera 3 160
● indication of parking assist instructions 3 158
● navigation, see description in the
Infotainment manual
● system messages
● settings for vehicle personalisation 3 105
Page 104 of 247

102Instruments and controlsGraphic-Info-Display
Press X to switch on the display.
Press MENU to select main menu
page.
Turn MENU to select a menu page.
Press MENU to confirm a selection.
Press BACK to exit a menu without
changing a setting.
7'' Colour-Info-Display
Selecting menus and settings
Menus and settings are accessed via
the display.
Press X to switch on the display.
Press ; to display the homepage.
Touch required menu display icon
with the finger.
Touch a respective icon to confirm a
selection.
Touch 9 to return to the next higher
menu level.
Press ; to return to the homepage.
For further information, see
Infotainment manual.
Vehicle personalisation 3 105.
8'' Colour-Info-Display
Selecting menus and settings
There are three options to operate the
display:
● via buttons below the display● by touching the touchscreen with
the finger
● via speech recognitionButton operation
Press X to switch on the display.
Press ; to display the homepage.
Turn MENU to select a menu display
icon or a function or to scroll a
submenu list.
Page 105 of 247

Instruments and controls103Press MENU to confirm a selection.
Press BACK to exit a menu without
changing a setting.
Press ; to return to the homepage.
For further information, see
Infotainment manual.Touchscreen operation
Display must be switched on by
pressing X. Press ; to select
homepage.
Touch required menu display icon or
a function with the finger.
Scroll a longer submenu list with the
finger up or down.
Confirm a required function or
selection by touching.
Touch q on the display to exit a
menu without changing a setting.
Press ; to return to the homepage.
For further information, see
Infotainment manual.Speech recognition
Description see Infotainment manual.
Vehicle personalisation 3 105.
Valet mode
Some functions of the Driver
Information Centre and the Info-
Display can be limited for some
drivers.
Activation or deactivation of valet
mode can be set in the menu
Settings in the vehicle personalisation
menu.
Vehicle personalisation 3 105.
For more information see
Infotainment manual.Vehicle messages
Messages are indicated mainly in the
Driver Information Centre, in some
cases together with a warning chime.
Press SET/CLR on the turn signal
lever to confirm a message.
Vehicle and service messages The vehicle messages are displayed
as text. Follow the instructions given
in the messages.
Page 108 of 247

106Instruments and controlsDelayed Door Lock: Activates or
deactivates the delayed door
locking function.
● Remote Lock, Unlock, and Start
Remote Unlock Feedback :
Activates or deactivates the
hazard warning flasher feedback
whilst unlocking.
Remote Lock Feedback :
Changes what kind of feedback
is given when locking the vehicle.
Remote Door Unlock : Changes
the configuration to unlock only
the driver's door or the whole
vehicle whilst unlocking.
Auto Relock Doors : Activates or
deactivates the automatic relock
function after unlocking without
opening the vehicle.
Remote Window Operation :
Activates or deactivates the
operation of power windows with
remote control.
Passive Door Unlock : Changes
the configuration to unlock only
the driver's door or the whole
vehicle whilst unlocking.Passive Door Lock : Activates or
deactivates the passive locking
function. This feature locks the
vehicle automatically after
several seconds if all doors have
been closed and an electronic
key has been removed from the
vehicle.
Remote Left in Vehicle Alarm :
Activates or deactivates the warning chime when the
electronic key remains in the
vehicle.
● Restore Factory Settings :
Resets all settings to the default settings.
Personal settings 7" Colour-Info-Display
Press ;, select Settings and then
Vehicle on the touch-screen.
In the corresponding submenus the
following settings can be changed:
Vehicle ● Climate & Air Quality
Auto Fan Max Speed : Modifies
the level of the cabin airflow of the climate control in automatic
mode.
Auto Heated Seats :
Automatically activates the seat
heating.
Auto Defog : Activates or
deactivates auto demist.
Page 118 of 247

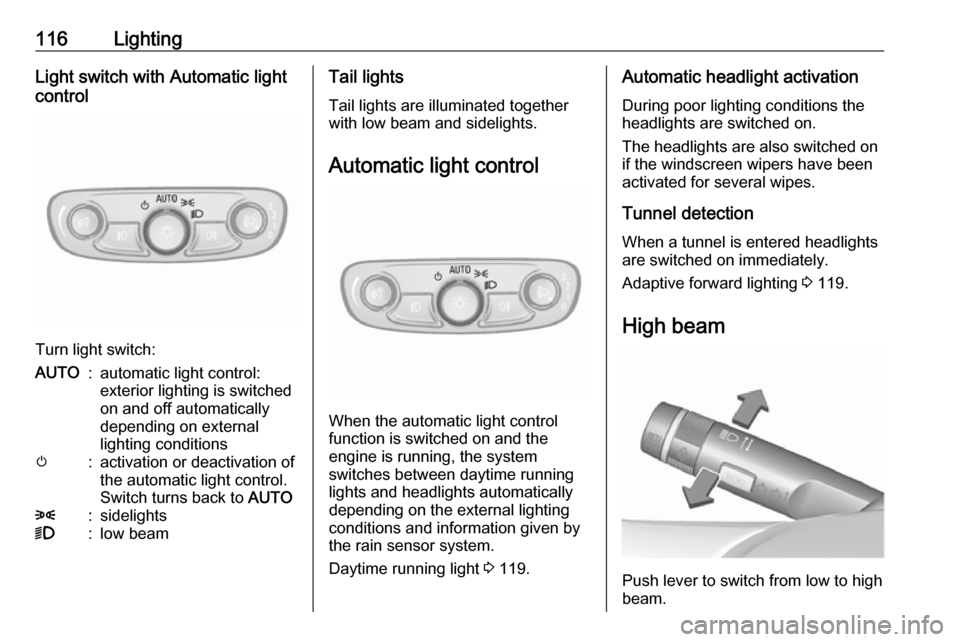
116LightingLight switch with Automatic light
control
Turn light switch:
AUTO:automatic light control:
exterior lighting is switched
on and off automatically
depending on external
lighting conditionsm:activation or deactivation of
the automatic light control.
Switch turns back to AUTO8:sidelights9:low beamTail lights
Tail lights are illuminated together
with low beam and sidelights.
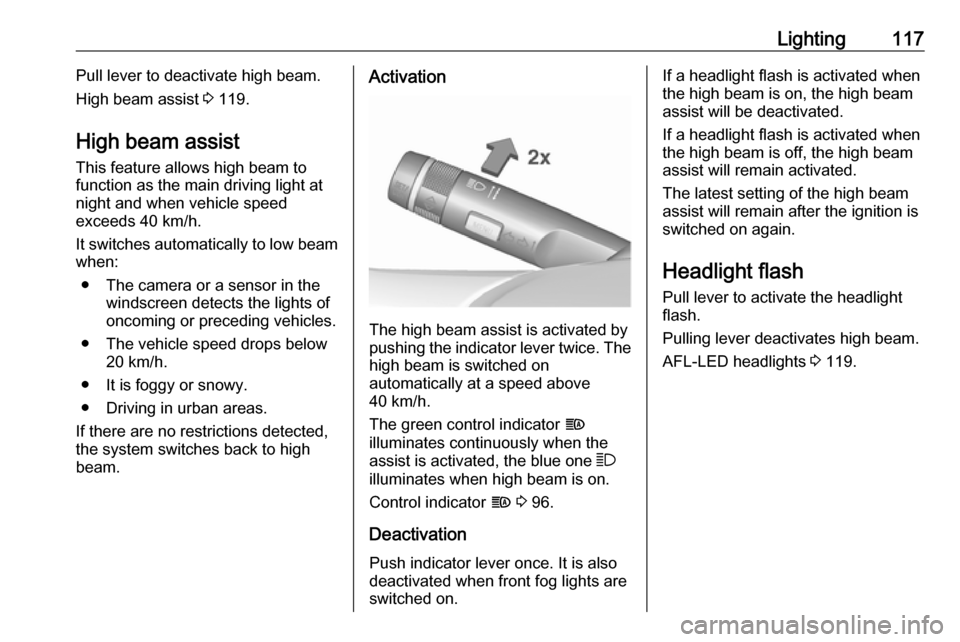
Automatic light control
When the automatic light control
function is switched on and the
engine is running, the system
switches between daytime running
lights and headlights automatically
depending on the external lighting
conditions and information given by
the rain sensor system.
Daytime running light 3 119.
Automatic headlight activation
During poor lighting conditions the
headlights are switched on.
The headlights are also switched on
if the windscreen wipers have been
activated for several wipes.
Tunnel detection
When a tunnel is entered headlights
are switched on immediately.
Adaptive forward lighting 3 119.
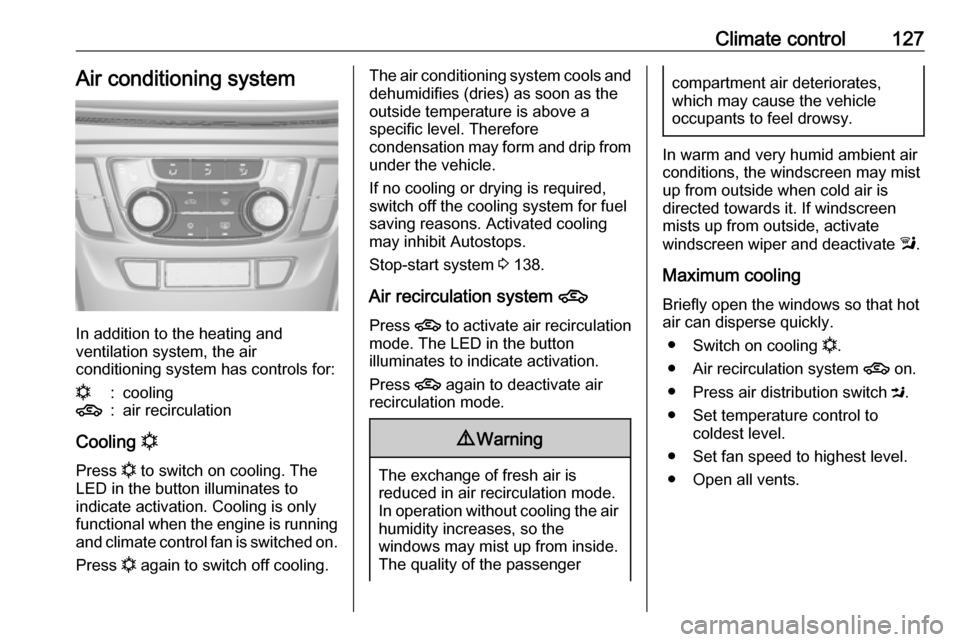
High beam
Push lever to switch from low to high
beam.
Page 119 of 247

Lighting117Pull lever to deactivate high beam.
High beam assist 3 119.
High beam assist This feature allows high beam to
function as the main driving light at
night and when vehicle speed
exceeds 40 km/h.
It switches automatically to low beam
when:
● The camera or a sensor in the windscreen detects the lights of
oncoming or preceding vehicles.
● The vehicle speed drops below 20 km/h.
● It is foggy or snowy.
● Driving in urban areas.
If there are no restrictions detected,
the system switches back to high
beam.Activation
The high beam assist is activated by
pushing the indicator lever twice. The high beam is switched on
automatically at a speed above
40 km/h.
The green control indicator f
illuminates continuously when the
assist is activated, the blue one 7
illuminates when high beam is on.
Control indicator f 3 96.
Deactivation Push indicator lever once. It is alsodeactivated when front fog lights are
switched on.
If a headlight flash is activated when
the high beam is on, the high beam
assist will be deactivated.
If a headlight flash is activated when
the high beam is off, the high beam
assist will remain activated.
The latest setting of the high beam
assist will remain after the ignition is
switched on again.
Headlight flash Pull lever to activate the headlight
flash.
Pulling lever deactivates high beam.
AFL-LED headlights 3 119.
Page 122 of 247

120Lighting● curve and cornering lights
● town light
● country light
● motorway light
● high beam assist
● reverse parking function
● eco mode
● dynamic automatic headlight levelling
Curve and cornering lights
On tight bends or when turning off,
depending on the steering angle or
the indicator light signal, an additional left or right reflector is switched on
which illuminates the road in the
direction of travel. It is activated up to
a speed of 70 km/h.
Town light
Activated automatically at a speed up to approx. 55 km/h. In situations with
exterior ambient light both cornering lights are switched on with reduced
intensity. The light is wide and
symmetrical.
Country light
Activated automatically at a speed
range between approx. 55 and
180 km/h. The beam of light and the
brightness is different between the left and the right side.
Motorway light Activated automatically at a speed
above approx. 180 km/h and minimal
steering movements. It switches on
after a delay or directly when the vehicle is powerfully accelerated. The
light beam is longer and brighter.
High beam assist
This feature allows high beam to
function as the main driving light at
night and when vehicle speed
exceeds 40 km/h.
It switches automatically to low beam
when:
● The camera or a sensor in the windscreen detects the lights of
oncoming or preceding vehicles.
● The vehicle speed drops below 20 km/h.
● It is foggy or snowy.
● Driving in urban areas.
If there are no restrictions detected,
the system switches back to high
beam.
Page 128 of 247

126Climate controlClimate controlClimate control systems.............126
Heating and ventilation system 126
Air conditioning system ...........127
Electronic climate control system .................................... 128
Auxiliary heater ........................130
Air vents ..................................... 131
Adjustable air vents .................131
Fixed air vents ......................... 131
Maintenance .............................. 131
Air intake ................................. 131
Pollen filter ............................... 131
Air conditioning regular
operation ................................ 132
Service .................................... 132Climate control systems
Heating and ventilation system
Controls for: ● air distribution
● temperature
● fan speed
● demisting and defrosting
Heated rear window Ü 3 36.
Temperature
red:warmblue:coldHeating will not be fully effective until
the engine has reached normal
operating temperature.
Air distributionl:to windscreen and front door
windowsM:to head areaK:to foot well and windscreen
Combination settings are possible.
Fan speed
Adjust the air flow by switching the fan
to the desired speed.
Demisting and defrosting ● Press V: fan automatically
switches to higher speed, the air
distribution is directed towards
the windscreen.
● Set temperature control to warmest level.
● Switch on heated rear window Ü.
● Open side air vents as required and direct them towards the doorwindows.
Page 129 of 247

Climate control127Air conditioning system
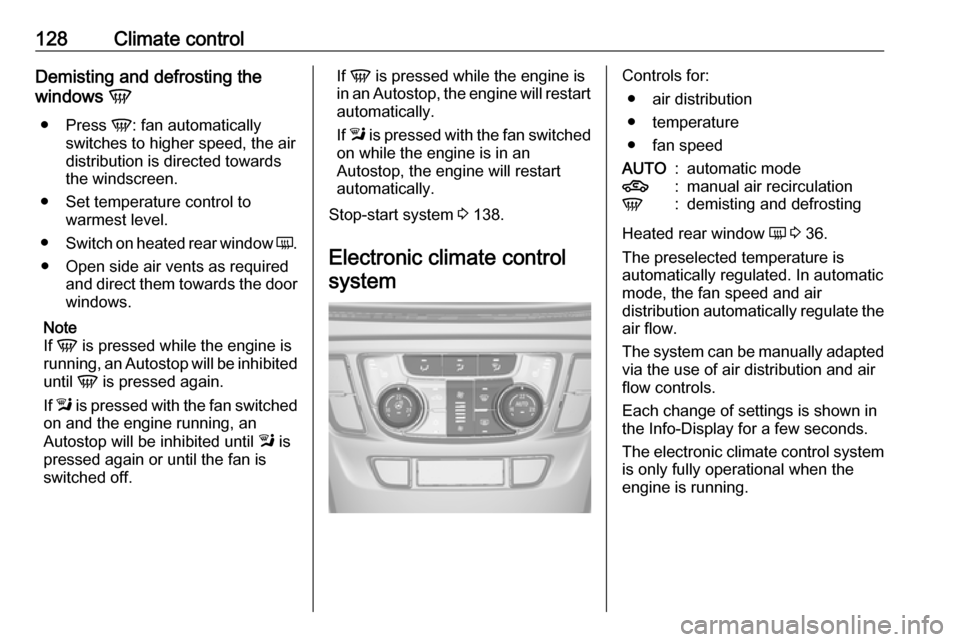
In addition to the heating and
ventilation system, the air
conditioning system has controls for:
n:cooling4:air recirculation
Cooling n
Press n to switch on cooling. The
LED in the button illuminates to
indicate activation. Cooling is only
functional when the engine is running and climate control fan is switched on.
Press n again to switch off cooling.
The air conditioning system cools and
dehumidifies (dries) as soon as the
outside temperature is above a
specific level. Therefore
condensation may form and drip from under the vehicle.
If no cooling or drying is required,
switch off the cooling system for fuel
saving reasons. Activated cooling
may inhibit Autostops.
Stop-start system 3 138.
Air recirculation system 4
Press 4 to activate air recirculation
mode. The LED in the button illuminates to indicate activation.
Press 4 again to deactivate air
recirculation mode.9 Warning
The exchange of fresh air is
reduced in air recirculation mode.
In operation without cooling the air humidity increases, so the
windows may mist up from inside.
The quality of the passenger
compartment air deteriorates,
which may cause the vehicle
occupants to feel drowsy.
In warm and very humid ambient air conditions, the windscreen may mist
up from outside when cold air is
directed towards it. If windscreen
mists up from outside, activate
windscreen wiper and deactivate l.
Maximum cooling
Briefly open the windows so that hot
air can disperse quickly.
● Switch on cooling n.
● Air recirculation system 4 on.
● Press air distribution switch M.
● Set temperature control to coldest level.
● Set fan speed to highest level.
● Open all vents.
Page 130 of 247

128Climate controlDemisting and defrosting the
windows V
● Press V: fan automatically
switches to higher speed, the air
distribution is directed towards
the windscreen.
● Set temperature control to warmest level.
● Switch on heated rear window Ü.
● Open side air vents as required and direct them towards the doorwindows.
Note
If V is pressed while the engine is
running, an Autostop will be inhibited
until V is pressed again.
If l is pressed with the fan switched
on and the engine running, an
Autostop will be inhibited until l is
pressed again or until the fan is
switched off.If V is pressed while the engine is
in an Autostop, the engine will restart automatically.
If l is pressed with the fan switched
on while the engine is in an
Autostop, the engine will restart
automatically.
Stop-start system 3 138.
Electronic climate control
systemControls for: ● air distribution
● temperature
● fan speedAUTO:automatic mode4:manual air recirculationV:demisting and defrosting
Heated rear window Ü 3 36.
The preselected temperature is
automatically regulated. In automatic
mode, the fan speed and air
distribution automatically regulate the
air flow.
The system can be manually adapted via the use of air distribution and air
flow controls.
Each change of settings is shown in
the Info-Display for a few seconds.
The electronic climate control system
is only fully operational when the
engine is running.