ECU OPEL MOKKA X 2019.5 Manual user
[x] Cancel search | Manufacturer: OPEL, Model Year: 2019.5, Model line: MOKKA X, Model: OPEL MOKKA X 2019.5Pages: 247, PDF Size: 6.86 MB
Page 189 of 247

Vehicle care187
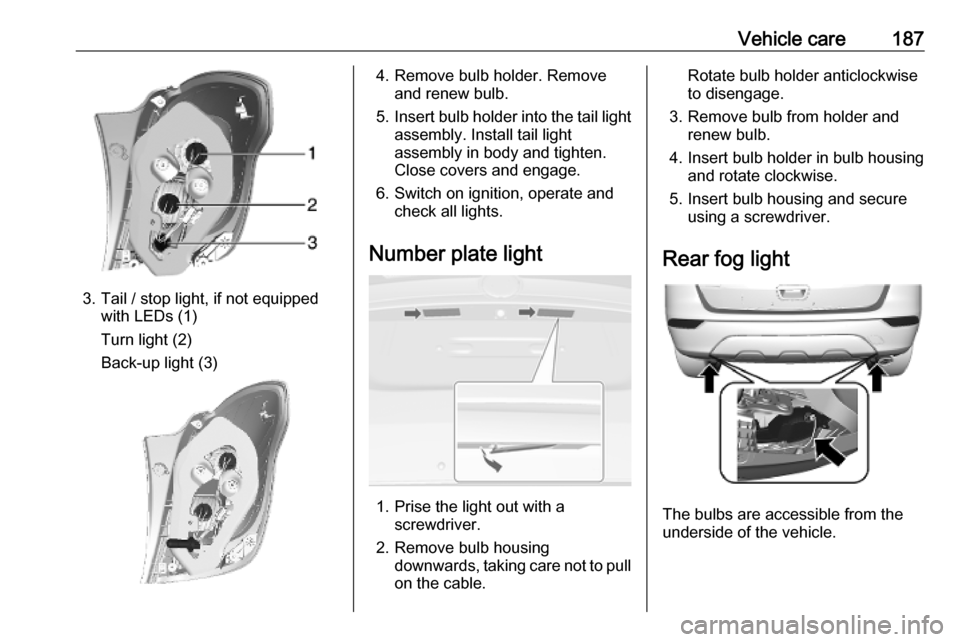
3. Tail / stop light, if not equippedwith LEDs (1)
Turn light (2)
Back-up light (3)
4. Remove bulb holder. Remove and renew bulb.
5. Insert bulb holder into the tail light
assembly. Install tail light
assembly in body and tighten.
Close covers and engage.
6. Switch on ignition, operate and check all lights.
Number plate light
1. Prise the light out with a screwdriver.
2. Remove bulb housing downwards, taking care not to pull
on the cable.
Rotate bulb holder anticlockwise
to disengage.
3. Remove bulb from holder and renew bulb.
4. Insert bulb holder in bulb housing and rotate clockwise.
5. Insert bulb housing and secure using a screwdriver.
Rear fog light
The bulbs are accessible from the
underside of the vehicle.
Page 208 of 247

206Vehicle careFront arm position of the lifting
platform at the underbody.
Spare wheelCaution
The use of a spare wheel that is smaller than the other wheels or in
combination with winter tyres
could affect driveability. Have the defective tyre replaced as soon as
possible.
Caution
The use of a spare wheel that is smaller than the other wheels or in
combination with winter tyres
could affect driveability. Have the defective tyre replaced as soon as
possible.
The spare wheel is located in the load
compartment beneath the floor
covering. It is secured with a wing nut.
Spare wheel with directional tyre If possible, fit directional tyres such
that they roll in the direction of travel.
The rolling direction is indicated by a
symbol (e.g. an arrow) on the
sidewall.
The following applies to tyres fitted
opposing the rolling direction:
● Driveability may be affected. Have the defective tyre renewed
or repaired as soon as possible
and fit it instead of the spare
wheel.
● Drive particularly carefully on wet
and snow-covered road
surfaces.
Fitting the spare wheel
Make the following preparations and
observe the following information:
● Park the vehicle on a level, firm and non-skid surface. The front
wheels must be in the straight-
ahead position.
● Apply the parking brake and engage first gear, reverse gear or
P .
● Remove the spare wheel 3 206.
● Never change more than one wheel at a time.
● Use the jack only to change wheels in case of puncture, not
for seasonal winter or summer
tyre change.
Page 209 of 247

Vehicle care207● The jack is maintenance-free.● If the ground on which the vehicle
is standing is soft, a solid board
(max. 1 cm thick) should be
placed under the jack.
● Take heavy objects out of the vehicle before jacking up.
● No people or animals may be in the vehicle when it is jacked-up.
● Never crawl under a jacked-up vehicle.
● Do not start the vehicle when it is
raised on the jack.
● Clean wheel nuts and thread with
a clean cloth before mounting the wheel.9 Warning
Do not grease wheel bolt, wheel
nut and wheel nut cone.
1. Disengage wheel nut caps with a
screwdriver and remove. Pull off
the wheel cover.
Alloy wheels: Disengage wheel
nut caps with a screwdriver and
remove. To protect the wheel,
place a soft cloth between the
screwdriver and the alloy wheel.
Vehicle tools 3 194.
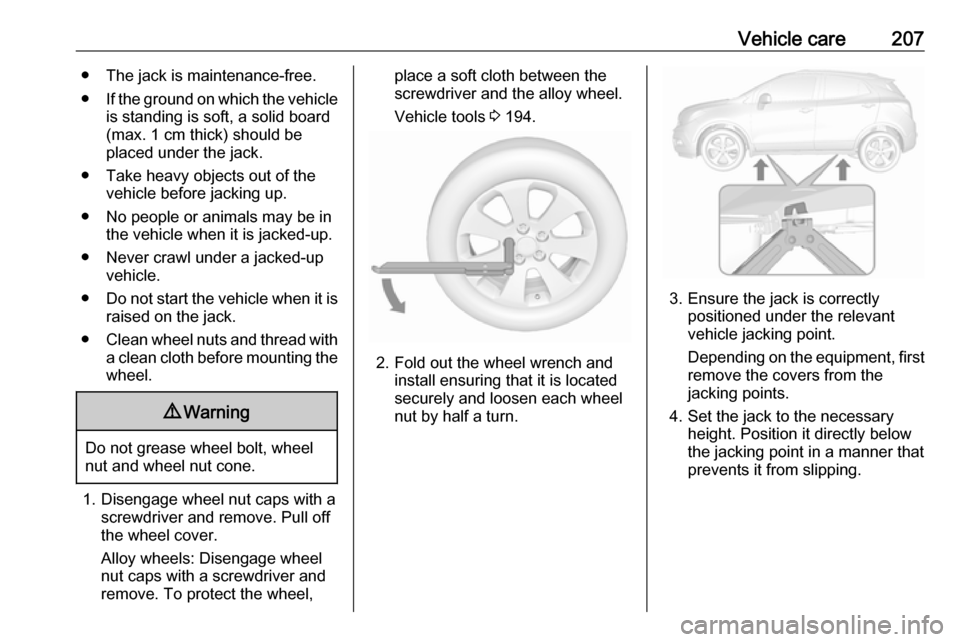
2. Fold out the wheel wrench and
install ensuring that it is located
securely and loosen each wheel
nut by half a turn.
3. Ensure the jack is correctly positioned under the relevant
vehicle jacking point.
Depending on the equipment, first
remove the covers from the
jacking points.
4. Set the jack to the necessary height. Position it directly below
the jacking point in a manner that
prevents it from slipping.
Page 210 of 247

208Vehicle care
Attach wheel wrench and with the
jack correctly aligned rotate wheel wrench until wheel is clear of the
ground.
5. Unscrew the wheel nuts. 6. Change the wheel. Spare wheel 3 206.
7. Screw on the wheel nuts.
8. Lower the vehicle and remove jack.
9. Install the wheel wrench ensuring that it locates securely and tighten
each nut in a crosswise
sequence. Tightening torque is
140 Nm.
10. Align the valve hole in the wheel cover with the tyre valve before
installing.
Install wheel nut caps.
Install centre cap on alloy wheels.
11. Install vehicle jacking point cover on versions with sill panels.
12. Stow the replaced wheel 3 206
and the vehicle tools 3 194.
13. Check the tyre pressure of the installed tyre and the wheel nut
torque as soon as possible.
Have the defective tyre renewed or
repaired as soon as possible.
Stowing a damaged full size
wheel in the load compartment
The spare wheel well is not designed for other tyre sizes than the spare
wheel.
A damaged full size wheel must be stowed in the load compartment and
secured with a strap.
Vehicle tools 3 194.
To secure the wheel: 1. Position the wheel in the middle of
the load compartment.
2. Place the loop end of the strap through the lashing eye on one
side.
3. Place the hook end of the strap through the loop and pull it until
the strap is fastened securely to
the lashing eye.
Page 211 of 247

Vehicle care209
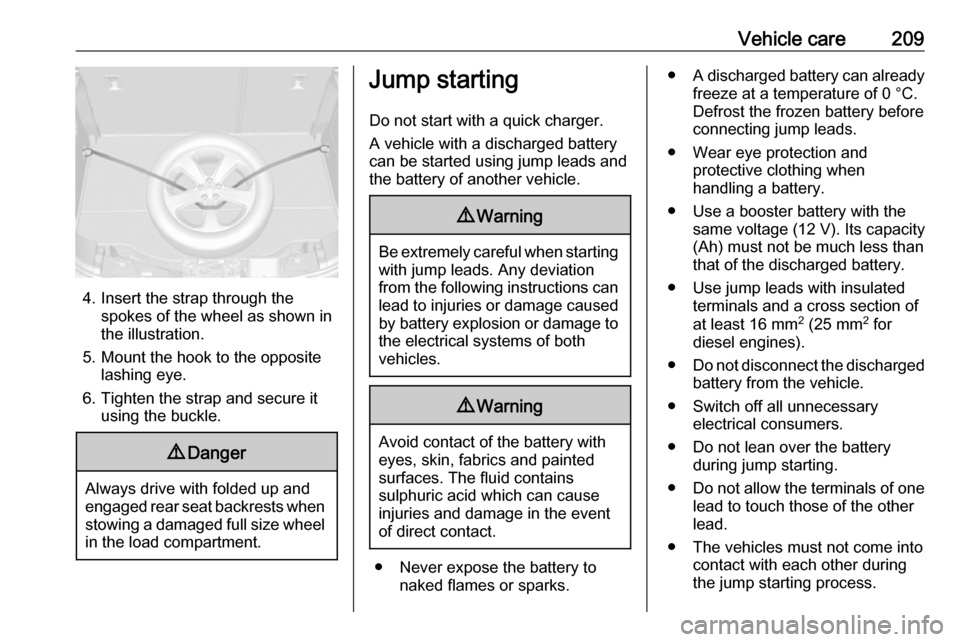
4. Insert the strap through thespokes of the wheel as shown in
the illustration.
5. Mount the hook to the opposite lashing eye.
6. Tighten the strap and secure it using the buckle.
9 Danger
Always drive with folded up and
engaged rear seat backrests when stowing a damaged full size wheel
in the load compartment.
Jump starting
Do not start with a quick charger.
A vehicle with a discharged battery
can be started using jump leads and the battery of another vehicle.9 Warning
Be extremely careful when starting
with jump leads. Any deviation
from the following instructions can
lead to injuries or damage caused
by battery explosion or damage to the electrical systems of both
vehicles.
9 Warning
Avoid contact of the battery with
eyes, skin, fabrics and painted
surfaces. The fluid contains
sulphuric acid which can cause
injuries and damage in the event
of direct contact.
● Never expose the battery to naked flames or sparks.
●A discharged battery can already
freeze at a temperature of 0 °C.
Defrost the frozen battery before
connecting jump leads.
● Wear eye protection and protective clothing when
handling a battery.
● Use a booster battery with the same voltage (12 V). Its capacity
(Ah) must not be much less than
that of the discharged battery.
● Use jump leads with insulated terminals and a cross section of
at least 16 mm 2
(25 mm 2
for
diesel engines).
● Do not disconnect the discharged
battery from the vehicle.
● Switch off all unnecessary electrical consumers.
● Do not lean over the battery during jump starting.
● Do not allow the terminals of one
lead to touch those of the other
lead.
● The vehicles must not come into contact with each other during
the jump starting process.
Page 237 of 247

Customer information235This software is provided “as is,”
without warranty of any kind, express
or implied. In no event shall Info-ZIP
or its contributors be held liable for
any direct, indirect, incidental, special
or consequential damages arising out
of the use of or inability to use this
software.
Permission is granted to anyone to
use this software for any purpose,
including commercial applications,
and to alter it and redistribute it freely, subject to the following restrictions:
1. Redistributions of source code must retain the above copyright
notice, definition, disclaimer, and
this list of conditions.
2. Redistributions in binary form (compiled executables) must
reproduce the above copyright
notice, definition, disclaimer, and
this list of conditions in
documentation and/or other
materials provided with the distribution. The sole exception to this condition is redistribution of a
standard UnZipSFX binary
(including SFXWiz) as part of a
self-extracting archive; that ispermitted without inclusion of this
license, as long as the normal
SFX banner has not been
removed from the binary or
disabled.
3. Altered versions--including, but not limited to, ports to new
operating systems, existing ports
with new graphical interfaces, and dynamic, shared, or static library
versions--must be plainly marked
as such and must not be
misrepresented as being the
original source. Such altered
versions also must not be
misrepresented as being Info-ZIP
releases--including, but not
limited to, labeling of the altered
versions with the names “Info-
ZIP” (or any variation thereof,
including, but not limited to,
different capitalizations), “Pocket
UnZip,” “WiZ” or “MacZip” without
the explicit permission of Info-ZIP.
Such altered versions are further
prohibited from misrepresentativeuse of the Zip-Bugs or Info-ZIP e- mail addresses or of the Info-ZIP
URL(s).
4. Info-ZIP retains the right to use the names “Info-ZIP,” “Zip,”
“UnZip,” “UnZipSFX,” “WiZ,” “Pocket UnZip,” “Pocket Zip,” and
“MacZip” for its own source and
binary releases.
Registered trademarksApple Inc.
Apple CarPlay™ is a trademark of
Apple Inc.
App Store ®
and iTunes Store ®
are
registered trademarks of Apple Inc.
iPhone ®
, iPod ®
, iPod touch ®
, iPod
nano ®
, iPad ®
and Siri ®
are registered
trademarks of Apple Inc.Bluetooth SIG, Inc.
Bluetooth ®
is a registered trademark
of Bluetooth SIG, Inc.DivX, LLC
DivX ®
and DivX Certified ®
are
registered trademarks of DivX, LLC.
Page 245 of 247

243Rear window wiper and washer ..80
Recommended fluids and lubricants ........................ 217, 221
Refuelling ................................... 167
Registered trademarks ...............235
Retained power off .....................132
Reversing lights .........................118
Ride control systems ..................147
Roof .............................................. 37
Roof load ...................................... 74
Roof rack ..................................... 74
S Seat adjustment ....................... 6, 41
Seat belt ........................................ 8
Seat belt reminder .......................92
Seat belts ..................................... 44
Seat heating ................................. 43
Seat position ................................ 40
Selective catalytic reduction .......139
Selector lever ............................. 142
Service ....................................... 127
Service display ............................ 87
Service information ....................216
Side airbag system ......................51
Software acknowledgement .......234
Spare wheel ............................... 206
Speed limiter......................... 97, 152
Speedometer ............................... 84
Starting and operating ................129Starting off ................................... 17
Starting the engine ....................132
Steering ...................................... 129
Steering wheel adjustment ......9, 77
Steering wheel controls ...............77
Stop-start system........................ 134
Storage compartments .................59
Sunroof ........................................ 37
Sunvisor lights ........................... 120
Sun visors .................................... 37
Symbols ......................................... 4
T
Tachometer ................................. 85
Tail lights ................................... 186
Three-point seat belt .................... 45
Tools .......................................... 194
Tow bar....................................... 171
Towing ................................ 171, 211
Towing another vehicle .............212
Towing equipment .....................172
Towing the vehicle .....................211
Traction Control system ............. 147
Traction Control system off........... 95
Traffic sign assistant .............97, 160
Trailer towing ............................. 172
Transmission ............................... 17
Transmission display .................141
Tread depth ............................... 200
Trip odometer .............................. 84Turn lights ............................ 92, 118
Tyre chains ................................ 201
Tyre designations ......................195
Tyre pressure ............................ 195
Tyre pressure monitoring system ............................... 95, 196
Tyre pressures ........................... 230
Tyre repair kit ............................. 202
U Ultrasonic parking assist............. 156
Underseat storage .......................60
Upholstery .................................. 215
Uplevel display ............................. 97
Using this manual ..........................3
V Valet mode ................................. 102
Vehicle battery ........................... 181
Vehicle checks............................ 177
Vehicle data ................................ 221
Vehicle data recording and privacy ..................................... 236
Vehicle detected ahead ................97
Vehicle dimensions .................... 228
Vehicle Identification Number ....219
Vehicle jack ................................ 194
Vehicle messages .....................104
Vehicle personalisation .............106
Vehicle security ............................ 31
Vehicle specific data ......................3