brake light OPEL MOVANO_B 2017 Manual user
[x] Cancel search | Manufacturer: OPEL, Model Year: 2017, Model line: MOVANO_B, Model: OPEL MOVANO_B 2017Pages: 255, PDF Size: 6.12 MB
Page 20 of 255
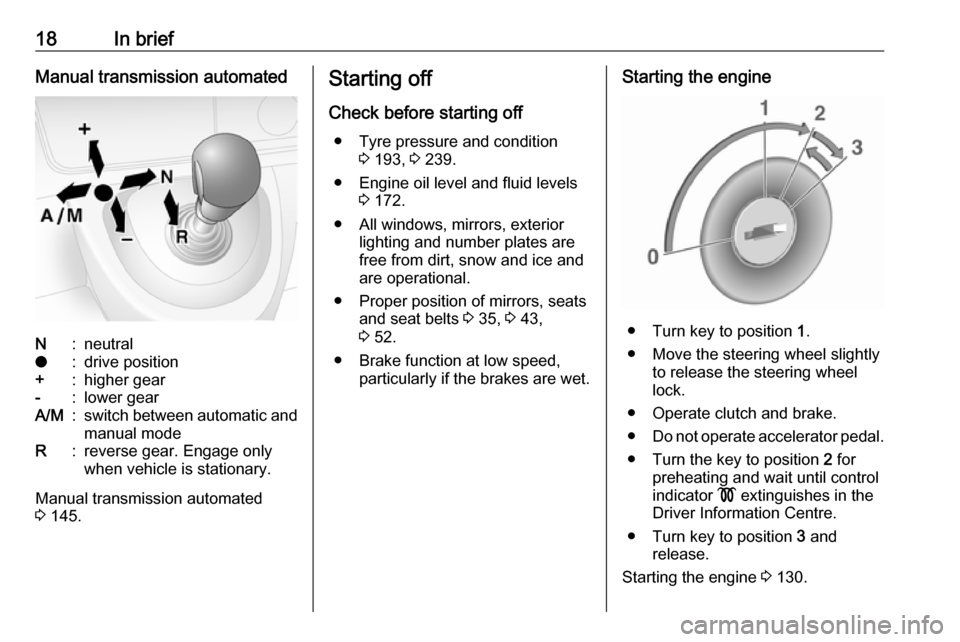
18In briefManual transmission automatedN:neutralo:drive position+:higher gear-:lower gearA/M:switch between automatic and
manual modeR:reverse gear. Engage only
when vehicle is stationary.
Manual transmission automated
3 145.
Starting off
Check before starting off ● Tyre pressure and condition 3 193, 3 239.
● Engine oil level and fluid levels 3 172.
● All windows, mirrors, exterior lighting and number plates are
free from dirt, snow and ice and
are operational.
● Proper position of mirrors, seats and seat belts 3 35, 3 43,
3 52.
● Brake function at low speed, particularly if the brakes are wet.Starting the engine
● Turn key to position 1.
● Move the steering wheel slightly to release the steering wheel
lock.
● Operate clutch and brake.
● Do not operate accelerator pedal.
● Turn the key to position 2 for
preheating and wait until control
indicator ! extinguishes in the
Driver Information Centre.
● Turn key to position 3 and
release.
Starting the engine 3 130.
Page 81 of 255

Instruments and controls79Instruments and
controlsControls ....................................... 80
Steering wheel adjustment ........80
Steering wheel controls .............80
Horn ........................................... 80
Steering column controls ...........80
Windscreen wiper/washer .........81
Outside temperature ..................82
Clock ......................................... 83
Power outlets ............................. 83
Cigarette lighter ......................... 84
Ashtrays .................................... 84
Warning lights, gauges and indi‐
cators ........................................... 85
Instrument cluster ......................85
Speedometer ............................. 85
Odometer .................................. 86
Trip odometer ............................ 86
Tachometer ............................... 86
Fuel gauge ................................ 86
AdBlue gauge ............................ 87
Engine coolant temperature gauge ....................................... 87
Engine oil level monitor .............87
Service display .......................... 88Transmission display .................88
Control indicators ......................89
Turn signal ................................. 92
Seat belt reminder .....................92
Airbag and belt tensioners .........92
Airbag deactivation ....................92
Charging system .......................93
Malfunction indicator light ..........93
Service vehicle soon .................93
Stop engine ............................... 94
Brake system ............................. 94
Antilock brake system (ABS) .....94
Upshift ....................................... 94
Lane departure warning ............94
Electronic Stability Program ......95
Electronic Stability Program off ............................................. 95
Engine coolant temperature ......95
Preheating ................................. 95
AdBlue ....................................... 95
Tyre pressure monitoring system ...................................... 95
Engine oil pressure ....................96
Low fuel ..................................... 96
Stop-start system ......................96
Exterior light .............................. 97
High beam ................................. 97
High beam assist .......................97
Fog light ..................................... 97
Rear fog light ............................. 97Cruise control............................ 97
Tachograph ............................... 97
Door open .................................. 97
Information displays .....................98
Driver Information Centre ..........98
Info display ................................ 98
Vehicle messages ........................99
Warning chimes .........................99
Trip computer ............................. 100
Tachograph ................................ 102
Page 93 of 255
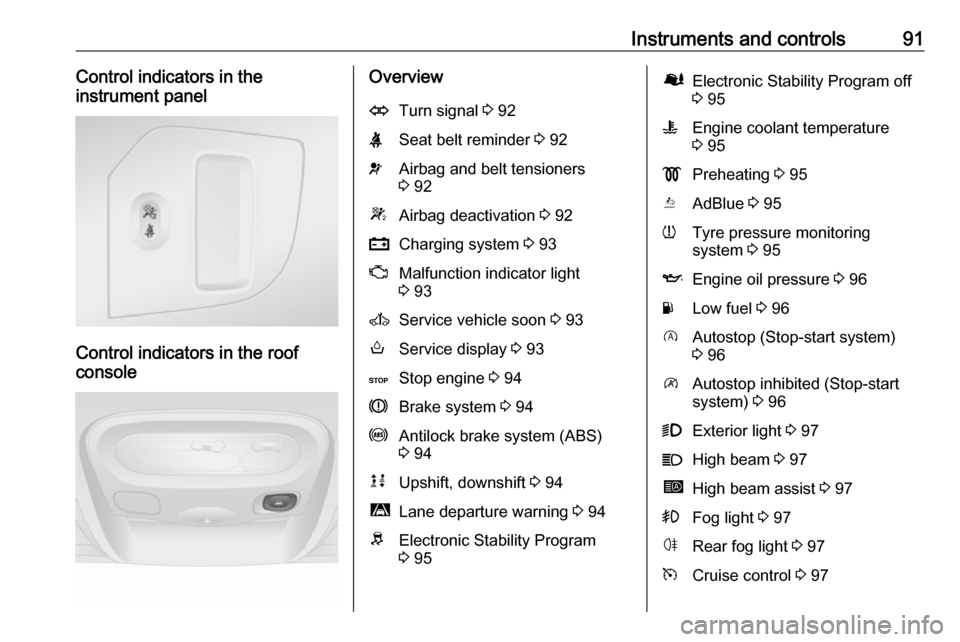
Instruments and controls91Control indicators in the
instrument panel
Control indicators in the roof
console
OverviewOTurn signal 3 92XSeat belt reminder 3 92vAirbag and belt tensioners
3 92WAirbag deactivation 3 92pCharging system 3 93ZMalfunction indicator light
3 93AService vehicle soon 3 93oService display 3 93CStop engine 3 94RBrake system 3 94uAntilock brake system (ABS)
3 94kjUpshift, downshift 3 94ìLane departure warning 3 94RElectronic Stability Program
3 95ØElectronic Stability Program off
3 95WEngine coolant temperature
3 95!Preheating 3 95YAdBlue 3 95wTyre pressure monitoring
system 3 95IEngine oil pressure 3 96YLow fuel 3 96DAutostop (Stop-start system)
3 96\Autostop inhibited (Stop-start
system) 3 969Exterior light 3 97CHigh beam 3 97íHigh beam assist 3 97>Fog light 3 97øRear fog light 3 97mCruise control 3 97
Page 95 of 255
Instruments and controls939Danger
Risk of fatal injury for a child using
a child restraint system together
with activated front passenger
airbag.
Risk of fatal injury for an adult
person with deactivated front
passenger airbag.
Airbag system 3 54, belt tensioners
3 51, airbag deactivation 3 58.
Charging system p illuminates red.
Illuminates when the ignition is
switched on and extinguishes shortly after the engine starts.
Illuminates when the engine is
running
Stop, switch off engine. Vehicle
battery is not charging. Engine
cooling may be interrupted. The
brake servo unit may cease to be
effective. Seek the assistance of a
workshop.
Malfunction indicator light
Z illuminates or flashes yellow.
Illuminates briefly when the ignition is
switched on.
Illuminates when the engine is
running
Fault in the emission control system. The permitted emission limits may be exceeded. Seek the assistance of a
workshop immediately.
If Z illuminates in combination with
A , stop vehicle and switch off engine
as soon as possible.9 Warning
Have the cause of the fault
remedied immediately by a
workshop.
Flashes when the engine is
running
Fault that could lead to catalytic
converter damage. Ease up on the
accelerator until the flashing stops.
Seek the immediate assistance of a
workshop.
Service vehicle soon
A illuminates yellow.
Illuminates briefly when the ignition is
switched on.
The vehicle needs a service.
May illuminate in combination with
another control indicator or a
message in the Driver Information
Centre 3 98.
Illuminates if cleaning of the diesel particle filter is required and
automatic cleaning does not occur
3 137.9 Warning
Have the cause of the fault
remedied immediately by a
workshop.
Service display
Control indicator o also illuminates in
the Driver Information Centre when
the remaining distance before the
next service reaches 0 km or the
service date is due.
Page 101 of 255

Instruments and controls99Vehicle messages
Messages appear in the Driver
Information Centre, in combination
with control indicator A or C.
Information messagesInformation messagesBATTERY MODE: ECONOMYESP OFFAUTO LIGHTS DEACTIVATEDOIL LEVEL CORRECT
Fault messages Displayed in combination with control
indicator A. Drive with caution and
seek the assistance of a workshop.
To remove fault message, press
button on end of wiper lever. After a
few seconds the message may
disappear automatically and A
remains illuminated. The fault will
then be stored in the on board
system.
Fault messagesCHECK ESPCHECK FUEL FILTERCHECK GEARBOXCHECK AUTO LIGHTS
Warning messages
These may appear with control
indicator C or in combination with
other warning messages, control
indicators or an audible warning. Stop engine immediately and seek the
assistance of a workshop.
Warning messagesINJECTION FAULTENGINE OVERHEATINGGEARBOX OVERHEATING
Tyre pressure monitoring system
3 194.
Warning chimes
When starting the engine or whilst
driving
Only one warning chime will sound at a time.
The warning chime regarding
unfastened seat belts has priority
over any other warning chime.
● If seat belt is not fastened 3 52.
● If a certain speed is exceeded with the parking brake applied
3 150.
● If the parking assist detects an object or a fault is present
3 158.
● If the vehicle has manual transmission automated and the
clutch temperature is too high
3 145.
● If the vehicle speed briefly exceeds a set limit 3 85.
● During closing of the power sliding door 3 27.
● If the sliding door is open and the
parking brake is released 3 27.
Page 102 of 255
100Instruments and controls● During activation anddeactivation of alarm monitoringof vehicle inclination 3 33.
● If the AdBlue level falls below a certain amount or a fault is
present 3 138.
● If the lane departure warning system detects an unintended
lane change and when the
system is activated 3 162.
When the vehicle is parked and/or
the driver's door is opened
● When the key is in the ignition switch.
● With exterior lights on 3 104.
● There is a fault with the power door lock system 3 26.
● If the vehicle has manual transmission automated 3 145;
the parking brake has not been
applied, neutral is not selected or
the brake pedal has not been
depressed. A corresponding
message may also appear in the
Driver Information Centre 3 98.● If the sliding side door exterior
handle is in the open position
when unlocking the vehicle 3 27.
● If the parking brake is not applied
when the power sliding door
switch is pressed 3 27.
● If the power sliding door is locked
from the inside with the child lock
active 3 27.
● If the engine is in an Autostop but
not switched off. Stop-start
system 3 132.Trip computer
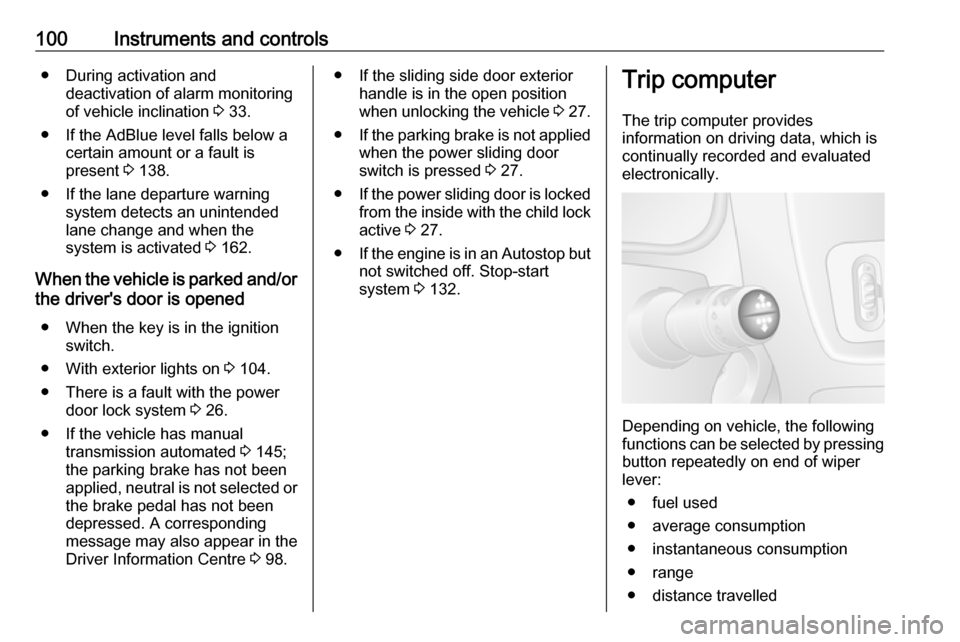
The trip computer provides
information on driving data, which is
continually recorded and evaluated electronically.
Depending on vehicle, the following
functions can be selected by pressing button repeatedly on end of wiper
lever:
● fuel used
● average consumption
● instantaneous consumption
● range
● distance travelled
Page 148 of 255
146Driving and operatingStarting the engine
Depress the brake pedal when
starting the engine. If the brake pedal
is not depressed, T illuminates in the
transmission display and the engine
cannot be started.
When the brake pedal is depressed,
the transmission automatically shifts
to N (neutral); "N" appears in the
transmission display and the engine
can be started. There may be a slight delay.
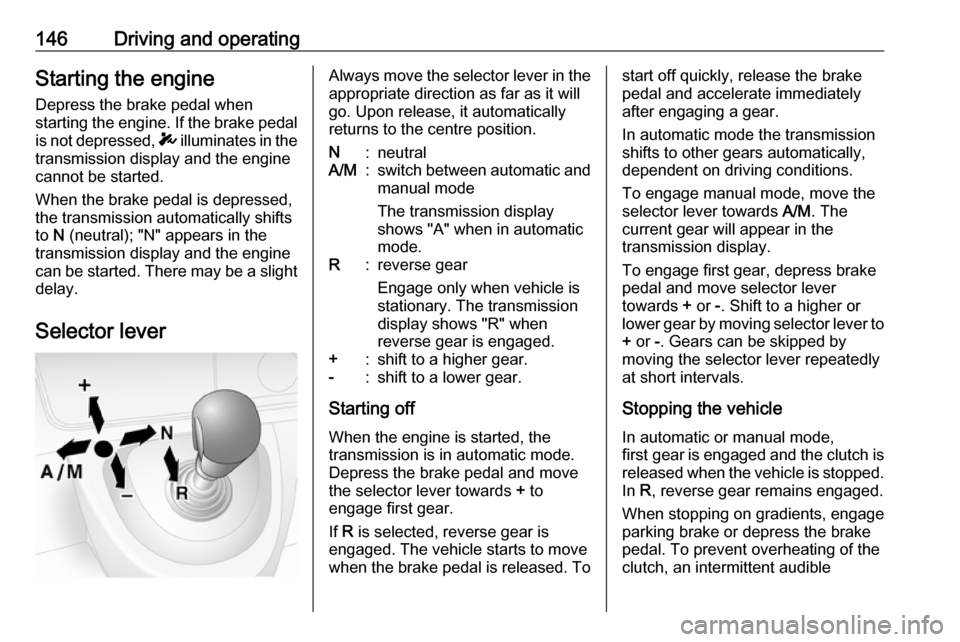
Selector leverAlways move the selector lever in the
appropriate direction as far as it will
go. Upon release, it automatically
returns to the centre position.N:neutralA/M:switch between automatic and manual mode
The transmission display
shows "A" when in automatic
mode.R:reverse gear
Engage only when vehicle is
stationary. The transmission
display shows "R" when
reverse gear is engaged.+:shift to a higher gear.-:shift to a lower gear.
Starting off
When the engine is started, the
transmission is in automatic mode. Depress the brake pedal and move
the selector lever towards + to
engage first gear.
If R is selected, reverse gear is
engaged. The vehicle starts to move
when the brake pedal is released. To
start off quickly, release the brake pedal and accelerate immediately
after engaging a gear.
In automatic mode the transmission
shifts to other gears automatically,
dependent on driving conditions.
To engage manual mode, move the
selector lever towards A/M. The
current gear will appear in the
transmission display.
To engage first gear, depress brake
pedal and move selector lever
towards + or -. Shift to a higher or
lower gear by moving selector lever to + or -. Gears can be skipped by
moving the selector lever repeatedly
at short intervals.
Stopping the vehicle In automatic or manual mode,
first gear is engaged and the clutch is
released when the vehicle is stopped.
In R, reverse gear remains engaged.
When stopping on gradients, engage
parking brake or depress the brake
pedal. To prevent overheating of the
clutch, an intermittent audible
Page 149 of 255
Driving and operating147warning may sound as a signal to
depress the brake pedal or apply the
parking brake.
Switch off engine if stopping for a lengthy period, e.g. in traffic jams.
When the vehicle is parked and the
driver's door is opened, a warning
chime will sound if neutral is not
selected or the brake pedal has not
been depressed.
Engine braking
Automatic mode
When driving downhill, the manual transmission automated does not shift into higher gears until a fairly
high engine speed has been reached. It shifts down in good time when
braking.
Manual mode
To utilise the engine braking effect, select a lower gear in good time when driving downhill.Rocking the vehicle
Rocking the vehicle is only
permissible if the vehicle is stuck in
sand, mud, snow or a hole. Move the
selector lever between R and A/M (or
between + and -) in a repeat pattern,
while applying light pressure to the
accelerator pedal. Do not race the
engine and avoid sudden
acceleration.
Parking
Apply the parking brake. The most recently engaged gear (see
transmission display) remains
engaged. With N, no gear is engaged.
When the ignition is switched off, the transmission no longer responds to
movement of the selector lever.
If the ignition is not switched off, or the parking brake has not been applied, a
warning chime will sound upon
opening the driver's door.
Manual mode If a higher gear is selected when the
engine speed is too low, or a lower
gear when the speed is too high, theshift is not executed. This prevents
the engine from running at too low or too high an engine speed.
If engine speed is too low, the
transmission automatically shifts to a
lower gear.
If engine speed is too high, the
transmission only switches to a higher gear via kickdown.
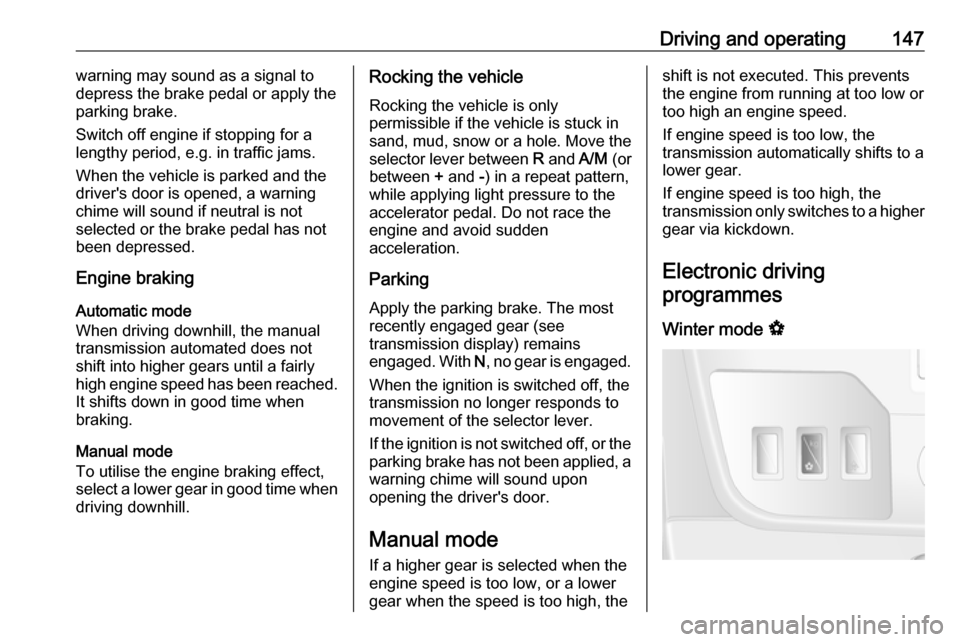
Electronic driving programmes
Winter mode V
Page 152 of 255
150Driving and operating9Warning
If there is a fault in the ABS, the
wheels may be liable to lock due
to braking that is heavier than
normal. The advantages of ABS are no longer available. During
hard braking, the vehicle can no longer be steered and may
swerve.
If control indicators u, A , R and
C illuminate, the ABS and ESP are
deactivated and the message
BRAKING FAULT is shown in the
Driver Information Centre. Seek the
assistance of a workshop.
Have the cause of the fault remedied
by a workshop.
Parking brake9 Warning
Always apply parking brake firmly
without operating the release
button, and apply as firmly as
possible on a downhill or uphill
slope.
To release the parking brake, pull
the lever up slightly, press the
release button and fully lower the
lever.
To reduce the operating forces of
the parking brake, depress the
brake pedal at the same time.
Control indicator R 3 94.
Parking 3 134.
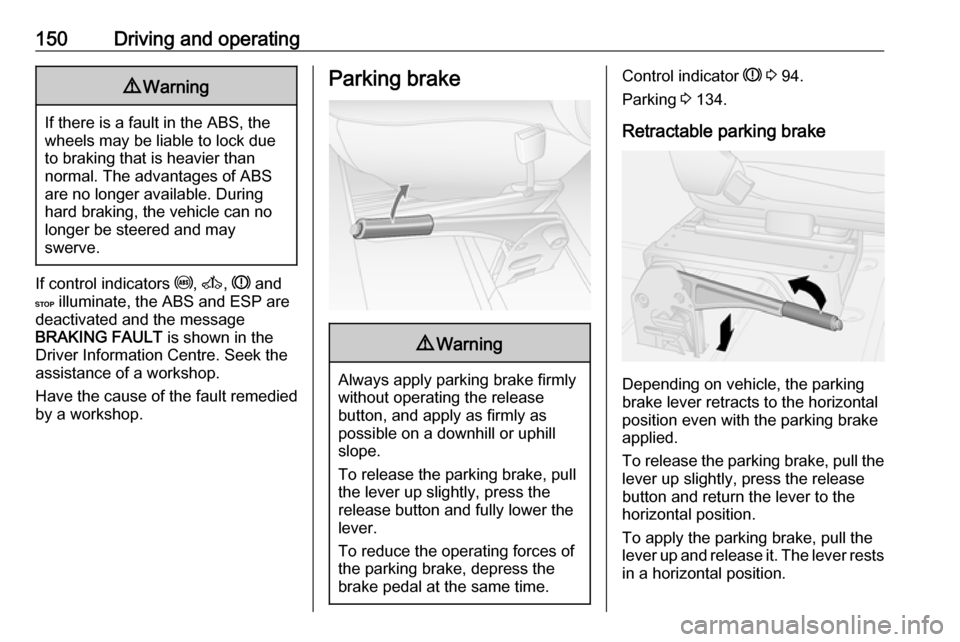
Retractable parking brake
Depending on vehicle, the parking
brake lever retracts to the horizontal
position even with the parking brake
applied.
To release the parking brake, pull the lever up slightly, press the release
button and return the lever to the
horizontal position.
To apply the parking brake, pull the
lever up and release it. The lever rests
in a horizontal position.
Page 168 of 255

166Driving and operatingTrailer hitch
General information
Only use towing equipment that has
been approved for your vehicle.
Entrust fitting of towing equipment at
a later date to a workshop. It may be
necessary to make changes that
affect the cooling system, heat
shields or other equipment.
Driving characteristics and towing tips
In the case of trailers with brakes,
attach the breakaway stopping cable.
Before attaching a trailer, lubricate
the coupling ball. However, do not do so if a stabiliser, which acts on thecoupling ball, is being used to reduce
snaking movements. For trailers with
low driving stability the use of a
stabiliser is recommended.
A maximum speed of 80 km/h must
not be exceeded, even in countries
where higher speeds are permitted.If the trailer starts snaking, drive more slowly, do not attempt to correct the
steering and brake sharply if
necessary.
When driving downhill, drive in the
same gear as if driving uphill and
drive at a similar speed.
Adjust tyre pressure to the value
specified for full load 3 239.
Trailer towing
Trailer loads The permissible trailer loads are
vehicle-dependent and engine-
dependent maximum values which
must not be exceeded. The actual
trailer load is the difference between
the actual gross weight of the trailer
and the actual coupling socket load
with the trailer coupled.
The permissible trailer loads are
specified in the vehicle documents. In
general, they are valid for gradients
up to max. 12%.
The permitted trailer load applies up to the specified incline and up to an
altitude of 1000 metres above sealevel. Since engine power decreases
as altitude increases due to the air
becoming thinner, therefore reducing
climbing ability, the permissible gross
train weight also decreases by 10%
for every 1000 metres of additional
altitude. The gross train weight does
not have to be reduced when driving
on roads with slight inclines (less than 8%, e.g. motorways).
The permissible gross train weight
must not be exceeded. This weight is
specified on the identification plate
3 218.
Vertical coupling load
The vertical coupling load is the load
exerted by the trailer on the coupling
ball. It can be varied by changing the
weight distribution when loading the
trailer.
The maximum permissible vertical
coupling load is specified on the
towing equipment identification plate
and in the vehicle documents. Always aim for the maximum load, especially in the case of heavy trailers. The
vertical coupling load should never
fall below 25 kg.