winter tyres OPEL MOVANO_B 2018.5 Manual user
[x] Cancel search | Manufacturer: OPEL, Model Year: 2018.5, Model line: MOVANO_B, Model: OPEL MOVANO_B 2018.5Pages: 271, PDF Size: 6.5 MB
Page 182 of 271

180Vehicle careVehicle careGeneral Information...................181
Accessories and vehicle modifications .......................... 181
Vehicle storage ........................181
End-of-life vehicle recovery .....182
Vehicle checks ........................... 182
Performing work ......................182
Bonnet ..................................... 182
Engine oil ................................. 183
Engine coolant ......................... 185
Power steering fluid .................185
Washer fluid ............................ 186
Brakes ..................................... 187
Brake fluid ............................... 187
Vehicle battery ......................... 187
Diesel fuel filter ........................189
Diesel fuel system bleeding .....189
Wiper blade replacement ........190
Bulb replacement .......................191
Headlights ............................... 191
Fog lights ................................. 194
Front turn lights .......................194
Tail lights ................................. 195
Side turn lights ......................... 196Centre high-mounted brake
light ......................................... 197
Number plate light ...................198
Interior lights ............................ 198
Instrument panel illumination ...199
Electrical system ........................200
Fuses ....................................... 200
Engine compartment fuse box . 201
Instrument panel fuse box .......201
Load compartment fuse box ....202
Vehicle tools .............................. 204
Tools ........................................ 204
Wheels and tyres .......................205
Tyres ....................................... 205
Winter tyres ............................. 206
Tyre designations ....................206
Tyre pressure .......................... 206
Tyre pressure monitoring system .................................... 207
Tread depth ............................. 209
Changing tyre and wheel size . 210 Wheel covers ........................... 210
Tyre chains .............................. 210
Tyre repair kit .......................... 211
Wheel changing .......................214
Spare wheel ............................ 216
Jump starting ............................. 219Towing....................................... 221
Towing the vehicle ...................221
Towing another vehicle ...........222
Appearance care .......................223
Exterior care ............................ 223
Interior care ............................. 225
Page 208 of 271

206Vehicle careWinter tyresWinter tyres improve driving safety at
temperatures below 7 °C and should
therefore be fitted on all wheels.
In accordance with country-specific
regulations, affix the maximum speed sticker in the driver's field of view.
Tyre designations
E.g. 215/65 R 16 C 109 R215:tyre width, mm65:cross-section ratio (tyre height
to tyre width), %R:belt type: RadialRF:type: RunFlat16:wheel diameter, inchesC:cargo or commercial use88:load index e.g. 109 is
equivalent to approx. 1030 kgR:speed code letter
Speed code letter:
Q:up to 160 km/hS:up to 180 km/hT:up to 190 km/hH:up to 210 km/hV:up to 240 km/hW:up to 270 km/hChoose a tyre appropriate for the
maximum speed of your vehicle.
The maximum speed is achievable at kerb weight with driver (75 kg) plus
125 kg payload. Optional equipment
could reduce the maximum speed of
the vehicle.
Directional tyres
Fit directional tyres such that they roll in the direction of travel. The rolling
direction is indicated by a symbol
(e.g. an arrow) on the sidewall.
Tyre pressure
Check the pressure of cold tyres at
least every 14 days and before any
long journey. Do not forget the spare
wheel. This also applies to vehicles
with tyre pressure monitoring system.
The tyre pressure information label
on the driver's door frame indicates the original equipment tyres and the
correspondent tyre pressures.
Always inflate tyres to the pressures
shown on the label.
Tyre pressures 3 252.The tyre pressure data refers to cold
tyres. It applies to summer and winter tyres.
Always inflate the spare tyre to the
pressure specified for full load.
Incorrect tyre pressures will impair
safety, vehicle handling, comfort and
fuel economy and will increase tyre
wear.
Tyre pressures differ depending on
various options. For the correct tyre
pressure value, follow the procedure
below:
1. Identify the engine identifier code.
Engine data 3 233.
2. Identify the respective tyre.
The tyre pressure tables show all
possible tyre combinations 3 252.
For the tyres approved for your
vehicle, refer to the EEC Certificate of Conformity provided with your vehicle
or other national registration
documents.
The driver is responsible for correct adjustment of tyre pressure.
Page 211 of 271

Vehicle care209After a puncture has been repaired
and the driver has inflated the tyres to
the correct tyre pressure, the tyre
pressure monitoring system needs to
recalculate.
Tyre pressure 3 252.
Tyre repair kit 3 211.
During driving, select the tyre
pressure menu in the Driver
Information Centre by pressing button on end of wiper lever. Press and holdbutton for approx. five seconds to
initialise recalculation. A
corresponding message appears in
the Driver Information Centre.
Several minutes of driving at a speed
above 40 km/h may be required to
complete the relearn process. The system can only provide limited
information during this time.
If problems occur during the relearn
process, control indicator w remains
illuminated and a warning message is displayed in the Driver Information
Centre.
Driver Information Centre 3 106.
Vehicle messages 3 107.General information
The use of tyre chains or
commercially available liquid tyre
repair kits can impair the function of
the system. Factory-approved tyre
repair kits can be used.
Tyre repair kit 3 211.
Tyre chains 3 210.
External high-power radio equipment
could disrupt the tyre pressure
monitoring system.
Each time the tyres are replaced, the
tyre pressure monitoring system
sensors must be dismounted and
serviced by a workshop.
Tread depth Check tread depth at regular
intervals.
Tyres should be replaced for safety
reasons at a tread depth of 2–3 mm
(4 mm for winter tyres).
For safety reasons it is recommended
that the tread depth of the tyres on
one axle should not vary by more than 2 mm.
The legally permissible minimum
tread depth (1.6 mm) has been
reached when the tread has worn
down as far as one of the tread wear
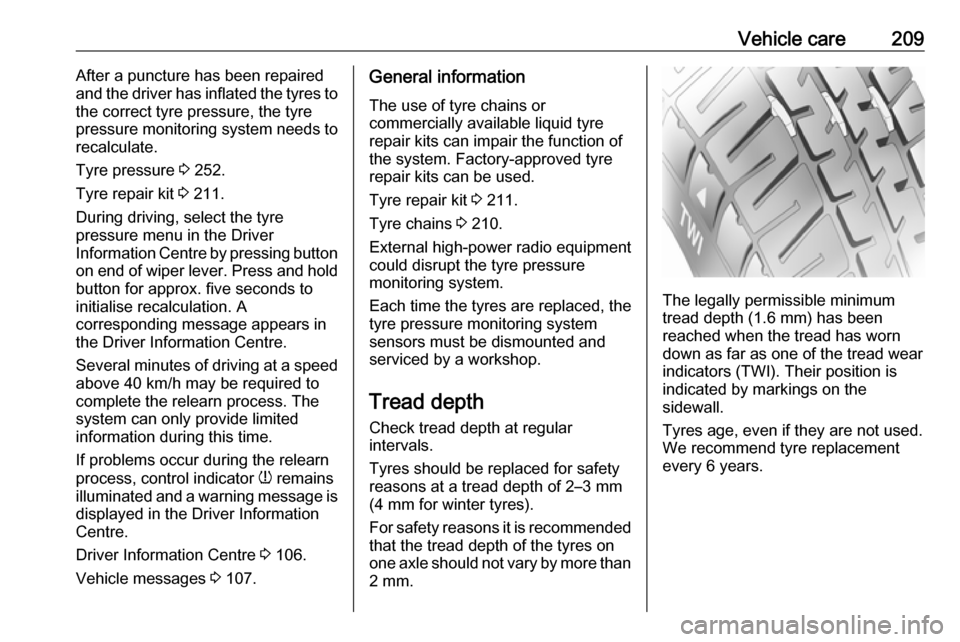
indicators (TWI). Their position is
indicated by markings on the
sidewall.
Tyres age, even if they are not used.
We recommend tyre replacement
every 6 years.
Page 218 of 271

216Vehicle careNote
If applicable, fit anti-theft bolts
nearest the tyre valve (otherwise it
may not be possible to refit the wheel cover).
10. Stow the replaced wheel 3 216
and the vehicle tools 3 204.
11. Have the new wheel balanced on the vehicle. Check the tyre
pressure of the installed tyre
3 252 and also the wheel bolt /
nut torque as soon as possible.
Have the defective tyre renewed or
repaired.
Spare wheel Some vehicles are equipped with atyre repair kit instead of a spare wheel
3 211.
The spare wheel can be classified as
a temporary spare wheel depending
on the size compared to the other
mounted wheels and country
regulations. In this case a permissible maximum speed applies, even
though no label at the spare wheel
indicates this.Caution
The use of a spare wheel that is smaller than the other wheels or in combination with winter tyres
could affect driveability. Have the defective tyre replaced as soon as
possible.
The spare wheel is held under the
vehicle frame using a winch and
secured by tightening a cable using
the wheel wrench and adapters
(depending on vehicle).
It may be necessary to jack the
vehicle up to gain access to the spare
wheel on a fully loaded vehicle with a flat rear tyre.
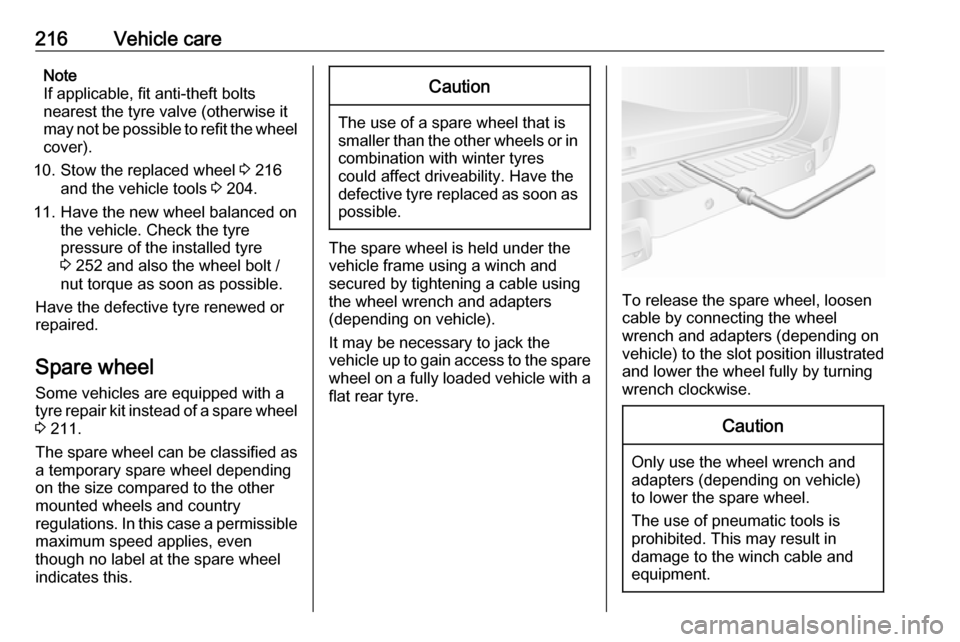
To release the spare wheel, loosen
cable by connecting the wheel
wrench and adapters (depending on
vehicle) to the slot position illustrated
and lower the wheel fully by turning
wrench clockwise.
Caution
Only use the wheel wrench and
adapters (depending on vehicle)
to lower the spare wheel.
The use of pneumatic tools is
prohibited. This may result in
damage to the winch cable and
equipment.
Page 220 of 271

218Vehicle careThen tighten cable using the wheel
wrench and adapters by connecting
to the slot position illustrated above
and turning wrench anticlockwise
until the wheel is secured in the fully
raised position.9 Warning
Ensure the front of the wheel (side
with tyre valve) is facing upwards
when the spare wheel is
reinstalled below the vehicle
frame.
Temporary spare wheel
Caution
The use of a spare wheel that is smaller than the other wheels or in combination with winter tyres
could affect driveability. Have the defective tyre replaced as soon as
possible.
Only mount one temporary spare
wheel. Do not drive faster than
80 km/h. Take curves slowly. Do not use for a long period of time.
If your vehicle gets a flat tyre on the
rear while towing another vehicle,
mount the temporary spare wheel in the front and the full tyre in the rear.
Tyre chains 3 210.
Summer and winter tyres
If you use winter tyres, the spare
wheel may still be fitted with a
summer tyre.
If you use the spare wheel when it is
fitted with a summer tyre the vehicle's driveability may be affected,
especially on slippery road surfaces.
Directional tyres Fit directional tyres such that they rollin the direction of travel. The rolling
direction is indicated by a symbol
(e.g. an arrow) on the sidewall.
The following applies to tyres fitted
opposing the rolling direction:
● Driveability may be affected. Have the defective tyre renewed
or repaired as soon as possible
and fit it instead of the spare
wheel.● Do not drive faster than 80 km/h.
● Drive particularly carefully on wet
and snow-covered road
surfaces.
Page 226 of 271

224Vehicle carePaintwork polish with silicone forms a
protective film, making waxing
unnecessary.
Unpainted plastic body parts must not be treated with wax or polishing
agents.
Matt filmed body parts or decor tapes must not be polished, to avoid
gleaming. Do not use hot wax
programmes in automatic car washes if the vehicle is equipped with theseparts.
Matt painted decor parts, e.g. mirror
housing cover, must not be polished.
Otherwise these parts would become
agleam or the colour would be
dissolved.
Windows and windscreen wiper
blades
Use a soft lint-free cloth or chamois
leather together with window cleaner and insect remover.
When cleaning the rear window from
inside, always wipe in parallel to the
heating element to prevent damage.For mechanical removal of ice, use a
sharp-edged ice scraper. Press the
scraper firmly against the glass so
that no dirt can get under it and
scratch the glass.
Remove dirt residues from smearing wiper blades by using a soft cloth and
window cleaner. Also make sure to
remove any residues such as wax,
insect residues and similar from the
window.
Wheels and tyres
Do not use high-pressure jet
cleaners.
Clean rims with a pH-neutral wheel
cleaner.
Rims are painted and can be treated
with the same agents as the body.
Paintwork damage
Rectify minor paintwork damage with
a touch-up pen before rust forms.
Have more extensive damage or rust areas repaired by a workshop.Underbody
Some areas of the vehicle underbody
have a PVC undercoating while other
critical areas have a durable
protective wax coating.
After the underbody is washed, check
the underbody and have it waxed if
necessary.
Bitumen / rubber materials could damage the PVC coating. Have
underbody work carried out by a
workshop.
Before and after winter, wash the
underbody and have the protective
wax coating checked.
Towing equipment Do not clean the coupling ball bar with
a steam-jet or high-pressure jet
cleaner.
Page 269 of 271

267UUltrasonic parking assist............. 169
Underseat storage .......................78
Upholstery .................................. 225
Upshift ........................................ 102
USB socket ................................... 91
Using this manual ..........................3
V Vehicle battery ...................187, 219
Vehicle checks............................ 182
Vehicle data ................................ 232
Vehicle data recording and privacy ..................................... 258
Vehicle dimensions .................... 242
Vehicle Identification Number ....230
Vehicle jack ................................ 204
Vehicle messages .....................107
Vehicle security ............................ 37
Vehicle specific data ......................3
Vehicle storage ........................... 181
Vehicle tools ............................... 204
Vehicle unlocking ........................... 6
Vehicle weight ........................... 235
Ventilation ................................... 120
W
Warning chimes .........................108
Warning lights ............................... 93
Warning triangle .......................... 83
Washer and wiper systems .........17Washer fluid ............................... 186
Washing the vehicle ...................223
Wheel changing .........................214
Wheel covers ............................. 210
Wheels and tyres .......................205
Wheel wrench ............................. 204
Wide view mirror .....................42, 45
Window guard............................... 83
Windows ....................................... 43
Windscreen................................... 43
Windscreen wiper and washer ....89
Winter tyres ............................... 206
Wiper blade replacement ..........190