tyre pressure OPEL MOVANO_B 2020 Manual user
[x] Cancel search | Manufacturer: OPEL, Model Year: 2020, Model line: MOVANO_B, Model: OPEL MOVANO_B 2020Pages: 353, PDF Size: 9.4 MB
Page 293 of 353

Vehicle care291Wheels and tyres
Tyre condition, wheel condition
Drive over edges slowly and at right
angles if possible. Driving over sharp
edges can cause tyre and wheel
damage. Do not trap tyres on the kerb when parking.
Regularly check the wheels for
damage. Seek the assistance of a
workshop in the event of damage or
unusual wear.
We recommend not swapping the
front wheels with the rear wheels and vice versa, as this can affect vehicle
stability. Always use less worn tyres
on the rear axle.
Tyres Factory-fitted tyres are matched to
the chassis and offer optimum driving comfort and safety.Winter tyres
Winter tyres improve driving safety at temperatures below 7 °C and should
therefore be fitted on all wheels.
In accordance with country-specific
regulations, affix the maximum speed
sticker in the driver's field of view.
Tyre designations
E.g. 215/65 R 16 C 109 R215:tyre width, mm65:cross-section ratio (tyre height
to tyre width), %R:belt type: RadialRF:type: RunFlat16:wheel diameter, inchesC:cargo or commercial use88:load index e.g. 109 is
equivalent to approx. 1030 kgR:speed code letter
Speed code letter:
Q:up to 160 km/hS:up to 180 km/hT:up to 190 km/hH:up to 210 km/hV:up to 240 km/hW:up to 270 km/hChoose a tyre appropriate for the
maximum speed of your vehicle.
The maximum speed is achievable at kerb weight with driver (75 kg) plus
125 kg payload. Optional equipment
could reduce the maximum speed of
the vehicle.
Directional tyres
Fit directional tyres such that they roll in the direction of travel. The rolling
direction is indicated by a symbol
(e.g. an arrow) on the sidewall.
Tyre pressure
Check the pressure of cold tyres at
least every 14 days and before any
long journey. Do not forget the spare
wheel. This also applies to vehicles
with tyre pressure monitoring system.
The tyre pressure information label
on the driver's door frame indicates the original equipment tyres and the
correspondent tyre pressures.
Always inflate tyres to the pressures
shown on the label.
Tyre pressures 3 317.
Page 294 of 353
292Vehicle careThe tyre pressure data refers to cold
tyres. It applies to summer and winter tyres.
Always inflate the spare tyre to the
highest pressure specified for this
tyre size.
Incorrect tyre pressures will impair
safety, vehicle handling, comfort and fuel economy and will increase tyre
wear.
Tyre pressures differ depending on
various options. For the correct tyre
pressure value, follow the procedure
below:
1. Identify the type of drive.
2. Identify the gross vehicle weight.
3. Identify the respective tyre.
The tyre pressure tables show all
possible tyre combinations 3 317.
For the tyres approved for your
vehicle, refer to the EEC Certificate of Conformity provided with your vehicle
or other national registration
documents.
The driver is responsible for correct
adjustment of tyre pressure.9 Warning
If the pressure is too low, this can
result in considerable tyre warm-
up and internal damage, leading to tread separation and even to tyre
blow-out at high speeds.
9 Warning
For specific tyres the
recommended tyre pressure as
shown in the tyre pressure table may exceed the maximum tyre
pressure as indicated on the tyre.
Never exceed the maximum tyre
pressure as indicated on the tyre.
Temperature dependency
Tyre pressure depends on the
temperature of the tyre. During
driving, tyre temperature and
pressure increase.
Tyre pressure values provided on the
tyre information label and tyre
pressure chart are valid for cold tyres, which means at 20 °C. The pressure
increases by nearly 10 kPa (0.1 bar)
for a 10 °C temperature increase.
This must be considered when warm
tyres are checked.
Trailer towing
When towing a trailer with a fully laden vehicle, the tyre pressure must
be increased by 20 kPa / 0.2 bar
(3.0 psi) and the maximum speed
limited to 100 km/h.
Trailer towing 3 265.
Rear-wheel drive, with twin rear
wheels
When inflating the outer tyre, the
inflation tube should be passed
between the two wheels.
Tyre pressure monitoringsystem
The tyre pressure monitoring system
uses radio and sensor technology to
check tyre pressure levels.
Page 295 of 353

Vehicle care293Caution
Tyre pressure monitoring system
warns only about low tyre pressure condition and does not replace
regular tyre maintenance by the
driver.
All wheels must be equipped with pressure sensors and the tyres must
have the prescribed pressure.
Note
In countries where the tyre pressure
monitoring system is legally
required, the use of wheels without
pressure sensors will invalidate the
vehicle operating permit.
The tyre pressure monitoring system
sensors monitor the tyre pressure
and transmit tyre pressure readings
to a receiver located in the vehicle.
Tyre pressure chart 3 317.
Low tyre pressure condition
A detected low tyre pressure
condition is indicated by illumination
of control indicator w 3 102 and a
corresponding message appears in
the Driver Information Centre.
If w illuminates, stop as soon as
possible and inflate the tyres as
recommended 3 317.
After inflating, some driving may be
required to update the tyre pressure
values in the system. During this time
w may illuminate.
If w illuminates at lower temperatures
and extinguishes after some driving,
this could be an indicator for
approaching a low tyre pressure
condition. Check tyre pressure of all
tyres.
If the tyre pressure must be reduced
or increased, switch off ignition.
Only mount wheels with pressure
sensors, otherwise w flashes for
several seconds then illuminates
continuously together with control
indicator j 3 99 and a
corresponding message appears in
the Driver Information Centre.
A spare wheel or temporary spare
wheel is not equipped with pressure
sensors. The tyre pressure
monitoring system is not operational
for these wheels. For the other
wheels, the tyre pressure monitoring
system remains operational.
Control indicator w and the
corresponding message appears at
each ignition cycle until the tyres are
inflated to the correct tyre pressure.
Driver Information Centre 3 105.
Vehicle messages 3 106.
Page 296 of 353
294Vehicle carePuncture
A puncture or severely under-inflated
tyre is indicated by illumination of
control indicator w together with C
3 100 and a corresponding message
appears in the Driver Information
Centre. Stop vehicle and switch off
engine.
Tyre pressure 3 317.
Tyre repair kit 3 296.
Spare wheel 3 301.
Wheel changing 3 299.
Relearn functionAfter a puncture has been repaired
and the driver has inflated the tyres to
the correct tyre pressure, the tyre
pressure monitoring system needs to recalculate.
Tyre pressure 3 317.
Tyre repair kit 3 296.
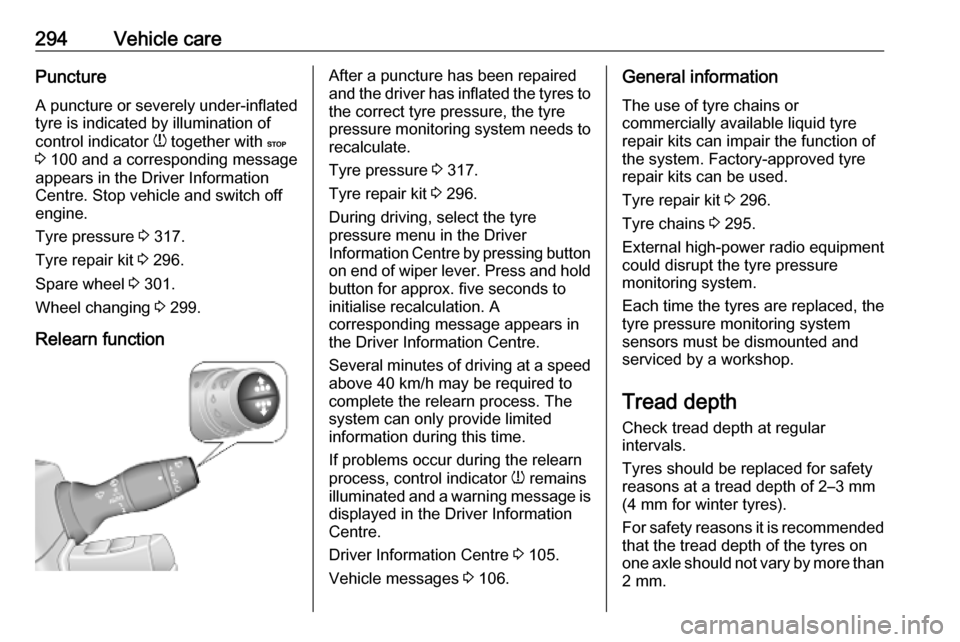
During driving, select the tyre
pressure menu in the Driver
Information Centre by pressing button
on end of wiper lever. Press and hold button for approx. five seconds to
initialise recalculation. A
corresponding message appears in
the Driver Information Centre.
Several minutes of driving at a speed above 40 km/h may be required to
complete the relearn process. The system can only provide limited
information during this time.
If problems occur during the relearn
process, control indicator w remains
illuminated and a warning message is displayed in the Driver Information
Centre.
Driver Information Centre 3 105.
Vehicle messages 3 106.General information
The use of tyre chains or
commercially available liquid tyre
repair kits can impair the function of
the system. Factory-approved tyre
repair kits can be used.
Tyre repair kit 3 296.
Tyre chains 3 295.
External high-power radio equipment
could disrupt the tyre pressure
monitoring system.
Each time the tyres are replaced, the
tyre pressure monitoring system
sensors must be dismounted and
serviced by a workshop.
Tread depth Check tread depth at regular
intervals.
Tyres should be replaced for safety
reasons at a tread depth of 2–3 mm
(4 mm for winter tyres).
For safety reasons it is recommended
that the tread depth of the tyres on
one axle should not vary by more than 2 mm.
Page 297 of 353

Vehicle care295
The legally permissible minimum
tread depth (1.6 mm) has been
reached when the tread has worn
down as far as one of the tread wear
indicators (TWI). Their position is
indicated by markings on the
sidewall.
Tyres age, even if they are not used.
We recommend tyre replacement
every 6 years.
Changing tyre and wheel
size
If tyres of a different size than those fitted at the factory are used, it may be necessary to reprogramme the
nominal tyre pressure and make
other vehicle modifications.
After converting to a different tyre
size, have the label with tyre
pressures replaced.
Tyre pressure monitoring system
3 292.9 Warning
The use of unsuitable tyres or
wheels may lead to accidents and will invalidate the vehicle
operating permit.
Wheel covers
Wheel covers and tyres that are
factory approved for the respective
vehicle and comply with all of the
relevant wheel and tyre combination
requirements must be used.
If the wheel covers and tyres used are
not factory approved, the tyres must
not have a rim protection ridge.
Wheel covers must not impair brake
cooling.9 Warning
Use of unsuitable tyres or wheel
covers could lead to sudden
pressure loss and thereby
accidents.
Tyre chains
Tyre chains are only permitted on the
drive wheels.
Page 299 of 353
Vehicle care297
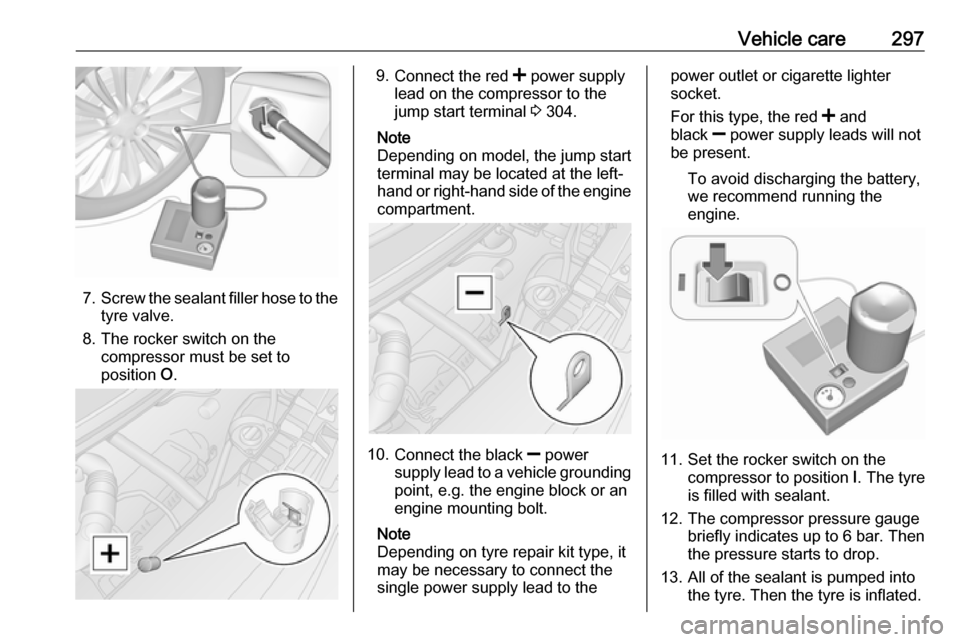
7.Screw the sealant filler hose to the
tyre valve.
8. The rocker switch on the compressor must be set to
position O.
9.
Connect the red < power supply
lead on the compressor to the
jump start terminal 3 304.
Note
Depending on model, the jump start
terminal may be located at the left-
hand or right-hand side of the engine
compartment.
10. Connect the black ] power
supply lead to a vehicle grounding
point, e.g. the engine block or an
engine mounting bolt.
Note
Depending on tyre repair kit type, it
may be necessary to connect the
single power supply lead to the
power outlet or cigarette lighter
socket.
For this type, the red < and
black ] power supply leads will not
be present.
To avoid discharging the battery,
we recommend running the
engine.
11. Set the rocker switch on the compressor to position I. The tyre
is filled with sealant.
12. The compressor pressure gauge briefly indicates up to 6 bar. Then
the pressure starts to drop.
13. All of the sealant is pumped into the tyre. Then the tyre is inflated.
Page 300 of 353

298Vehicle care
14. The prescribed tyre pressureshould be obtained within
10 minutes.
Tyre pressure 3 317.
When the correct pressure is
obtained, turn off the compressor
by setting rocker switch to position O .
If the prescribed tyre pressure is
not obtained within 10 minutes,
remove the tyre repair kit. Move
the vehicle one tyre rotation
(approx. 2 m). Reattach the tyre
repair kit and continue the filling
procedure for 10 minutes. If the
prescribed tyre pressure is still not
obtained, the tyre is too badly
damaged. Seek the assistance of
a workshop.
Drain excess tyre pressure with
the button beside the pressure
indicator.
Do not run the compressor for
longer than 10 minutes.
15. Detach the tyre repair kit.
16. Remove any excess sealant using a cloth.
17. Take the label indicating maximum permitted speed from
the tyre repair kit and affix in the
driver's field of view.
18. Screw the sealant filler hose to the
free connection on the sealant
bottle. This prevents sealant from
escaping. Store the sealant bottle
in the plastic bag. Stow tyre repair kit under the front seat.
19. Continue driving immediately so that the sealant is evenly
distributed throughout the tyre.
After driving approx. 10 km, but no more than 10 minutes, stop and
check tyre pressure using the
compressor. Screw compressor
air hose directly onto tyre valve
and compressor when doing this.
20. If the tyre pressure is more than 3.1 bar , set it to the correct value.
Repeat the procedure until there
is no more loss of pressure.
If the tyre pressure has fallen
below 3.1 bar, the vehicle must
Page 301 of 353

Vehicle care299not be driven. Seek the
assistance of a workshop.
21. Stow tyre repair kit under the front
seat.
Note
The driving characteristics of the repaired tyre are severely affected,therefore have this tyre replaced.
If unusual noise is heard or the
compressor becomes hot, turn
compressor off for at least
30 minutes.
The built-in safety valve opens at a
pressure of 7 bar.
Note the expiry date of the kit. After
this date its sealing capability is no
longer guaranteed. Pay attention to
storage information on sealant
bottle.
Replace the used sealant bottle. Dispose of the bottle as prescribed
by applicable laws.
The compressor and sealant can be used from approx. -30 °C.Wheel changing
Make the following preparations and
observe the following information:
● Park the vehicle on a level, firm and non-slippery surface. The
front wheels must be in the
straight-ahead position.
● Apply the parking brake and engage first gear or reverse gear(manual transmission) or N
(manual transmission
automated).
● Switch off the air suspension system 3 231.
● Remove the spare wheel 3 301.
● Never change more than one wheel at a time.
● Use the jack only to change wheels in case of puncture, not
for seasonal winter or summer
tyre change.
● The jack is maintenance-free.
● If the ground on which the vehicle
is standing is soft, a solid board
(max. 1 cm thick) should be
placed under the jack.● No people or animals may be in the vehicle when it is jacked-up.
● Never crawl under a jacked-up vehicle.
● Do not start the engine when the vehicle is raised on the jack.
● Clean wheel bolts / nuts and their
threads before mounting the
wheel.9 Warning
Do not grease wheel bolt, wheel
nut and wheel nut cone.
1. Remove the wheel cover using the hook supplied.
Vehicle tools 3 290.
Depending on vehicle, first
remove the bolt / nut covers by
hand then remove the wheel
cover, or press wheel cover at the points indicated by the arrows and
turn to release.
Rear-wheel drive, with twin rear
wheels: Remove the tyre valve
extender from the inner rear
wheel.
Page 303 of 353
Vehicle care301Raise the vehicle by pressing the
wheel wrench until the wheel is
clear of the ground.
4. Unscrew wheel bolts / nuts completely and wipe clean with a
cloth.
Put wheel bolts / nuts somewhere
where the threads will not be
soiled.
5. Change the wheel.
6. Screw in the wheel bolts / nuts. Separately supplied bolts must beused for the temporary spare
wheel. These are allowed only for the temporary spare wheel. Refer
to an label on the temporary spare
wheel.
7. Lower vehicle.
8. Install the wheel wrench (depending on vehicle, attach
wheel wrench to adapters)
ensuring that it is securely located and tighten each wheel bolt / nut
in a crosswise sequence.
Tightening torque is: 172 Nm
(Front-wheel drive), 235 Nm(Rear-wheel drive with twin rear
wheels), 264 Nm (Rear-wheel
drive with single rear wheels).
9. Refit wheel cover. Rear-wheel drive, with twin rear
wheels: Install the tyre valve
extender to the inner rear wheel
before refitting the wheel cover.
Note
If applicable, fit anti-theft bolts
nearest the tyre valve (otherwise it
may not be possible to refit the wheel
cover).
10. Stow the replaced wheel 3 301
and the vehicle tools 3 290.
11. Have the new wheel balanced on the vehicle. Check the tyre
pressure of the installed tyre
3 317 and also the wheel bolt /
nut torque as soon as possible.
Have the defective tyre renewed or
repaired.
Spare wheel
The spare wheel can be classified as
a temporary spare wheel depending
on the size compared to the othermounted wheels and country
regulations. In this case a permissible maximum speed applies, even
though no label at the spare wheel
indicates this.Caution
The use of a spare wheel that is smaller than the other wheels or in
combination with winter tyres
could affect driveability. Have the
defective tyre replaced as soon as
possible.
The spare wheel is held under the
vehicle frame using a winch and
secured by tightening a cable using
the wheel wrench and adapters
(depending on vehicle).
It may be necessary to jack the
vehicle up to gain access to the spare
wheel on a fully loaded vehicle with a flat rear tyre.
Page 311 of 353
Vehicle care309Do not clean the engine compartment
with a steam-jet or high-pressure jet
cleaner.
Thoroughly rinse and leather-off the
vehicle. Rinse leather frequently. Use
separate leathers for painted and
glass surfaces: remnants of wax on
the windows will impair vision.
Do not use hard objects to remove
spots of tar. Use tar removal spray on painted surfaces.
Exterior lights
Headlight and other light covers are
made of plastic. Do not use any
abrasive or caustic agents, do not use an ice scraper, and do not clean them
dry.
Polishing and waxing
Wax the vehicle regularly (at the
latest when water no longer beads).
Otherwise, the paintwork will dry out.
Polishing is necessary only if the paint
has become dull or if solid deposits
have become attached to it.Paintwork polish with silicone forms a
protective film, making waxing
unnecessary.
Unpainted plastic body parts must not be treated with wax or polishing
agents.
Matt filmed body parts or decor tapes must not be polished, to avoid
gleaming. Do not use hot wax
programmes in automatic car washes if the vehicle is equipped with these
parts.
Matt painted decor parts, e.g. mirror
housing cover, must not be polished. Otherwise these parts would become
agleam or the colour would be
dissolved.
Windows and windscreen wiper
blades
Switch off wipers before handling in
their areas.
Use a soft lint-free cloth or chamois leather together with window cleaner
and insect remover.
When cleaning the rear window from
inside, always wipe in parallel to the
heating element to prevent damage.For mechanical removal of ice, use a
sharp-edged ice scraper. Press the
scraper firmly against the glass so
that no dirt can get under it and
scratch the glass.
Remove dirt residues from smearing wiper blades by using a soft cloth and window cleaner. Also make sure to
remove any residues such as wax,
insect residues and similar from the
window.
Wheels and tyres
Do not use high-pressure jet
cleaners.
Clean rims with a pH-neutral wheel
cleaner.
Rims are painted and can be treated
with the same agents as the body.
Paintwork damage
Rectify minor paintwork damage with
a touch-up pen before rust forms.
Have more extensive damage or rust areas repaired by a workshop.