OPEL VECTRA 1988 Service Manual Online
Manufacturer: OPEL, Model Year: 1988, Model line: VECTRA, Model: OPEL VECTRA 1988Pages: 525, PDF Size: 58.26 MB
Page 81 of 525
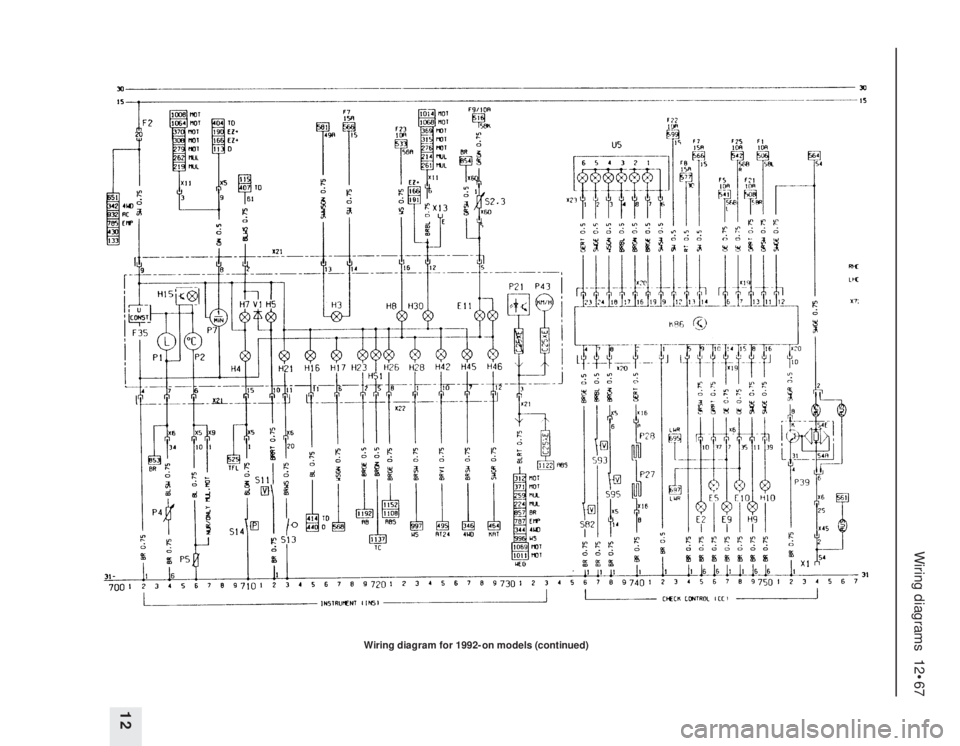
Wiring diagrams 12•67
12
Wiring diagram for 1992-on models (continued)
Page 82 of 525
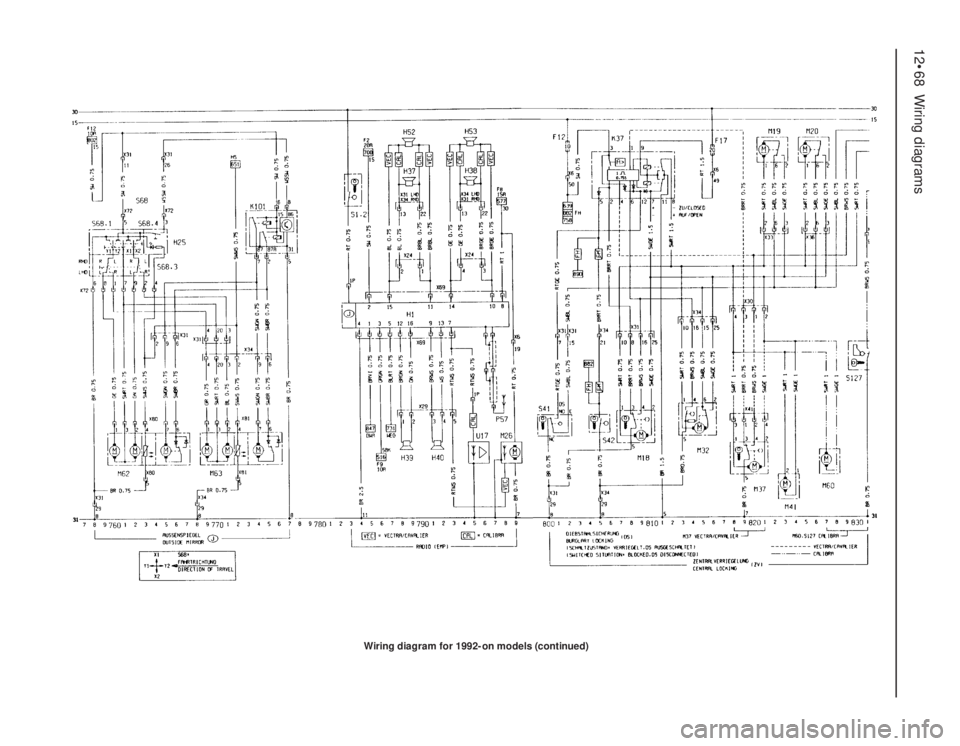
12•68Wiring diagrams
Wiring diagram for 1992-on models (continued)
Page 83 of 525
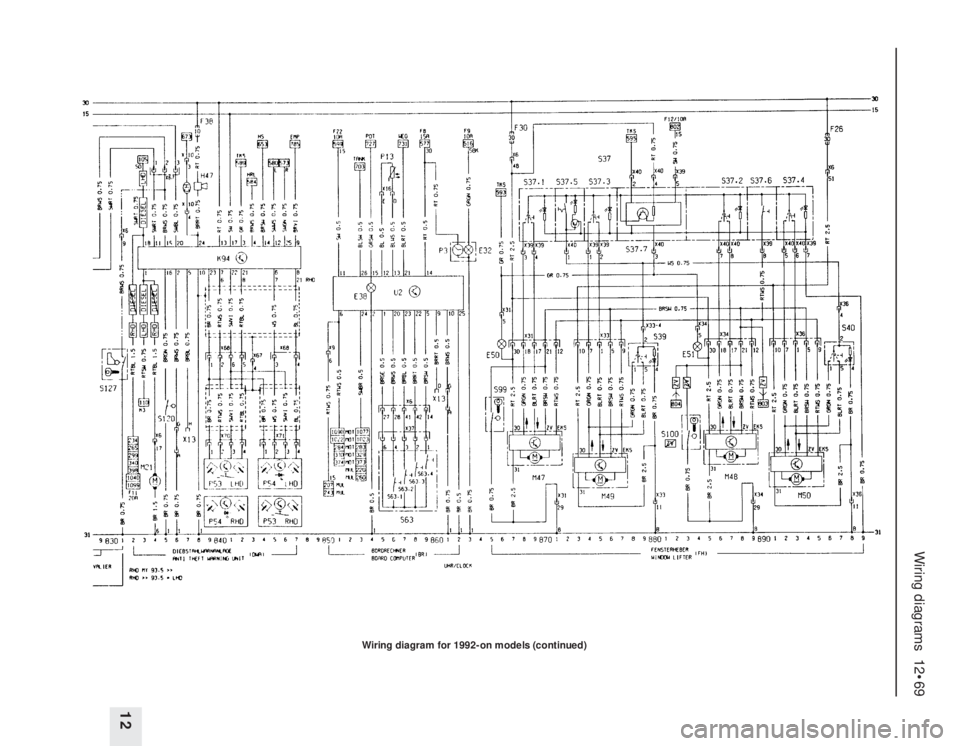
Wiring diagrams 12•69
12
Wiring diagram for 1992-on models (continued)
Page 84 of 525
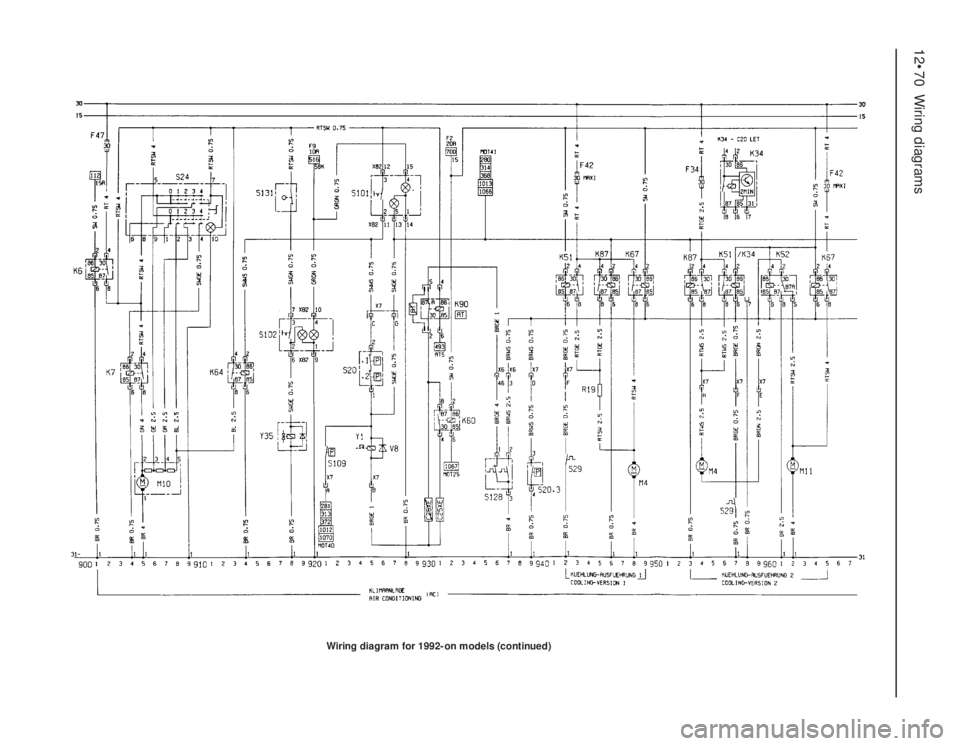
12•70Wiring diagrams
Wiring diagram for 1992-on models (continued)
Page 85 of 525
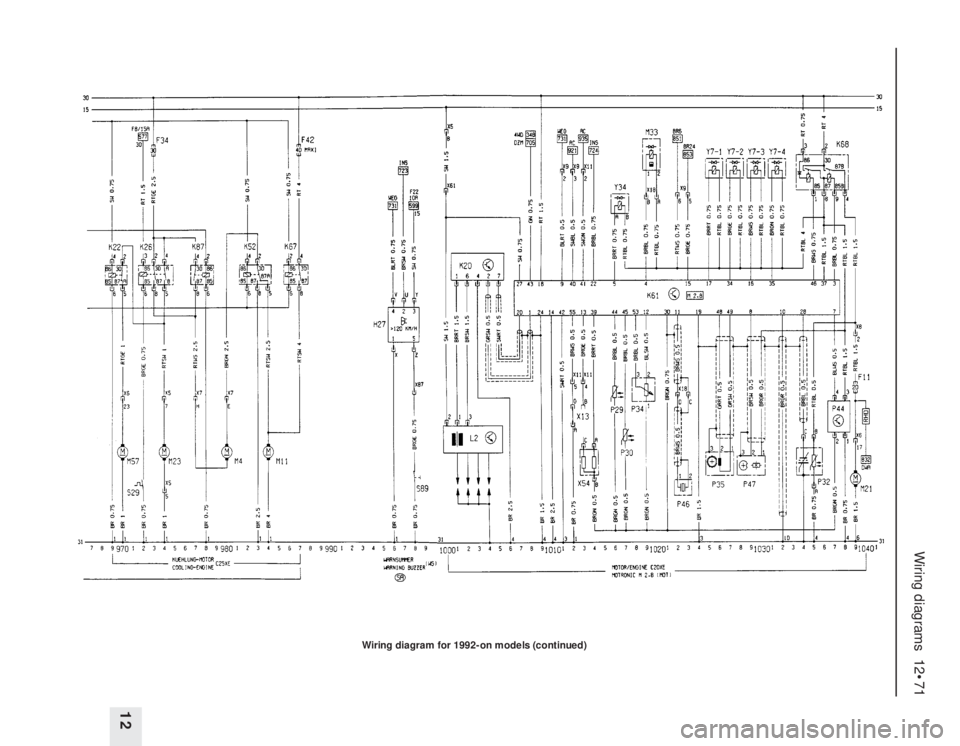
Wiring diagrams 12•71
12
Wiring diagram for 1992-on models (continued)
Page 86 of 525
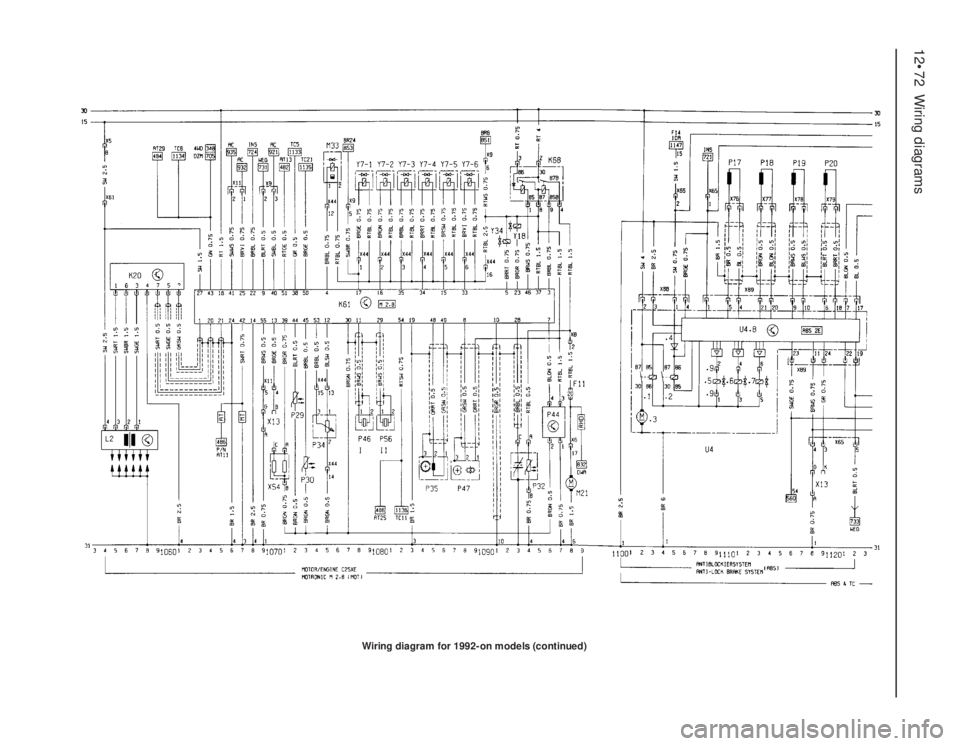
12•72Wiring diagrams
Wiring diagram for 1992-on models (continued)
Page 87 of 525
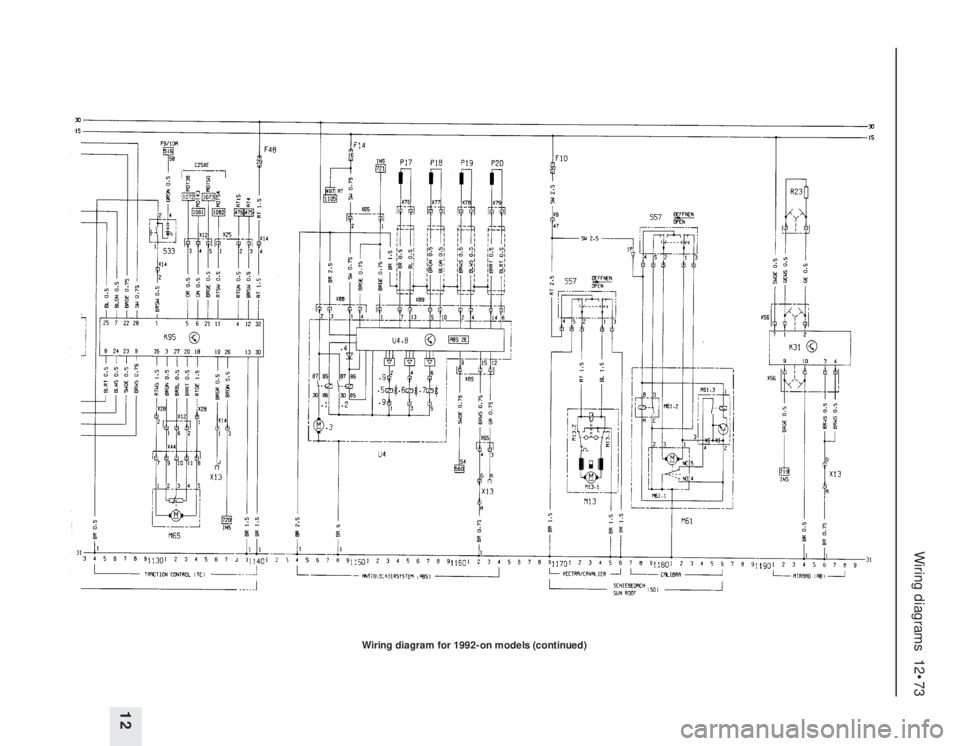
Wiring diagrams 12•73
12
Wiring diagram for 1992-on models (continued)
Page 88 of 525
5
System type . . . . . . . . . . . . . . . . . . . . . . . . . . . . . . . . . . . . . . . . . . . 12 volt, negative earth
Battery capacity . . . . . . . . . . . . . . . . . . . . . . . . . . . . . . . . . . . . . . . 36, 44, 55 or 66 Ah
Alternator
Type . . . . . . . . . . . . . . . . . . . . . . . . . . . . . . . . . . . . . . . . . . . . . . . . . . . . Bosch or Delco-Remy
Output . . . . . . . . . . . . . . . . . . . . . . . . . . . . . . . . . . . . . . . . . . . . . . . . . . . 55 or 70 A, depending upon model
Minimum brush length:
Bosch type alternator . . . . . . . . . . . . . . . . . . . . . . . . . . . . . . . . . . . . . 5.0 mm protrusion
Delco-Remy type alternator . . . . . . . . . . . . . . . . . . . . . . . . . . . . . . . . 11.0 mm overall length
Starter motor
Type . . . . . . . . . . . . . . . . . . . . . . . . . . . . . . . . . . . . . . . . . . . . . . . . . . . . Pre-engaged, Bosch or Delco-Remy
Minimum brush length:
Bosch DF type starter motor . . . . . . . . . . . . . . . . . . . . . . . . . . . . . . . 11.5 mm
Bosch DM type starter motor . . . . . . . . . . . . . . . . . . . . . . . . . . . . . . . 3.0 mm
Bosch DW type starter motor . . . . . . . . . . . . . . . . . . . . . . . . . . . . . . . 4.5 mm
Delco-Remy type starter motor . . . . . . . . . . . . . . . . . . . . . . . . . . . . . 4.0 mm
System type
14 NV . . . . . . . . . . . . . . . . . . . . . . . . . . . . . . . . . . . . . . . . . . . . . . . . . HEI (High Energy Ignition) system
16 SV and 18 SV . . . . . . . . . . . . . . . . . . . . . . . . . . . . . . . . . . . . . . . . . MSTS-i (Microprocessor Spark Timing System)
C16 NZ, C16 NZ2 and C18 NZ . . . . . . . . . . . . . . . . . . . . . . . . . . . . . . Multec, with MSTS-i
X16 SZ . . . . . . . . . . . . . . . . . . . . . . . . . . . . . . . . . . . . . . . . . . . . . . . . Multec, with DIS (Direct Ignition System)
20 NE, C20 NE and 20 SEH, (up to 1990) . . . . . . . . . . . . . . . . . . . . . Motronic M4.1
20 NE, C20 NE and 20 SEH, (from 1990) . . . . . . . . . . . . . . . . . . . . . . Motronic M1.5
20 XEJ and C20 XE, (up to 1993) . . . . . . . . . . . . . . . . . . . . . . . . . . . . Motronic M2.5
C20 XE (from 1993) . . . . . . . . . . . . . . . . . . . . . . . . . . . . . . . . . . . . . . . Motronic M2.8
X20 XEV . . . . . . . . . . . . . . . . . . . . . . . . . . . . . . . . . . . . . . . . . . . . . . . Simtec 56.1
Coil
Output . . . . . . . . . . . . . . . . . . . . . . . . . . . . . . . . . . . . . . . . . . . . . . . . . . . 16.0 to 20.0 kilovolts
Primary winding resistance (DOHC models only) . . . . . . . . . . . . . . . . . . 0.2 to 0.34 ohms
Secondary winding resistance (DOHC models only) . . . . . . . . . . . . . . . 7.2 to 8.2 ohms
Chapter 5
Engine electrical systems
Alternator - description . . . . . . . . . . . . . . . . . . . . . . . . . . . . . . . . . . . . .7
Alternator - removal and refitting . . . . . . . . . . . . . . . . . . . . . . . . . . . . .9
Alternator - testing . . . . . . . . . . . . . . . . . . . . . . . . . . . . . . . . . . . . . . .10
Alternator brushes - removal, inspection and refitting . . . . . . . . . . . .11
Alternator drivebelt - removal, refitting and adjusting . . . . . . . . . . . . .8
Battery - removal and refitting . . . . . . . . . . . . . . . . . . . . . . . . . . . . . . .6
Battery - testing and charging . . . . . . . . . . . . . . . . . . . . . . . . . . . . . . .5
Camshaft phase sensor (C20 XE engine) - removal and refitting . . . .27
DIS module - removal and refitting . . . . . . . . . . . . . . . . . . . . . . . . . . .26
Distributor - dismantling, inspection and reassembly . . . . . . . . . . . .20
Distributor (DOHC models) - removal and refitting . . . . . . . . . . . . . . .19
Distributor (SOHC models) - removal and refitting . . . . . . . . . . . . . . .18
Distributor cap and rotor arm - removal and refitting . . . . . . . . . . . . .17
Electrical system - general . . . . . . . . . . . . . . . . . . . . . . . . . . . . . . . . . .1Electrical system - precautions . . . . . . . . . . . . . . . . . . . . . . . . . . . . . .3
Electronic modules - removal and refitting . . . . . . . . . . . . . . . . . . . . .23
Ignition coil - removal, testing and refitting . . . . . . . . . . . . . . . . . . . .16
Ignition system - general . . . . . . . . . . . . . . . . . . . . . . . . . . . . . . . . . . .2
Ignition system testing - general . . . . . . . . . . . . . . . . . . . . . . . . . . . . .4
Ignition timing - adjustment for use with unleaded petrol . . . . . . . . .22
Ignition timing - checking and adjustment . . . . . . . . . . . . . . . . . . . . .21
Motronic system components - removal and refitting . . . . . . . . . . . .25
MSTS-i components - removal and refitting . . . . . . . . . . . . . . . . . . .24
Starter motor - general . . . . . . . . . . . . . . . . . . . . . . . . . . . . . . . . . . . .12
Starter motor - removal and refitting . . . . . . . . . . . . . . . . . . . . . . . . .14
Starter motor - overhaul . . . . . . . . . . . . . . . . . . . . . . . . . . . . . . . . . . .15
Starter motor - testing . . . . . . . . . . . . . . . . . . . . . . . . . . . . . . . . . . . .13
5•1
Specifications Contents
Easy,suitable for
novice with little
experienceFairly easy,suitable
for beginner with
some experienceFairly difficult,
suitable for competent
DIY mechanic
Difficult,suitable for
experienced DIY
mechanicVery difficult,
suitable for expert DIY
or professional
Degrees of difficulty
54321
Page 89 of 525
Distributor
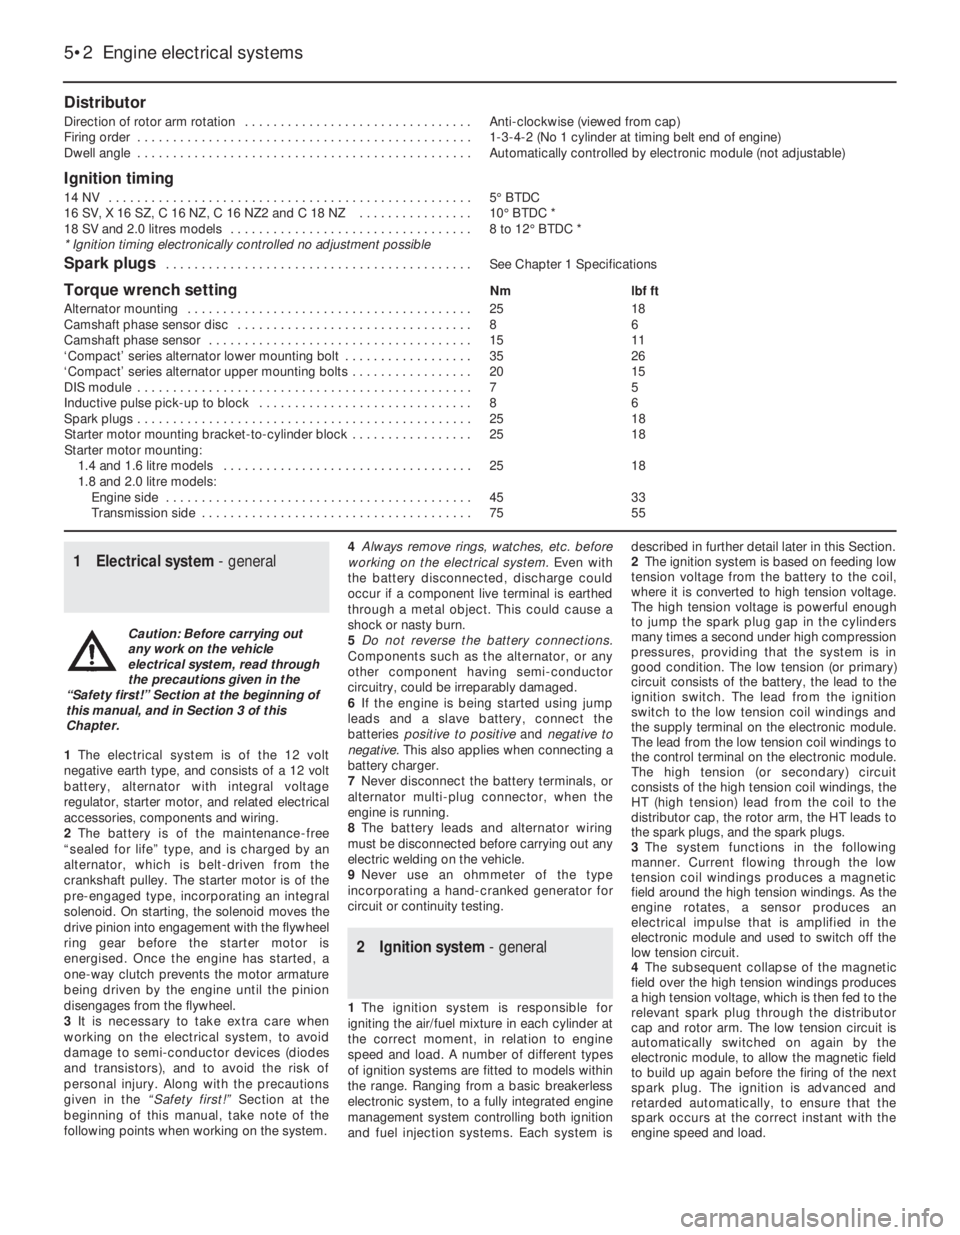
Direction of rotor arm rotation . . . . . . . . . . . . . . . . . . . . . . . . . . . . . . . .Anti-clockwise (viewed from cap)
Firing order . . . . . . . . . . . . . . . . . . . . . . . . . . . . . . . . . . . . . . . . . . . . . . .1-3-4-2 (No 1 cylinder at timing belt end of engine)
Dwell angle . . . . . . . . . . . . . . . . . . . . . . . . . . . . . . . . . . . . . . . . . . . . . . .Automatically controlled by electronic module (not adjustable)
Ignition timing
14 NV . . . . . . . . . . . . . . . . . . . . . . . . . . . . . . . . . . . . . . . . . . . . . . . . . . .5°BTDC
16 SV, X 16 SZ, C 16 NZ, C 16 NZ2 and C 18 NZ . . . . . . . . . . . . . . . .10°BTDC *
18 SV and 2.0 litres models . . . . . . . . . . . . . . . . . . . . . . . . . . . . . . . . . .8 to 12°BTDC *
* Ignition timing electronically controlled no adjustment possible
Spark plugs . . . . . . . . . . . . . . . . . . . . . . . . . . . . . . . . . . . . . . . . . . .See Chapter 1 Specifications
Torque wrench settingNmlbf ft
Alternator mounting . . . . . . . . . . . . . . . . . . . . . . . . . . . . . . . . . . . . . . . .2518
Camshaft phase sensor disc . . . . . . . . . . . . . . . . . . . . . . . . . . . . . . . . .86
Camshaft phase sensor . . . . . . . . . . . . . . . . . . . . . . . . . . . . . . . . . . . . .1511
‘Compact’ series alternator lower mounting bolt . . . . . . . . . . . . . . . . . .3526
‘Compact’ series alternator upper mounting bolts . . . . . . . . . . . . . . . . .2015
DIS module . . . . . . . . . . . . . . . . . . . . . . . . . . . . . . . . . . . . . . . . . . . . . . .75
Inductive pulse pick-up to block . . . . . . . . . . . . . . . . . . . . . . . . . . . . . .86
Spark plugs . . . . . . . . . . . . . . . . . . . . . . . . . . . . . . . . . . . . . . . . . . . . . . .2518
Starter motor mounting bracket-to-cylinder block . . . . . . . . . . . . . . . . .2518
Starter motor mounting:
1.4 and 1.6 litre models . . . . . . . . . . . . . . . . . . . . . . . . . . . . . . . . . . .2518
1.8 and 2.0 litre models:
Engine side . . . . . . . . . . . . . . . . . . . . . . . . . . . . . . . . . . . . . . . . . . .4533
Transmission side . . . . . . . . . . . . . . . . . . . . . . . . . . . . . . . . . . . . . .7555
1Electrical system - general
1The electrical system is of the 12 volt
negative earth type, and consists of a 12 volt
battery, alternator with integral voltage
regulator, starter motor, and related electrical
accessories, components and wiring.
2The battery is of the maintenance-free
“sealed for life” type, and is charged by an
alternator, which is belt-driven from the
crankshaft pulley. The starter motor is of the
pre-engaged type, incorporating an integral
solenoid. On starting, the solenoid moves the
drive pinion into engagement with the flywheel
ring gear before the starter motor is
energised. Once the engine has started, a
one-way clutch prevents the motor armature
being driven by the engine until the pinion
disengages from the flywheel.
3It is necessary to take extra care when
working on the electrical system, to avoid
damage to semi-conductor devices (diodes
and transistors), and to avoid the risk of
personal injury. Along with the precautions
given in the “Safety first!” Section at the
beginning of this manual, take note of the
following points when working on the system.4Always remove rings, watches, etc. before
working on the electrical system. Even with
the battery disconnected, discharge could
occur if a component live terminal is earthed
through a metal object. This could cause a
shock or nasty burn.
5Do not reverse the battery connections.
Components such as the alternator, or any
other component having semi-conductor
circuitry, could be irreparably damaged.
6If the engine is being started using jump
leads and a slave battery, connect the
batteries positive to positive and negative to
negative. This also applies when connecting a
battery charger.
7Never disconnect the battery terminals, or
alternator multi-plug connector, when the
engine is running.
8The battery leads and alternator wiring
must be disconnected before carrying out any
electric welding on the vehicle.
9Never use an ohmmeter of the type
incorporating a hand-cranked generator for
circuit or continuity testing.
2Ignition system - general
1The ignition system is responsible for
igniting the air/fuel mixture in each cylinder at
the correct moment, in relation to engine
speed and load. A number of different types
of ignition systems are fitted to models within
the range. Ranging from a basic breakerless
electronic system, to a fully integrated engine
management system controlling both ignition
and fuel injection systems. Each system isdescribed in further detail later in this Section.
2The ignition system is based on feeding low
tension voltage from the battery to the coil,
where it is converted to high tension voltage.
The high tension voltage is powerful enough
to jump the spark plug gap in the cylinders
many times a second under high compression
pressures, providing that the system is in
good condition. The low tension (or primary)
circuit consists of the battery, the lead to the
ignition switch. The lead from the ignition
switch to the low tension coil windings and
the supply terminal on the electronic module.
The lead from the low tension coil windings to
the control terminal on the electronic module.
The high tension (or secondary) circuit
consists of the high tension coil windings, the
HT (high tension) lead from the coil to the
distributor cap, the rotor arm, the HT leads to
the spark plugs, and the spark plugs.
3The system functions in the following
manner. Current flowing through the low
tension coil windings produces a magnetic
field around the high tension windings. As the
engine rotates, a sensor produces an
electrical impulse that is amplified in the
electronic module and used to switch off the
low tension circuit.
4The subsequent collapse of the magnetic
field over the high tension windings produces
a high tension voltage, which is then fed to the
relevant spark plug through the distributor
cap and rotor arm. The low tension circuit is
automatically switched on again by the
electronic module, to allow the magnetic field
to build up again before the firing of the next
spark plug. The ignition is advanced and
retarded automatically, to ensure that the
spark occurs at the correct instant with the
engine speed and load.
5•2Engine electrical systems
Caution: Before carrying out
any work on the vehicle
electrical system, read through
the precautions given in the
“Safety first!” Section at the beginning of
this manual, and in Section 3 of this
Chapter.
Page 90 of 525
HEI (High Energy Ignition)
system
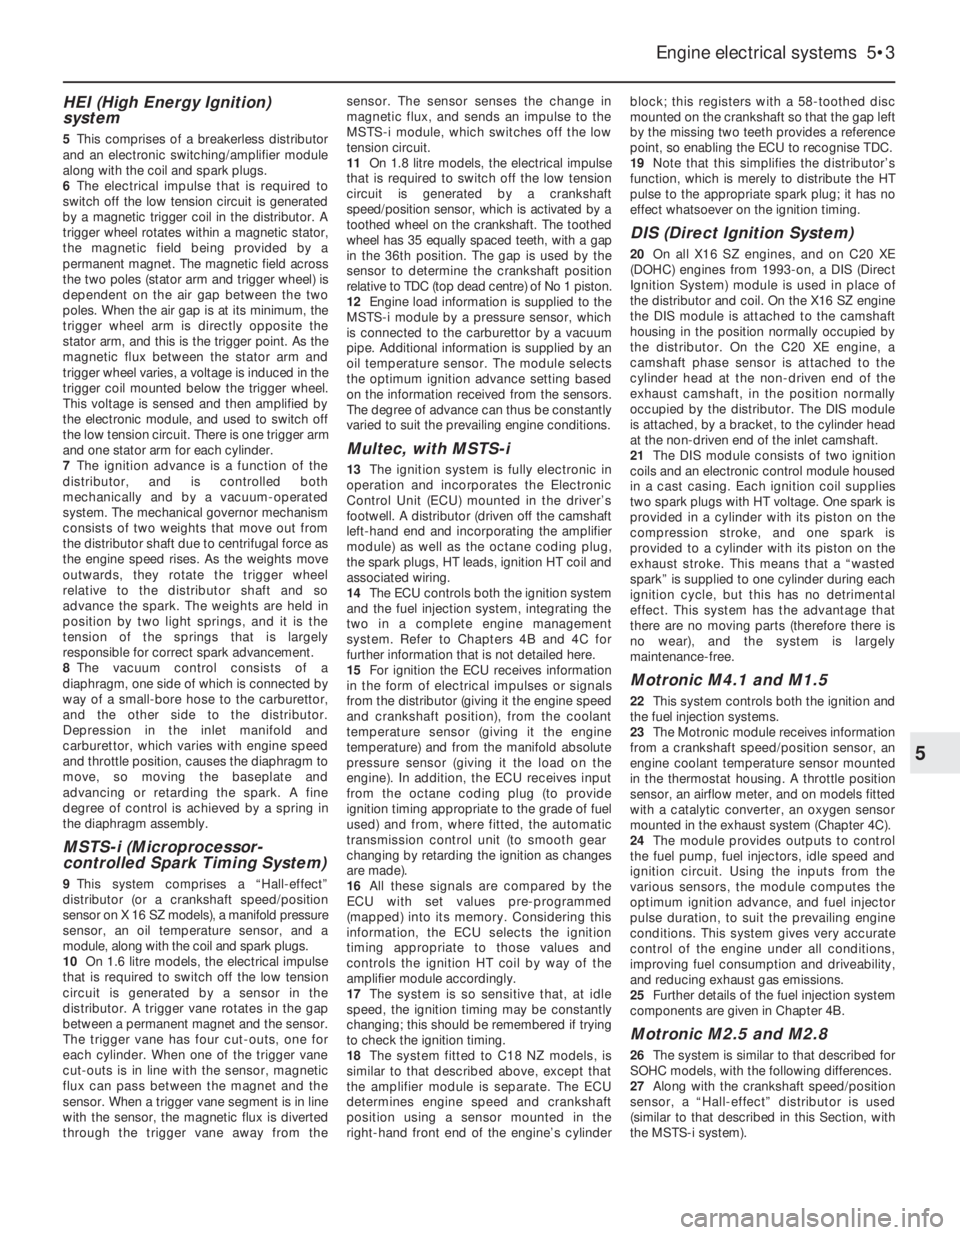
5This comprises of a breakerless distributor
and an electronic switching/amplifier module
along with the coil and spark plugs.
6The electrical impulse that is required to
switch off the low tension circuit is generated
by a magnetic trigger coil in the distributor. A
trigger wheel rotates within a magnetic stator,
the magnetic field being provided by a
permanent magnet. The magnetic field across
the two poles (stator arm and trigger wheel) is
dependent on the air gap between the two
poles. When the air gap is at its minimum, the
trigger wheel arm is directly opposite the
stator arm, and this is the trigger point. As the
magnetic flux between the stator arm and
trigger wheel varies, a voltage is induced in the
trigger coil mounted below the trigger wheel.
This voltage is sensed and then amplified by
the electronic module, and used to switch off
the low tension circuit. There is one trigger arm
and one stator arm for each cylinder.
7The ignition advance is a function of the
distributor, and is controlled both
mechanically and by a vacuum-operated
system. The mechanical governor mechanism
consists of two weights that move out from
the distributor shaft due to centrifugal force as
the engine speed rises. As the weights move
outwards, they rotate the trigger wheel
relative to the distributor shaft and so
advance the spark. The weights are held in
position by two light springs, and it is the
tension of the springs that is largely
responsible for correct spark advancement.
8The vacuum control consists of a
diaphragm, one side of which is connected by
way of a small-bore hose to the carburettor,
and the other side to the distributor.
Depression in the inlet manifold and
carburettor, which varies with engine speed
and throttle position, causes the diaphragm to
move, so moving the baseplate and
advancing or retarding the spark. A fine
degree of control is achieved by a spring in
the diaphragm assembly.
MSTS-i (Microprocessor-
controlled Spark Timing System)
9This system comprises a “Hall-effect”
distributor (or a crankshaft speed/position
sensor on X 16 SZ models), a manifold pressure
sensor, an oil temperature sensor, and a
module, along with the coil and spark plugs.
10On 1.6 litre models, the electrical impulse
that is required to switch off the low tension
circuit is generated by a sensor in the
distributor. A trigger vane rotates in the gap
between a permanent magnet and the sensor.
The trigger vane has four cut-outs, one for
each cylinder. When one of the trigger vane
cut-outs is in line with the sensor, magnetic
flux can pass between the magnet and the
sensor. When a trigger vane segment is in line
with the sensor, the magnetic flux is diverted
through the trigger vane away from thesensor. The sensor senses the change in
magnetic flux, and sends an impulse to the
MSTS-i module, which switches off the low
tension circuit.
11On 1.8 litre models, the electrical impulse
that is required to switch off the low tension
circuit is generated by a crankshaft
speed/position sensor, which is activated by a
toothed wheel on the crankshaft. The toothed
wheel has 35 equally spaced teeth, with a gap
in the 36th position. The gap is used by the
sensor to determine the crankshaft position
relative to TDC (top dead centre) of No 1 piston.
12Engine load information is supplied to the
MSTS-i module by a pressure sensor, which
is connected to the carburettor by a vacuum
pipe. Additional information is supplied by an
oil temperature sensor. The module selects
the optimum ignition advance setting based
on the information received from the sensors.
The degree of advance can thus be constantly
varied to suit the prevailing engine conditions.
Multec, with MSTS-i
13The ignition system is fully electronic in
operation and incorporates the Electronic
Control Unit (ECU) mounted in the driver’s
footwell. A distributor (driven off the camshaft
left-hand end and incorporating the amplifier
module) as well as the octane coding plug,
the spark plugs, HT leads, ignition HT coil and
associated wiring.
14The ECU controls both the ignition system
and the fuel injection system, integrating the
two in a complete engine management
system. Refer to Chapters 4B and 4C for
further information that is not detailed here.
15For ignition the ECU receives information
in the form of electrical impulses or signals
from the distributor (giving it the engine speed
and crankshaft position), from the coolant
temperature sensor (giving it the engine
temperature) and from the manifold absolute
pressure sensor (giving it the load on the
engine). In addition, the ECU receives input
from the octane coding plug (to provide
ignition timing appropriate to the grade of fuel
used) and from, where fitted, the automatic
transmission control unit (to smooth gear
changing by retarding the ignition as changes
are made).
16All these signals are compared by the
ECU with set values pre-programmed
(mapped) into its memory. Considering this
information, the ECU selects the ignition
timing appropriate to those values and
controls the ignition HT coil by way of the
amplifier module accordingly.
17The system is so sensitive that, at idle
speed, the ignition timing may be constantly
changing; this should be remembered if trying
to check the ignition timing.
18The system fitted to C18 NZ models, is
similar to that described above, except that
the amplifier module is separate. The ECU
determines engine speed and crankshaft
position using a sensor mounted in the
right-hand front end of the engine’s cylinderblock; this registers with a 58-toothed disc
mounted on the crankshaft so that the gap left
by the missing two teeth provides a reference
point, so enabling the ECU to recognise TDC.
19Note that this simplifies the distributor’s
function, which is merely to distribute the HT
pulse to the appropriate spark plug; it has no
effect whatsoever on the ignition timing.
DIS (Direct Ignition System)
20On all X16 SZ engines, and on C20 XE
(DOHC) engines from 1993-on, a DIS (Direct
Ignition System) module is used in place of
the distributor and coil. On the X16 SZ engine
the DIS module is attached to the camshaft
housing in the position normally occupied by
the distributor. On the C20 XE engine, a
camshaft phase sensor is attached to the
cylinder head at the non-driven end of the
exhaust camshaft, in the position normally
occupied by the distributor. The DIS module
is attached, by a bracket, to the cylinder head
at the non-driven end of the inlet camshaft.
21The DIS module consists of two ignition
coils and an electronic control module housed
in a cast casing. Each ignition coil supplies
two spark plugs with HT voltage. One spark is
provided in a cylinder with its piston on the
compression stroke, and one spark is
provided to a cylinder with its piston on the
exhaust stroke. This means that a “wasted
spark” is supplied to one cylinder during each
ignition cycle, but this has no detrimental
effect. This system has the advantage that
there are no moving parts (therefore there is
no wear), and the system is largely
maintenance-free.
Motronic M4.1 and M1.5
22This system controls both the ignition and
the fuel injection systems.
23The Motronic module receives information
from a crankshaft speed/position sensor, an
engine coolant temperature sensor mounted
in the thermostat housing. A throttle position
sensor, an airflow meter, and on models fitted
with a catalytic converter, an oxygen sensor
mounted in the exhaust system (Chapter 4C).
24The module provides outputs to control
the fuel pump, fuel injectors, idle speed and
ignition circuit. Using the inputs from the
various sensors, the module computes the
optimum ignition advance, and fuel injector
pulse duration, to suit the prevailing engine
conditions. This system gives very accurate
control of the engine under all conditions,
improving fuel consumption and driveability,
and reducing exhaust gas emissions.
25Further details of the fuel injection system
components are given in Chapter 4B.
Motronic M2.5 and M2.8
26The system is similar to that described for
SOHC models, with the following differences.
27Along with the crankshaft speed/position
sensor, a “Hall-effect” distributor is used
(similar to that described in this Section, with
the MSTS-i system).
Engine electrical systems 5•3
5