clock OPEL VIVARO C 2020.25 Manual user
[x] Cancel search | Manufacturer: OPEL, Model Year: 2020.25, Model line: VIVARO C, Model: OPEL VIVARO C 2020.25Pages: 287, PDF Size: 28.79 MB
Page 228 of 287

226Vehicle care2. Rotate the bulb socketanticlockwise to disengage and
withdraw from the reflector.
3. Slightly press down the bulb, turn it anticlockwise and remove it
from the socket.
4. Replace and insert the new bulb into socket by turning clockwise.
5. Insert the bulb socket into the reflector and turn clockwise.
Tail lights
Tail light assembly All body styles except platform cab
1. Vehicles with a cover hiding the lower tail light assembly screw:
remove cover by carefully
releasing its retaining lugs with a
screwdriver and tilting the cover
slightly towards the outside.
2. Unscrew and remove the two screws.
3. Vehicles with air vent or coverbehind the tail light, in the trim:
Remove air vent or cover.
Page 230 of 287

228Vehicle care12. Clip in cover which may havecovered the lower tail light
assembly screw.
13. Attach cover or air vent behind the
tail light if removed before.
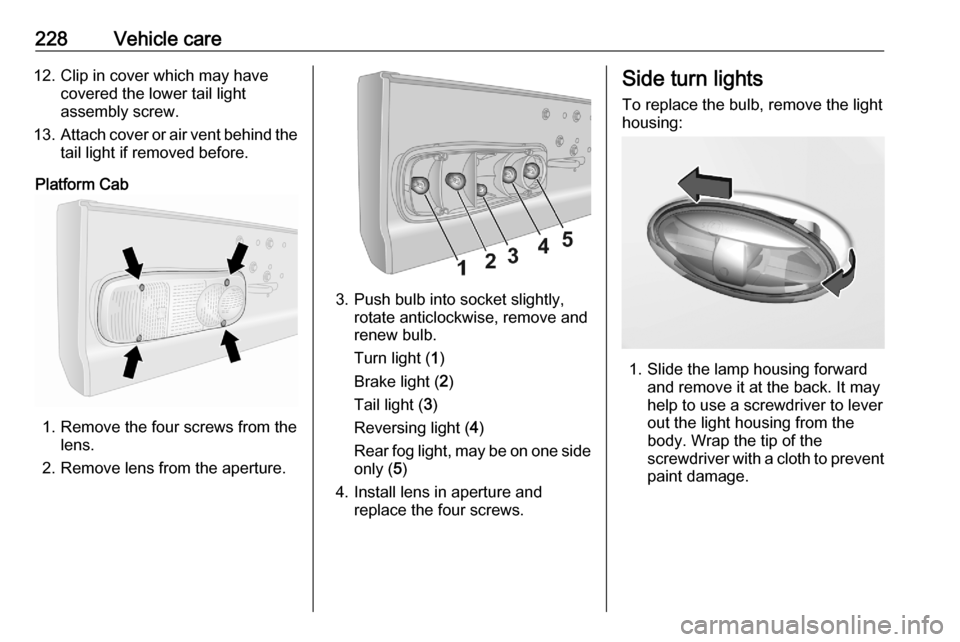
Platform Cab
1. Remove the four screws from the lens.
2. Remove lens from the aperture.
3. Push bulb into socket slightly, rotate anticlockwise, remove and
renew bulb.
Turn light ( 1)
Brake light ( 2)
Tail light ( 3)
Reversing light ( 4)
Rear fog light, may be on one side
only ( 5)
4. Install lens in aperture and replace the four screws.
Side turn lights
To replace the bulb, remove the light
housing:
1. Slide the lamp housing forward and remove it at the back. It may
help to use a screwdriver to lever
out the light housing from the
body. Wrap the tip of the
screwdriver with a cloth to prevent
paint damage.
Page 231 of 287

Vehicle care229
2.Pull the retaining lug upwards and
remove the bulb socket from the
plug connector.
3. Replace the complete unit.
4. Insert left end of the lamp, slide to
the left and insert right end.
Centre high-mounted brake light
Vehicles with hinged doors or
tailgate
1. Open the rear doors.
2. a) vehicles with tailgate:
Loose the inner trim from clips by
swiveling it upwards and
downwards. Pull trim off carefully.
b) vehicles with hinged doors:
Wrap a cloth around the tip of a
slot screwdriver to prevent paint
damage. Remove the inner cover
or air vent with the screwdriver.
3. Push the brake light assembly carefully out through the recess.
4. Detach the cable from the retainer
in the light assembly.
5. Remove the socket of the defect bulb by turning it a quarter turn
anti-clockwise.
6. Renew bulb.
7. Install brake light assembly like explained above, in reversed
order.
Page 246 of 287

244Vehicle care
2. Disconnect the connector fromthe cartridge by turning it a quarter
turn anti-clockwise.
3. Pull pipe assembly out slightly, then disconnect connector from
the air hose by turning it a quarter
turn anticlockwise.
4. Remove air hose.
Keep the kit vertical and unscrew
the cartridge from the bottom.
5. To fit the new cartridge and new pipe, carry out these operations in
reverse order.
Wheel changing
Make the following preparations and
observe the following information:
● Park the vehicle on a level, firm and non-skid surface. The front
wheels must be in the straight-
ahead position.
● If necessary, place a chock under
the wheel diagonally opposite the
wheel to be changed.
● Apply the parking brake and engage first gear, reverse gear or
P .
● If the ground on which the vehicle
is standing is soft, a solid board
(max. 1 cm thick) should be
placed under the jack.
● Take heavy objects out of the vehicle before jacking up.
● No people or animals may be in the vehicle when it is jacked-up.
● Never crawl under a jacked-up vehicle.
● Do not start the vehicle when it is
raised on the jack.
● Before screwing in the wheel bolts, clean them.
Page 248 of 287

246Vehicle careThe spare wheel can be classified as
a temporary spare wheel depending
on the size compared to the other
mounted wheels and country
regulations. In this case a permissible maximum speed applies, even
though no label at the spare wheel
indicates this.
Only mount one temporary spare
wheel. Do not drive faster than
80 km/h. Take curves slowly. Do not use for a long period of time.Caution
The use of a spare wheel that issmaller than the other wheels or in
combination with winter tyres
could affect driveability. Have the defective tyre replaced as soon as
possible.
If the vehicle is equipped with a trailer hitch, lift the back of the vehicle on
one of the rear vehicle jacking points
for easier access to the spare wheel.
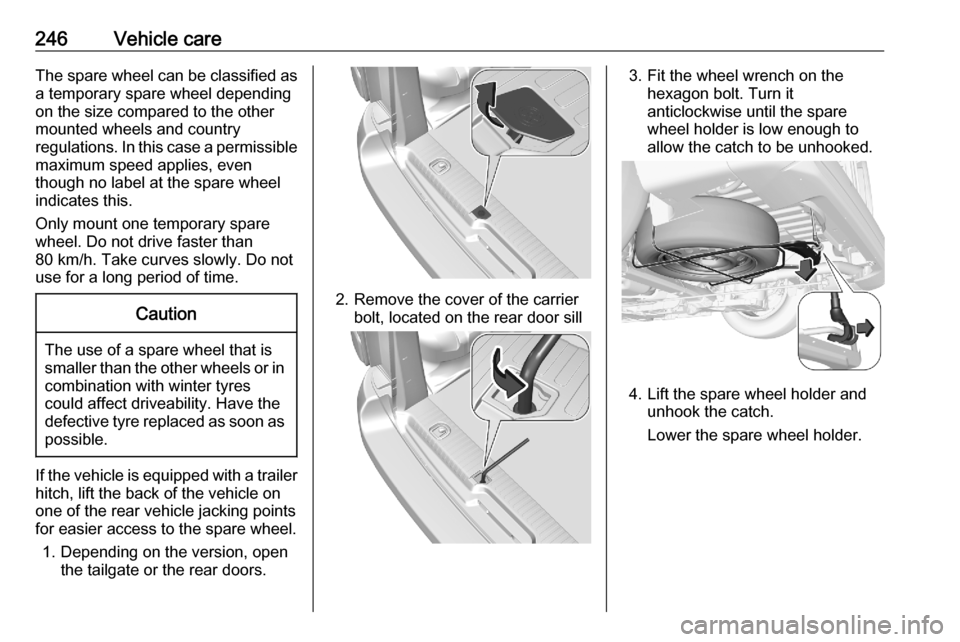
1. Depending on the version, open the tailgate or the rear doors.
2. Remove the cover of the carrierbolt, located on the rear door sill
3. Fit the wheel wrench on the hexagon bolt. Turn it
anticlockwise until the spare wheel holder is low enough to
allow the catch to be unhooked.
4. Lift the spare wheel holder and unhook the catch.
Lower the spare wheel holder.
Page 249 of 287

Vehicle care247
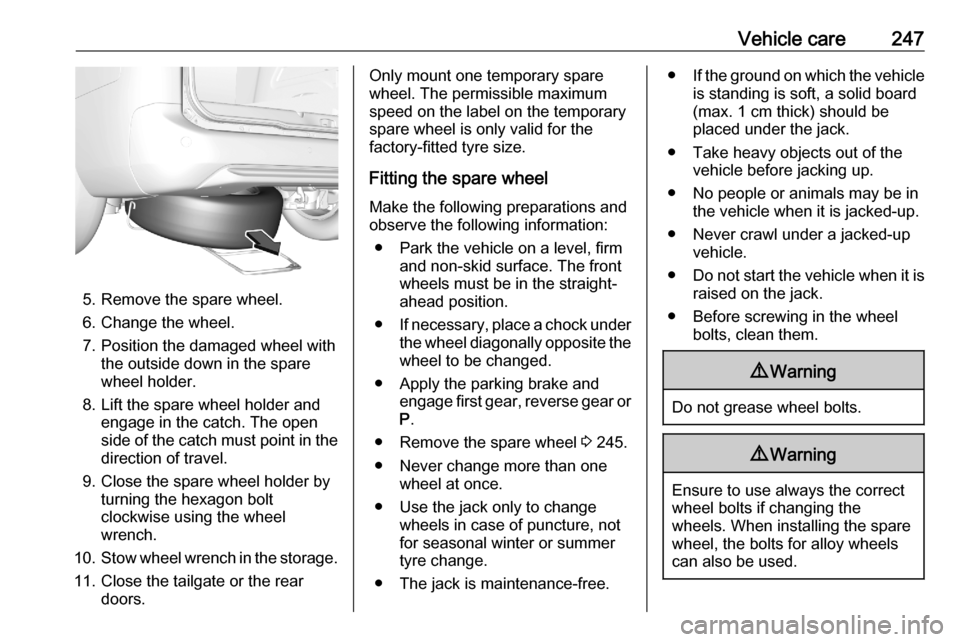
5. Remove the spare wheel.
6. Change the wheel.
7. Position the damaged wheel with the outside down in the spare
wheel holder.
8. Lift the spare wheel holder and engage in the catch. The open
side of the catch must point in the
direction of travel.
9. Close the spare wheel holder by turning the hexagon bolt
clockwise using the wheel
wrench.
10. Stow wheel wrench in the storage.
11. Close the tailgate or the rear doors.
Only mount one temporary spare
wheel. The permissible maximum
speed on the label on the temporary
spare wheel is only valid for the
factory-fitted tyre size.
Fitting the spare wheel
Make the following preparations and
observe the following information:
● Park the vehicle on a level, firm and non-skid surface. The front
wheels must be in the straight- ahead position.
● If necessary, place a chock under
the wheel diagonally opposite the
wheel to be changed.
● Apply the parking brake and engage first gear, reverse gear or
P .
● Remove the spare wheel 3 245.
● Never change more than one wheel at once.
● Use the jack only to change wheels in case of puncture, not
for seasonal winter or summer
tyre change.
● The jack is maintenance-free.● If the ground on which the vehicle
is standing is soft, a solid board
(max. 1 cm thick) should be
placed under the jack.
● Take heavy objects out of the vehicle before jacking up.
● No people or animals may be in the vehicle when it is jacked-up.
● Never crawl under a jacked-up vehicle.
● Do not start the vehicle when it is
raised on the jack.
● Before screwing in the wheel bolts, clean them.9Warning
Do not grease wheel bolts.
9Warning
Ensure to use always the correct
wheel bolts if changing the
wheels. When installing the spare
wheel, the bolts for alloy wheels can also be used.
Page 253 of 287

Vehicle care2513. Connect the black lead to thenegative terminal of the booster
battery.
4. Connect the other end of the black
lead to a vehicle grounding point
of your vehicle in the engine
compartment.
Route the leads so that they cannot
catch on rotating parts in the engine
compartment.
To start the engine: 1. Start the engine of the vehicle providing the jump.
2. After 5 minutes, start the other engine. Start attempts should be
made for no longer than 15
seconds at an interval of 1 minute.
3. Allow both engines to idle for approx. three minutes with the
leads connected.
4. Switch on electrical consumers e.g. headlights, heated rear
window of the vehicle receiving
the jump start.
5. Reverse above sequence exactly when removing leads.Towing
Towing the vehicle
Press in the middle of the cover plate
and slide to the upper left corner to
unclip it.
The towing eye is stowed with the vehicle tools 3 234.
Screw in the towing eye clockwise as
far as it will go until it stops in a
horizontal position.
Attach a tow rope – or better a tow rod
– to the towing eye.
The towing eye must only be used for
towing and not for recovering the
vehicle.
Switch on ignition to release steering
wheel lock and to permit operation of
brake lights, horn and windscreen
wiper.
Page 255 of 287

Vehicle care253
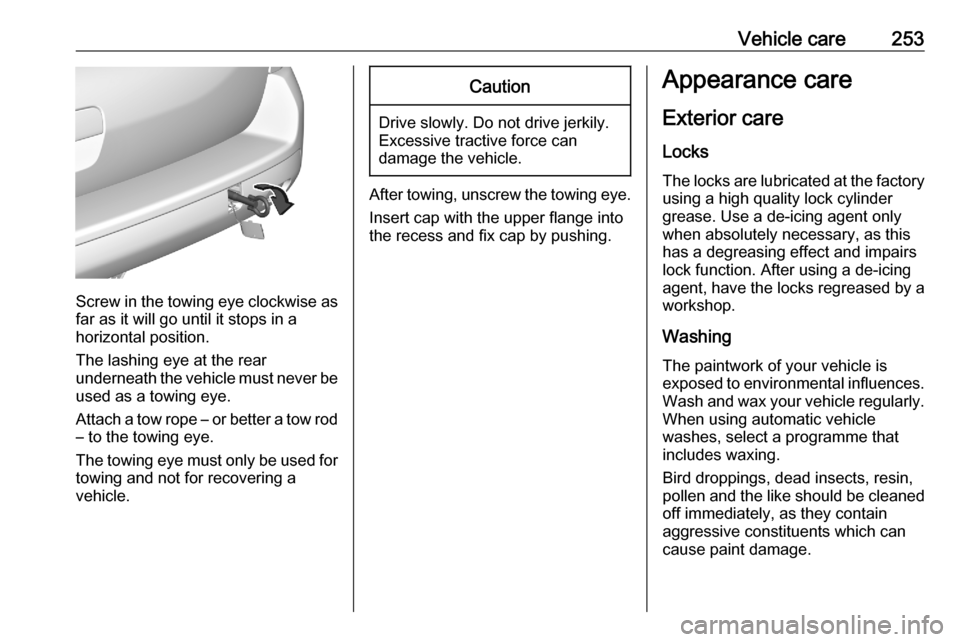
Screw in the towing eye clockwise asfar as it will go until it stops in a
horizontal position.
The lashing eye at the rear
underneath the vehicle must never be used as a towing eye.
Attach a tow rope – or better a tow rod
– to the towing eye.
The towing eye must only be used for
towing and not for recovering a
vehicle.
Caution
Drive slowly. Do not drive jerkily.
Excessive tractive force can
damage the vehicle.
After towing, unscrew the towing eye.
Insert cap with the upper flange into
the recess and fix cap by pushing.
Appearance care
Exterior care LocksThe locks are lubricated at the factoryusing a high quality lock cylinder
grease. Use a de-icing agent only
when absolutely necessary, as this
has a degreasing effect and impairs
lock function. After using a de-icing
agent, have the locks regreased by a
workshop.
WashingThe paintwork of your vehicle is
exposed to environmental influences.
Wash and wax your vehicle regularly.
When using automatic vehicle
washes, select a programme that
includes waxing.
Bird droppings, dead insects, resin,
pollen and the like should be cleaned
off immediately, as they contain
aggressive constituents which can
cause paint damage.
Page 259 of 287

Vehicle care2573.Turn retainers anti-clockwise for a
quarter turn.
1. Move the driver's seat backwards
as far as possible.
2. Align slots in the mat with the retainers, as shown.
3. Turn retainers clockwise for aquarter turn.
Removing1. Move the driver's seat backwards
as far as possible.
2. Turn retainers a quarter turn towards the opposite direction
than during installation.
3. Remove the mat.
Page 283 of 287

281Climate control systems.............139
Clock............................................. 98
Control indicators........................ 110
Control of the vehicle .................153
Controls ........................................ 94
Convex shape .............................. 39
Coolant and antifreeze ...............262
Cornering lights .......................... 133
Cruise control ....................115, 174
Cupholders .................................. 78
Curtain airbag system .................. 65
D Danger, Warnings and Cautions ...4
Daytime running lights ...............133
Declaration of conformity ............273
DEF ............................................ 162
Deflation detection system .........114
Diesel exhaust fluid ....................162
Diesel fuel system bleeding .......219
Door open .................................. 116
Doors ...................................... 31, 33
Driver alert .................................. 201
Driver assistance systems ..........174
Driver Information Centre ...........116
Driving characteristics and towing tips .............................. 205
Driving hints ................................ 153E
Electric adjustment ......................39
Electrical system......................... 231
Electronic climate control system 143
Electronic driving programmes ..168
Electronic key system ...................24
Electronic Stability Control and Traction Control system ..113, 171
Emergency call ........................... 128
End-of-life vehicle recovery .......213
Engine compartment fuse box ...232
Engine coolant ........................... 215
Engine coolant temperature ......113
Engine coolant temperature gauge ..................................... 108
Engine data ............................... 268
Engine exhaust .......................... 161
Engine identification ...................265
Engine oil ................... 214, 262, 266
Engine oil level monitor ..............109
Engine oil pressure ....................114
Entry lighting .............................. 137
Event data recorders ..................275
Exhaust filter ....................... 113, 161
Exit lighting ................................ 137
Exterior care .............................. 253
Exterior light ............................... 115
Exterior lighting ....................13, 130
Exterior mirrors ............................. 39F
Fault ........................................... 168
Fixed air vents ........................... 150
Floor mats................................... 256
Folding front seat ..........................51
Folding mirrors ............................. 40
Folding tray .................................. 86
Forward collision alert................. 187
Front airbag system .....................64
Front fog lights ...........115, 134, 224
Front pedestrian protection ........191
Front seats.................................... 48
Front storage ................................ 79
Front turn lights .......................... 225
Fuel for diesel engines ..............203
Fuel gauge ................................. 107 Fuses ......................................... 231
G
Gauges ....................................... 105
Gear selection ........................... 166
Gear shifting ............................... 113
General information ...................205
Glass panel .................................. 46
Glovebox ..................................... 78
Glovebox cooler ......................... 150
H
Halogen headlights ....................220
Hand brake ................................. 170
Hazard warning flashers ............133