wheel OPEL ZAFIRA C 2017.5 Manual user
[x] Cancel search | Manufacturer: OPEL, Model Year: 2017.5, Model line: ZAFIRA C, Model: OPEL ZAFIRA C 2017.5Pages: 293, PDF Size: 9.02 MB
Page 72 of 293

70StorageRear console
At the rear side of the FlexConsole
there is a storage drawer. Pull out to
open.
Caution
Do not use for ashes or for other
glowing items.
Rear carrier system
Rear carrier system for four
bicycles
The rear carrier system (Flex-Fix
system) allows two bicycles to be
attached to an extendable carrier
integrated into the vehicle floor. It is
possible to attach two further bicycles
on an adapter. The transportation of
other objects is not permitted.
The maximum load of the rear carrier
system is 80 kg with attached adapter and 60 kg without attached adapter.The maximum load per bicycle on the
rear carrier system is 30 kg. This
allows the attachment of electrically-
powered bicycles to the rear carrier system. The maximum load per
bicycle on the adapter is 20 kg.
The wheelbase of a bicycle must not
exceed 1.15 metres. Otherwise the
secure fastening of a bicycle is not
possible.
If not in use, the rear carrier system must be slid back into the vehiclefloor.
There must not be any objects on the bicycles that could become loose
during transportation.Caution
If the rear carrier system is
extended and the vehicle is fully loaded, the chassis clearance will
be reduced.
Drive carefully whenever the road has a steep inclination or when
driving over a ramp, bump, etc.
Page 74 of 293

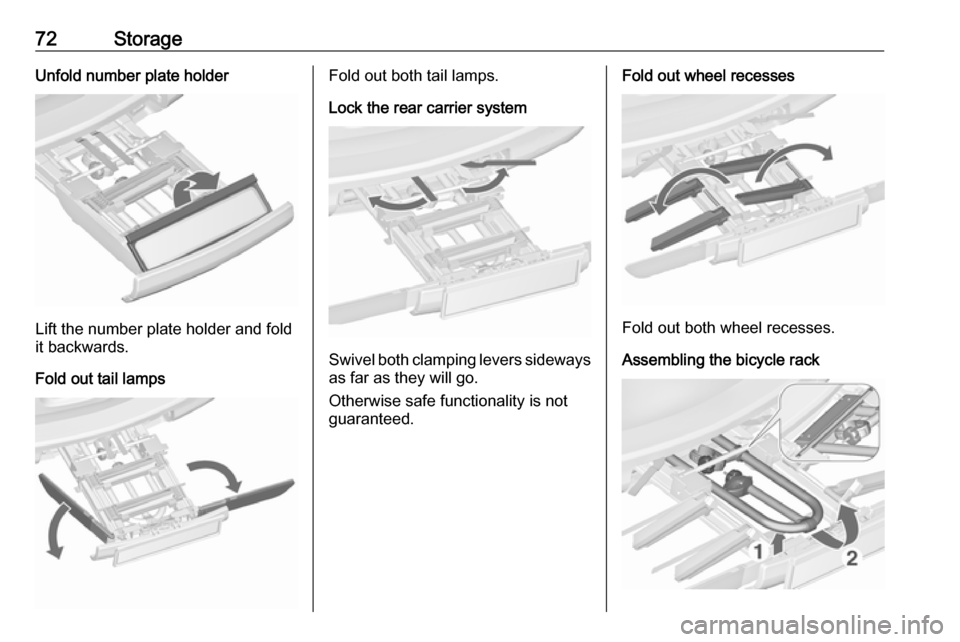
72StorageUnfold number plate holder
Lift the number plate holder and fold
it backwards.
Fold out tail lamps
Fold out both tail lamps.
Lock the rear carrier system
Swivel both clamping levers sideways as far as they will go.
Otherwise safe functionality is not
guaranteed.
Fold out wheel recesses
Fold out both wheel recesses.
Assembling the bicycle rack
Page 75 of 293

Storage73Lift the rack at the rear (1) and pull it
backwards.
Fold up the rack (2).
Push down the rack (1) and turn
handle (2) backwards to engage.
Attaching the first bicycle
1. Rotate the pedals into position as shown in the illustration and put
the bicycle on the foremost wheel
recess.
Make sure that the bicycle stands centrally on the wheel recesses.
2. Attach the short mounting bracket
to the bicycle frame. Turn the
knob clockwise to fasten.
Page 76 of 293

74Storage3.Secure both bicycle wheels to the
wheel recesses using the strap
retainers.
4. Check the bicycle to make sure it is secure.Caution
Ensure gap between bicycle and
vehicle is at least 5 cm. If
necessary, loosen handlebar and swivel sideways.
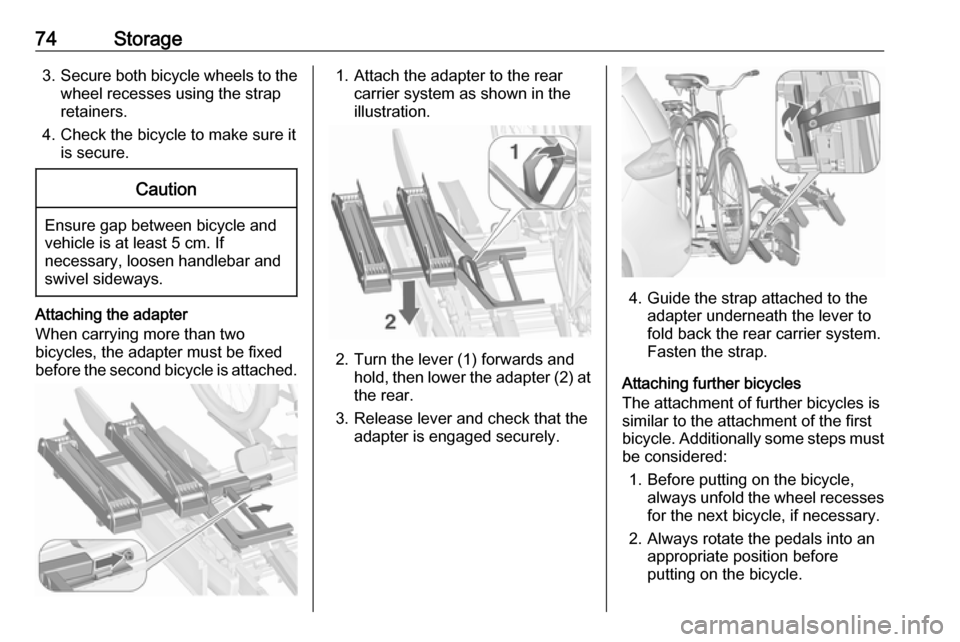
Attaching the adapter
When carrying more than two
bicycles, the adapter must be fixed
before the second bicycle is attached.
1. Attach the adapter to the rear carrier system as shown in the
illustration.
2. Turn the lever (1) forwards and hold, then lower the adapter (2) at
the rear.
3. Release lever and check that the adapter is engaged securely.
4. Guide the strap attached to theadapter underneath the lever to
fold back the rear carrier system.
Fasten the strap.
Attaching further bicycles
The attachment of further bicycles is
similar to the attachment of the first
bicycle. Additionally some steps must be considered:
1. Before putting on the bicycle, always unfold the wheel recesses
for the next bicycle, if necessary.
2. Always rotate the pedals into an appropriate position before
putting on the bicycle.
Page 77 of 293

Storage75
3. Position the bicycles on the rearcarrier system alternately aligned
to the left and to the right.
4. Align the bicycles to the one attached before. The wheel hubsof the bicycles must not touch
each other.
5. Attach the bicycles with mounting brackets and strap retainers as
described for the first bicycle. The
mounting brackets should be
fixed in parallel.
Use the long mounting bracket to
attach the second bicycle to the
rack.
Use the longer accessory
mounting bracket to attach the
third bicycle to the rack.
Use the short accessory mounting
bracket to attach the fourth
bicycle. The bracket must be fixed
between the frames of the third
and fourth bicycle.
6. Additionally secure both bicycle wheels of the fourth bicycle to thewheel recesses using the
tensioning straps.
It is recommended to attach a
warning sign to the rearmost bicycle
to increase visibility.
Fold the rear carrier system
backwards
The rear carrier system can be folded backwards to gain access to the load
compartment.
Page 78 of 293

76Storage● Without attached adapter:
Push the lever (1) to disengage
and hold.
Pull the rack (2) backwards to
fold the rear carrier system.
● With attached adapter:
9 Warning
Take care when disengaging the
rear carrier system as it will tilt
backwards. Risk of injury.
Hold frame (1) of rearmost
bicycle with one hand and pull the
loop (2) to disengage.
Hold rearmost bicycle with both
hands and fold the rear carrier
system backwards.
To increase visibility, the tail lights of
the vehicle are activated when the
rear carrier system is folded back.
9 Warning
When folding the rear carrier
system forwards again, take care
that the system is engaged
securely.
Removing bicycles
Undo strap retainers on bicycle tyres.
Turn knob anti-clockwise and remove
mounting brackets.
Detaching adapter
Detach the adapter before removing
the last bicycle remaining on the rear
carrier system.
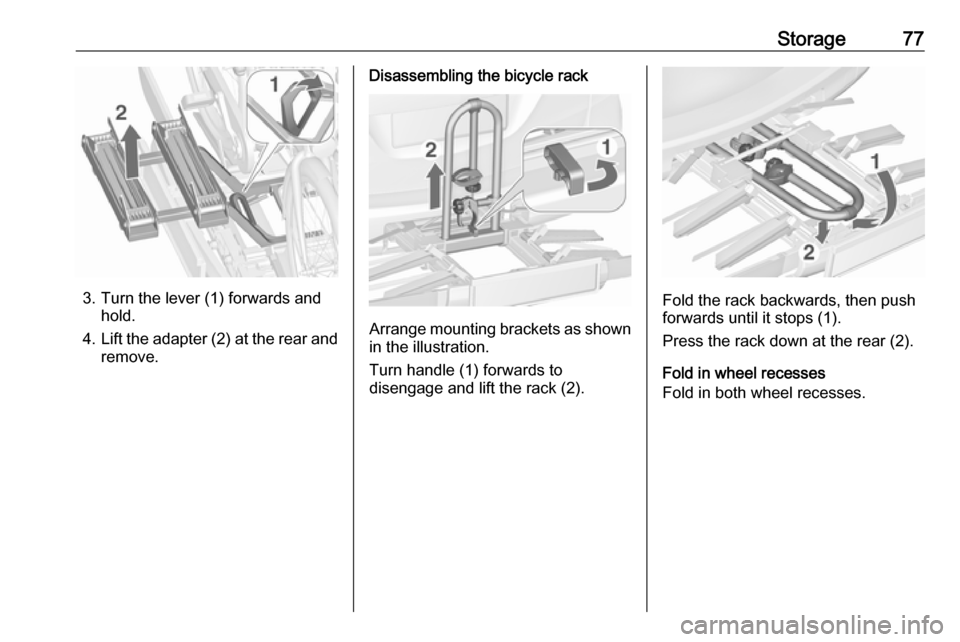
1. Fold in wheel recesses.
2. Unbutton the strap.
Page 79 of 293

Storage77
3. Turn the lever (1) forwards andhold.
4. Lift the adapter (2) at the rear and
remove.
Disassembling the bicycle rack
Arrange mounting brackets as shown in the illustration.
Turn handle (1) forwards to
disengage and lift the rack (2).
Fold the rack backwards, then push
forwards until it stops (1).
Press the rack down at the rear (2).
Fold in wheel recesses
Fold in both wheel recesses.
Page 80 of 293

78Storage
Stow the strap retainers accurately.
Unlock the rear carrier system
Swivel both clamping levers inwards
as far as they will go.
Fold in tail lamps
Swivel in both tail lamps.
Fold in number plate holder
Lift the number plate holder and fold
it forwards.
Retracting the rear carrier systemCaution
Take care that all foldable parts,
e.g. wheel recesses and mounting brackets, are stowed accurately.
Otherwise the rear carrier system might get damaged when trying to retract it.
Push the release lever up and hold.
Lift the rear carrier system slightly and
push it into the bumper until it
engages.
Release lever must return to original
position.9 Warning
If the system cannot be correctly
engaged, please seek the
assistance of a workshop.
Page 98 of 293

96Instruments and controlsInstruments and
controlsControls ....................................... 97
Steering wheel adjustment ........97
Steering wheel controls .............97
Heated steering wheel ...............97
Horn ........................................... 98
Windscreen wiper/washer .........98
Rear window wiper/washer .......99
Outside temperature ................100
Clock ....................................... 101
Power outlets ........................... 102
Cigarette lighter .......................103
Ashtrays .................................. 103
Warning lights, gauges and indi‐ cators ......................................... 103
Instrument cluster ....................103
Speedometer ........................... 103
Odometer ................................ 104
Trip odometer .......................... 104
Tachometer ............................. 104
Fuel gauge .............................. 105
Fuel selector ............................ 105
Engine coolant temperature gauge ..................................... 106
Service display ........................ 107Control indicators ....................107
Turn signal ............................... 110
Seat belt reminder ...................111
Airbag and belt tensioners .......111
Airbag deactivation ..................112
Charging system .....................112
Malfunction indicator light ........112
Brake and clutch system .........112
Operate pedal .......................... 113
Electric parking brake ..............113
Electric parking brake fault ......113
Antilock brake system (ABS) ...113
Gear shifting ............................ 114
Power steering ........................ 114
Following distance ...................114
Lane departure warning ..........114
Electronic Stability Control off . 114
Electronic Stability Control and Traction Control system .........114
Traction Control system off .....114
Preheating ............................... 115
Diesel particle filter ..................115
AdBlue ..................................... 115
Tyre pressure monitoring system .................................... 115
Engine oil pressure ..................115
Low fuel ................................... 116
Immobiliser .............................. 116
Exterior light ............................ 116
High beam ............................... 116High beam assist.....................116
LED headlights ........................ 116
Fog light ................................... 116
Rear fog light ........................... 116
Cruise control .......................... 116
Adaptive cruise control ............117
Vehicle detected ahead ...........117
Speed limiter ........................... 117
Traffic sign assistant ................117
Door open ................................ 117
Information displays ...................117
Driver Information Centre ........117
Info display .............................. 121
Vehicle messages ......................123
Warning chimes .......................124
Battery voltage ........................ 124
Vehicle personalisation ..............125
Telematics service .....................128
OnStar ..................................... 128
Page 99 of 293

Instruments and controls97Controls
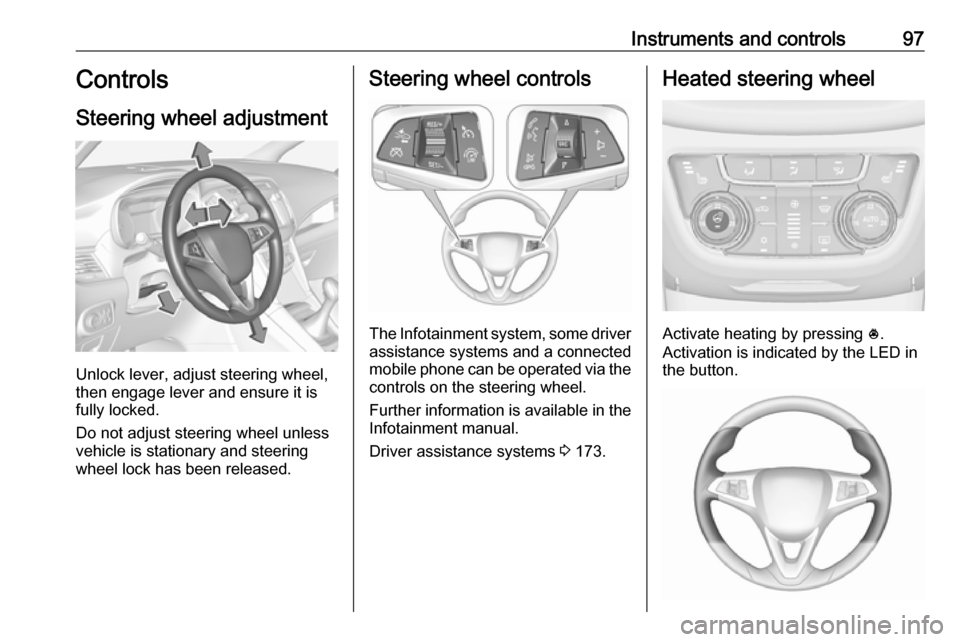
Steering wheel adjustment
Unlock lever, adjust steering wheel,
then engage lever and ensure it is
fully locked.
Do not adjust steering wheel unless
vehicle is stationary and steering
wheel lock has been released.
Steering wheel controls
The Infotainment system, some driver assistance systems and a connected
mobile phone can be operated via the
controls on the steering wheel.
Further information is available in the
Infotainment manual.
Driver assistance systems 3 173.
Heated steering wheel
Activate heating by pressing *.
Activation is indicated by the LED in
the button.