parking brake OPEL ZAFIRA C 2017.5 Owner's Guide
[x] Cancel search | Manufacturer: OPEL, Model Year: 2017.5, Model line: ZAFIRA C, Model: OPEL ZAFIRA C 2017.5Pages: 293, PDF Size: 9.02 MB
Page 235 of 293
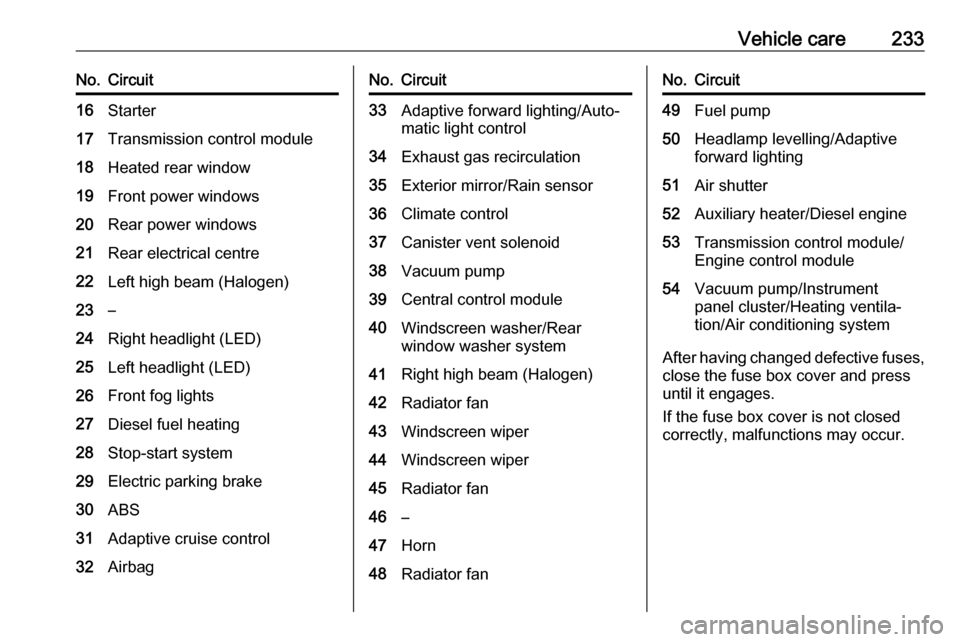
Vehicle care233No.Circuit16Starter17Transmission control module18Heated rear window19Front power windows20Rear power windows21Rear electrical centre22Left high beam (Halogen)23–24Right headlight (LED)25Left headlight (LED)26Front fog lights27Diesel fuel heating28Stop-start system29Electric parking brake30ABS31Adaptive cruise control32AirbagNo.Circuit33Adaptive forward lighting/Auto‐
matic light control34Exhaust gas recirculation35Exterior mirror/Rain sensor36Climate control37Canister vent solenoid38Vacuum pump39Central control module40Windscreen washer/Rear
window washer system41Right high beam (Halogen)42Radiator fan43Windscreen wiper44Windscreen wiper45Radiator fan46–47Horn48Radiator fanNo.Circuit49Fuel pump50Headlamp levelling/Adaptive
forward lighting51Air shutter52Auxiliary heater/Diesel engine53Transmission control module/
Engine control module54Vacuum pump/Instrument
panel cluster/Heating ventila‐
tion/Air conditioning system
After having changed defective fuses,
close the fuse box cover and press
until it engages.
If the fuse box cover is not closed
correctly, malfunctions may occur.
Page 242 of 293

240Vehicle careSystem status and pressure warningsare displayed by a message
indicating the corresponding tyre in the Driver Information Centre.
The system considers the tyre
temperature for the warnings.
A detected low tyre pressure
condition is indicated by control
indicator w 3 115.
If w illuminates, stop as soon as
possible and inflate the tyres as
recommended 3 275.
If w flashes for 60-90 seconds and
then illuminates continuously, there is
a fault in the system. Consult a
workshop.
After inflating, some driving may be
required to update the tyre pressure
values in the Driver Information
Centre. During this time w may
illuminate.
If w illuminates at lower temperatures
and extinguishes after some driving,
this could be an indicator for
approaching a low tyre pressure
condition. Check tyre pressure.
Vehicle messages 3 123.
If the tyre pressure must be reduced
or increased, switch off ignition.
Only mount wheels with pressure
sensors, otherwise the tyre pressure
will not be displayed and w
illuminates continuously.
A temporary spare wheel is not
equipped with pressure sensors. The
tyre pressure monitoring system is
not operational for these wheels.
Control indicator w illuminates. For
the further three wheels the system
remains operational.
The use of commercially available
liquid tyre repair kits can impair the
function of the system. Factory-
approved repair kits can be used.
Operating electronic devices or being close to facilities using similar wave
frequencies could disrupt the tyre
pressure monitoring system.Each time the tyres are replaced, tyre pressure monitoring system sensors
must be dismounted and serviced. For the screwed sensor: replace
valve core and sealing ring. For
clipped sensor: replace complete
valve stem.
Vehicle loading status Adjust tyre pressure to load condition
according to the tyre information label or tyre pressure chart 3 275, and
select the appropriate setting in the Tyre load menu in the Driver
Information Centre 3 117. This
setting is the reference for the tyre
pressure warnings.
The Tyre load menu only appears if
the vehicle is at a standstill and the parking brake is applied. On vehicles
with automatic transmission the
selector lever has to be in P.
Page 243 of 293

Vehicle care241
Select Tyre load page under Vehicle
Information Menu ? in the Driver
Information Centre 3 117.
Select: ● Light for comfort pressure up to
3 people.
● Eco for Eco pressure up to
3 people.
● Max for full load.
Tyre pressure sensor matching
process
Each tyre pressure sensor has a
unique identification code. The
identification code must be matched
to a new wheel position after rotating
the wheels or exchanging the
complete wheel set and if one or more
tyre pressure sensors were replaced. The tyre pressure sensor matching
process should also be performed
after replacing a spare wheel with a
road wheel containing the tyre
pressure sensor.
The malfunction light w and the
warning message or code should
extinguish at the next ignition cycle.
The sensors are matched to the
wheel positions, using a relearn tool,
in the following order: left side front
wheel, right side front wheel, right
side rear wheel and left side rear
wheel. The turn signal light at the
current active position is illuminated
until sensor is matched.
Consult your workshop for service.
There are two minutes to match the
first wheel position, and five minutes
overall to match all four wheel
positions. If it takes longer, the
matching process stops and must be
restarted.
The tyre pressure sensor matching
process is:
1. Apply the parking brake.2. Turn the ignition on.
3. On vehicles with automatic transmission: set the selector
lever to P.
On vehicles with manual
transmission: select neutral.
4. Press MENU on the turn signal
lever to select the Vehicle
Information Menu ? in the
Driver Information Centre.
5. Turn the adjuster wheel to scroll to
the tyre pressure menu.
Page 246 of 293

244Vehicle care9Warning
Do not drive faster than 80 km/h.
Do not use for a lengthy period.
Steering and handling may be
affected.
If you have a flat tyre:
Apply the parking brake and engage
first gear, reverse gear or P.
The tyre repair kit is on the left side in
the load compartment behind a cover.
1. Take the tyre repair kit from the compartment.
2. Remove the compressor.
3. Remove the electrical connection cable and air hose from the
stowage compartments on the
underside of the compressor.
4. Screw the compressor air hose to
the connection on the sealant
bottle.
5. Fit the sealant bottle into the retainer on the compressor.
Set the compressor near the tyre
in such a way that the sealant
bottle is upright.
6. Unscrew valve cap from defective
tyre.
7. Screw the filler hose to the tyre valve.
8. The switch on the compressor must be set to J.
Page 248 of 293

246Vehicle care
If tyre pressure is more than
1.3 bar , set it to the correct value.
Repeat the procedure until there
is no more loss of pressure.
If the tyre pressure has fallen
below 1.3 bar, the vehicle must
not be used. Seek the assistance
of a workshop.
18. Stow away tyre repair kit in load compartment.
Note
The driving characteristics of the
repaired tyre are severely affected,
therefore have this tyre replaced.
If unusual noise is heard or the
compressor becomes hot, turn
compressor off for at least
30 minutes.
The built-in safety valve opens at a
pressure of seven bar.
Note the expiry date of the kit. After
this date its sealing capability is no
longer guaranteed. Pay attention to
storage information on sealant
bottle.
Replace the used sealant bottle. Dispose of the bottle as prescribed
by applicable laws.
The compressor and sealant can be used from approx. -30 °C.
The adapters supplied can be used
to pump up other items e.g.
footballs, air mattresses, inflatable
dinghies etc. They are located on the
underside of the compressor. To
remove, screw on compressor air hose and withdraw adapter.
Wheel changing
Some vehicles are equipped with a
tyre repair kit instead of a spare wheel 3 243.Make the following preparations and
observe the following information:
● Park the vehicle on a level, firm and non-skid surface. The front
wheels must be in the straight-
ahead position.
● Apply the parking brake and engage first gear, reverse gear or
P .
● Remove the spare wheel 3 249.
● Never change more than one wheel at once.
● Use the jack only to change wheels in case of puncture, not
for seasonal winter or summer
tyre change.
● The jack is maintenance-free.
● If the ground on which the vehicle
is standing is soft, a solid board
(max. 1 cm thick) should be
placed under the jack.
● Take heavy objects out of the vehicle before jacking up.
● No people or animals may be in the vehicle when it is jacked-up.
● Never crawl under a jacked-up vehicle.
Page 254 of 293

252Vehicle careJump startingDo not start with quick charger.
A vehicle with a discharged battery
can be started using jump leads and the battery of another vehicle.
Do not start with quick charger.9 Warning
Be extremely careful when starting
with jump leads. Any deviation
from the following instructions can
lead to injuries or damage caused
by battery explosion or damage to the electrical systems of both
vehicles.
9 Warning
Avoid contact of the battery with
eyes, skin, fabrics and painted
surfaces. The fluid contains
sulphuric acid which can cause
injuries and damage in the event
of direct contact.
● Never expose the vehicle battery
to naked flames or sparks.
● A discharged vehicle battery can already freeze at a temperature
of 0 °C. Defrost the frozen vehicle
battery before connecting jump leads.
● Wear eye protection and protective clothing when
handling a battery.
● Use a booster vehicle battery with the same voltage (12 Volt).
Its capacity (Ah) must not be
much less than that of the
discharged vehicle battery.
● Use jump leads with insulated terminals and a cross section of
at least 16 mm 2
(25 mm 2
for
diesel engines).
● Do not disconnect the discharged
vehicle battery from the vehicle.
● Switch off all unnecessary electrical consumers.
● Do not lean over the battery during jump starting.
● Do not allow the terminals of one
lead to touch those of the other
lead.● The vehicles must not come into contact with each other during
the jump starting process.
● Apply the parking brake, transmission in neutral,
automatic transmission in P.
● Open the positive terminal protection cap of your vehicle in
the engine compartment and of
the booster vehicle battery.
Page 289 of 293

287Child restraint systems ................60
Cigarette lighter .........................103
Climate control ............................. 16
Climate control systems .............142
Clock........................................... 101
Code ........................................... 123
Collision damage repair ..............281
Control indicators........................ 107
Control of the vehicle .................151
Controls ........................................ 97
Convex shape .............................. 29
Coolant and antifreeze ...............260
Cruise control ....................116, 173
Cupholders .................................. 66
Curtain airbag system .................. 58
Curve lighting.............................. 136
D Danger, Warnings and Cautions ...4
Daytime running lights ...............135
Declaration of conformity ............278
DEF ............................................ 159
Diesel exhaust fluid ....................159
Diesel fuel system bleeding .......222
Diesel particle filter .............115, 157
Door open .................................. 117
Door panel storage .......................68
Doors ............................................ 25
Driver assistance systems ..........173
Driver Information Centre ...........117Driving characteristics and
towing tips .............................. 209
Driving hints ................................ 151
E Electric adjustment ......................29
Electrical system......................... 230
Electric parking brake .........113, 166
Electric parking brake fault .........113
Electronic climate control system 144
Electronic driving programmes ..163
Electronic Stability Control.......... 170
Electronic Stability Control and Traction Control system ..........114
Electronic Stability Control off..... 114
End-of-life vehicle recovery .......216
Engine compartment fuse box ...232
Engine coolant ........................... 218
Engine coolant temperature gauge ..................................... 106
Engine data ............................... 268
Engine exhaust .......................... 157
Engine identification ...................264
Engine oil ................... 217, 260, 265
Engine oil pressure ....................115
Entry lighting .............................. 140
Event data recorders ..................283
Exit lighting ................................ 140
Exterior care .............................. 255
Exterior light ............................... 116Exterior lighting ....................13, 132
Exterior mirrors ............................. 29
F
Fault ........................................... 164
First aid kit ................................... 92
Fixed air vents ........................... 149
Flex-Fix system ............................ 70
Fog light ..................................... 116
Fog lights ................................... 225
Folding mirrors ............................. 29
Folding tray .................................. 92
Following distance ......................114
Following distance indication ......185
Forward collision alert................. 182
Front airbag system .....................57
Front fog lights ........................... 137
Front seats.................................... 38
Front storage ................................ 68
Fuel............................................. 198
Fuel consumption - CO 2-
Emissions ............................... 208
Fuel for diesel engines ..............199
Fuel for liquid gas operation .......201
Fuel for natural gas operation ...200
Fuel for petrol engines ...............198
Fuel gauge ................................. 105
Fuel selector .............................. 105
funnel .......................................... 203
Fuses ......................................... 230
Page 291 of 293

289PParking ................................ 19, 156
Parking assist ............................ 188
Parking brake ............................ 166
Parking lights ............................. 138
Particulate filter ........................... 157
Performance .............................. 270
Performing work ........................216
Pollen filter ................................. 149
Power outlets ............................. 102
Power seat adjustment ................41
Power steering............................ 114
Power steering fluid ....................219
Power windows ............................ 31
Preheating ................................. 115
Puncture ..................................... 246
Q Quickheat ................................... 148
R
Radio Frequency Identification (RFID) ..................................... 284
Radio remote control ...................21
Reading lights ............................ 140
Rear carrier system ......................70
Rear floor storage cover ..............83
Rear fog light .....................116, 138
Rear seats .................................... 44
Rear storage ................................. 81
Rear view camera ...................... 192Rear window wiper/washer .......... 99
Recommended fluids and lubricants ........................ 260, 265
Refuelling ................................... 203
Registered trademarks ...............283
Retained power off .....................152
Reversing lights .........................138
Ride control system ....................169
Roller blinds ................................. 34
Roof .............................................. 34
Roof load ...................................... 94
Roof rack ..................................... 93
S Safety net .................................... 90
Seat adjustment ............................. 6
Seat belt ........................................ 8
Seat belt reminder .....................111
Seat belts ..................................... 50
Seat heating ................................. 43
Seat position ................................ 38
Second row seats ........................44
Selective catalytic reduction .......159
Selector lever ............................. 162
Service ............................... 149, 259
Service display .......................... 107
Service information ....................259
Side airbag system ......................57
Side blind spot alert ....................190
Sidelights .................................... 132Side turn signal lights ................229
Software acknowledgement .......281
Spare wheel ............................... 249
Speed limiter....................... 117, 174
Speedometer ............................. 103
Starting and operating ................151
Starting off ................................... 17
Starting the engine ....................152
Steering ...................................... 151
Steering wheel adjustment ......9, 97
Steering wheel controls ...............97
Stop-start system........................ 154
Storage ......................................... 66
Storage compartments .................66
Sunvisor lights ........................... 140
Sun visors .................................... 33
Symbols ......................................... 4
T
Tachometer ............................... 104
Tail lights ................................... 226
Third row seats ............................ 48
Three-point seat belt .................... 51
Tools .......................................... 237
Tow bar....................................... 209
Towing ................................ 209, 253
Towing another vehicle .............254
Towing equipment .....................210
Towing the vehicle .....................253
Traction Control system ............. 169