tow bar OPEL ZAFIRA C 2018 Manual user
[x] Cancel search | Manufacturer: OPEL, Model Year: 2018, Model line: ZAFIRA C, Model: OPEL ZAFIRA C 2018Pages: 341, PDF Size: 9.99 MB
Page 57 of 341

Seats, restraints55geschÞtzt ist, da dies den TOD oder
SCHWERE VERLETZUNGEN DES
KINDES zur Folge haben kann.
FR: NE JAMAIS utiliser un siÃĻge
d'enfant orientÃĐ vers l'arriÃĻre sur un
siÃĻge protÃĐgÃĐ par un COUSSIN
GONFLABLE ACTIF placÃĐ devant lui,
sous peine d'infliger des
BLESSURES GRAVES, voire
MORTELLES Ã l'ENFANT.
ES: NUNCA utilice un sistema de
retenciÃģn infantil orientado hacia
atrÃĄs en un asiento protegido por un
AIRBAG FRONTAL ACTIVO. Peligro de MUERTE o LESIONES GRAVES
para el NIÃO.
RU: ÐÐÐÐ ÐÐĐÐÐÐĒÐĄÐŊ
ŅŅŅÐ°Ð―Ð°ÐēÐŧÐļÐēаŅŅ ÐīÐĩŅŅКÐūÐĩ
ŅÐīÐĩŅÐķÐļÐēаŅŅÐĩÐĩ ŅŅŅŅÐūÐđŅŅÐēÐū ÐŧÐļŅÐūО
Ð―Ð°Ð·Ð°Ðī Ð―Ð° ŅÐļÐīÐĩÐ―ŅÐĩ аÐēŅÐūОÐūÐąÐļÐŧŅ,
ÐūÐąÐūŅŅÐīÐūÐēÐ°Ð―Ð―ÐūО ŅŅÐūÐ―ŅаÐŧŅÐ―ÐūÐđ
ÐŋÐūÐīŅŅКÐūÐđ ÐąÐĩзÐūÐŋаŅÐ―ÐūŅŅÐļ, ÐĩŅÐŧÐļ
ÐÐÐÐĢÐĻÐÐ ÐÐ ÐÐĒÐÐÐŪЧÐÐÐ! ÐŅÐū
ОÐūÐķÐĩŅ ÐŋŅÐļÐēÐĩŅŅÐļ К ÐĄÐÐÐ ÐĒÐ ÐļÐŧÐļ
ÐĄÐÐ ÐŽÐÐÐÐŦÐ ÐĒÐ ÐÐÐÐÐ
Ð ÐÐÐÐÐÐ.NL: Gebruik NOOIT een achterwaarts
gericht kinderzitje op een stoel met
een ACTIEVE AIRBAG ervoor, om
DODELIJK of ERNSTIG LETSEL van het KIND te voorkomen.
DA: Brug ALDRIG en bagudvendt
autostol pÃĨ et forsÃĶde med AKTIV
AIRBAG, BARNET kan komme i
LIVSFARE eller komme ALVORLIGT
TIL SKADE.
SV: AnvÃĪnd ALDRIG en bakÃĨtvÃĪnd
barnstol pÃĨ ett sÃĪte som skyddas med en framfÃķrvarande AKTIV AIRBAG.
DÃDSFALL eller ALLVARLIGA
SKADOR kan drabba BARNET.
FI: ÃLÃ KOSKAAN sijoita taaksepÃĪin
suunnattua lasten turvaistuinta
istuimelle, jonka edessÃĪ on
AKTIIVINEN TURVATYYNY, LAPSI
VOI KUOLLA tai VAMMAUTUA
VAKAVASTI.
NO: Bakovervendt
barnesikringsutstyr mÃĨ ALDRI brukes
pÃĨ et sete med AKTIV
KOLLISJONSPUTE foran, da det kan fÃļre til at BARNET utsettes for
LIVSFARE og fare for ALVORLIGE
SKADER.PT: NUNCA use um sistema de
retençÃĢo para crianças voltado para
trÃĄs num banco protegido com um
AIRBAG ACTIVO na frente do
mesmo, poderÃĄ ocorrer a PERDA DE
VIDA ou FERIMENTOS GRAVES na
CRIANÃA.
IT: Non usare mai un sistema di
sicurezza per bambini rivolto
all'indietro su un sedile protetto da AIRBAG ATTIVO di fronte ad esso:
pericolo di MORTE o LESIONI
GRAVI per il BAMBINO!
EL: Î ÎÎĪΠΞη ÏÏηÏÎđΞÎŋÏÎŋÎđÎĩÎŊÏÎĩ ÏÎąÎđÎīÎđΚÏ
ΚΎÎļÎđÏΞι ÎąÏÏÎąÎŧÎĩÎŊÎąÏ ÎžÎĩ ÏÎŋÏÎŽ ÏÏÎŋÏ ÏÎą
ÏÎŊÏÏ ÏÎĩ ΚΎÎļÎđÏΞι ÏÎŋÏ
ÏÏÎŋÏÏÎąÏÎĩÏÎĩÏÎąÎđ
ÎąÏÏ ÎžÎĩÏÏÏÎđÎšÏ ÎÎÎÎĄÎÎ ÎÎÎĄÎÎĢÎÎÎ, ÎīÎđÏÏÎđ ÏÎŋ ÏÎąÎđÎīÎŊ ΞÏÎŋÏÎĩÎŊ Î―Îą Ï
ÏÎŋÏÏÎĩÎŊ
ÎÎÎÎÎĢÎÎÎ ÎŪ ÎĢÎÎÎÎĄÎ
ÎĪÎĄÎÎĨÎÎÎĪÎÎĢÎÎ.
PL: NIE WOLNO montowaÄ fotelika
dzieciÄcego zwrÃģconego tyÅem do
kierunku jazdy na fotelu, przed
ktÃģrym znajduje siÄ WÅÄCZONA
PODUSZKA POWIETRZNA.
Niezastosowanie siÄ do tego
zalecenia moÅže byÄ przyczynÄ
ÅMIERCI lub POWAÅŧNYCH
OBRAÅŧEÅ u DZIECKA.
Page 256 of 341

254Driving and operatingGeneral information
The official fuel consumption and
specific CO 2 emission figures quoted
relate to the EU base model with
standard equipment.
Fuel consumption data and CO 2
emission data are determined
according to regulation
R (EC) No. 715/2007 (in the version
respectively applicable), taking into
consideration the vehicle weight in
running order, as specified by the
regulation.
The figures are provided only for the purpose of comparison between different vehicle variants and mustnot be taken as a guarantee for the
actual fuel consumption of a
particular vehicle. Additional
equipment may result in slightly
higher results than the stated
consumption and CO 2 figures.
Furthermore, fuel consumption is dependent on personal driving style
as well as road and traffic conditions.Natural gas
The fuel consumption information
was obtained using reference fuel
G20 (methane proportion
99 - 100 mol%) under prescribed
driving conditions. When using
natural gas with a lower proportion of
methane, the fuel consumption can
differ from the specified values.Trailer hitch
General information
Only use towing equipment that has
been approved for your vehicle.
Vehicles with natural gas engines
require special towing equipment.
Entrust retrofitting of towing
equipment to a workshop. It may be
necessary to make changes that
affect the cooling system, heat
shields or other equipment.
The bulb outage detection function for trailer brake light cannot detect a
partial bulb outage. E.g. in case of
4x 5 Watt bulbs, the function only
detects lamp outage when only a
single 5 Watt lamp remains or none
remain.
Fitting of towing equipment could
cover the opening of the towing eye.
If this is the case use the coupling ball
bar for towing. Always keep the
coupling ball bar in the vehicle.
Page 258 of 341

256Driving and operatingRear axle load
When the trailer is coupled and the
towing vehicle fully loaded, the
permissible rear axle load (see
identification plate or vehicle
documents) may be exceeded by
60 kg , the gross vehicle weight rating
may be exceeded by 60 kg. If the
permissible rear axle load is
exceeded, a maximum speed of
100 km/h applies.
Towing equipmentCaution
When operating without a trailer,
remove the coupling ball bar.
Stowage of coupling ball bar
The coupling ball bar is stowed in the
stowage compartment in the right
sidewall.
Fitting the coupling ball bar
Disengage and fold down the socket. Remove the sealing plug from the
opening for the coupling ball bar and
stow it.
Page 259 of 341

Driving and operating257Checking the tensioning of the
coupling ball bar
â Red marking on rotary knob must
point towards green marking on
coupling ball bar.
â The gap between the rotary knob
and the coupling ball bar must be approx. 6 mm.
â The key must be in position c.
Otherwise, the coupling ball bar must be tensioned before being inserted:
â Unlock coupling ball bar by turning key to position c.
â Pull out rotary knob and turn
clockwise as far as it will go.
Inserting the coupling ball bar
Insert the tensioned coupling ball bar
in the opening and push firmly
upwards until it audibly engages.
The rotary handle snaps back into its
original position, resting against the
coupling ball bar without a gap.9 Warning
Do not touch rotary handle during
insertion.
Lock the coupling ball bar by turning
the key to position e. Remove the key
and close the protective flap.
Eye for break-away stopping cable
Page 260 of 341

258Driving and operatingAttach breakaway stopping cable to
eye.
Check that the coupling ball bar is correctly installed
â Green marking on rotary knob must point towards green
marking on coupling ball bar.
â There must be no gap between the rotary handle and the
coupling ball bar.
â The coupling ball bar must be firmly engaged in the opening.
â The coupling ball bar must be locked and the key removed.9Warning
Towing a trailer is permitted only
when a coupling ball bar is fitted correctly. If the coupling ball bardoes not engage correctly, seekthe assistance of a workshop.
Dismounting the coupling ball bar
Open the protective flap and turn the
key to position c to unlock the
coupling ball bar.
Pull out rotary handle and turn
clockwise as far as it will go. Pull out coupling ball bar downwards.
Insert sealing plug in opening. Fold away socket.
Trailer stability assist
If the system detects snaking
movements, engine power is reduced
and the vehicle/trailer combination is
selectively braked until the snaking ceases. While system is working keep steering wheel as still as possible.
Trailer stability assist (TSA) is a
function of the Electronic Stability
Control 3 218.
Page 292 of 341

290Vehicle care9. Connect the compressor plug tothe power outlet or cigarette
lighter socket.
To avoid discharging the battery,
we recommend running the
engine.
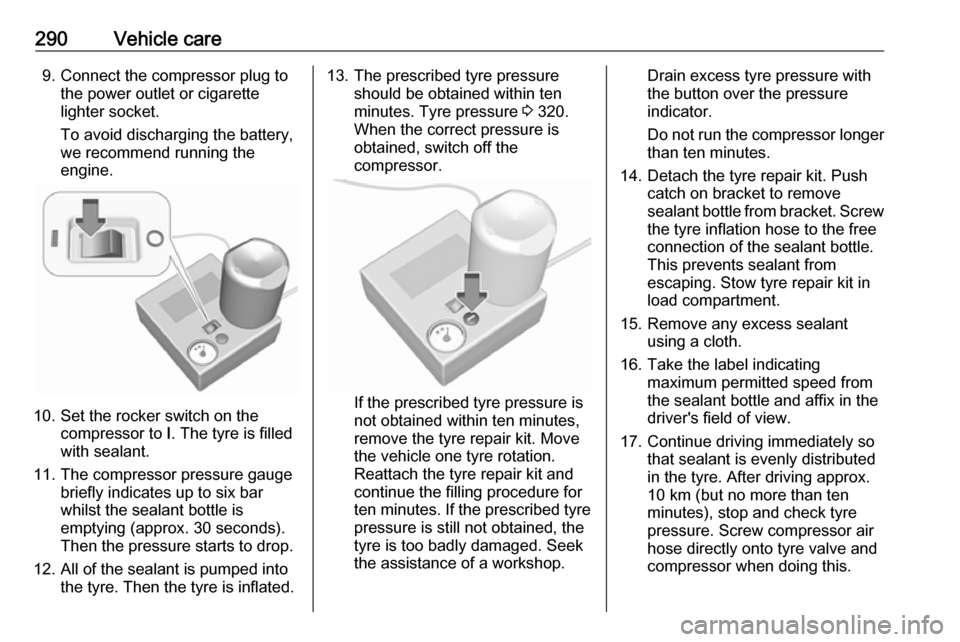
10. Set the rocker switch on the compressor to I. The tyre is filled
with sealant.
11. The compressor pressure gauge briefly indicates up to six bar
whilst the sealant bottle is
emptying (approx. 30 seconds).
Then the pressure starts to drop.
12. All of the sealant is pumped into the tyre. Then the tyre is inflated.
13. The prescribed tyre pressureshould be obtained within ten
minutes. Tyre pressure 3 320.
When the correct pressure is
obtained, switch off the
compressor.
If the prescribed tyre pressure is
not obtained within ten minutes,
remove the tyre repair kit. Move
the vehicle one tyre rotation.
Reattach the tyre repair kit and
continue the filling procedure for
ten minutes. If the prescribed tyre
pressure is still not obtained, the
tyre is too badly damaged. Seek
the assistance of a workshop.
Drain excess tyre pressure with
the button over the pressure indicator.
Do not run the compressor longer
than ten minutes.
14. Detach the tyre repair kit. Push catch on bracket to remove
sealant bottle from bracket. Screw the tyre inflation hose to the free
connection of the sealant bottle.
This prevents sealant from
escaping. Stow tyre repair kit in
load compartment.
15. Remove any excess sealant using a cloth.
16. Take the label indicating maximum permitted speed from
the sealant bottle and affix in the
driver's field of view.
17. Continue driving immediately so that sealant is evenly distributed
in the tyre. After driving approx.
10 km (but no more than ten
minutes), stop and check tyre
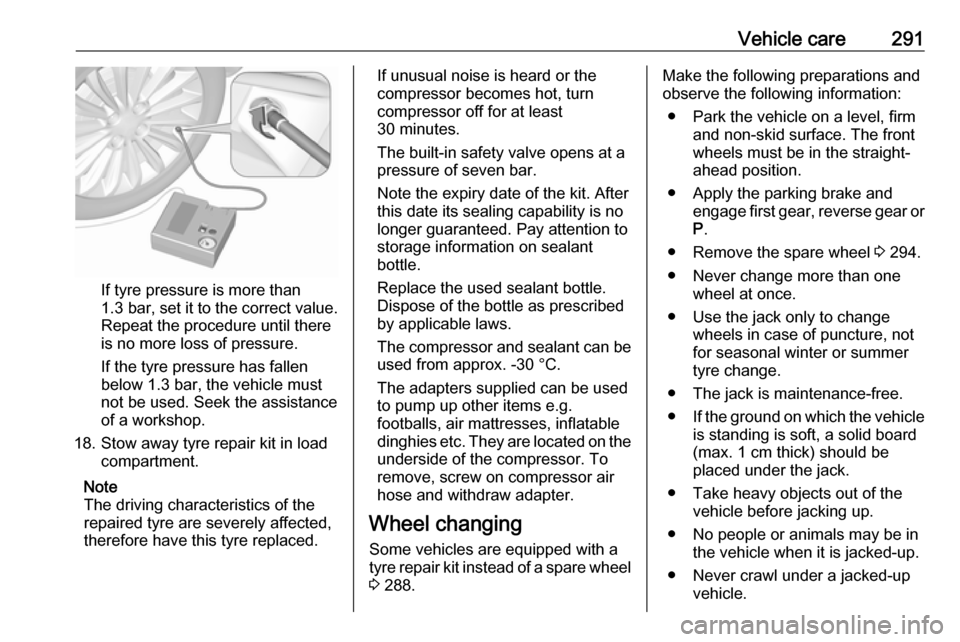
pressure. Screw compressor air
hose directly onto tyre valve and
compressor when doing this.
Page 293 of 341

Vehicle care291
If tyre pressure is more than
1.3 bar , set it to the correct value.
Repeat the procedure until there
is no more loss of pressure.
If the tyre pressure has fallen
below 1.3 bar, the vehicle must
not be used. Seek the assistance
of a workshop.
18. Stow away tyre repair kit in load compartment.
Note
The driving characteristics of the
repaired tyre are severely affected,
therefore have this tyre replaced.
If unusual noise is heard or the
compressor becomes hot, turn
compressor off for at least
30 minutes.
The built-in safety valve opens at a
pressure of seven bar.
Note the expiry date of the kit. After
this date its sealing capability is no
longer guaranteed. Pay attention to
storage information on sealant
bottle.
Replace the used sealant bottle. Dispose of the bottle as prescribed
by applicable laws.
The compressor and sealant can be used from approx. -30 °C.
The adapters supplied can be used
to pump up other items e.g.
footballs, air mattresses, inflatable
dinghies etc. They are located on the
underside of the compressor. To
remove, screw on compressor air hose and withdraw adapter.
Wheel changing
Some vehicles are equipped with a
tyre repair kit instead of a spare wheel 3 288.Make the following preparations and
observe the following information:
â Park the vehicle on a level, firm and non-skid surface. The front
wheels must be in the straight-
ahead position.
â Apply the parking brake and engage first gear, reverse gear or
P .
â Remove the spare wheel 3 294.
â Never change more than one wheel at once.
â Use the jack only to change wheels in case of puncture, not
for seasonal winter or summer
tyre change.
â The jack is maintenance-free.
â If the ground on which the vehicle
is standing is soft, a solid board
(max. 1 cm thick) should be
placed under the jack.
â Take heavy objects out of the vehicle before jacking up.
â No people or animals may be in the vehicle when it is jacked-up.
â Never crawl under a jacked-up vehicle.
Page 302 of 341

300Vehicle care
Screw in the towing eye as far as it will
go until it stops in a horizontal
position.
The lashing eye at the rear
underneath the vehicle must never be used as a towing eye.
Attach a tow rope â or even better a
tow bar â to the towing eye.
The towing eye must only be used for
towing and not for recovering a
vehicle.
Caution
Drive slowly. Do not drive jerkily.
Excessive tractive force can
damage the vehicle.
After towing, unscrew the towing eye.
Insert cap at the bottom and engage.
Appearance care
Exterior care
Locks The locks are lubricated at the factoryusing a high quality lock cylinder
grease. Use de-icing agent only when absolutely necessary, as this has a
degreasing effect and impairs lock function. After using a de-icing agent,
have the locks regreased by a
workshop.
Washing
The paintwork of your vehicle is
exposed to environmental influences. Wash and wax your vehicle regularly.
When using automatic vehicle
washes, select a programme that
includes waxing.
Bird droppings, dead insects, resin,
pollen and the like should be cleaned
off immediately, as they contain
aggressive constituents which can
cause paint damage.
Page 304 of 341

302Vehicle careGlass panel
Never clean with solvents or abrasive
agents, fuels, aggressive media
(e.g. paint cleaner, acetone-
containing solutions etc.), acidic or
highly alkaline media or abrasive
pads.
Wheels and tyres
Do not use high-pressure jet
cleaners.
Clean rims with a pH-neutral wheel
cleaner.
Rims are painted and can be treated
with the same agents as the body.
Paintwork damageRectify minor paintwork damage with
a touch-up pen before rust forms. Have more extensive damage or rust
areas repaired by a workshop.
Underbody Some areas of the vehicle underbody
have a PVC undercoating while other
critical areas have a durable
protective wax coating.After the underbody is washed, check the underbody and have it waxed if
necessary.
Bitumen/rubber materials could
damage the PVC coating. Have
underbody work carried out by a
workshop.
Before and after winter, wash the
underbody and have the protective
wax coating checked.
Liquid gas system9 Danger
Liquid gas is heavier than air and
can collect in sink points.
Take care when performing work
at the underbody in a pit.
For painting work and when using a
drying booth at a temperature above
60 °C, the liquid gas tank must be
removed.
Do not make any modifications to the
liquid gas system.
Towing equipment
Do not clean the coupling ball bar with a steam-jet or high-pressure jet
cleaner.
Rear carrier system Clean the rear carrier system with a
steam-jet or high-pressure jet cleaner
at least once a year.
Operate the rear carrier system
periodically if not in regular use, in
particular during winter.
Air shutter Clean the shutter system in the front
bumper to maintain correct
functionality.
Interior care
Interior and upholstery Only clean the vehicle interior,
including the instrument panel fascia
and panelling, with a dry cloth or
interior cleaner.
Page 339 of 341

337Seat belt ........................................ 8
Seat belt reminder .....................111
Seat belts ..................................... 50
Seat heating ................................. 43
Seat position ................................ 38
Second row seats ........................44
Selective catalytic reduction .......207
Selector lever ............................. 210
Service ............................... 197, 304
Service display .......................... 107
Service information ....................304
Side airbag system ......................58
Side blind spot alert ....................238
Sidelights .................................... 130
Side turn signal lights ................274
Smartphone ................................ 159
Phone projection .....................164
Software acknowledgement .......328
Spare wheel ............................... 294
Speech recognition .....................180
Speed dial numbers ...................184
Speed limiter....................... 117, 222 Speedometer ............................. 103
Starting and operating ................199
Starting off ................................... 17
Starting the engine ....................200
Station search............................. 154
Steering ...................................... 199
Steering wheel adjustment ......9, 97
Steering wheel audio controls ....142Steering wheel controls ...............97
Stop-start system........................ 202
Storage ......................................... 66
Storage compartments .................66
Storing stations ........................... 156
Sunvisor lights ........................... 138
Sun visors .................................... 33
Switching the Infotainment system on ................................ 145
Symbols ......................................... 4
System settings .......................... 152
T
Tachometer ............................... 104
Tail lights ................................... 271
Theft-deterrent feature ..............141
Third row seats ............................ 48
Three-point seat belt .................... 51
TMC stations .............................. 166
Tone settings .............................. 150
Tools .......................................... 282
Touch beep volume ....................151
Tow bar....................................... 254
Towing ................................ 254, 298
Towing another vehicle .............299
Towing equipment .....................256
Towing the vehicle .....................298
TP volume .................................. 151
Traction Control system ............. 217
Traction Control system off......... 114Traffic incidents .......................... 176
Traffic sign assistant ...........117, 241
Trailer coupling ........................... 254
Trailer stability assist .................258
Trailer towing ............................. 255
Transmission ............................... 16
Transmission display .................210
Tread depth ............................... 287
Trip odometer ............................ 103
Turn and lane-change signals ...135
Turn list ....................................... 176
Turn signal ................................. 110
Tyre chains ................................ 288
Tyre designations ......................282
Tyre pressure ............................ 283
Tyre pressure monitoring system ............................. 115, 284
Tyre pressures ........................... 320
Tyre repair kit ............................. 288
U
Ultrasonic parking assist............. 235
Underseat storage .......................68
Upholstery .................................. 302
Usage ................. 145, 154, 167, 180
Bluetooth ................................. 159
Menu ....................................... 148
Navigation system ...................167
Phone ...................................... 184