steering wheel OPEL ZAFIRA C 2019 Manual user
[x] Cancel search | Manufacturer: OPEL, Model Year: 2019, Model line: ZAFIRA C, Model: OPEL ZAFIRA C 2019Pages: 317, PDF Size: 9.38 MB
Page 177 of 317
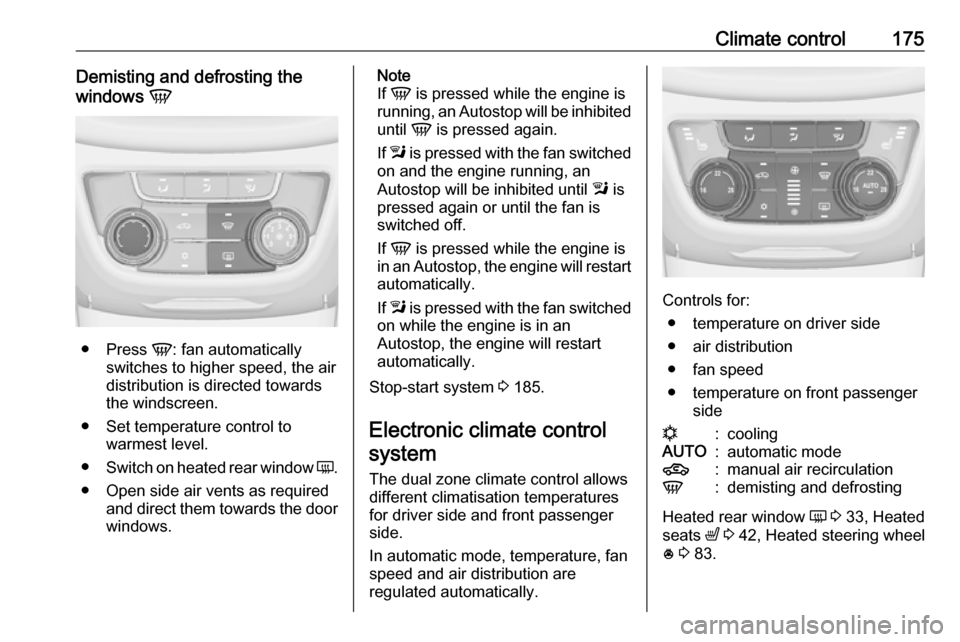
Climate control175Demisting and defrosting the
windows V
●
Press V: fan automatically
switches to higher speed, the air
distribution is directed towards
the windscreen.
● Set temperature control to warmest level.
● Switch on heated rear window Ü.
● Open side air vents as required and direct them towards the door
windows.
Note
If V is pressed while the engine is
running, an Autostop will be inhibited
until V is pressed again.
If l is pressed with the fan switched
on and the engine running, an
Autostop will be inhibited until l is
pressed again or until the fan is
switched off.
If V is pressed while the engine is
in an Autostop, the engine will restart
automatically.
If l is pressed with the fan switched
on while the engine is in an
Autostop, the engine will restart
automatically.
Stop-start system 3 185.
Electronic climate control system
The dual zone climate control allows
different climatisation temperatures
for driver side and front passenger
side.
In automatic mode, temperature, fan
speed and air distribution are
regulated automatically.
Controls for:
● temperature on driver side
● air distribution
● fan speed
● temperature on front passenger side
n:coolingAUTO:automatic mode4:manual air recirculationV:demisting and defrosting
Heated rear window Ü 3 33, Heated
seats ß 3 42, Heated steering wheel
* 3 83.
Page 185 of 317
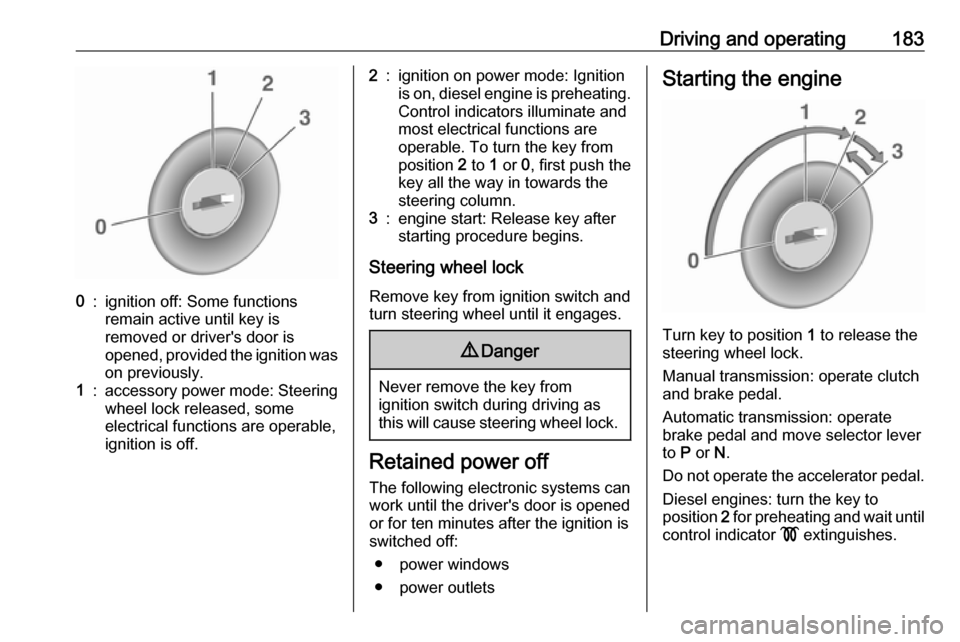
Driving and operating1830:ignition off: Some functions
remain active until key is
removed or driver's door is
opened, provided the ignition was
on previously.1:accessory power mode: Steering wheel lock released, some
electrical functions are operable,
ignition is off.2:ignition on power mode: Ignition
is on, diesel engine is preheating.
Control indicators illuminate and
most electrical functions are
operable. To turn the key from
position 2 to 1 or 0, first push the
key all the way in towards the steering column.3:engine start: Release key after
starting procedure begins.
Steering wheel lock
Remove key from ignition switch and
turn steering wheel until it engages.
9 Danger
Never remove the key from
ignition switch during driving as
this will cause steering wheel lock.
Retained power off
The following electronic systems can
work until the driver's door is opened
or for ten minutes after the ignition is
switched off:
● power windows
● power outlets
Starting the engine
Turn key to position 1 to release the
steering wheel lock.
Manual transmission: operate clutch
and brake pedal.
Automatic transmission: operate
brake pedal and move selector lever
to P or N.
Do not operate the accelerator pedal. Diesel engines: turn the key to
position 2 for preheating and wait until
control indicator ! extinguishes.
Page 189 of 317

Driving and operating187● The charge level of the vehiclebattery is below a defined level.
● The brake vacuum is not sufficient.
● The vehicle is driven at least at walking speed.
● The climate control system requests an engine start.
● The air conditioning is manually switched on.
If the bonnet is not fully closed, a warning message is displayed in the
Driver Information Centre.
If an electrical accessory, e.g. a
portable CD player, is connected to
the power outlet, a brief power drop
during engine restart may be
noticeable.Parking9 Warning
● Do not park the vehicle on an
easily ignitable surface. The
high temperature of the
exhaust system could ignite the
surface.
● Always apply the parking brake. Activate the manual
parking brake without pressing the release button. Apply as
firmly as possible on a downhill slope or uphill slope. Depress
brake pedal at the same time to
reduce operating force.
For vehicles with electric
parking brake, pull switch m for
a minimum of one second until
control indicator m illuminates
constantly and electric parking
brake is applied 3 96.
● Switch off the engine. ● If the vehicle is on a level surface or uphill slope, engage
first gear or set the selector
lever to position P before
removing the ignition key. On
an uphill slope, turn the front
wheels away from the kerb.
If the vehicle is on a downhill
slope, engage reverse gear or
set the selector lever to position
P before removing the ignition
key. Turn the front wheels
towards the kerb.
● Close the windows.
● Remove the ignition key from the ignition switch. Turn the
steering wheel until the
steering wheel lock is felt to
engage.
For vehicles with automatic
transmission, the key can only
be removed when the selector
lever is in position P.
● Lock the vehicle.
● Activate the anti-theft alarm system.
● The engine cooling fans may run
after the engine has been
switched off 3 240.
Page 218 of 317
216Driving and operatingdepending on the vehicle equipment,
either the radar behind the radiator
grille or the front camera in the
windscreen to detect the distance of
a vehicle directly ahead in your path. It is active at speeds above 40 km/h.
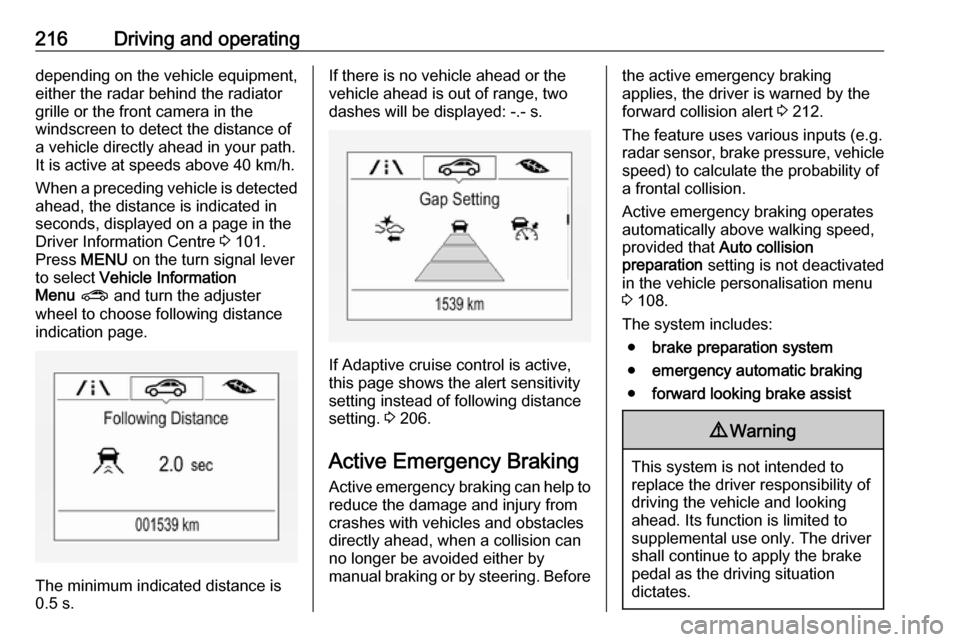
When a preceding vehicle is detected
ahead, the distance is indicated in
seconds, displayed on a page in the
Driver Information Centre 3 101.
Press MENU on the turn signal lever
to select Vehicle Information
Menu ? and turn the adjuster
wheel to choose following distance
indication page.
The minimum indicated distance is
0.5 s.
If there is no vehicle ahead or the vehicle ahead is out of range, two
dashes will be displayed: -.- s.
If Adaptive cruise control is active,
this page shows the alert sensitivity
setting instead of following distance setting. 3 206.
Active Emergency Braking
Active emergency braking can help to reduce the damage and injury from
crashes with vehicles and obstacles
directly ahead, when a collision can no longer be avoided either by
manual braking or by steering. Before
the active emergency braking
applies, the driver is warned by the forward collision alert 3 212.
The feature uses various inputs (e.g.
radar sensor, brake pressure, vehicle speed) to calculate the probability of
a frontal collision.
Active emergency braking operates automatically above walking speed,
provided that Auto collision
preparation setting is not deactivated
in the vehicle personalisation menu
3 108.
The system includes: ● brake preparation system
● emergency automatic braking
● forward looking brake assist9Warning
This system is not intended to
replace the driver responsibility of driving the vehicle and looking
ahead. Its function is limited to
supplemental use only. The driver shall continue to apply the brake
pedal as the driving situation
dictates.
Page 239 of 317

Driving and operating237Dismounting the coupling ball bar
Open the protective flap and turn the
key to position c to unlock the
coupling ball bar.
Pull out rotary handle and turn
clockwise as far as it will go. Pull out coupling ball bar downwards.
Insert sealing plug in opening. Fold away socket.
Trailer stability assist
If the system detects snaking
movements, engine power is reduced
and the vehicle/trailer combination is
selectively braked until the snaking ceases. While system is working keep steering wheel as still as possible.
Trailer stability assist (TSA) is a
function of the Electronic Stability
Control 3 200.
Page 240 of 317

238Vehicle careVehicle careGeneral Information...................239
Accessories and vehicle modifications .......................... 239
Vehicle storage ........................239
End-of-life vehicle recovery .....240
Vehicle checks ........................... 240
Performing work ......................240
Bonnet ..................................... 240
Engine oil ................................. 241
Engine coolant ......................... 242
Power steering fluid .................243
Washer fluid ............................ 244
Brakes ..................................... 244
Brake fluid ............................... 244
Vehicle battery ......................... 244
Diesel fuel system bleeding .....246
Wiper blade replacement ........246
Bulb replacement .......................247
Halogen headlights ..................247
LED headlights ........................ 249
Front fog lights ......................... 249
Tail lights ................................. 250
Side turn lights ......................... 253
Number plate light ...................253Interior lights ............................ 254
Instrument panel illumination ...254
Electrical system ........................254
Fuses ....................................... 254
Engine compartment fuse box . 256
Instrument panel fuse box .......258
Load compartment fuse box ....259
Vehicle tools .............................. 261
Tools ........................................ 261
Wheels and tyres .......................261
Winter tyres ............................. 261
Tyre designations ....................261
Tyre pressure .......................... 262
Tyre pressure monitoring system .................................... 263
Tread depth ............................. 266
Changing tyre and wheel size . 267
Wheel covers ........................... 267
Tyre chains .............................. 267
Tyre repair kit .......................... 267
Wheel changing .......................270
Spare wheel ............................ 271
Jump starting ............................. 276
Towing ....................................... 278
Towing the vehicle ...................278
Towing another vehicle ...........279Appearance care .......................280
Exterior care ............................ 280
Interior care ............................. 282
Page 260 of 317
258Vehicle careInstrument panel fuse box
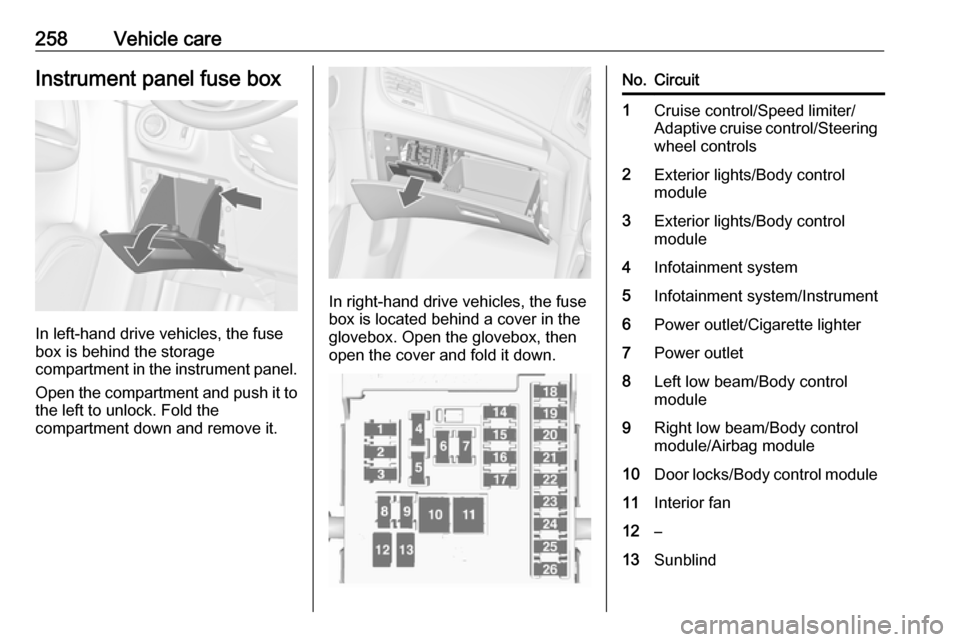
In left-hand drive vehicles, the fuse
box is behind the storage
compartment in the instrument panel.
Open the compartment and push it to the left to unlock. Fold the
compartment down and remove it.
In right-hand drive vehicles, the fuse
box is located behind a cover in the
glovebox. Open the glovebox, then
open the cover and fold it down.
No.Circuit1Cruise control/Speed limiter/
Adaptive cruise control/Steering wheel controls2Exterior lights/Body control
module3Exterior lights/Body control
module4Infotainment system5Infotainment system/Instrument6Power outlet/Cigarette lighter7Power outlet8Left low beam/Body control
module9Right low beam/Body control
module/Airbag module10Door locks/Body control module11Interior fan12–13Sunblind
Page 261 of 317
Vehicle care259No.Circuit14Diagnostic connector15Airbag16Power outlet17Air conditioning system18Logistics19Body control module20Body control module21Instrument panel cluster/Anti-
theft alarm system22Ignition sensor23Body control module24Body control module25Steering wheel heating26–
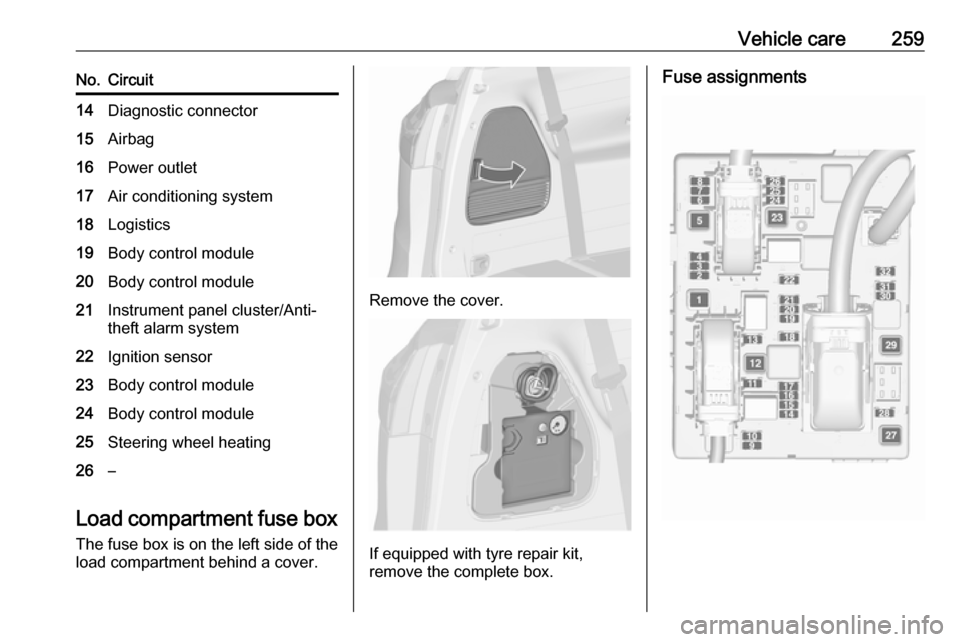
Load compartment fuse box
The fuse box is on the left side of the
load compartment behind a cover.
Remove the cover.
If equipped with tyre repair kit,
remove the complete box.
Fuse assignments
Page 280 of 317
278Vehicle care3. Allow both engines to idle forapprox. three minutes with the
leads connected.
4. Switch on electrical consumers (e.g. headlights, heated rear
window) of the vehicle receiving
the jump start.
5. Reverse above sequence exactly when removing leads.Towing
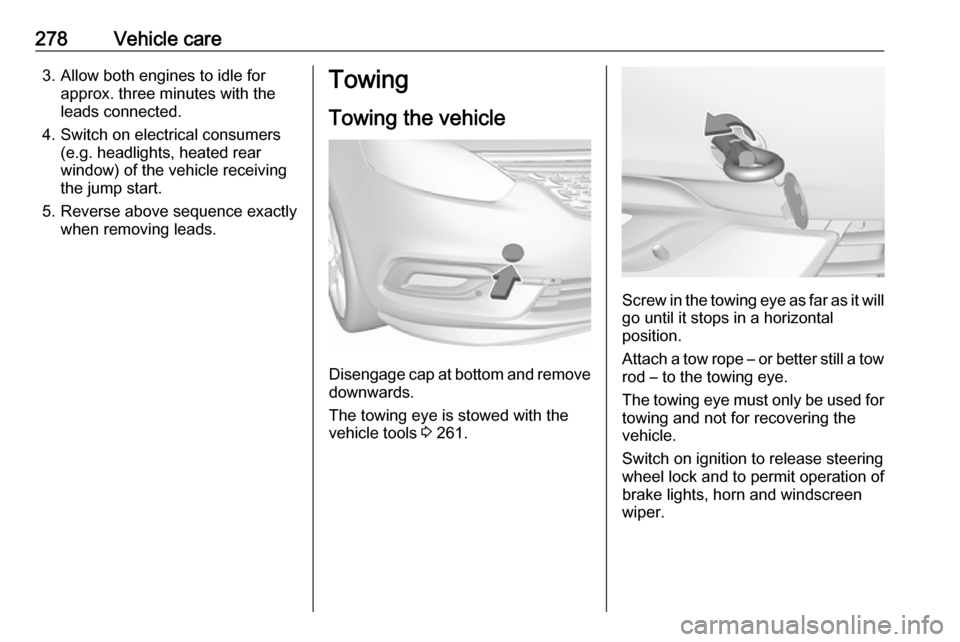
Towing the vehicle
Disengage cap at bottom and removedownwards.
The towing eye is stowed with the
vehicle tools 3 261.
Screw in the towing eye as far as it will
go until it stops in a horizontal
position.
Attach a tow rope – or better still a tow
rod – to the towing eye.
The towing eye must only be used for towing and not for recovering the
vehicle.
Switch on ignition to release steering
wheel lock and to permit operation of
brake lights, horn and windscreen
wiper.
Page 308 of 317

306Customer informationComfort and infotainment
functions
Comfort settings and custom settings
can be stored in the vehicle and
changed or reset at any time.
Depending on the equipment level in
question, these include
● seat and steering wheel position settings
● chassis and air conditioning settings
● custom settings such as interior lighting
You can input your own data in the
infotainment functions for your
vehicle as part of the selected
features.
Depending on the equipment level in
question, these include
● multimedia data such as music, videos or photos for playback in
an integrated multimedia system
● address book data for use with an
integrated hands-free system or an integrated navigation system● input destinations
● data on the use of online services
This data for comfort and
infotainment functions can be stored
locally in the vehicle or be kept on a
device that you have connected to the
vehicle ( e.g. a smartphone, USB stick
or MP3 player). Data that you have
input yourself can be deleted at any
time.
This data can only be transmitted out
of the vehicle at your request,
particularly when using online
services in accordance with the
settings selected by you.
Smartphone integration, e.g.
Android Auto or Apple CarPlay
If your vehicle is equipped
accordingly, you can connect your
smartphone or another mobile device
to the vehicle so that you can control
it via the controls integrated in the
vehicle. The smartphone image and
sound can be output via the
multimedia system in this case. At the same time, specific information is
transmitted to your smartphone.
Depending on the type of integration,this includes data such as position
data, day / night mode and other
general vehicle information. For more
information, please see the operating
instructions for the vehicle /
infotainment system.
Integration allows selected
smartphone apps to be used, such as
navigation or music playback. No
further integration is possible
between smartphone and vehicle, in particular active access to vehicle
data. The nature of further data
processing is determined by the
provider of the app used. Whether
you can define settings, and if so
which ones, is dependent on the app
in question and your smartphone's
operating system.