display Peugeot 106 Dag 2001.5 Owner's Manual
[x] Cancel search | Manufacturer: PEUGEOT, Model Year: 2001.5, Model line: 106 Dag, Model: Peugeot 106 Dag 2001.5Pages: 107, PDF Size: 2.96 MB
Page 15 of 107
I N S T R U M E N T S A N D C O N T R O L S18
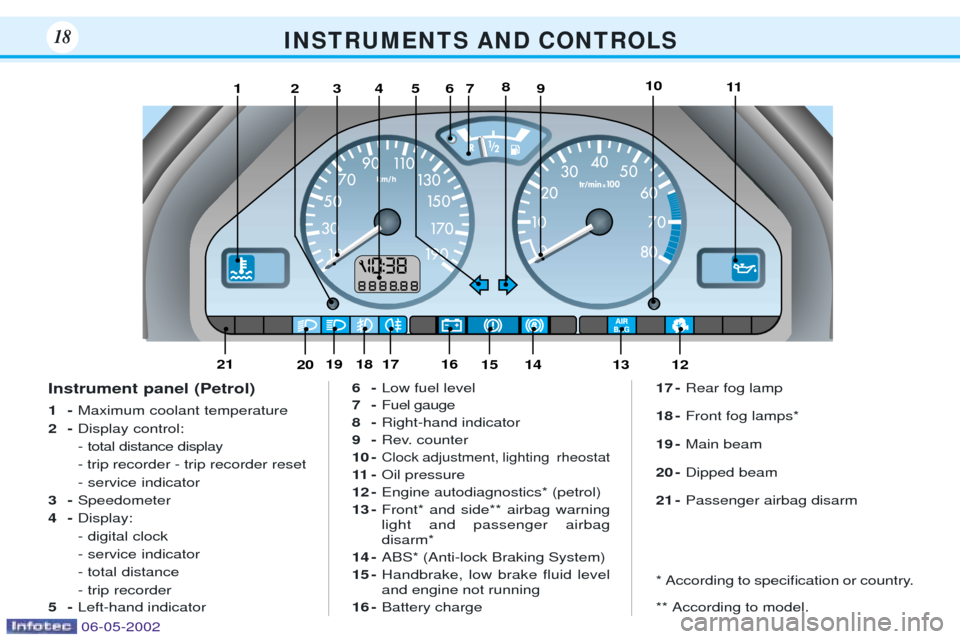
123456791011812
131415161718192021
Instrument panel (Petrol) 1-Maximum coolant temperature
2- Display control:
- total distance display- trip recorder - trip recorder reset- service indicator
3- Speedometer
4- Display:
- digital clock- service indicator
- total distance
- trip recorder
5- Left-hand indicator 6-
Low fuel level
7- Fuel gauge
8- Right-hand indicator
9- Rev. counter
10 -
Clock adjustment, lighting rheostat
11 - Oil pressure
12 - Engine autodiagnostics* (petrol)
13 - Front* and side** airbag warning light and passenger airbagdisarm*
14 - ABS* (Anti-lock Braking System)
15 - Handbrake, low brake fluid leveland engine not running
16 - Battery charge 17 -
Rear fog lamp
18 - Front fog lamps*
19 - Main beam
20 - Dipped beam
21 - Passenger airbag disarm
* According to speciÞcation or country. ** According to model.
06-05-2002
Page 16 of 107
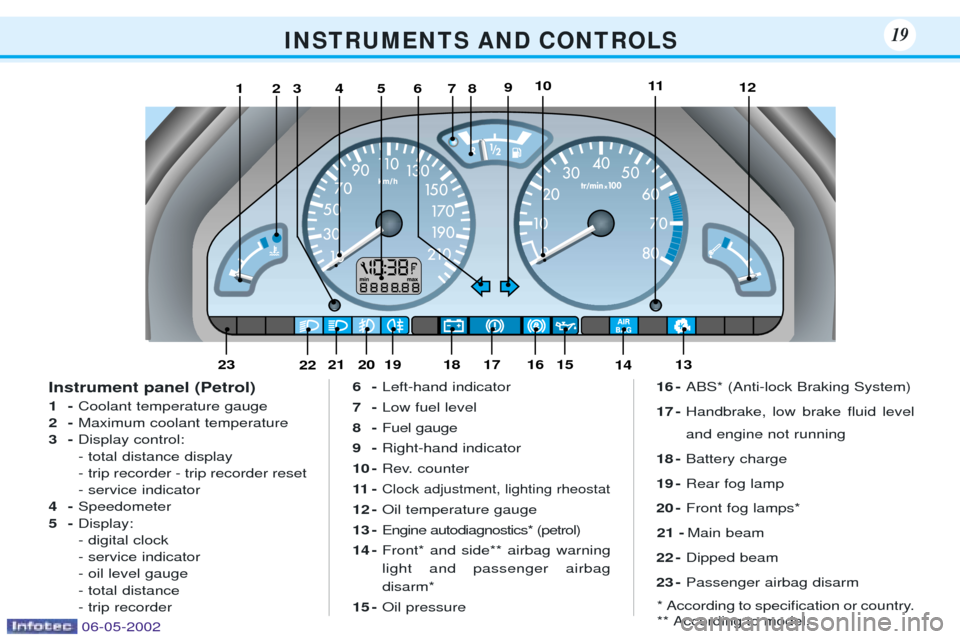
I N S T R U M E N T S A N D C O N T R O L S19
123456781011129
1416171819202122231315
Instrument panel (Petrol) 1-Coolant temperature gauge
2- Maximum coolant temperature
3- Display control:
- total distance display
- trip recorder - trip recorder reset
- service indicator
4- Speedometer
5- Display:
- digital clock
- service indicator - oil level gauge
- total distance
- trip recorder 6-
Left-hand indicator
7- Low fuel level
8- Fuel gauge
9- Right-hand indicator
10 - Rev. counter
11 -
Clock adjustment, lighting rheostat
12 - Oil temperature gauge
13 - Engine autodiagnostics* (petrol)
14 - Front* and side** airbag warning light and passenger airbagdisarm*
15 - Oil pressure 16 -
ABS* (Anti-lock Braking System)
17 - Handbrake, low brake ßuid level and engine not running
18 - Battery charge
19 - Rear fog lamp
20 - Front fog lamps*
21 - Main beam
22 - Dipped beam
23 - Passenger airbag disarm
* According to speciÞcation or country. ** According to model.
06-05-2002
Page 17 of 107
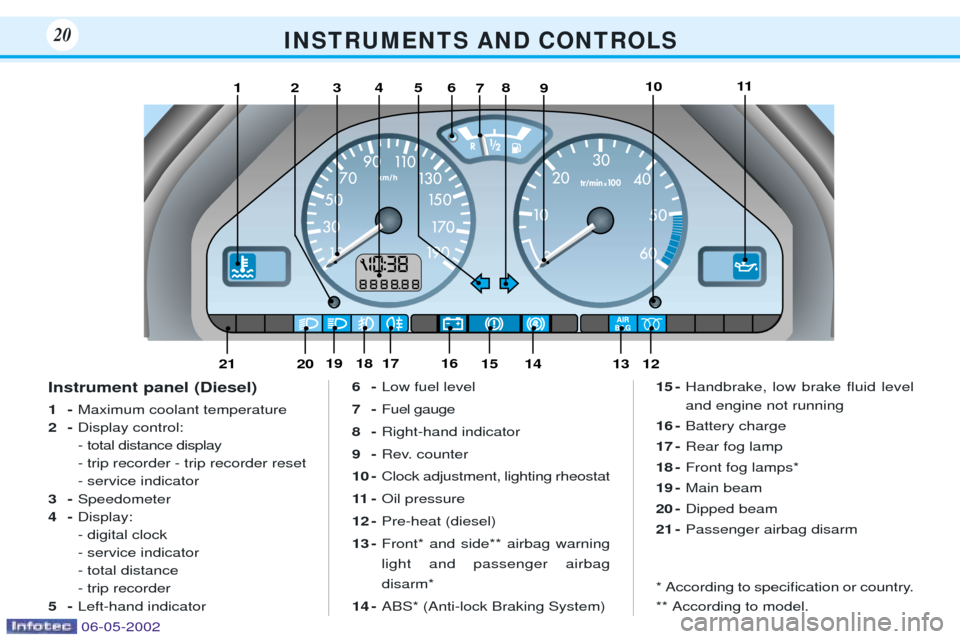
I N S T R U M E N T S A N D C O N T R O L S20
12345910118
13121415161718192021
67
Instrument panel (Diesel) 1-Maximum coolant temperature
2- Display control:
- total distance display- trip recorder - trip recorder reset- service indicator
3- Speedometer
4- Display:- digital clock- service indicator- total distance- trip recorder
5- Left-hand indicator 6-
Low fuel level
7- Fuel gauge
8- Right-hand indicator
9- Rev. counter
10 - Clock adjustment, lighting rheostat
11 - Oil pressure
12 - Pre-heat (diesel)
13 - Front* and side** airbag warning light and passenger airbagdisarm*
14 - ABS* (Anti-lock Braking System) 15 -
Handbrake, low brake fluid level and engine not running
16 - Battery charge
17 - Rear fog lamp
18 - Front fog lamps*
19 - Main beam
20 - Dipped beam
21 - Passenger airbag disarm
* According to speciÞcation or country. ** According to model.
06-05-2002
Page 21 of 107
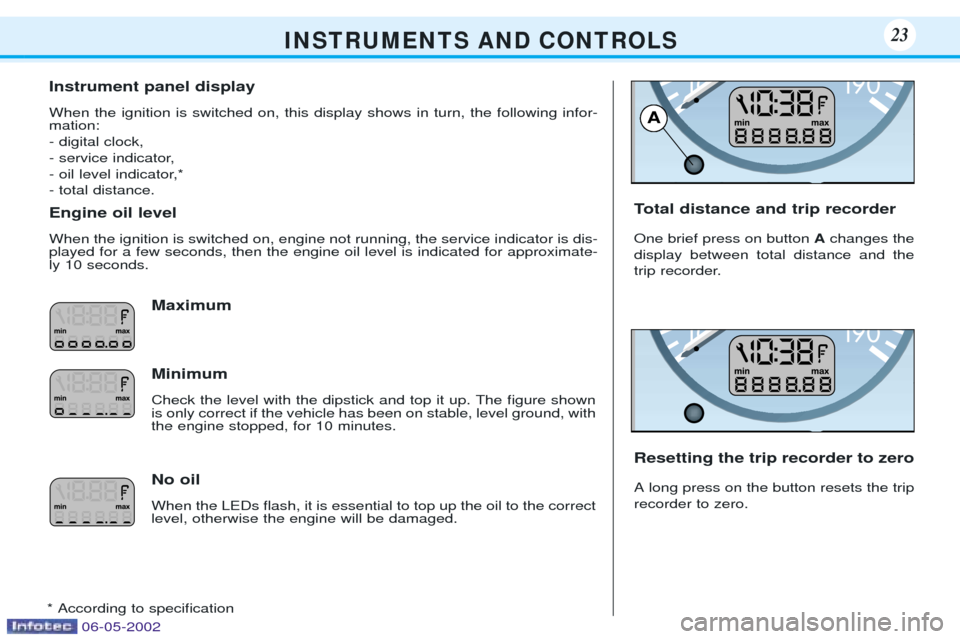
Instrument panel display When the ignition is switched on, this display shows in turn, the following infor- mation: - digital clock,
- service indicator,
- oil level indicator,*- total distance. Engine oil level When the ignition is switched on, engine not running, the service indicator is dis- played for a few seconds, then the engine oil level is indicated for approximate-ly 10 seconds.Maximum Minimum Check the level with the dipstick and top it up. The Þgure shown is only correct if the vehicle has been on stable, level ground, withthe engine stopped, for 10 minutes. No oil When the LEDs ßash, it is essential to top up the oil to the correct level, otherwise the engine will be damaged.
* According to speciÞcation Total distance and trip recorder One brief press on button
Achanges the
display between total distance and the
trip recorder. Resetting the trip recorder to zero A long press on the button resets the trip recorder to zero.
I N S T R U M E N T S A N D C O N T R O L S23
A
06-05-2002
Page 22 of 107
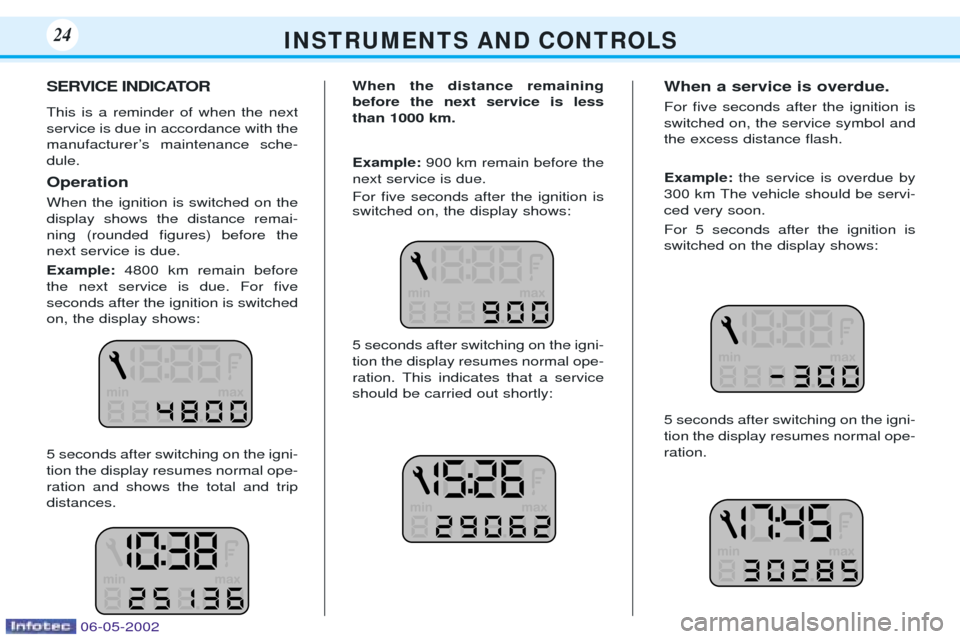
SERVICE INDICATOR This is a reminder of when the next service is due in accordance with the
manufacturerÕs maintenance sche-dule. Operation When the ignition is switched on the display shows the distance remai-ning (rounded Þgures) before thenext service is due. Example:4800 km remain before
the next service is due. For Þve seconds after the ignition is switchedon, the display shows: 5 seconds after switching on the igni- tion the display resumes normal ope-ration and shows the total and tripdistances. When the distance remainingbefore the next service is lessthan 1000 km. Example:
900 km remain before the
next service is due. For Þve seconds after the ignition is switched on, the display shows: 5 seconds after switching on the igni- tion the display resumes normal ope-ration. This indicates that a serviceshould be carried out shortly: When a service is overdue. For Þve seconds after the ignition is switched on, the service symbol andthe excess distance ßash. Example:
the service is overdue by
300 km The vehicle should be servi- ced very soon. For 5 seconds after the ignition is switched on the display shows: 5 seconds after switching on the igni- tion the display resumes normal ope-ration.
I N S T R U M E N T S A N D C O N T R O L S24
06-05-2002
Page 23 of 107
Service intervals If your vehicle is used in certain par-
ticularly difficult conditions it isnecessary to follow the "Arduousconditions" servicing schedule,which involves shorter intervals bet-
ween services (see the Warrantyand Maintenance Record booklet). Comment:If the time limit between
two services is reached before the relevant mileage limit, the servicespanner symbol will light up and thedisplay will show 0.
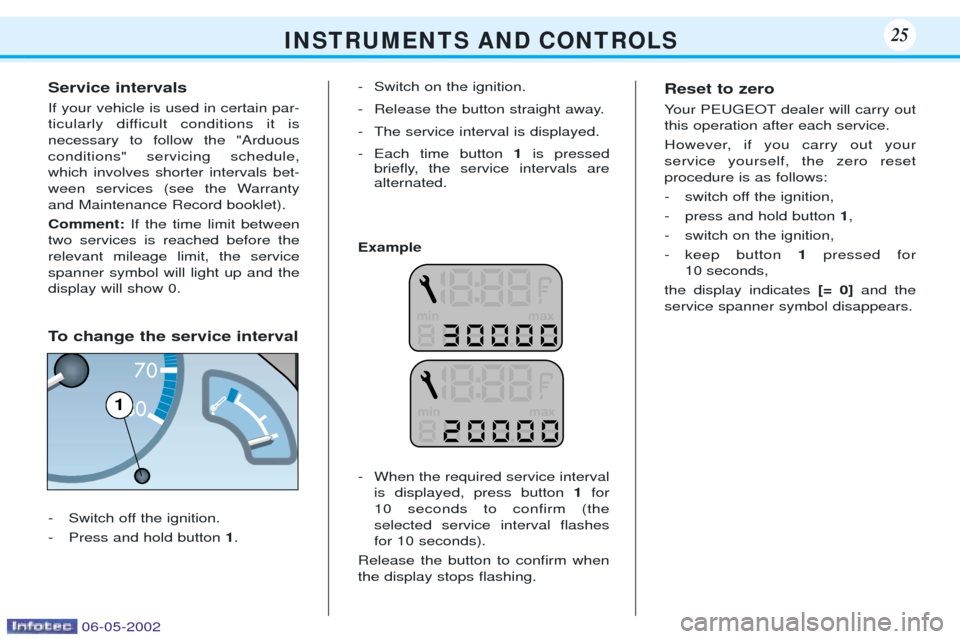
To change the service interval
- Switch off the ignition.
- Press and hold button 1. - Switch on the ignition.
- Release the button straight away.
- The service interval is displayed.
- Each time button
1is pressed
brießy, the service intervals are alternated.
Example
- When the required service interval is displayed, press button 1for
10 seconds to confirm (the selected service interval ßashes
for 10 seconds).
Release the button to conÞrm whenthe display stops ßashing. Reset to zero
Your PEUGEOT dealer will carry out this operation after each service.
However, if you carry out your service yourself, the zero resetprocedure is as follows:
- switch off the ignition,
- press and hold button
1,
- switch on the ignition,
- keep button 1pressed for
10 seconds,
the display indicates [= 0]and the
service spanner symbol disappears.
I N S T R U M E N T S A N D C O N T R O L S25
1
06-05-2002
Page 24 of 107
Service intervals If your vehicle is used in certain par-
ticularly difficult conditions it isnecessary to follow the "Arduousconditions" servicing schedule,which involves shorter intervals bet-
ween services (see the Warrantyand Maintenance Record booklet). Comment:If the time limit between
two services is reached before the relevant mileage limit, the servicespanner symbol will light up and thedisplay will show 0.
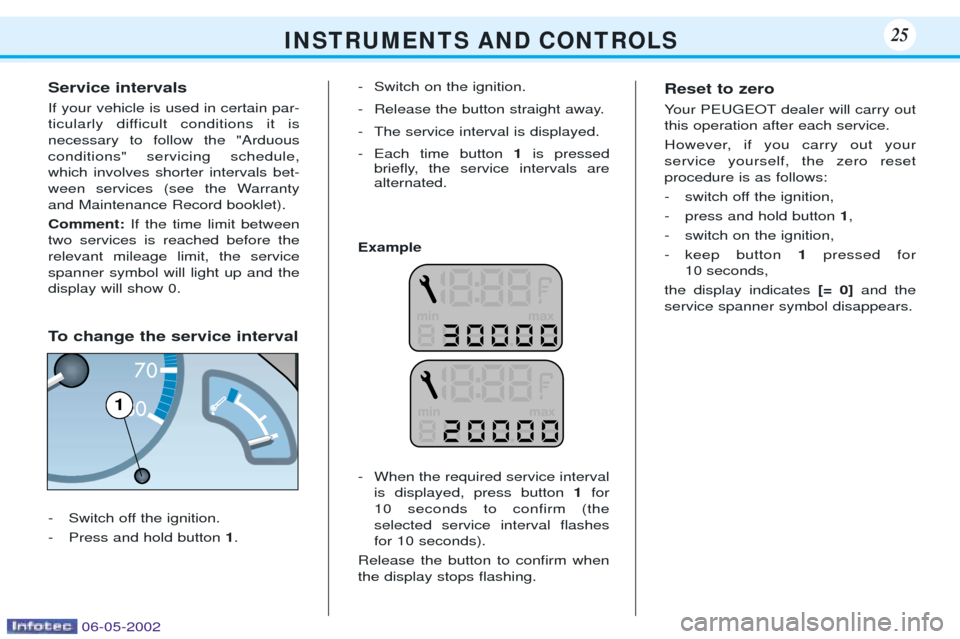
To change the service interval
- Switch off the ignition.
- Press and hold button 1. - Switch on the ignition.
- Release the button straight away.
- The service interval is displayed.
- Each time button
1is pressed
brießy, the service intervals are alternated.
Example
- When the required service interval is displayed, press button 1for
10 seconds to confirm (the selected service interval ßashes
for 10 seconds).
Release the button to conÞrm whenthe display stops ßashing. Reset to zero
Your PEUGEOT dealer will carry out this operation after each service.
However, if you carry out your service yourself, the zero resetprocedure is as follows:
- switch off the ignition,
- press and hold button
1,
- switch on the ignition,
- keep button 1pressed for
10 seconds,
the display indicates [= 0]and the
service spanner symbol disappears.
I N S T R U M E N T S A N D C O N T R O L S25
1
06-05-2002
Page 27 of 107
Y O U R 1 0 6 I N D E TA I L28
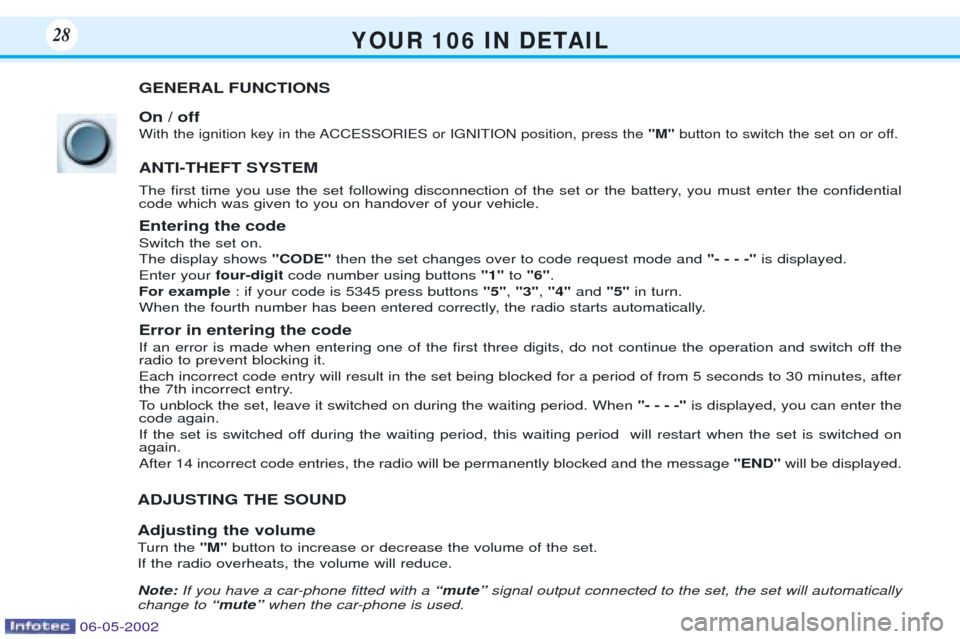
GENERAL FUNCTIONS On / off
With the ignition key in the ACCESSORIES or IGNITION position, press the "M"button to switch the set on or off.
ANTI-THEFT SYSTEM
The first time you use the set following disconnection of the set or the battery, you must enter the confidential code which was given to you on handover of your vehicle. Entering the code Switch the set on. The display shows "CODE"then the set changes over to code request mode and "- - - -"is displayed.
Enter your four-digitcode number using buttons "1"to "6" .
For example : if your code is 5345 press buttons "5", "3" , "4" and "5"in turn.
When the fourth number has been entered correctly, the radio starts automatically.
Error in entering the code
If an error is made when entering one of the first three digits, do not continue the operation and switch off the radio to prevent blocking it. Each incorrect code entry will result in the set being blocked for a period of from 5 seconds to 30 minutes, after
the 7th incorrect entry.
To unblock the set, leave it switched on during the waiting period. When "- - - -"is displayed, you can enter the
code again.
If the set is switched off during the waiting period, this waiting period will restart when the set is switched on again. After 14 incorrect code entries, the radio will be permanently blocked and the message "END"will be displayed.
ADJUSTING THE SOUND Adjusting the volume
Turn the "M"button to increase or decrease the volume of the set.
If the radio overheats, the volume will reduce. Note: If you have a car-phone fitted with a ÒmuteÓsignal output connected to the set, the set will automatically
change to ÒmuteÓwhen the car-phone is used.
06-05-2002
Page 28 of 107
Y O U R 1 0 6 I N D E TA I L29
AUDIO SETTINGS Press the ÒAUDIOÓbutton several times in succession to access the bass (BASS), treble (TREB), loudness
(LOUD) , fader (FAD)and balance (BAL).
Exit from audio mode is automatic after a few seconds, without pressing any button or by pressing the ÒAUDIOÓ
button after adjusting the balance. Note: bass and treble settings are specific to each source. It is possible to set them differently for radio, cassette
and CD.
Bass setting When ÒBASSÓ is displayed, press the ÒGÓor ÒHÓ buttons to vary the setting.
Ð ÒBASS Ð9Ó for a minimum bass setting,
Ð ÒBASS 0Ó for a normal position,
Ð ÒBASS +9Ó for a maximum bass setting.
Treble settingWhen ÒTREBÓ is displayed, press the ÒGÓor ÒHÓ buttons to vary the setting.
Ð ÒTREB Ð9Ó for a minimum treble setting,
Ð ÒTREB 0Ó for a normal position,
Ð ÒTREB +9Ó for a maximum treble setting.
Adjusting the loudness
This function automatically emphasises bass and treble tones when the volume is low. Press the ÒGÓor ÒHÓ buttons to switch this function on or off.
Setting the front/rear sound distribution (Fader) When ÒFADÓ is displayed, press the ÒGÓor ÒHÓ buttons to vary the setting.
The ÒGÓ button increases the volume at the front.
The ÒHÓbutton increases the volume at the rear.
This function can be deactived by pressing buttons ÒMÓandÒIÓ simultaneously.
Setting the right/left sound distribution (Balance)When ÒBALÓ is displayed, press the ÒGÓorÒHÓ buttons to vary the setting.
The ÒGÓ button increases the volume on the right-hand side.
The ÒHÓ button increases the volume on the left-hand side.
06-05-2002
Page 29 of 107
Y O U R 1 0 6 I N D E TA I L30
RADIO Notes on radio reception
Your radio is subject to phenomena which do not affect domestic sets. Both MW/LW and FM reception are subject to various forms of interference which are no reflection on the quality of your set, but are due to the nature of thesignals and the way in which they are transmitted.On MW/LW, interference may be noticed when passing underneath high voltage power lines or bridges or through
tunnels.
On FM, interference may be the result of increasing distance from the transmitter, reflection of the signal by
obstacles (mountains, hills, buildings etc), or of being in an area which is not covered by a transmitter. Selecting the radio Press the "SRC"button, until the radio is selected.
Selecting a wavebandBy short presses on the "BND/AST"button, you can select the FM1, FM2, FM3 and AM wavebands.
Automatic station searchBriefly press button ÒJÓor ÒKÓ to search for the station immediately above or below. By continuing to press the
button in the direction selected, you will obtain continous scrolling of the frequency. The scrolling stops at the first station found as soon as you release the button.
If the TA traffic programme is selected, only stations broadcasting this type of programme are selected.Searching for a station occurs first in ÒLOÓsensitivity (selection of the most powerful transmitters) during
scanning of the waveband, then in ÒDXÓsensitivity (selection of the weakest and most distant transmitters).
Manual station search Press the ÒMANÓbutton.
Briefly press button ÒJÓor ÒKÓ respectively to increase or reduce the frequency displayed.
By continuing to press the button in the direction selected, you will obtain continuous scrolling of the frequency. Scrolling stops as soon as you release the button.Pressing the ÒMANÓbutton again returns you to automatic station search.
06-05-2002