check oil PEUGEOT 108 2016 Owners Manual
[x] Cancel search | Manufacturer: PEUGEOT, Model Year: 2016, Model line: 108, Model: PEUGEOT 108 2016Pages: 268, PDF Size: 6.17 MB
Page 10 of 268
8
108_en_Chap00b_vue-ensemble_ed01-2016
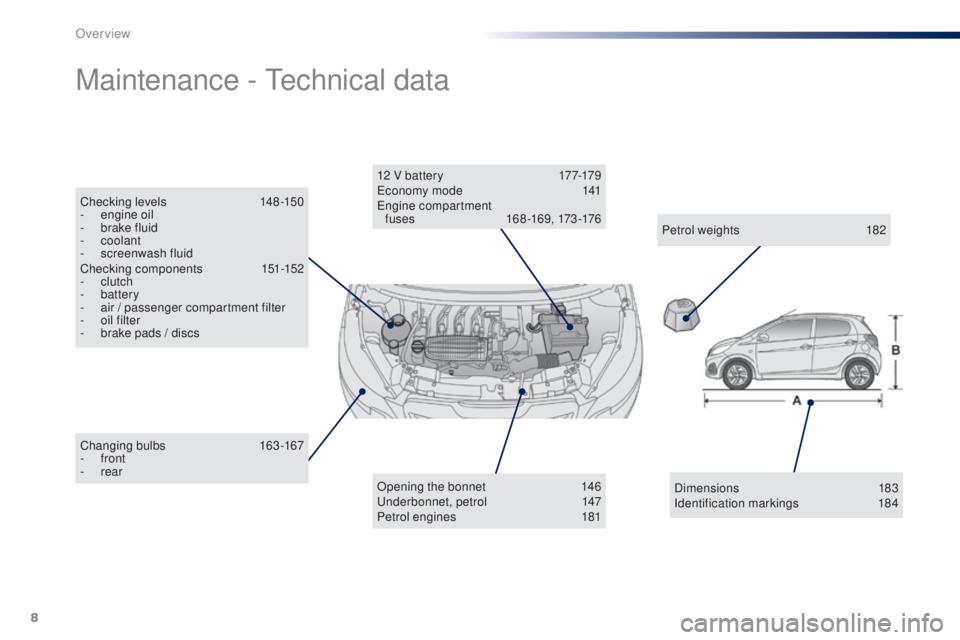
Changing bulbs 163-167
- front
-
rear
Maintenance - te chnical data
Opening the bonnet 1 46un
derbonnet, petrol 1 47
Petrol engines
1
81
12 V battery
1
77-179
ec
onomy mode
1
41
en
gine compartment
f u s e s
1
6 8 -16 9, 173 -176
Petrol weights
1
82
Checking levels
1
48 -150
-
e
ngine oil
-
b
rake fluid
-
coolant
-
s
creenwash fluid
Checking components
1
51-152
-
clutch
-
battery
-
a
ir / passenger compartment filter
-
o
il filter
-
b
rake pads / discs
Dimensions 183
Identification markings
1
84
Over view
Page 12 of 268
10
108_en_Chap00c_eco-conduite_ed01-2016
Limit the causes of excess consumption
Spread loads throughout the vehicle; place the heaviest items in the
bottom of the boot, as close as possible to the rear seats.
Limit the loads carried in the vehicle and reduce wind resistance
(roof bars, roof rack...). u
s
e a roof box in preference.
Remove roof bars and roof racks after use.
At the end of winter, remove snow tyres and refit your summer tyres.
observe the recommendations on
maintenance
Check the tyre pressures regularly, when cold, referring to the label in
the door aperture, driver's side.
Carry out this check in particular:
-
b
efore a long journey,
-
a
t each change of season,
-
a
fter a long period out of use.
Don't forget the spare wheel and the tyres on any trailer or caravan.
Have your vehicle serviced regularly (engine oil, oil filter, air filter,
passenger compartment filter...) and observe the schedule of
operations recommended in the warranty and maintenance record.
When refuelling, do not continue after the third cut-off of the nozzle to
avoid any over flow.
At the wheel of your new vehicle, it is only after the first 1 800 miles
(3
000 kilometres) that you will see the fuel consumption settle down to
a consistent average.
eco-driving
Page 18 of 268
16
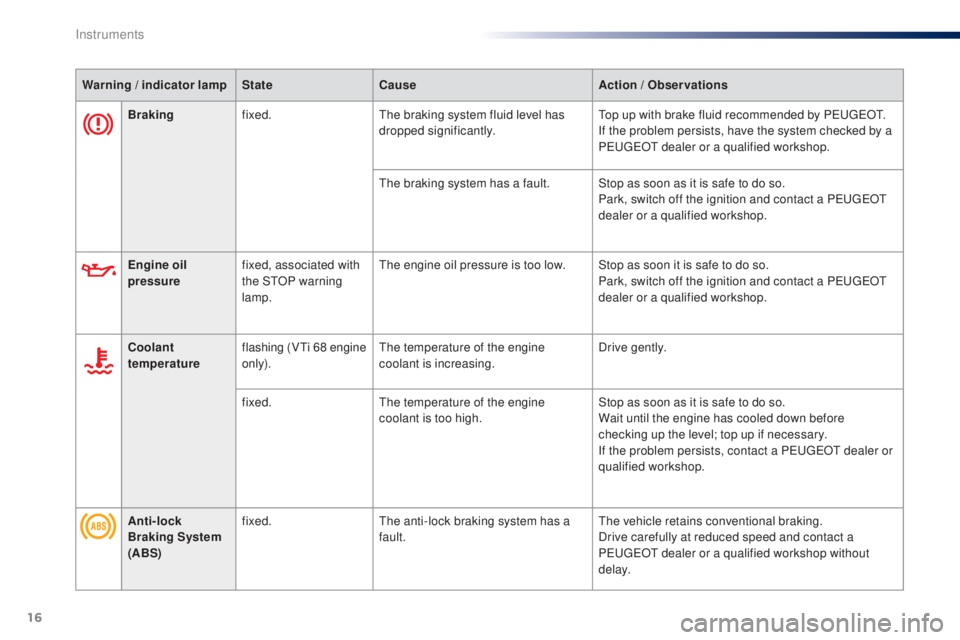
Brakingfixed.th e braking system fluid level has
dropped significantly.to p up with brake fluid recommended by Pe ugeOt.
I f the problem persists, have the system checked by a
P
e
uge
Ot
dealer or a qualified workshop.
th
e braking system has a fault. Stop as soon as it is safe to do so.Park, switch off the ignition and contact a P
e
uge
Ot
dealer or a qualified workshop.
Warning / indicator lamp
StateCause Action / o
b
servations
en
gine oil
pressure fixed, associated with
the S
tO
P warning
lamp.
th
e engine oil pressure is too low. Stop as soon it is safe to do so.Park, switch off the ignition and contact a P
e
uge
Ot
dealer or a qualified workshop.
Coolant
temperature flashing (V
ti 6
8
e
ngine
only).
the
temperature of the engine
coolant is increasing. Drive gently.
fixed.
the
temperature of the engine
coolant is too high. Stop as soon as it is safe to do so.
Wait until the engine has cooled down before
checking up the level; top up if necessary.
If the problem persists, contact a P
e
uge
Ot
dealer or
qualified workshop.
Anti-lock
Braking System
(ABS) fixed.
th
e anti-lock braking system has a
fault.
th
e vehicle retains conventional braking.
Drive carefully at reduced speed and contact a
P
e
uge
Ot
dealer or a qualified workshop without
d e l ay.
Instruments
Page 150 of 268
148
108_en_Chap07_info-pratiques_ed01-2016
Checking levels
take care when working under the
bonnet, as certain areas of the engine
may be extremely hot (risk of burns) and
the cooling fan could start at any time
(even with the ignition off).
engine oil level
the check of the oil level is carried
out with the dipstick, located under
the bonnet. For the position of the
dipstick, refer to the under-bonnet
view on a previous page.
Checking with dipstick
Check all of these levels regularly, in line with the manufacturer's service schedule. top them up if necessary, unless other wise indicated.
If a level drops significantly, have the corresponding system checked by a Pe ugeOt dealer or a qualified workshop.
to e
nsure the accuracy of the reading,
your vehicle must be on a level
sur face, with the engine off for at least
30
minutes.
It is normal to top up the oil level between
two services (or oil changes). P
e
uge
Ot
recommends that you check the level, and top
up if necessary, every 3 000 miles (5 000 km). If you find that the oil level is above the A mark
or below the B mark, do not star t the engine
.
-
I
f the level is above the MAX mark (risk
of engine damage), contact a P
e
uge
Ot
dealer or a qualified workshop.
-
I
f the level is below the MIN mark, you
must top-up the engine oil.
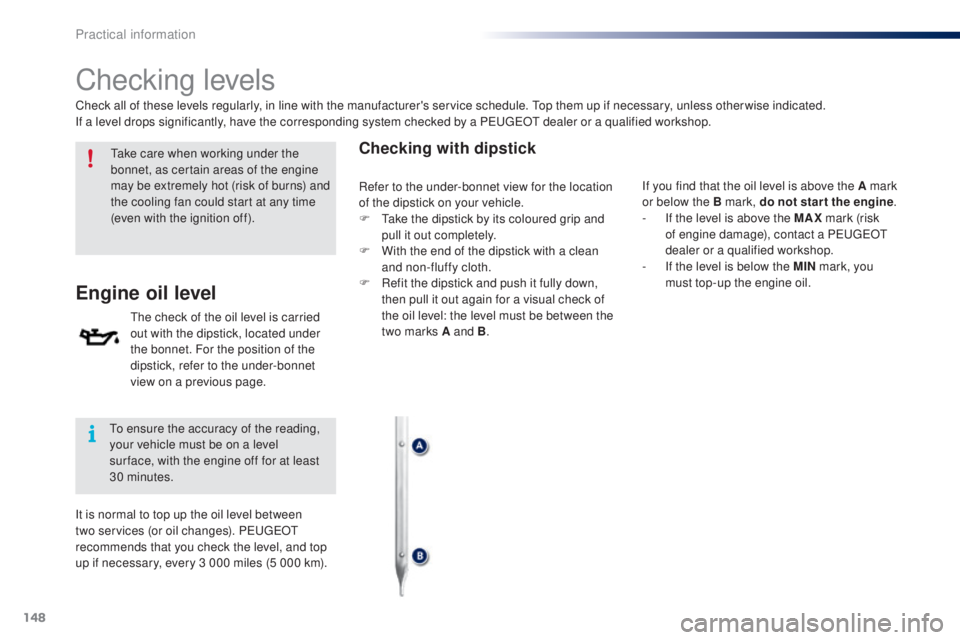
Refer to the under-bonnet view for the location
of the dipstick on your vehicle.
F
t
a
ke the dipstick by its coloured grip and
pull it out completely.
F
W
ith the end of the dipstick with a clean
and non-fluffy cloth.
F
R
efit the dipstick and push it fully down,
then pull it out again for a visual check of
the oil level: the level must be between the
two marks A and B .
Practical information
Page 151 of 268
149
108_en_Chap07_info-pratiques_ed01-2016
the brake fluid level should be close
to the "MA X" mark. If it is not, check
the brake pad wear.
Brake fluid level
Changing the fluid
Refer to the manufacturer's service schedule
for details of the interval for this operation.
Fluid specification
the brake fluid must conform to the
manufacturer's recommendations.
topping-up the engine oil
oil gradethe oil must be the correct grade for your
engine and conform to the manufacturer's
recommendations.
Refer to the under-bonnet view for the location
of the oil filler cap on your vehicle.
F
u
n
screw the filler cap for access to the
filler orifice.
F
P
our in the oil in small quantities, avoiding
spills onto the engine (risk of fire).
F
W
ait a few minutes before checking the
level again using the dipstick.
F
t
o
p-up again if necessary.
F
A
fter checking and topping up, carefully
refit the oil filler cap and the dipstick to its
housing.
engine oil change
Refer to the manufacturer's service schedule
for details of the interval for this operation.
In order to maintain the reliability of the engine
and emissions control system, never use
additives in the engine oil.
7
Practical information
Page 153 of 268
151
108_en_Chap07_info-pratiques_ed01-2016
Checks
12 V battery
the battery does not require any maintenance.
However, check regularly that the terminals
are correctly tightened (versions without quick
release terminals) and that the connections
are clean.Refer to the manufacturer's
service schedule for details of the
replacement intervals for these
components.
Air filter and passenger compartment filter
Replace the oil filter each time the
engine oil is changed.
Refer to the manufacturer's
service schedule for details of
the replacement interval for this
component.
oil filter
unless otherwise indicated, check these components in accordance with the manufacturer's service schedule and according to your engine.
Other wise, have them checked by a PeugeOt dealer or a qualified workshop.
Depending on the environment (e.g. dusty
atmosphere) and the use of the vehicle
(e.g. city driving), replace them twice as often
if necessary .
A clogged passenger compartment filter may
have an adverse effect on the per formance
of the air conditioning system and generate
undesirable odours.
When carrying out any operation on the 12 V
battery, refer to the corresponding section for
details of the precautions to be taken before
starting work.
Manual gearbox
the gearbox does not require any
maintenance (no oil change).
Refer to the manufacturer's service
schedule for the checking interval for
this component.
Clutch
the clutch is operated mechanically and
requires regular adjustment.
Refer to the manufacturer's service schedule
for information on when the adjustment should
be checked.
In the event of an operating fault
(difficulty moving off, for example),
contact a P
e
uge
Ot
dealer or a
qualified workshop.
Versions equipped with Stop & Start are
fitted with a 12 V lead-acid battery of
specific technology and specification.
Its replacement should be carried
out only by a P
e
uge
Ot
dealer or a
qualified workshop.
7
Practical information
Page 154 of 268
152
108_en_Chap07_info-pratiques_ed01-2016
etg gearbox
the etg gearbox does not require
any maintenance (no oil change).
Refer to the manufacturer's service
schedule for information on when this
unit should be checked.
Brake wear depends on the style
of driving, particularly in the case
of vehicles used in town, over short
distances. It may be necessary to
Brake pads
For information on checking brake
disc wear, contact a Pe ugeOt
dealer or a qualified workshop.
Brake disc wearOnly use products recommended by
Pe ugeOt or products of equivalent
quality and specification.
In order to optimise the operation of
units as important as those in the
braking system, P
e
uge
Ot
selects and
offers very specific products.
After washing the vehicle, dampness,
or in wintry conditions, ice can form
on the brake discs and pads: braking
efficiency may be reduced. Make light
brake applications to dry and defrost
the brakes.
Parking brake
If excessive travel or a loss of
effectiveness of this system is
noticed, the parking brake must
be checked, even between two
services.
Checking this system must be done by a
P
e
uge
Ot
dealer or a qualified workshop.
have the condition of the brakes checked, even
between vehicle services.
un
less there is a leak in the circuit, a drop in
the brake fluid level indicates that the brake
pads are worn.
to a
void damaging the electrical units,
never use a high pressure jet wash in
the engine compartment.
Practical information
Page 157 of 268
155
108_en_Chap08_en-cas-pannes_ed01-2016
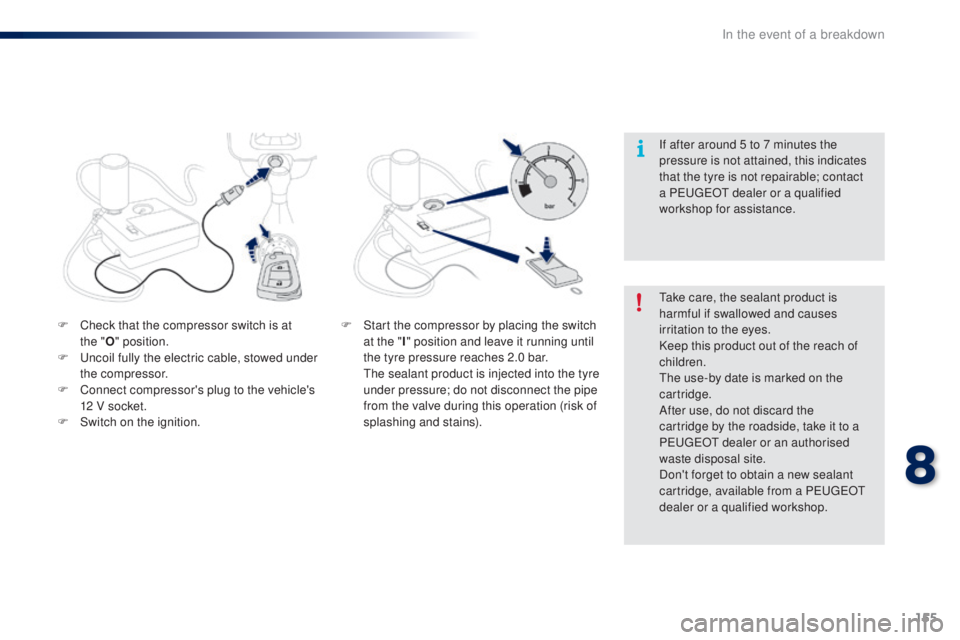
F Check that the compressor switch is at the "o" position.
F
u
n
coil fully the electric cable, stowed under
the compressor.
F
C
onnect compressor's plug to the vehicle's
12 V socket.
F
S
witch on the ignition.
ta
ke care, the sealant product is
harmful if swallowed and causes
irritation to the eyes.
Keep this product out of the reach of
children.
th
e use-by date is marked on the
cartridge.
After use, do not discard the
cartridge by the roadside, take it to a
P
e
uge
Ot
dealer or an authorised
waste disposal site.
Don't forget to obtain a new sealant
cartridge, available from a P
e
uge
Ot
dealer or a qualified workshop. If after around 5 to 7 minutes the
pressure is not attained, this indicates
that the tyre is not repairable; contact
a P
e
uge
Ot
dealer or a qualified
workshop for assistance.
F S tart the compressor by placing the switch
at the " I" position and leave it running until
the tyre pressure reaches 2.0 bar.
t
h
e sealant product is injected into the tyre
under pressure; do not disconnect the pipe
from the valve during this operation (risk of
splashing and stains).
8
In the event of a breakdown
Page 158 of 268
156
108_en_Chap08_en-cas-pannes_ed01-2016
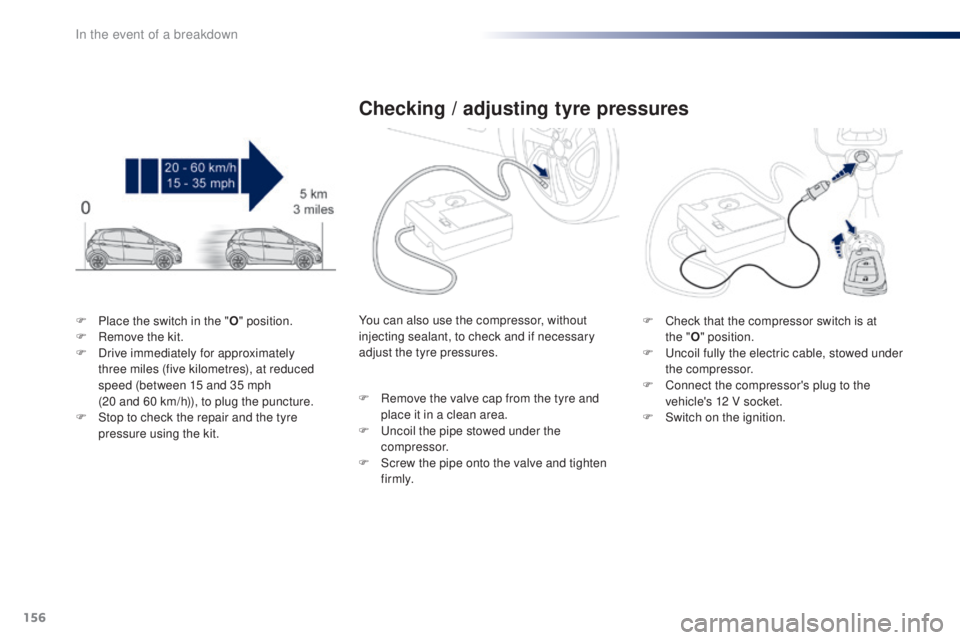
F Place the switch in the "o" position.
F R emove the kit.
F
D
rive immediately for approximately
three
miles (five kilometres), at reduced
speed (between 15 and 35 mph
(20 and 60
km/h)), to plug the puncture.
F
S
top to check the repair and the tyre
pressure using the kit.
Checking / adjusting tyre pressures
F Check that the compressor switch is at the "o" position.
F
u
n
coil fully the electric cable, stowed under
the compressor.
F
C
onnect the compressor's plug to the
vehicle's 12 V socket.
F
S
witch on the ignition.
You can also use the compressor, without
injecting sealant, to check and if necessary
adjust the tyre pressures.
F
R
emove the valve cap from the tyre and
place it in a clean area.
F
u
n
coil the pipe stowed under the
compressor.
F
S
crew the pipe onto the valve and tighten
f i r m l y.
In the event of a breakdown
Page 259 of 268
257
108_en_Chap11_index-alpha_ed01-2016
Main beam ..............................................98, 16 4
Maintenance ............................................. 9, 148
Manual mode
.................................................. 77
Mat
.................................................................. 66
Menu (touch screen)
....................189, 190, 202,
208, 220
Mirror, rear view
............................................................... 51
Mirrors, door
............................................................... 50
Mirror, vanity
..............................
.....................64
Mode, driving
........................................................... 77Navigation
.....................................................
220
Number plate lamps
...................................... 16
7
Opening the bonnet
...................................... 14
6
Opening the boot
..............................
........
34, 39
Opening the doors
...............................
...........
34
Parcel shelf, rear
............................................. 67
P
arking brake
..........................................76, 152
Passenger compartment filter
.............................................................151
Pedal, clutch.................................................. 151
Port,
u
S
B
.................................6
3, 65, 198, 245
Power steering
................................................18
Pressures, tyres
............................................157
M
N
O
P
Lamp, boot ...................................................... 62
Lamps, front .......................................... 163, 16 4
Lamps, rear
................................................... 166
Lamps, warning and indicator
..................15 -25
Lane Departure Warning System (LDWS)
.....93
Level, brake fluid
........................................... 14
9
Level, engine coolant
.................................... 150
Level, engine oil
...............................
.............148
Levels and checks
................................. 147-150
Lighting
................
.......................................... 16 4
Lighting dimmer
..............................
................27
Lighting, guide-me home
..............................102
Lighting on reminder
..................................... 10 0
Loading
............................................................. 9
Locating your vehicle
...................................... 32
L
ocking/unlocking a door from the inside....... 38
Low fuel level
.................................... 17, 26, 138Mode, easy (automatic mode)
........................
77
Mountings, Isofix ...........................................132
L
Pre-tensioning seat belts ..............................117
Protecting children ................................ 117, 11 9 ,
123 -127
Puncture
........................................................ 153
Radio
..................................................... 19 4, 242
RDS
....................................................... 195, 242
Rear foglamp ......................................... 10 0, 166
Rear quarter panel windows
........................................................ 41
Rear screen (demisting)
..................................61
Recharging the battery
................................. 17
9
Reinitialisation of the under-inflation detection system
........................................... 96
Remote control
.......................................... 3
2, 37
Removing and fitting a fuse
.......................................................... 168
Removing a wheel
........................................ 15 8
Removing the mat
........................................... 66
Replacing bulbs
............................................ 163
Replacing the air filter
...................................151
Replacing the oil filter
................................... 1
51
Replacing the passenger compartment filter
...................................... 151
Replacing wiper blades
......................................................... 14 4
Reversing camera
........................................... 92
Reversing lamps
........................................... 166
Roof bars
....................................................... 14
4
Roof, electric fabric
............................................................. 42
Routine checks
..................................... 151, 152
R
.
Alphabetical index