ESP PEUGEOT 108 2018 User Guide
[x] Cancel search | Manufacturer: PEUGEOT, Model Year: 2018, Model line: 108, Model: PEUGEOT 108 2018Pages: 180, PDF Size: 7.14 MB
Page 64 of 180
62
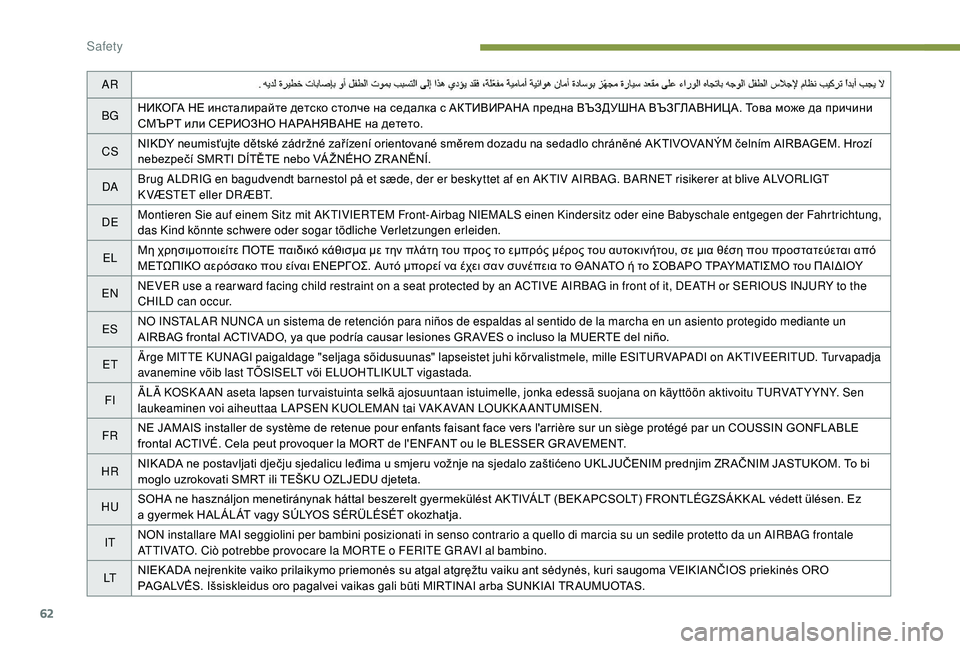
AR
BG НИКОГА НЕ инсталирайте детско столче на седалка с АКТИВИРАНА предна ВЪЗДУШНА ВЪЗГЛАВНИЦА. Това може да причини
СМЪРТ или СЕРИОЗНО НАРАНЯВАНЕ на детето.
CS NIKDY neumisťujte dětské zádržné zařízení orientované směrem dozadu na sedadlo chráněné AKTIVOVANÝM čelním AIRBAGEM. Hrozí
nebezpečí SMRTI DÍTĚTE nebo VÁ ŽNÉHO ZR ANĚNÍ.
DA Brug ALDRIG en bagudvendt barnestol på et sæde, der er beskyttet af en AKTIV AIRBAG. BARNET risikerer at blive ALVORLIGT
K VÆSTET eller DR ÆBT.
DE Montieren Sie auf einem Sitz mit AKTIVIERTEM Front-Airbag NIEMALS einen Kindersitz oder eine Babyschale entgegen der Fahrtrichtung,
das Kind könnte schwere oder sogar tödliche Verletzungen erleiden.
EL Μη χρησιμοποιείτε ΠΟΤΕ παιδικό κάθισμα με την πλάτη του προς το εμπρός μέρος του αυτοκινήτου, σε μια θέση που προστατεύεται από
ΜΕΤΩΠΙΚΟ αερόσακο που είναι ΕΝΕΡΓΟΣ. Αυτό μπορεί να έχει σαν συνέπεια το ΘΑΝΑΤΟ ή το ΣΟΒΑΡΟ ΤΡΑΥΜΑΤΙΣΜΟ του ΠΑΙΔΙΟΥ
EN NEVER use a
rear ward facing child restraint on a seat protected by an ACTIVE AIRBAG in front of it, DEATH or SERIOUS INJURY to the
CHILD can occur.
ES NO INSTALAR NUNCA un sistema de retención para niños de espaldas al sentido de la marcha en un asiento protegido mediante un
AIRBAG frontal ACTIVADO, ya que podría causar lesiones GR AVES o
incluso la MUERTE del niño.
ET Ärge MITTE KUNAGI paigaldage "seljaga sõidusuunas" lapseistet juhi kõr valistmele, mille ESITURVAPADI on AKTIVEERITUD. Tur vapadja
avanemine võib last TÕSISELT või ELUOHTLIKULT vigastada.
FI ÄLÄ KOSK A AN aseta lapsen tur vaistuinta selkä ajosuuntaan istuimelle, jonka edessä suojana on käyttöön aktivoitu TURVAT Y YNY. Sen
laukeaminen voi aiheuttaa LAPSEN KUOLEMAN tai VAK AVAN LOUKK A ANTUMISEN.
FR NE JAMAIS installer de système de retenue pour enfants faisant face vers l'arrière sur un siège protégé par un COUSSIN GONFLABLE
frontal ACTIVÉ. Cela peut provoquer la MORT de l'ENFANT ou le BLESSER GR AVEMENT.
HR NIK ADA ne postavljati dječju sjedalicu leđima u
smjeru vožnje na sjedalo zaštićeno UKLJUČENIM prednjim ZR AČNIM JASTUKOM. To bi
moglo uzrokovati SMRT ili TEŠKU OZLJEDU djeteta.
HU SOHA ne használjon menetiránynak háttal beszerelt gyermekülést AKTIVÁLT (BEK APCSOLT) FRONTLÉGZSÁKK AL védett ülésen. Ez
a
gyermek HALÁLÁT vagy SÚLYOS SÉRÜLÉSÉT okozhatja.
IT NON installare MAI seggiolini per bambini posizionati in senso contrario a
quello di marcia su un sedile protetto da un AIRBAG frontale
ATTIVATO. Ciò potrebbe provocare la MORTE o
FERITE GR AVI al bambino.
LT NIEK ADA neįrenkite vaiko prilaikymo priemonės su atgal atgręžtu vaiku ant sėdynės, kuri saugoma VEIKIANČIOS priekinės ORO
PAGALVĖS. Išsiskleidus oro pagalvei vaikas gali būti MIRTINAI arba SUNKIAI TR AUMUOTAS.
Safety
Page 71 of 180
69
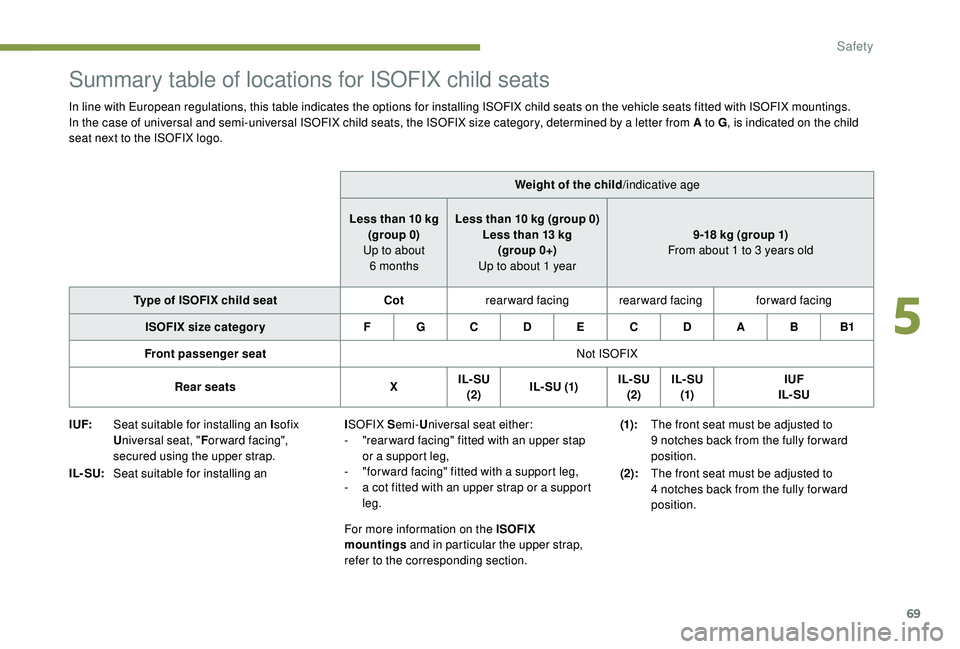
Summary table of locations for ISOFIX child seats
In line with European regulations, this table indicates the options for installing ISOFIX child seats on the vehicle seats fitted with ISOFIX mountings.
In the case of universal and semi-universal ISOFIX child seats, the ISOFIX size category, determined by a letter from A to G, is indicated on the child
seat next to the ISOFIX logo.
Weight of the child/indicative age
Less than 10
kg
(group 0)
Up to about 6
monthsLess than 10
kg (group 0)
Less than 13
kg
(group 0+)
Up to about 1
year9-18
kg (group 1)
From about 1
to 3 years old
Type of ISOFIX child seat Cotrearward facing rearward facing forward facing
ISOFIX size categor y F G C D E C D A B B1
Front passenger seat Not ISOFIX
Rear seats XIL- SU
(2) I L- SU (1) IL- SU
(2) IL- SU
(1) IUF
IL- SU
I UF: Seat suitable for installing an I sofix
U niversal seat, " For ward facing",
secured using the upper strap.
IL- SU: Seat suitable for installing an I
SOFIX S emi-Universal seat either:
-
"
rear ward facing" fitted with an upper stap
or a
support leg,
-
"
for ward facing" fitted with a support leg,
-
a c
ot fitted with an upper strap or a support
leg.
For more information on the ISOFIX
mountings and in particular the upper strap,
refer to the corresponding section. (1):
The front seat must be adjusted to
9
notches back from the fully for ward
position.
(2): The front seat must be adjusted to
4
notches back from the fully for ward
position.
5
Safety
Page 72 of 180
70
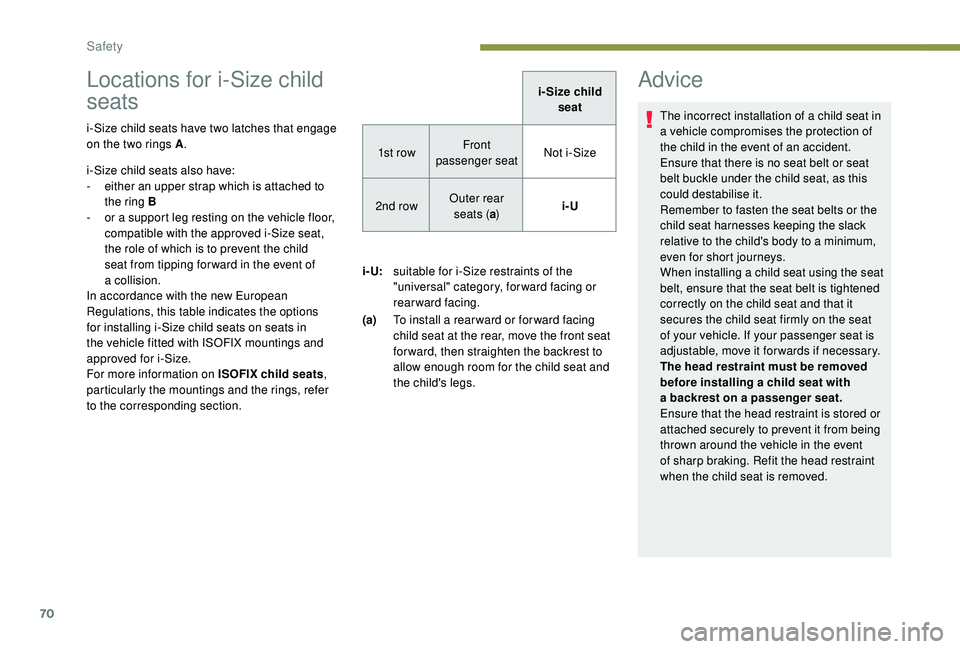
Locations for i-Size child
seats
i-Size child seats have two latches that engage
on the two rings A.
i-Size child seats also have:
-
e
ither an upper strap which is attached to
the ring B
-
o
r a support leg resting on the vehicle floor,
compatible with the approved i-Size seat,
the role of which is to prevent the child
seat from tipping for ward in the event of
a
collision.
In accordance with the new European
Regulations, this table indicates the options
for installing i-Size child seats on seats in
the vehicle fitted with ISOFIX mountings and
approved for i-Size.
For more information on ISOFIX child seats ,
particularly the mountings and the rings, refer
to the corresponding section. i-Size child
seat
1st row Front
passenger seat Not i-Size
2nd row Outer rear
seats ( a) i-U
i- U: suitable for i-Size restraints of the
"universal" category, forward facing or
rearward facing.
(a) To install a
rearward or forward facing
child seat at the rear, move the front seat
for ward, then straighten the backrest to
allow enough room for the child seat and
the child's legs.
Advice
The incorrect installation of a child seat in
a vehicle compromises the protection of
the child in the event of an accident.
Ensure that there is no seat belt or seat
belt buckle under the child seat, as this
could destabilise it.
Remember to fasten the seat belts or the
child seat harnesses keeping the slack
relative to the child's body to a
minimum,
even for short journeys.
When installing a
child seat using the seat
belt, ensure that the seat belt is tightened
correctly on the child seat and that it
secures the child seat firmly on the seat
of your vehicle. If your passenger seat is
adjustable, move it forwards if necessary.
The head restraint must be removed
before installing a
child seat with
a
backrest on a passenger seat.
Ensure that the head restraint is stored or
attached securely to prevent it from being
thrown around the vehicle in the event
of sharp braking. Refit the head restraint
when the child seat is removed.
Safety
Page 81 of 180
79
If you stop the vehicle but keep the engine
running, you must always move the gear
selector to the neutral position N.
A continuous audible signal sounds if you
turn the ignition switch to " OFF" while the
vehicle is in 2nd, 3rd, 4th or 5th gear.
If this happens, turn the ignition switch
to " ON ", move the gear selector to the
position N , return it to position E , M or R,
then turn the ignition switch to " OFF".
If the vehicle is on a
slope, use the brake
to stop the vehicle from moving and place
the gear selector to position N , E or R.
In all cases, you must apply the parking
brake to immobilise the vehicle.
Before doing anything in the engine
compartment, make sure that the gear
selector is in neutral N and the parking
brake is applied.Operating limits
When on a slope or when hill start assist is
a ctivated, never keep the vehicle stationary
using the accelerator: you could damage the
clutch.
In these situations, an audible signal sounds.
F
I
n that case, move the gear selector to
position N .
F
W
ait 15 minutes before moving off again, to
allow the clutch to cool down.
Operating faults
With the ignition on, lighting of this
warning lamp indicates a gearbox
fault.
Contact a
PEUGEOT dealer or
a
qualified workshop.
If N flashes in the instrument panel together
with an audible signal for a
long period of time:
-
m
ake sure that the ignition switch is
correctly set to the " ON" position,
-
m
ove the gear selector to N , then return it to
E , M or R .
If 1
flashes in the instrument panel:
-
m
ove the gear selector to E or M , then
return it to N .
If R flashes in the instrument panel:
-
m ove the gear selector to R , then return it to N.
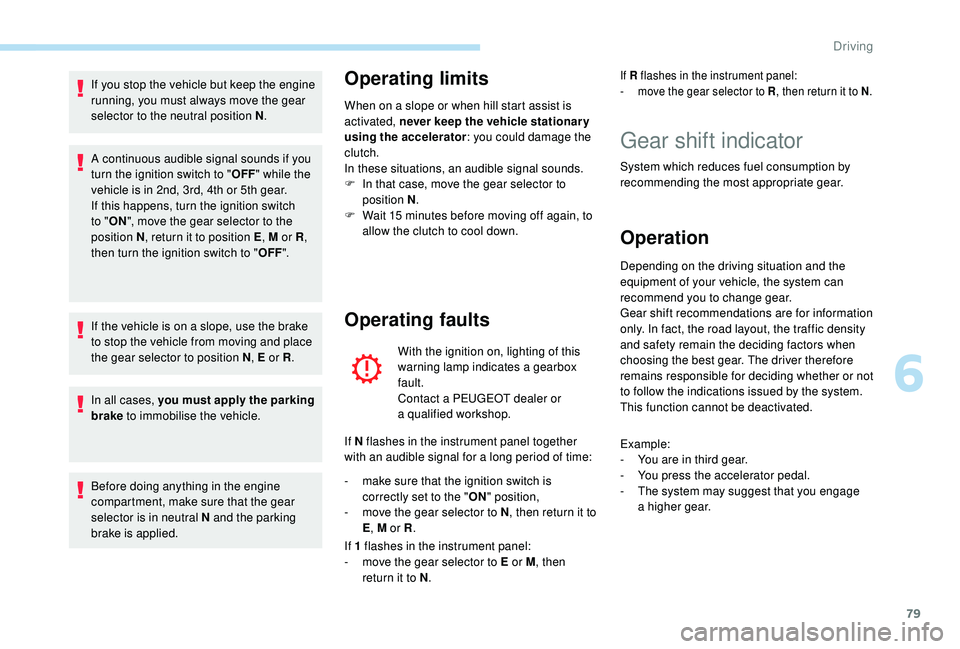
Gear shift indicator
System which reduces fuel consumption by
recommending the most appropriate gear.
Operation
Depending on the driving situation and the
equipment of your vehicle, the system can
recommend you to change gear.
Gear shift recommendations are for information
only. In fact, the road layout, the traffic density
and safety remain the deciding factors when
choosing the best gear. The driver therefore
remains responsible for deciding whether or not
to follow the indications issued by the system.
This function cannot be deactivated.
Example:
-
Y
ou are in third gear.
-
Y
ou press the accelerator pedal.
-
T
he system may suggest that you engage
a
higher gear.
6
Driving
Page 84 of 180
82
Operating fault
In the event of a fault with the
s ystem, this warning lamp flashes in
the instrument panel.
Have it checked by a
PEUGEOT dealer or
a
qualified workshop.
Maintenance
Before doing anything under the bonnet,
deactivate the Stop & Start system to
avoid any risk of injury resulting from an
automatic change to START mode.
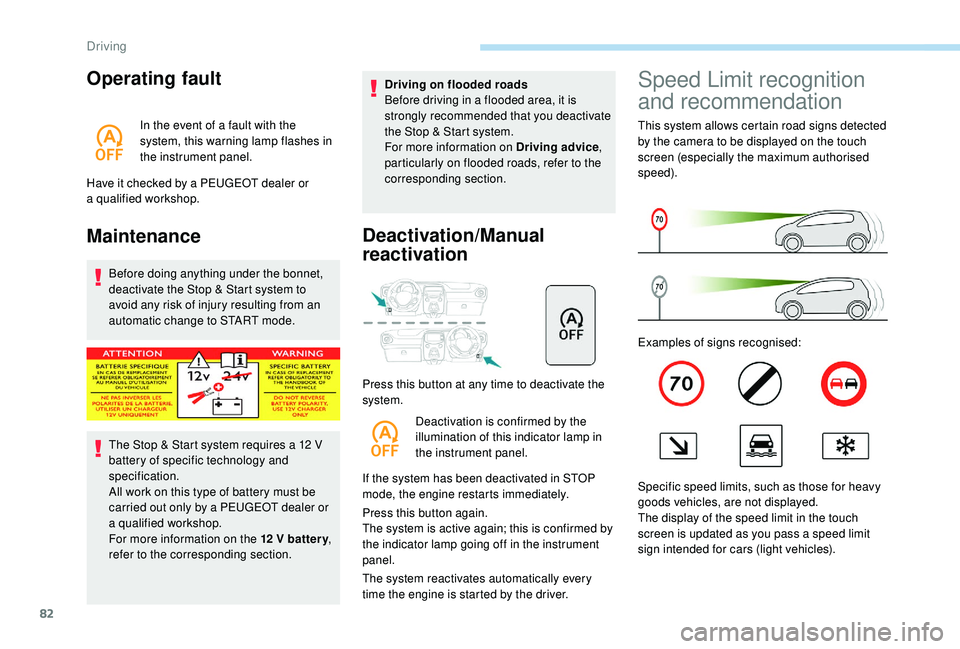
The Stop & Start system requires a
12 V
battery of specific technology and
specification.
All work on this type of battery must be
carried out only by a
PEUGEOT dealer or
a
qualified workshop.
For more information on the 12
V batter y,
refer to the corresponding section. Driving on flooded roads
Before driving in a
flooded area, it is
strongly recommended that you deactivate
the Stop & Start system.
For more information on Driving advice ,
particularly on flooded roads, refer to the
corresponding section.
Deactivation/Manual
reactivation
Press this button at any time to deactivate the
system.
Deactivation is confirmed by the
illumination of this indicator lamp in
the instrument panel.
If the system has been deactivated in STOP
mode, the engine restarts immediately.
Press this button again.
The system is active again; this is confirmed by
the indicator lamp going off in the instrument
panel.
The system reactivates automatically every
time the engine is started by the driver.
Speed Limit recognition
and recommendation
This system allows certain road signs detected
by the camera to be displayed on the touch
screen (especially the maximum authorised
speed).
Examples of signs recognised:
Specific speed limits, such as those for heavy
goods vehicles, are not displayed.
The display of the speed limit in the touch
screen is updated as you pass a
speed limit
sign intended for cars (light vehicles).
Driving
Page 86 of 180
84
- when towing,
- d riving with a space-saver type spare wheel
or snow chains fitted,
-
p
uncture repair using the temporary repair
kit,
-
y
oung drivers, etc.
The following situations may inter fere with the
operation of the system or prevent it working:
-
p
oor visibility (inadequate street lighting,
falling snow, rain, fog),
-
w
indscreen area located in front of the
camera: dirty, misted, frost-covered, snow-
covered, damaged or covered by a
sticker,
-
f
ault with the camera,
-
h
idden road signs (other vehicles,
vegetation, snow),
-
s
peed limit signs that do not conform to the
standard, are damaged or distorted.
If an app on your smart phone is used
via Mirror Screen, the sign displayed by
the system may be temporarily hidden. It
will be redisplayed as soon as you pass
another sign.Speed limiter
System which prevents the
vehicle from exceeding the speed
programmed by the driver.
The limiter is switched on manually: this
can be done regardless of the vehicle speed.
However, if you are travelling at less than
18
mph (30 km/h), the programmed speed will
be set at 18
mph (30 km/h).
The speed limiter is paused using the control.
The programmed speed can be exceeded
temporarily by pressing the accelerator firmly
beyond the point of resistance.
To return to the programmed speed, simply
release the accelerator pedal until the set limit
speed has been reached again.
The programmed speed is erased when
the ignition is switched off.
The limiter cannot, under any
circumstances, replace respect for speed
limits, nor the vigilance of the driver.
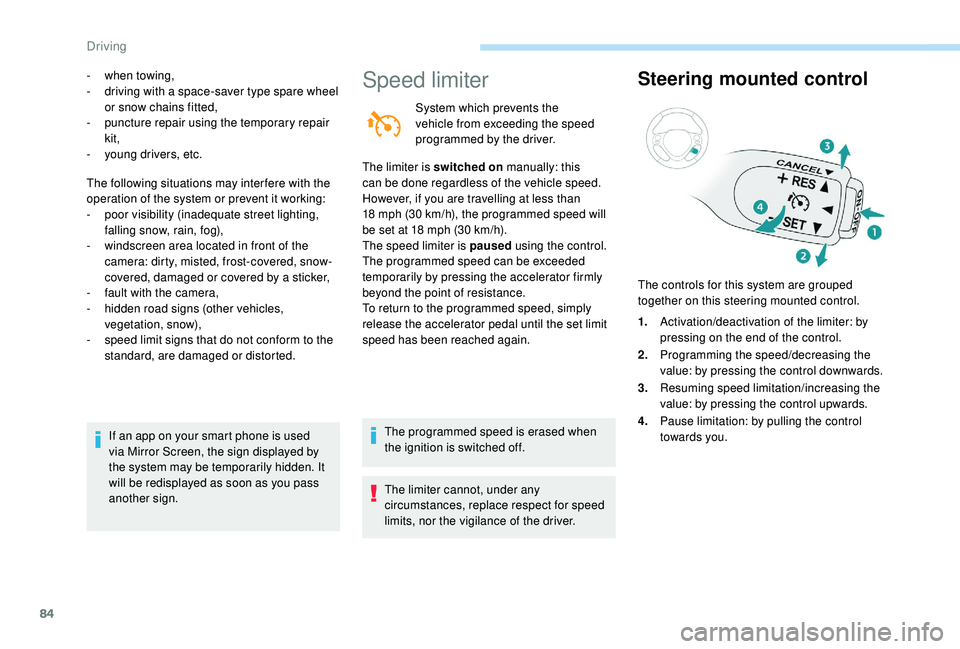
Steering mounted control
The controls for this system are grouped
together on this steering mounted control.
1.Activation/deactivation of the limiter: by
pressing on the end of the control.
2. Programming the speed/decreasing the
value: by pressing the control downwards.
3. Resuming speed limitation/increasing the
value: by pressing the control upwards.
4. Pause limitation: by pulling the control
towards you.
Driving
Page 88 of 180
86
Temporarily exceeding the
speed setting
F Press firmly on the accelerator pedal,
going beyond the point of resistance, to
exceed the programmed speed limit.
The speed limiter is deactivated temporarily
and the displayed programmed speed flashes.
An audible signal accompanies the
flashing of the programmed speed when
exceeding the speed is not due to an
action by the driver (steep hill…).
As soon as the vehicle's speed returns to the
programmed value, the limiter operates again:
the display of the programmed speed becomes
steady again.
Switching off
F Press the end of the control: the display of information on the speed limiter disappears.
Operating fault
If this warning lamp comes on in
the instrument panel it signals
a
malfunction of the limiter. Have it checked by a
PEUGEOT dealer or
a
qualified workshop.
The use of mats not approved by
PEUGEOT may inter fere with the
operation of the speed limiter.
To avoid any risk of jamming of the pedals:
-
e
nsure that mats are secured correctly,
-
n
ever place one mat on top of another.
Active City Brake
Active City Brake is a driving assistance
s ystem that aims to avoid a frontal collision or
to reduce the speed of an impact if the driver
does not react or reacts too late (brake applied
too late).
This system has been designed to improve driving
safety.
It remains the driver's responsibility to continuously
monitor the state of the traffic and to assess the
distances and relative speeds of other vehicles.
Active City Brake cannot in any circumstances
replace the need for vigilance on the part of the
driver.
Never look at the laser sensor through
an optical instrument (magnifying glass,
microscope…) at a
distance of less than
10
centimetres: risk of eye injury.
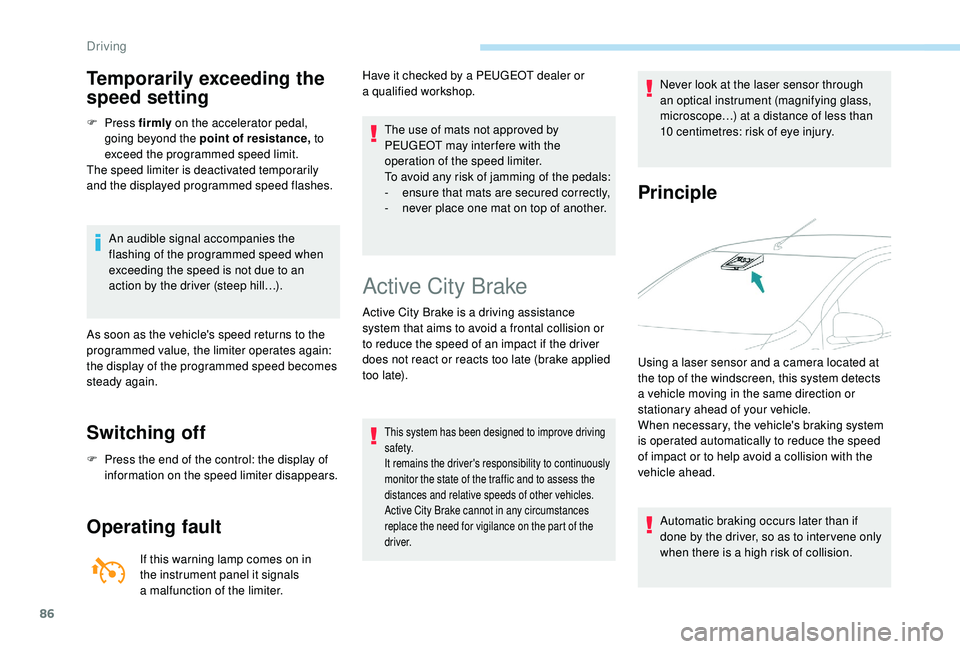
Principle
Using a laser sensor and a camera located at
t he top of the windscreen, this system detects
a
vehicle moving in the same direction or
stationary ahead of your vehicle.
When necessary, the vehicle's braking system
is operated automatically to reduce the speed
of impact or to help avoid a
collision with the
vehicle ahead.
Automatic braking occurs later than if
done by the driver, so as to inter vene only
when there is a
high risk of collision.
Driving
Page 94 of 180
92
Under-inflation detection
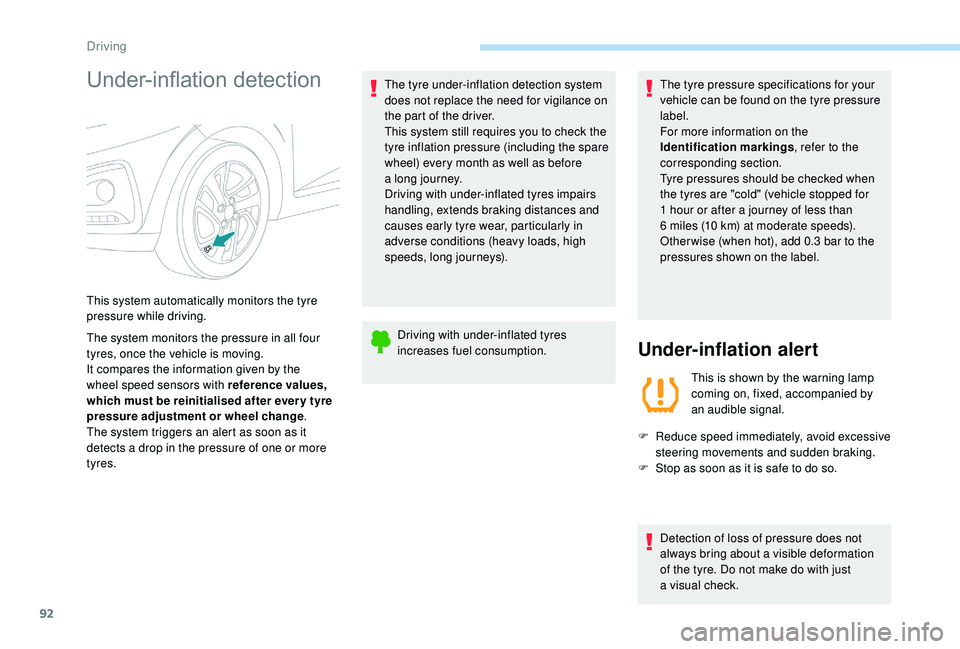
The system monitors the pressure in all four
tyres, once the vehicle is moving.
It compares the information given by the
wheel speed sensors with reference values,
which must be reinitialised after ever y tyre
pressure adjustment or wheel change.
The system triggers an alert as soon as it
detects a
drop in the pressure of one or more
tyres. The tyre under-inflation detection system
does not replace the need for vigilance on
the part of the driver.
This system still requires you to check the
tyre inflation pressure (including the spare
wheel) every month as well as before
a
long journey.
Driving with under-inflated tyres impairs
handling, extends braking distances and
causes early tyre wear, particularly in
adverse conditions (heavy loads, high
speeds, long journeys).
Driving with under-inflated tyres
increases fuel consumption. The tyre pressure specifications for your
vehicle can be found on the tyre pressure
label.
For more information on the
Identification markings
, refer to the
corresponding section.
Tyre pressures should be checked when
the tyres are "cold" (vehicle stopped for
1 hour or after a journey of less than
6 miles (10 km) at moderate speeds).
Other wise (when hot), add 0.3 bar to the
pressures shown on the label.Under-inflation alert
This is shown by the warning lamp
coming on, fixed, accompanied by
an audible signal.
F
R
educe speed immediately, avoid excessive
steering movements and sudden braking.
F
S
top as soon as it is safe to do so.
This system automatically monitors the tyre
pressure while driving.
Detection of loss of pressure does not
always bring about a visible deformation
of the tyre. Do not make do with just
a
visual check.
Driving
Page 100 of 180
98
Energy economy mode
(Only for vehicles equipped with the Keyless
Entry and Starting system.)
System which manages the duration of use of
certain functions to conser ve a sufficient level
of charge in the battery.
After the engine has stopped, you can still
use functions such as the audio system,
windscreen wipers, dipped beam headlamps,
courtesy lamps, etc. for a
max. combined time
of 20
minutes.
This period may be greatly reduced if the
battery is not fully charged.
Entry into the mode
Once this time has elapsed, the active
functions are put on standby.
Exiting the mode
These functions will be automatically restored
the next time the vehicle is used.
To restore the use of these functions
immediately, start the engine and allow it run
for at least 5
minutes. Let the engine run for the duration
specified to ensure that the battery charge
is sufficient.
Do not repeatedly and continuously restart
the engine in order to charge the battery.
A flat battery prevents the engine from
starting.
For more information on the 12
V batter y
,
refer to the corresponding section.
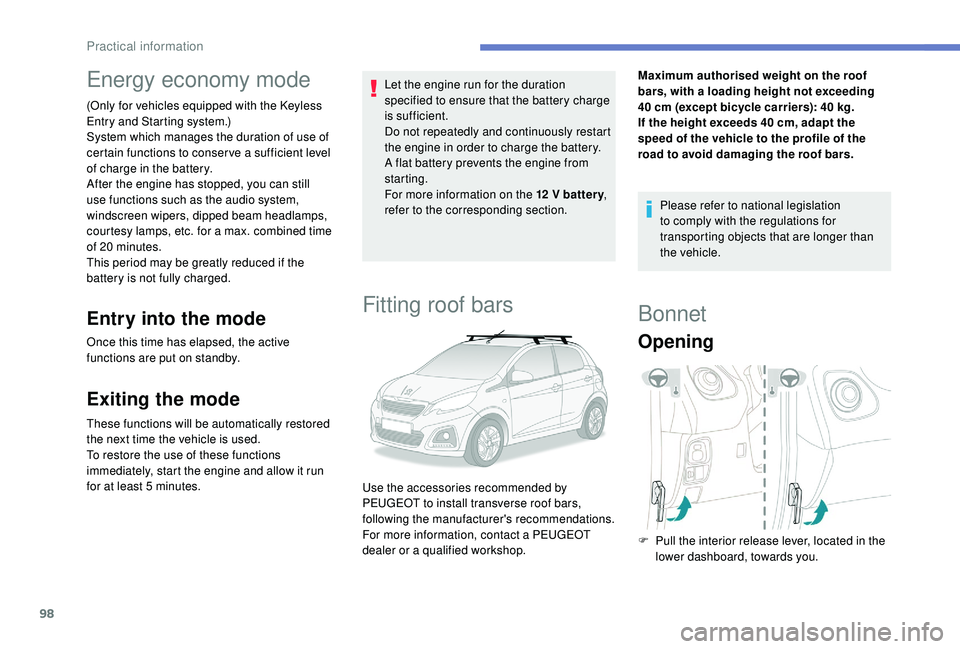
Fitting roof bars
Maximum authorised weight on the roof
bars, with a loading height not exceeding
40
cm (except bicycle carriers): 40 kg.
If the height exceeds 40
cm, adapt the
speed of the vehicle to the profile of the
road to avoid damaging the roof bars.
Please refer to national legislation
to comply with the regulations for
transporting objects that are longer than
the vehicle.
Use the accessories recommended by
PEUGEOT to install transverse roof bars,
following the manufacturer's recommendations.
For more information, contact a
PEUGEOT
dealer or a
qualified workshop.
Bonnet
Opening
F Pull the interior release lever, located in the lower dashboard, towards you.
Practical information
Page 101 of 180
99
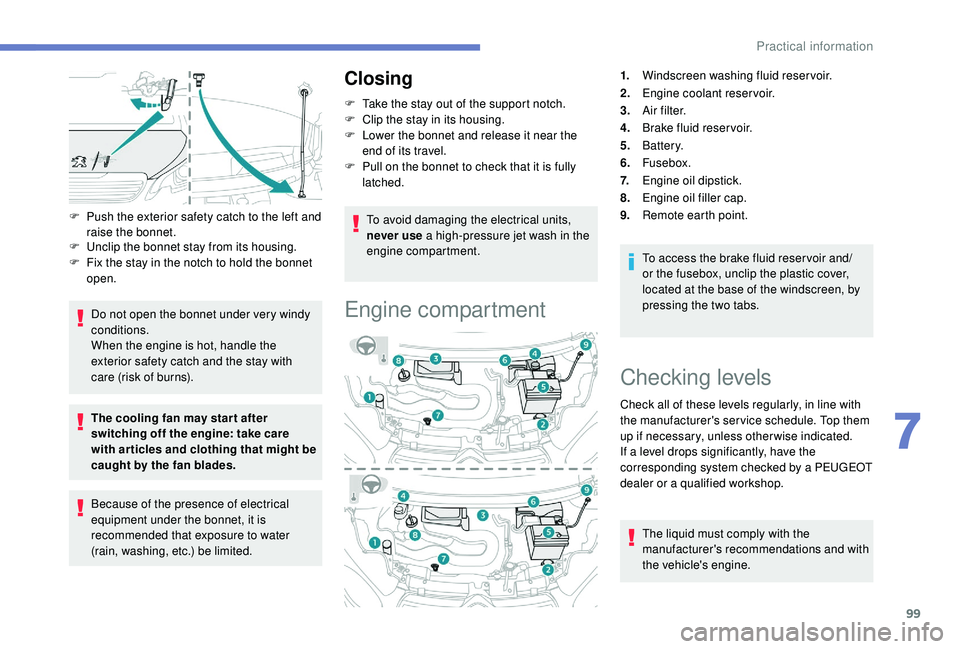
F Push the exterior safety catch to the left and raise the bonnet.
F
U
nclip the bonnet stay from its housing.
F
F
ix the stay in the notch to hold the bonnet
open.
Do not open the bonnet under very windy
conditions.
When the engine is hot, handle the
exterior safety catch and the stay with
care (risk of burns).
The cooling fan may star t after
switching off the engine: take care
with articles and clothing that might be
caught by the fan blades.
Because of the presence of electrical
equipment under the bonnet, it is
recommended that exposure to water
(rain, washing, etc.) be limited.
Closing
F Take the stay out of the support notch.
F C lip the stay in its housing.
F
L
ower the bonnet and release it near the
end of its travel.
F
P
ull on the bonnet to check that it is fully
latched.
To avoid damaging the electrical units,
never use a
high-pressure jet wash in the
engine compartment.
Engine compartment
1. Windscreen washing fluid reservoir.
2. Engine coolant reservoir.
3. A i r f i l t e r.
4. Brake fluid reser voir.
5. Battery.
6. Fusebox.
7. Engine oil dipstick.
8. Engine oil filler cap.
9. Remote earth point.
To access the brake fluid reser voir and/
or the fusebox, unclip the plastic cover,
located at the base of the windscreen, by
pressing the two tabs.
Checking levels
Check all of these levels regularly, in line with
the manufacturer's service schedule. Top them
up if necessary, unless other wise indicated.
If a
level drops significantly, have the
corresponding system checked by a
PEUGEOT
dealer or a
qualified workshop.
The liquid must comply with the
manufacturer's recommendations and with
the vehicle's engine.
7
Practical information