lights PEUGEOT 108 2018 Owners Manual
[x] Cancel search | Manufacturer: PEUGEOT, Model Year: 2018, Model line: 108, Model: PEUGEOT 108 2018Pages: 180, PDF Size: 7.14 MB
Page 18 of 180
16
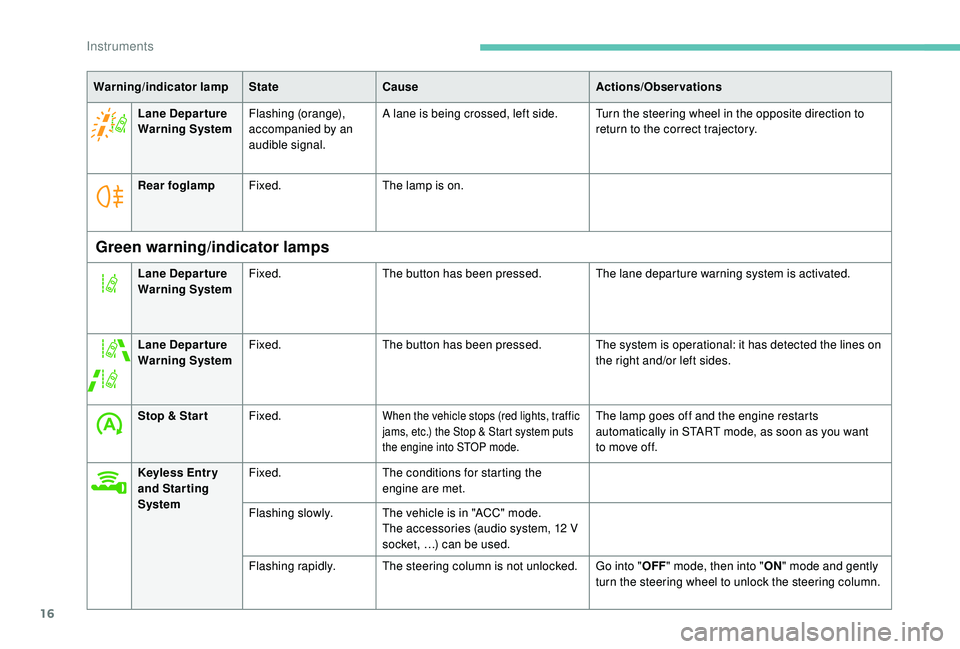
Warning/indicator lampStateCause Actions/Observations
Lane Depar ture
Warning System Flashing (orange),
accompanied by an
audible signal. A lane is being crossed, left side. Turn the steering wheel in the opposite direction to
return to the correct trajectory.
Rear foglamp Fixed. The lamp is on.
Green warning/indicator lamps
Lane Depar ture
Warning SystemFixed.
The button has been pressed. The lane departure warning system is activated.
Lane Depar ture
Warning System Fixed.
The button has been pressed. The system is operational: it has detected the lines on
the right and/or left sides.
Stop & Star t Fixed.
When the vehicle stops (red lights, traffic
jams, etc.) the Stop & Start system puts
the engine into STOP mode.The lamp goes off and the engine restarts
automatically in START mode, as soon as you want
to move off.
Keyless Entr y
and Star ting
System Fixed.
The conditions for starting the
engine are met.
Flashing slowly. The vehicle is in "ACC" mode.
The accessories (audio system, 12
V
socket, …) can be used.
Flashing rapidly. The steering column is not unlocked. Go into " OFF" mode, then into " ON" mode and gently
turn the steering wheel to unlock the steering column.
Instruments
Page 43 of 180
41
With the automatic air
conditioning system
F Press the dedicated button, its indicator lamp comes on.
F
T
o switch it off, press this button again; its
indicator lamp goes off.
The other settings (air flow, air distribution,
etc.) are controlled automatically.
Rear screen demist –
defrost
The control button is located
on the heating/ventilation or air
conditioning system control panel.
Switching on
The rear screen demist – defrost can only
operate when the engine is running.
F
P
ress this button to demist /defrost the rear
screen and, depending on version, the door
mirrors. The indicator lamp associated with
the button comes on.
Switching off
F Press this button again to switch off the demisting/defrosting. The indicator lamp
associated with the button goes off.
Switch off the demisting/defrosting of
the rear screen and door mirrors, if
fitted, as soon as appropriate, as lower
current consumption results in reduced
fuel consumption.
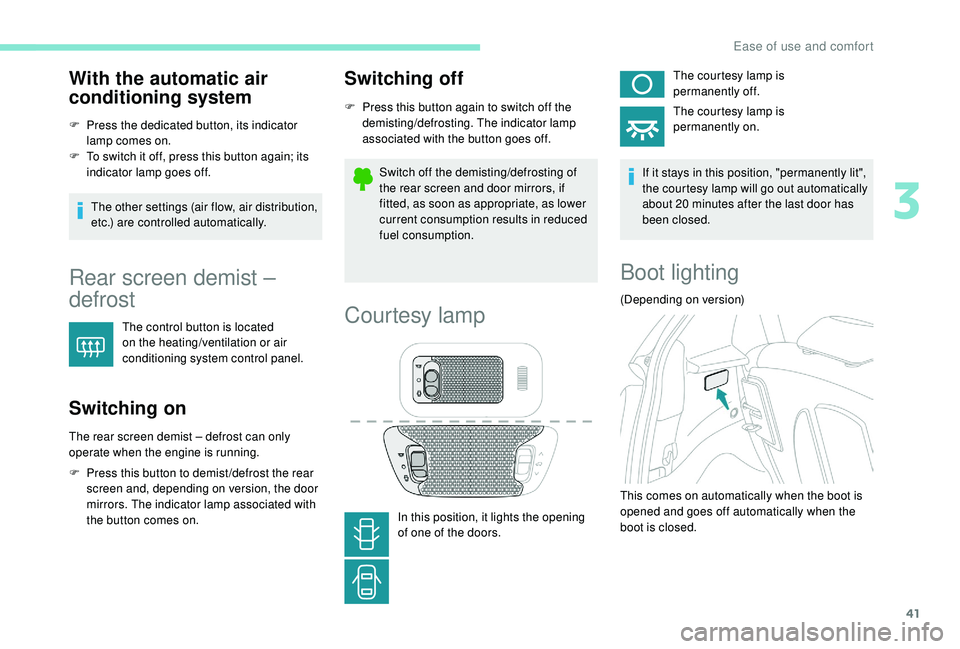
Courtesy lamp
In this position, it lights the opening
of one of the doors. The courtesy lamp is
permanently off.
The courtesy lamp is
permanently on.
If it stays in this position, "permanently lit",
the courtesy lamp will go out automatically
about 20 minutes after the last door has
been closed.
Boot lighting
(Depending on version)
This comes on automatically when the boot is
opened and goes off automatically when the
boot is closed.
3
Ease of use and comfort
Page 50 of 180
48
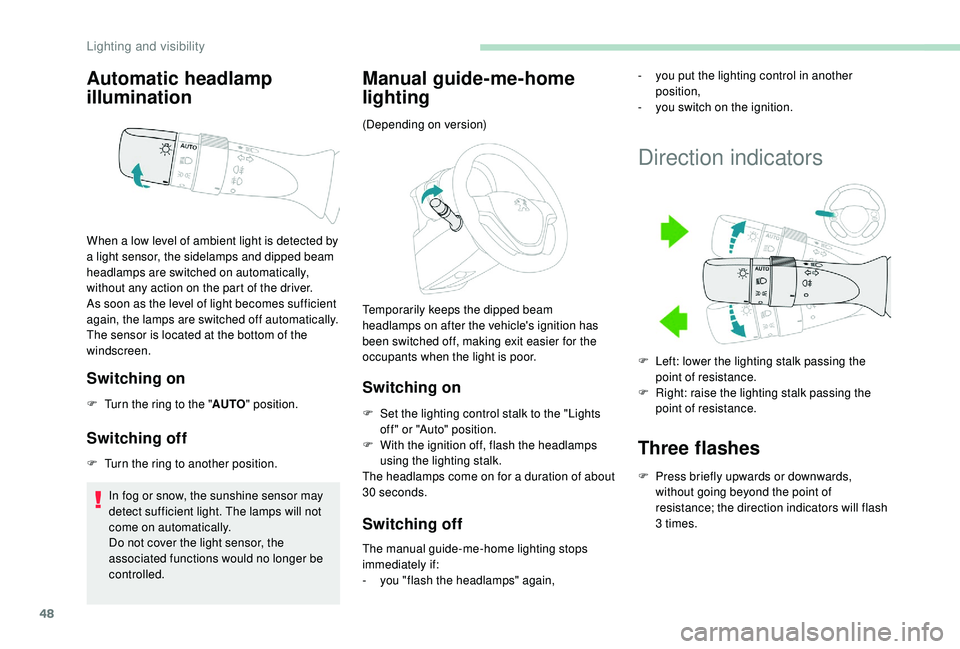
Automatic headlamp
illumination
Switching on
F Turn the ring to the "AUTO" position.
Switching off
F Turn the ring to another position.
In fog or snow, the sunshine sensor may
detect sufficient light. The lamps will not
come on automatically.
Do not cover the light sensor, the
associated functions would no longer be
controlled.
Manual guide-me-home
lighting
Switching on
F Set the lighting control stalk to the "Lights off " or "Auto" position.
F
W
ith the ignition off, flash the headlamps
using the lighting stalk.
The headlamps come on for a
duration of about
30
seconds.
Switching off
The manual guide-me-home lighting stops
immediately if:
-
y
ou "flash the headlamps" again,
When a
low level of ambient light is detected by
a
light sensor, the sidelamps and dipped beam
headlamps are switched on automatically,
without any action on the part of the driver.
As soon as the level of light becomes sufficient
again, the lamps are switched off automatically.
The sensor is located at the bottom of the
windscreen. (Depending on version)
Temporarily keeps the dipped beam
headlamps on after the vehicle's ignition has
been switched off, making exit easier for the
occupants when the light is poor.
Direction indicators
Three flashes
F Press briefly upwards or downwards,
without going beyond the point of
resistance; the direction indicators will flash
3
times.
-
y
ou put the lighting control in another
position,
-
y
ou switch on the ignition.
F
L
eft: lower the lighting stalk passing the
point of resistance.
F
R
ight: raise the lighting stalk passing the
point of resistance.
Lighting and visibility
Page 57 of 180
55
Release
F Press the red button on the buckle.
F G uide the seat belt as it reels in.
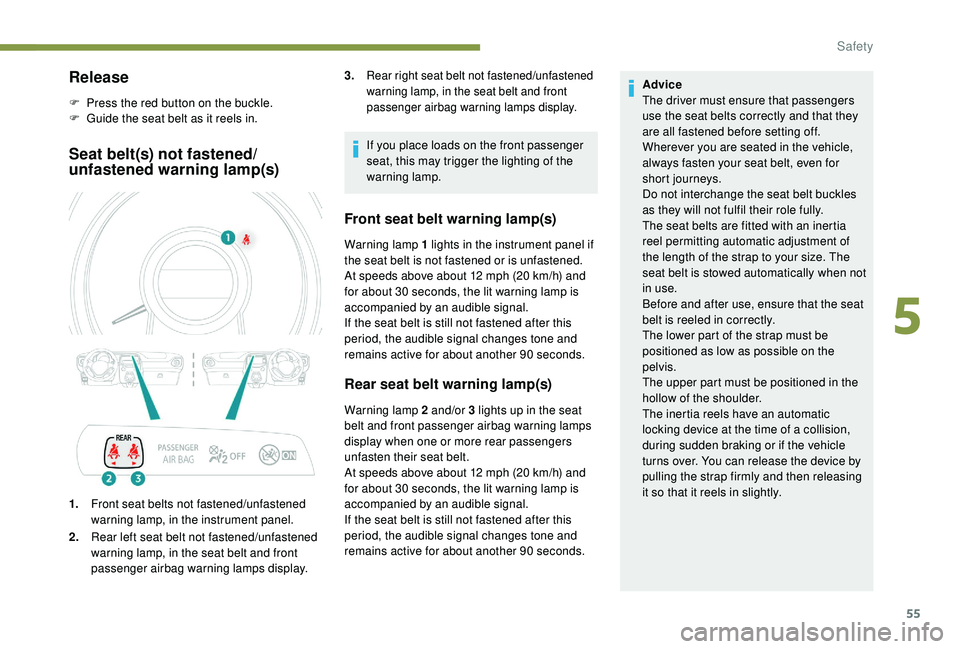
Seat belt(s) not fastened/
unfastened warning lamp(s)
1.Front seat belts not fastened/unfastened
warning lamp, in the instrument panel.
2. Rear left seat belt not fastened/unfastened
warning lamp, in the seat belt and front
passenger airbag warning lamps display. If you place loads on the front passenger
seat, this may trigger the lighting of the
warning lamp.
Front seat belt warning lamp(s)
Warning lamp 1 lights in the instrument panel if
t he seat belt is not fastened or is unfastened.
At speeds above about 12
mph (20 km/h) and
for about 30
seconds, the lit warning lamp is
accompanied by an audible signal.
If the seat belt is still not fastened after this
period, the audible signal changes tone and
remains active for about another 90
seconds.
Rear seat belt warning lamp(s)
Warning lamp 2 and/or 3 lights up in the seat
b elt and front passenger airbag warning lamps
display when one or more rear passengers
unfasten their seat belt.
At speeds above about 12
mph (20 km/h) and
for about 30
seconds, the lit warning lamp is
accompanied by an audible signal.
If the seat belt is still not fastened after this
period, the audible signal changes tone and
remains active for about another 90
seconds.Advice
The driver must ensure that passengers
use the seat belts correctly and that they
are all fastened before setting off.
Wherever you are seated in the vehicle,
always fasten your seat belt, even for
short journeys.
Do not interchange the seat belt buckles
as they will not fulfil their role fully.
The seat belts are fitted with an inertia
reel permitting automatic adjustment of
the length of the strap to your size. The
seat belt is stowed automatically when not
in use.
Before and after use, ensure that the seat
belt is reeled in correctly.
The lower part of the strap must be
positioned as low as possible on the
pelvis.
The upper part must be positioned in the
hollow of the shoulder.
The inertia reels have an automatic
locking device at the time of a
collision,
during sudden braking or if the vehicle
turns over. You can release the device by
pulling the strap firmly and then releasing
it so that it reels in slightly.
3.
Rear right seat belt not fastened/unfastened
warning lamp, in the seat belt and front
passenger airbag warning lamps display.
5
Safety
Page 63 of 180
61
Deactivating the
passenger's front airbag
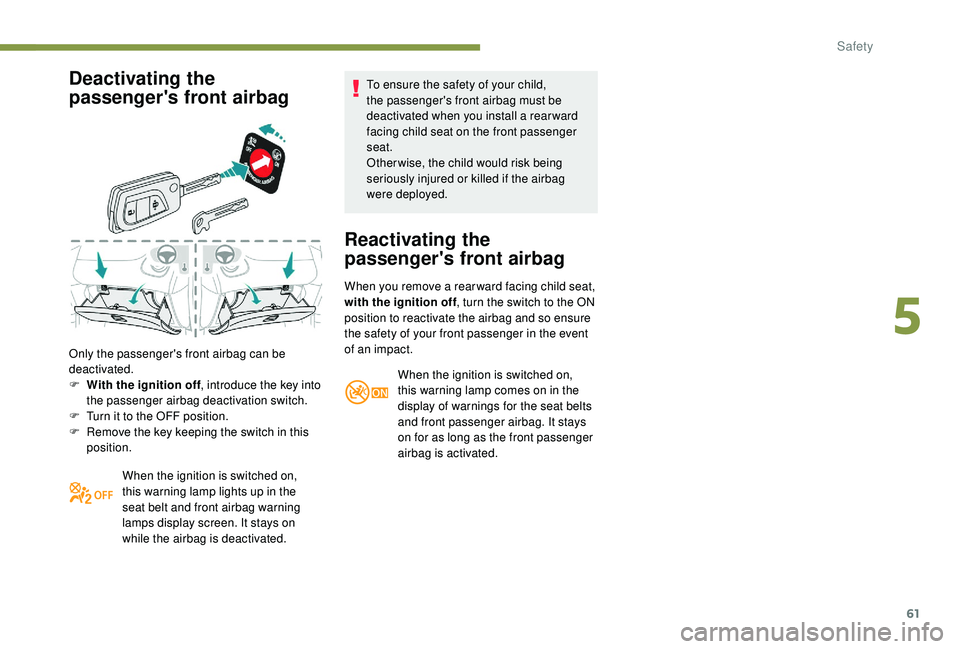
Only the passenger's front airbag can be
deactivated.
F
W
ith the ignition off , introduce the key into
the passenger airbag deactivation switch.
F
T
urn it to the OFF position.
F
R
emove the key keeping the switch in this
position.
When the ignition is switched on,
this warning lamp lights up in the
seat belt and front airbag warning
lamps display screen. It stays on
while the airbag is deactivated. To ensure the safety of your child,
the passenger's front airbag must be
deactivated when you install a
rear ward
facing child seat on the front passenger
seat.
Otherwise, the child would risk being
seriously injured or killed if the airbag
were deployed.
Reactivating the
passenger's front airbag
When you remove a rear ward facing child seat,
w ith the ignition off , turn the switch to the ON
position to reactivate the airbag and so ensure
the safety of your front passenger in the event
of an impact.
When the ignition is switched on,
this warning lamp comes on in the
display of warnings for the seat belts
and front passenger airbag. It stays
on for as long as the front passenger
airbag is activated.
5
Safety
Page 76 of 180
74
With the electronic key inside the vehicle: each
press of the "START/STOP " button, without
action on the pedals , allows the mode of the
vehicle to be changed:
F
F
irst press (" ACC" mode). The accessories
(audio system, 12
V socket, etc.) can be
used.
F
Sec
ond press (" ON" mode). Ignition on.
F
T
hird press (" OFF" m o d e).
If you use accessories for a
prolonged
period of time, the vehicle will
automatically transfer into " OFF" mode
after about 20
minutes.
Be careful , to avoid discharging the
battery.
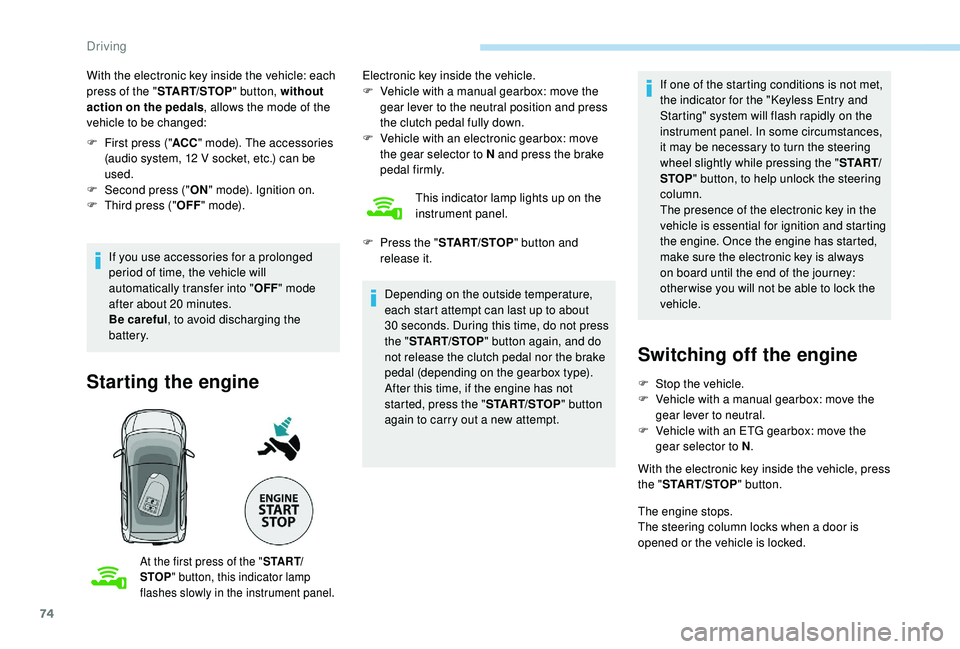
Starting the engine
At the first press of the " S TA R T/
STOP " button, this indicator lamp
flashes slowly in the instrument panel.
Electronic key inside the vehicle.
F V ehicle with a manual gearbox: move the
gear lever to the neutral position and press
the clutch pedal fully down.
F
V
ehicle with an electronic gearbox: move
the gear selector to N and press the brake
pedal firmly.
This indicator lamp lights up on the
instrument panel.
Depending on the outside temperature,
each start attempt can last up to about
30
seconds. During this time, do not press
the " START/STOP " button again, and do
not release the clutch pedal nor the brake
pedal (depending on the gearbox type).
After this time, if the engine has not
started, press the " START/STOP" button
again to carry out a
new attempt.
F
P
ress the " START/STOP " button and
release it. If one of the starting conditions is not met,
the indicator for the "Keyless Entry and
Starting" system will flash rapidly on the
instrument panel. In some circumstances,
it may be necessary to turn the steering
wheel slightly while pressing the "
S TA R T/
STOP " button, to help unlock the steering
column.
The presence of the electronic key in the
vehicle is essential for ignition and starting
the engine. Once the engine has started,
make sure the electronic key is always
on board until the end of the journey:
other wise you will not be able to lock the
vehicle.
Switching off the engine
F Stop the vehicle.
F V ehicle with a manual gearbox: move the
gear lever to neutral.
F
V
ehicle with an ETG gearbox: move the
gear selector to N .
With the electronic key inside the vehicle, press
the " START/STOP " button.
The engine stops.
The steering column locks when a
door is
opened or the vehicle is locked.
Driving
Page 78 of 180
76
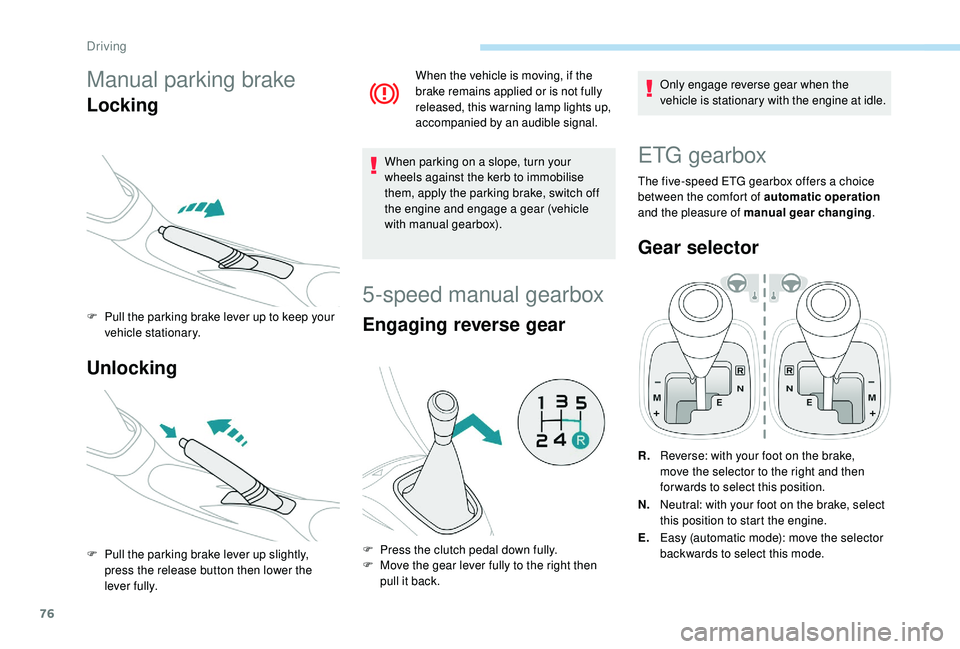
Manual parking brake
Locking
F Pull the parking brake lever up to keep your vehicle stationary.
Unlocking
F Pull the parking brake lever up slightly, press the release button then lower the
lever fully.
When the vehicle is moving, if the
brake remains applied or is not fully
released, this warning lamp lights up,
accompanied by an audible signal.
When parking on a slope, turn your
w heels against the kerb to immobilise
them, apply the parking brake, switch off
the engine and engage a
gear (vehicle
with manual gearbox).
5-speed manual gearbox
Engaging reverse gear
F Press the clutch pedal down fully.
F M ove the gear lever fully to the right then
pull it back.
Only engage reverse gear when the
vehicle is stationary with the engine at idle.
ETG gearbox
The five-speed ETG gearbox offers a choice
b etween the comfort of automatic operation
and the pleasure of manual gear changing .
Gear selector
R.Reverse: with your foot on the brake,
move the selector to the right and then
for wards to select this position.
N. Neutral: with your foot on the brake, select
this position to start the engine.
E. Easy (automatic mode): move the selector
backwards to select this mode.
Driving
Page 83 of 180
81
Operation
Going into engine STOP mode
This indicator lamp comes on in the
instrument panel and the engine
goes into standby automatically:
-
w
hen the vehicle is stationary, you put the
gearbox into neutral and release the clutch
pedal.
Stop & Starttime counters
A partial time counter counts the periods in
STOP mode during a journey. For your convenience during parking
manoeuvres, STOP mode is not available
for a
few seconds after coming out of
reverse gear.
Stop & Start does not change features
of the vehicle such as braking, power
steering…
Never refuel with the engine in STOP
mode; you must switch off the ignition.
Special cases: STOP mode not
available
Stop & Start
The Stop & Start system puts the engine
temporarily into standby – STOP mode – during
traffic stops (red lights, traffic jams, etc.). The
engine restarts automatically – START mode
– as soon as you want to move off. Restarting
occurs instantly, quickly and silently.
Per fect for urban use, the Stop & Start system
reduces fuel consumption and exhaust
emissions as well as the noise level when
stationary. -
t
he engine is needed to maintain
a comfortable temperature in the passenger
compartment,
-
d
emisting is active,
-
s
ome special conditions (battery charge,
engine temperature, braking assistance,
vehicle stopped on a
steep slope, high
altitude…) where the engine is needed to
assure control of a
system.
Going into engine START mode
This indicator lamp goes off and the
engine restarts automatically:
-
w
hen you fully depress the clutch pedal.
Special case: START invoked
automatically
START mode is invoked automatically if:
- y
ou open the driver's door,
-
y
ou open the bonnet,
-
y
ou unfasten the driver's seat belt,
-
s
ome temporary conditions apply (battery
charge, engine temperature, braking
assistance, vehicle on a
steep slope,
adjustment of the air conditioning, …) where
it is necessary for control of a
system or of
the vehicle.
It is displayed in the trip computer as soon as
the Stop & Start acts.
Press one of the "
DISP" buttons to return to the
previous display.
A global time counter counts the periods in
STOP mode since the last reset to zero.
When it is displayed, press for more than two
seconds on one of the " DISP" buttons to reset
to zero.
STOP mode does not activate, mainly when:
-
t
he driver's door is open,
-
t
he driver's seat belt is not fastened,
6
Driving
Page 87 of 180
85
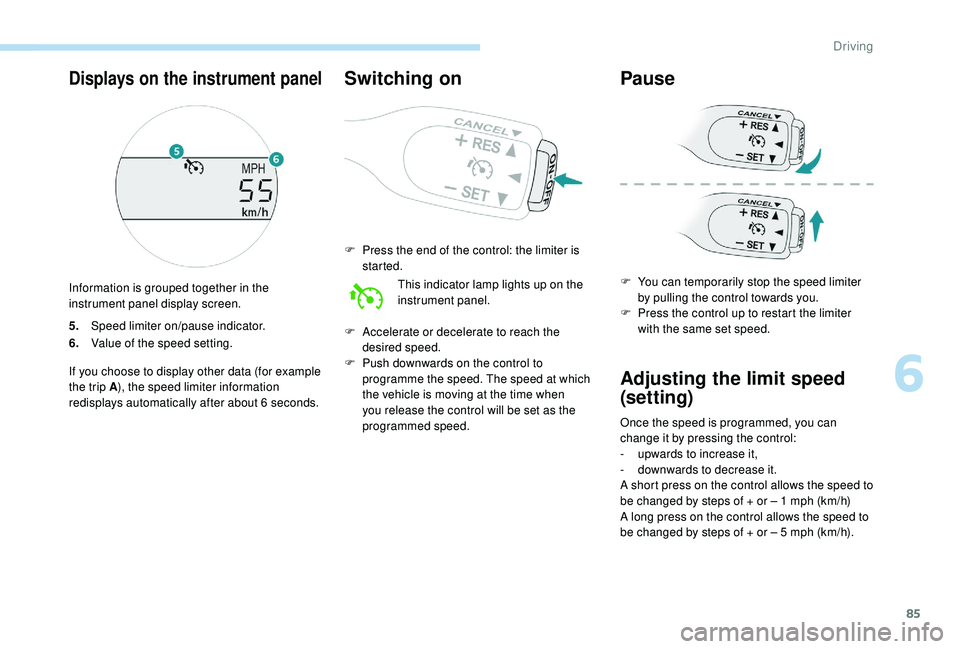
5.Speed limiter on/pause indicator.
6. Value of the speed setting.
If you choose to display other data (for example
the trip A ), the speed limiter information
redisplays automatically after about 6
seconds.
Switching on
F Press the end of the control: the limiter is started.
This indicator lamp lights up on the
instrument panel.
F
A
ccelerate or decelerate to reach the
desired speed.
F
P
ush downwards on the control to
programme the speed. The speed at which
the vehicle is moving at the time when
you release the control will be set as the
programmed speed.
Pause
F You can temporarily stop the speed limiter by pulling the control towards you.
F
P
ress the control up to restart the limiter
with the same set speed.
Adjusting the limit speed
(set ting)
Once the speed is programmed, you can
change it by pressing the control:
-
u
pwards to increase it,
-
d
ownwards to decrease it.
A short press on the control allows the speed to
be changed by steps of + or – 1
mph (km/h)
A long press on the control allows the speed to
be changed by steps of + or – 5
mph (km/h).
Displays on the instrument panel
Information is grouped together in the
instrument panel display screen.
6
Driving
Page 90 of 180
88
Setting the thresholds for
triggering the alertDeactivation/reactivation
Press this button for more than 3 seconds.
T his warning lamp comes on in the
instrument panel and the message
"PCS OFF" is displayed. Press this button again to reactivate the
system.
This indicator lamp lights up on the
instrument panel.
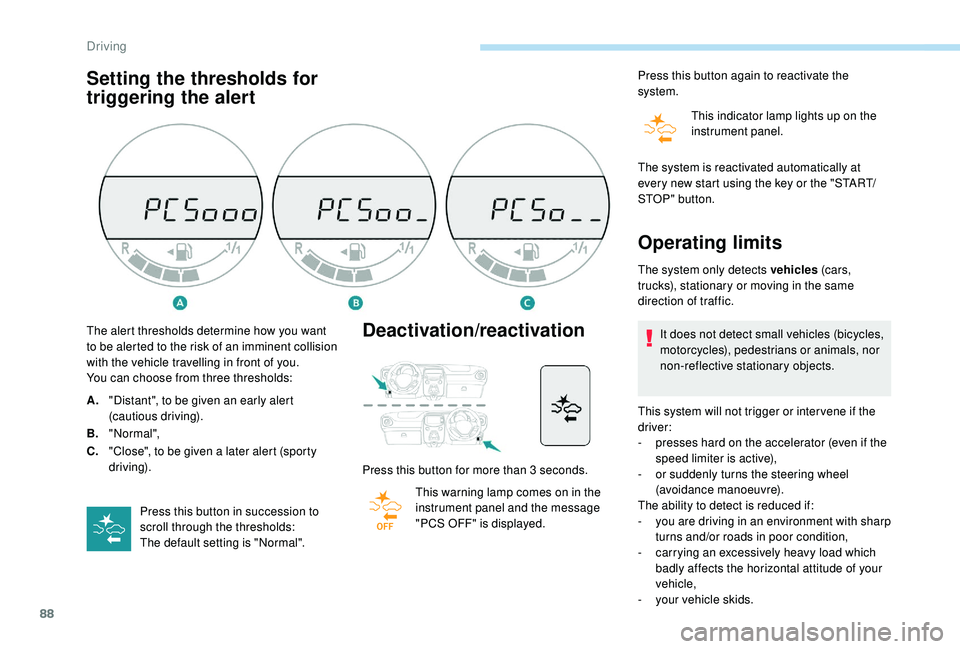
The alert thresholds determine how you want
to be alerted to the risk of an imminent collision
with the vehicle travelling in front of you.
You can choose from three thresholds:
A. "Distant", to be given an early alert
(cautious driving).
B. "Normal",
C. "Close", to be given a
later alert (sporty
driving).
Press this button in succession to
scroll through the thresholds:
The default setting is "Normal". The system is reactivated automatically at
every new start using the key or the "START/
STOP " button.
Operating limits
The system only detects vehicles
(c ar s,
trucks), stationary or moving in the same
direction of traffic.
It does not detect small vehicles (bicycles,
motorcycles), pedestrians or animals, nor
non-reflective stationary objects.
This system will not trigger or inter vene if the
driver:
-
p
resses hard on the accelerator (even if the
speed limiter is active),
-
o
r suddenly turns the steering wheel
(avoidance manoeuvre).
The ability to detect is reduced if:
-
y
ou are driving in an environment with sharp
turns and/or roads in poor condition,
-
c
arrying an excessively heavy load which
badly affects the horizontal attitude of your
vehicle,
-
y
our vehicle skids.
Driving