PEUGEOT 2008 2016 User Guide
Manufacturer: PEUGEOT, Model Year: 2016, Model line: 2008, Model: PEUGEOT 2008 2016Pages: 450, PDF Size: 14.16 MB
Page 11 of 450
9
2008_en_Chap00b_vue-ensemble_ed01-2016
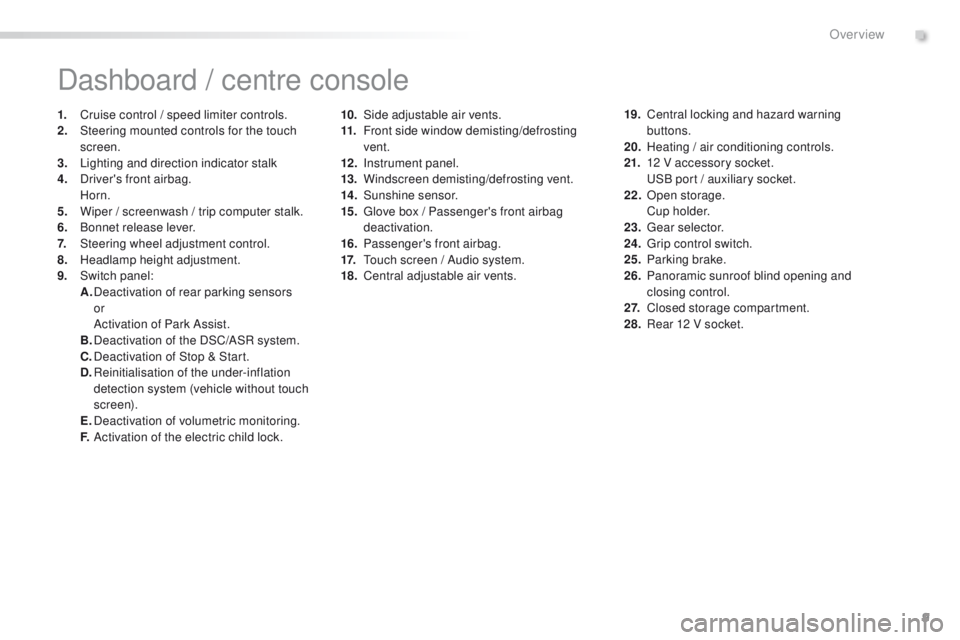
10. Side adjustable air vents.
11. Front side window demisting/defrosting
vent.
12 .
I
nstrument panel.
13.
W
indscreen demisting/defrosting vent.
14 .
S
unshine sensor.
15.
G
love box / Passenger's front airbag
deactivation.
16.
P
assenger's front airbag.
17.
T
ouch screen / Audio system.
18.
C
entral adjustable air vents.
Dashboard / centre console
1. Cruise control / speed limiter controls.
2. Steering mounted controls for the touch
screen.
3.
L
ighting and direction indicator stalk
4.
D
river's front airbag.
Horn.
5.
W
iper / screenwash / trip computer stalk.
6.
B
onnet release lever.
7.
S
teering wheel adjustment control.
8.
H
eadlamp height adjustment.
9.
S
witch panel:
A.
D
eactivation of rear parking sensors
or
A
ctivation of Park Assist.
B.
D
eactivation of the DSC/ASR system.
C.
D
eactivation of Stop & Start.
D.
R
einitialisation of the under-inflation
detection system (vehicle without touch
screen).
E.
D
eactivation of volumetric monitoring.
F.
A
ctivation of the electric child lock. 19. C
entral locking and hazard warning
buttons.
20.
H
eating / air conditioning controls.
21.
1
2 V accessory socket.
U
SB port / auxiliary socket.
22.
O
pen storage.
C
u p h o l d e r.
23.
G
ear selector.
24.
G
rip control switch.
25.
P
arking brake.
26.
P
anoramic sunroof blind opening and
closing control.
2 7.
C
losed storage compartment.
28.
R
ear 12 V socket.
.
Over view
Page 12 of 450
10
2008_en_Chap00b_vue-ensemble_ed01-2016
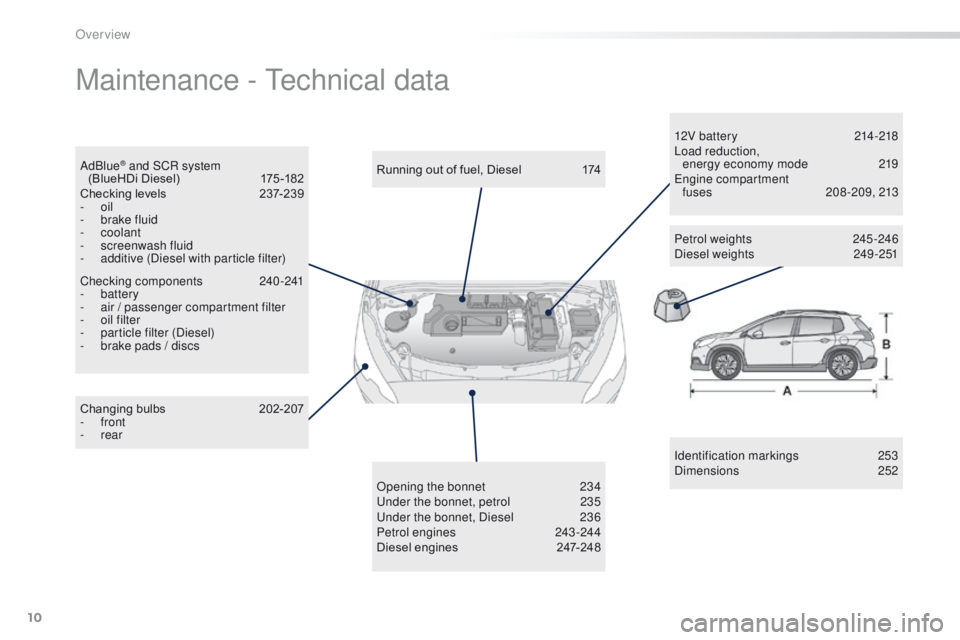
Maintenance - Technical data
Identification markings 253
Dimensions 252
Changing bulbs
2
02-207
-
front
-
rear Running out of fuel, Diesel
1
74
Opening the bonnet
2
34
Under the bonnet, petrol
2
35
Under the bonnet, Diesel
2
36
Petrol engines
2
43 -244
Diesel engines
2
47-248 12V batter y
21
4 -218
Load reduction, energy economy mode
2
19
Engine compartment fuses
2
08 -209, 213
Petrol weights
2
45 -246
Diesel weights
2
49-251
AdBlue
® and SCR system
(BlueHDi Diesel) 1 75 -182
Checking levels
23
7-239
-
oil
-
b
rake fluid
-
coolant
-
s
creenwash fluid
-
a
dditive (Diesel with particle filter)
Checking components
2
40-241
-
battery
-
a
ir / passenger compartment filter
-
o
il filter
-
p
article filter (Diesel)
-
b
rake pads / discs
Over view
Page 13 of 450

11
2008_en_Chap00b_vue-ensemble_ed01-2016
.
Over view
Page 14 of 450
12
2008_en_Chap00c_eco-conduite_ed01-2016
Eco-driving
Eco-driving is a range of everyday practices that allow the motorist to optimise their fuel consumption and CO2 emissions.
Optimise the use of your gearbox
With a manual gearbox, move off gently and change up without waiting.
During acceleration change up early.
With an automatic or electronic gearbox, give preference to automatic
mode and avoid pressing the accelerator pedal heavily or suddenly.
The gear shift indicator invites you to engage the most suitable gear:
as soon as the indication is displayed in the instrument panel, follow it
straight away.
For vehicles fitted with an electronic or automatic gearbox, this
indicator appears only in manual mode.
Drive smoothly
Maintain a safe distance between vehicles, use engine braking rather
than the brake pedal, and press the accelerator progressively. These
practices contribute towards a reduction in fuel consumption and
CO
2 emissions and also help to reduce the background traffic noise.
If your vehicle has cruise control, make use of the system at speeds
above 25 mph (40 km/h) when the traffic is flowing well.
Control the use of your electrical
equipment
Before moving off, if the passenger compartment is too warm, ventilate it
by opening the windows and air vents before using the air conditioning.
Above 30 mph (50 km/h), close the windows and leave the air vents
open.
Remember to make use of equipment that can help keep the
temperature in the passenger compartment down (sunroof and window
blinds...).
Switch off the air conditioning, unless it has automatic regulation, as
soon as the desired temperature is attained.
Switch off the demisting and defrosting controls, if not automatic.
Switch off the heated seat as soon as possible.
Switch off the headlamps and front foglamps when the level of light
does not require their use.
Avoid running the engine before moving off, particularly in winter; your
vehicle will warm up much faster while driving.
As a passenger, if you avoid connecting your multimedia devices
(film, music, video game...), you will contribute towards limiting the
consumption of electrical energy, and so of fuel.
Disconnect your portable devices before leaving the vehicle.
Eco-driving
Page 15 of 450
13
2008_en_Chap00c_eco-conduite_ed01-2016
Limit the causes of excess consumption
Spread loads throughout the vehicle; place the heaviest items in the
bottom of the boot, as close as possible to the rear seats.
Limit the loads carried in the vehicle and reduce wind resistance (roof
bars, roof rack, bicycle carrier, trailer...). Use a roof box in preference.
Remove roof bars and roof racks after use.
At the end of winter, remove snow tyres and refit your summer tyres.
Observe the recommendations on
maintenance
Check the tyre pressures regularly, when cold, referring to the label in
the door aperture, driver's side.
Carry out this check in particular:
-
b
efore a long journey,
-
a
t each change of season,
-
a
fter a long period out of use.
Don't forget the spare wheel and the tyres on any trailer or caravan.
Have your vehicle serviced regularly (engine oil, oil filter, air filter,
passenger compartment filter...) and observe the schedule of
operations recommended in the manufacturer's service schedule.
With a BlueHDi Diesel engine, if the SCR system is faulty your vehicle
becomes polluting; go to a PEUGEOT dealer or a qualified workshop
without delay to have the emissions of nitrous oxides brought back to
the legal level.
When refuelling, do not continue after the third cut-off of the nozzle to
avoid any over flow.
At the wheel of your new vehicle, it is only after the first 1 800 miles
(3 000 kilometres) that you will see the fuel consumption settle down to
a consistent average.
.
Eco-driving
Page 16 of 450
14
LCD instrument panel
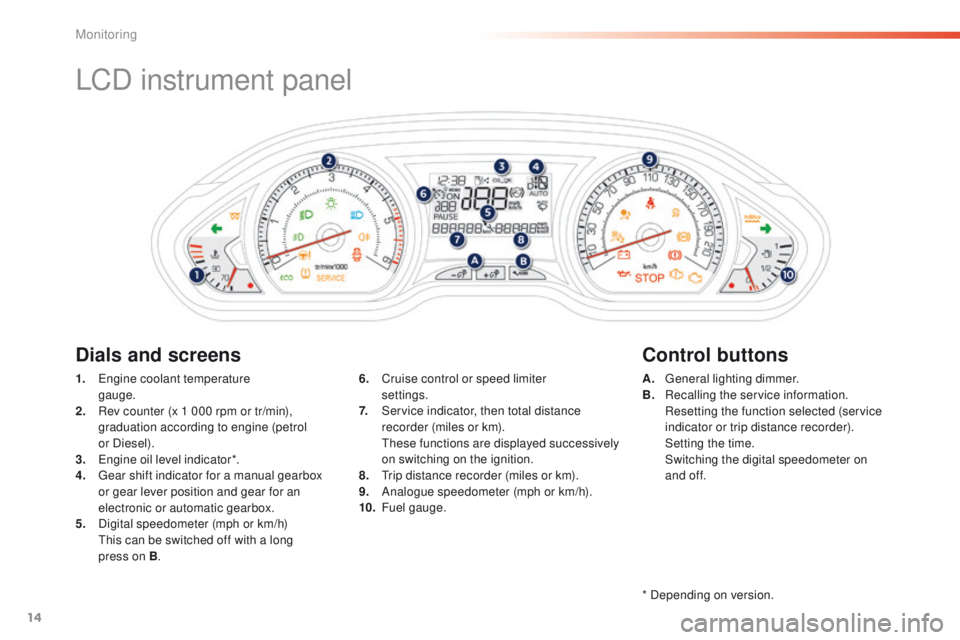
1. Engine coolant temperature gauge.
2.
R
ev counter (x 1 000 rpm or tr/min),
graduation according to engine (petrol
or Diesel).
3.
E
ngine oil level indicator*.
4.
G
ear shift indicator for a manual gearbox
or gear lever position and gear for an
electronic or automatic gearbox.
5.
D
igital speedometer (mph or km/h)
T
his can be switched off with a long
press on B . A. G
eneral lighting dimmer.
B. R ecalling the service information.
R
esetting the function selected (service
indicator or trip distance recorder).
S
etting the time.
S
witching the digital speedometer on
and of f.
6. C
ruise control or speed limiter
settings.
7.
S
ervice indicator, then total distance
recorder (miles or km).
T
hese functions are displayed successively
on switching on the ignition.
8.
T
rip distance recorder (miles or km).
9.
A
nalogue speedometer (mph or km/h).
10.
F
uel gauge.
Dials and screens Control buttons
* Depending on version.
Monitoring
Page 17 of 450
15
2008_en_Chap01_controle-de-marche_ed01-2016
Matrix instrument panel
Dials and screensControl buttons
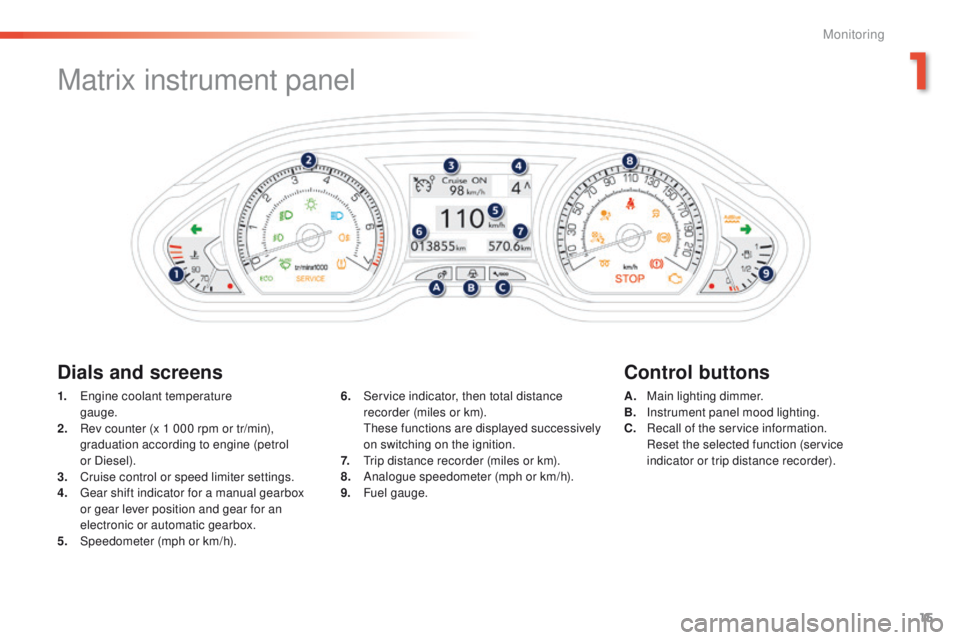
1. Engine coolant temperature
gauge.
2.
R
ev counter (x 1 000 rpm or tr/min),
graduation according to engine (petrol
or Diesel).
3.
C
ruise control or speed limiter settings.
4.
G
ear shift indicator for a manual gearbox
or gear lever position and gear for an
electronic or automatic gearbox.
5.
Spe
edometer (mph or km/h). A. M
ain lighting dimmer.
B. I nstrument panel mood lighting.
C.
R
ecall of the service information.
R
eset the selected function (service
indicator or trip distance recorder).
6. S
ervice indicator, then total distance
recorder (miles or km).
T
hese functions are displayed successively
on switching on the ignition.
7.
T
rip distance recorder (miles or km).
8.
A
nalogue speedometer (mph or km/h).
9.
F
uel gauge.
1
Monitoring
Page 18 of 450
16
Library of indicator and warning lamps
Certain warning lamps may come on in
one of two modes. Only by relating the
type of lighting to the operating status
of the vehicle can it be ascertained
whether the situation is normal or
whether a fault has occurred.When the ignition is switched on
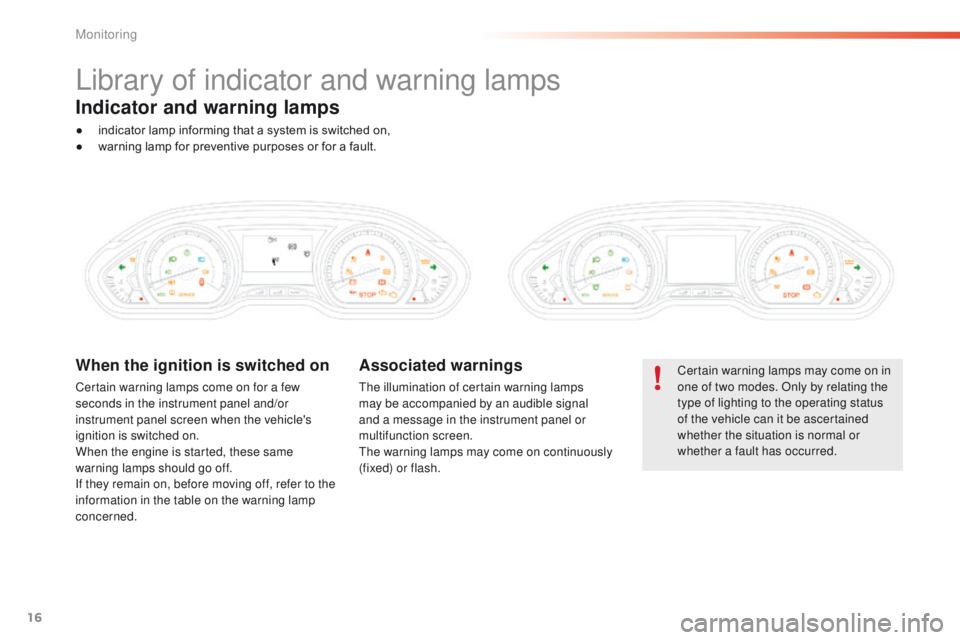
Certain warning lamps come on for a few
seconds in the instrument panel and/or
instrument panel screen when the vehicle's
ignition is switched on.
When the engine is started, these same
warning lamps should go off.
If they remain on, before moving off, refer to the
information in the table on the warning lamp
concerned.
Associated warnings
The illumination of certain warning lamps
may be accompanied by an audible signal
and a message in the instrument panel or
multifunction screen.
The warning lamps may come on continuously
(fixed) or flash.
Indicator and warning lamps
● indicator lamp informing that a system is switched on,
● w arning lamp for preventive purposes or for a fault.
Monitoring
Page 19 of 450
17
2008_en_Chap01_controle-de-marche_ed01-2016
Warning / indicator lampStateCause Action / Observations
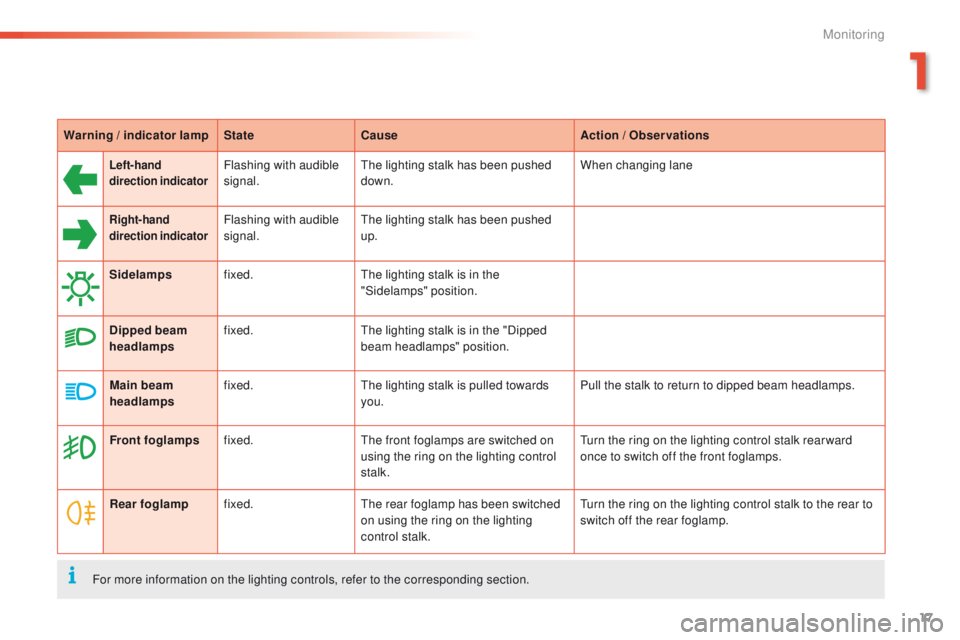
Left-hand
direction indicatorFlashing with audible
signal.The lighting stalk has been pushed
down. When changing lane
Right-hand
direction indicatorFlashing with audible
signal.The lighting stalk has been pushed
up.
Sidelamps fixed. The lighting stalk is in the
"Sidelamps" position.
Dipped beam
headlamps fixed.
The lighting stalk is in the "Dipped
beam headlamps" position.
Main beam
headlamps fixed.
The lighting stalk is pulled towards
you. Pull the stalk to return to dipped beam headlamps.
Front foglamps fixed. The front foglamps are switched on
using the ring on the lighting control
stalk. Turn the ring on the lighting control stalk rear ward
once to switch off the front foglamps.
Rear foglamp fixed. The rear foglamp has been switched
on using the ring on the lighting
control stalk. Turn the ring on the lighting control stalk to the rear to
switch off the rear foglamp.
For more information on the lighting controls, refer to the corresponding section.
1
Monitoring
Page 20 of 450

18
Warning / indicator lampStateCause Action / Observations
Diesel engine
pre-heating fixed.
The key is at position 2 (ignition on) in
the ignition switch. Wait until the warning lamp goes off before starting.
The period of illumination of the warning lamp is
determined by the ambient conditions (up to about
30
seconds in very low temperatures).
If the engine does not start, switch the ignition off and
then on, wait until the warning lamp goes off again,
then start the engine.
Parking brake fixed. The parking brake is applied or not
properly released. Release the parking brake to switch off the warning
lamp, keeping your foot on the brake pedal.
Observe the safety recommendations.
For more information on the parking brake, refer to the
corresponding section.
Foot on the
brake pedal fixed.
The brake pedal must be pressed. With an electronic gearbox, press the brake pedal to
start the engine (lever in position N).
With an automatic gearbox, with the engine running,
press the brake pedal before releasing the parking
brake, to unlock the lever and come out of position P .
If you wish to release the parking brake without
pressing the brake pedal, this warning lamp will
remain on.
flashing. With an electronic gearbox, if you
hold the vehicle on an incline using
the accelerator for too long, the
clutch overheats. Use the brake pedal and/or the parking brake.
Monitoring