audio PEUGEOT 2008 2016 Owners Manual
[x] Cancel search | Manufacturer: PEUGEOT, Model Year: 2016, Model line: 2008, Model: PEUGEOT 2008 2016Pages: 450, PDF Size: 14.16 MB
Page 5 of 450

.
2008_en_Chap00a_sommaire_ed01-2016
General safety recommendations 134
Direction indicators
1
35
Hazard warning lamps
1
35
H or n
13
6
Emergency or assistance call
1
36
Under-inflation detection
1
37
ESC system
1
40
Grip control
1
43
Active City Brake
1
45
Front seat belts
1
49
Airbags
152
Safety
Fuel tank 1 70
Misfuel prevention (Diesel) 1 72
Running out of fuel (Diesel)
1
74
AdBlue
® and SCR system
(BlueHDi Diesel) 1 75
Temporary puncture repair kit
1
83
Changing a wheel
1
94
Snow chains
2
01
Changing a bulb
2
02
Changing a fuse
2
08
12 V battery
2
14
Changing a wiper blade
2
20
To w i n g
2 2 1
Towing a trailer
2
23
Towbar with quickly detachable towball
2
25
Fitting roof bars
2
30
Advice on care and maintenance
2
30
Accessories
2
31
Practical information
Bonnet 234
Petrol engines 2 35
Diesel engines
2
36
Checking levels
2
37
Checks
240
Checks
General information 2 42
Petrol engines 2 43
Petrol weights
2
45
Diesel engines
2
47
Diesel weights
2
49
Dimensions
252
Identification markings
2
53
Technical data
Emergency call 254
Assistance call 2 55
7-inch touch screen
2
57
Audio system / Bluetooth
3
27
Audio system
3
47
Audio equipment and telematics
Alphabetical index
Carrying children 1 56
Deactivating the passenger's front airbag 1 58
ISOFIX child seats
1
65
Child lock
1
69
Child safety
Lighting 1 17
Headlamp adjustment 1 24
Cornering lighting
1
25
Wiper controls
1
26
Lighting dimmer
1
30
Courtesy lamps
1
31
Interior mood lighting
1
32
Panoramic glazed sunroof
1
33
Visibility
Contents
Page 8 of 450

6
2008_en_Chap00b_vue-ensemble_ed01-2016
Instruments and controls
Courtesy lamps 131
Interior mood lighting 1 32
Rear view mirror
6
1
Emergency / Assistance call
1
36, 254-255
Manual parking brake
8
2Manual gearbox
8
3
5-speed electronic gearbox
8
4- 86
6-speed electronic gearbox
87
-90
Automatic gearbox
9
1-94
Automatic gearbox ( E AT 6)
9 5 - 9 8
Gear shift indicator
99
Stop & Start
1
00 -102
Hill start assist
1
03
Dashboard fuses
2
08-212
USB port / Auxiliary socket
7
2-73 Heating, ventilation
6
5-69
Manual air conditioning
6
5-66
Dual-zone air conditioning
6
7- 69
Front demisting / defrosting
7
0
Rear screen demisting/
defrosting
70
B
luetooth audio system
3
27-345
Door mirrors
6
0
Electric windows, deactivating
5
4-55 Audio system
3
47-358
Glove box fuses
2
08 -209, 212
Touch screen
2
57-325
Opening the bonnet
2
34
Over view
Page 11 of 450

9
2008_en_Chap00b_vue-ensemble_ed01-2016
10. Side adjustable air vents.
11. Front side window demisting/defrosting
vent.
12 .
I
nstrument panel.
13.
W
indscreen demisting/defrosting vent.
14 .
S
unshine sensor.
15.
G
love box / Passenger's front airbag
deactivation.
16.
P
assenger's front airbag.
17.
T
ouch screen / Audio system.
18.
C
entral adjustable air vents.
Dashboard / centre console
1. Cruise control / speed limiter controls.
2. Steering mounted controls for the touch
screen.
3.
L
ighting and direction indicator stalk
4.
D
river's front airbag.
Horn.
5.
W
iper / screenwash / trip computer stalk.
6.
B
onnet release lever.
7.
S
teering wheel adjustment control.
8.
H
eadlamp height adjustment.
9.
S
witch panel:
A.
D
eactivation of rear parking sensors
or
A
ctivation of Park Assist.
B.
D
eactivation of the DSC/ASR system.
C.
D
eactivation of Stop & Start.
D.
R
einitialisation of the under-inflation
detection system (vehicle without touch
screen).
E.
D
eactivation of volumetric monitoring.
F.
A
ctivation of the electric child lock. 19. C
entral locking and hazard warning
buttons.
20.
H
eating / air conditioning controls.
21.
1
2 V accessory socket.
U
SB port / auxiliary socket.
22.
O
pen storage.
C
u p h o l d e r.
23.
G
ear selector.
24.
G
rip control switch.
25.
P
arking brake.
26.
P
anoramic sunroof blind opening and
closing control.
2 7.
C
losed storage compartment.
28.
R
ear 12 V socket.
.
Over view
Page 37 of 450

35
2008_en_Chap01_controle-de-marche_ed01-2016
Menus
Press this button for access to the
different menus.
Navigation
Depending on trim level, navigation
can be not available, an option or
standard.
See the "Audio equipment and
telematics" section.Radio Media
See the "Audio equipment and telematics" section.Settings
Allows configuration of the display
and the system.
Gives access to interactive help
for the vehicle's main systems and
warning lamps.
Connected services
These services can be not available,
an option or standard.
See the "Audio equipment and
telematics" section. Telephone
See the "Audio equipment and telematics" section.Driving
Allows access to the trip computer and,
depending on version, the adjustment
of settings for certain functions.
See the corresponding section.
1.
V
olume / mute.
See the "Audio equipment and telematics" section.
1
Monitoring
Page 38 of 450

36
"Settings" menu
The functions available through this menu are detailed in the table below.Button Corresponding function Comments
Audio settings Adjustment of volume, balance...
Turn off screen Turns the screen off.
Color schemes Choice of a color scheme.
Interactive help Access to the interactive user guide.
System Settings Choice of units:
-
t
emperature (°Celsius or °Fahrenheit)
-
d
istance and fuel consumption (l/100 km, mpg or km/l).
Time/Date Setting the date and time.
Languages Choice of language used.
Screen settings Adjustment of the screen (brightness) and display settings (scrolling of text, animations...)
Calculator
Calendar
Monitoring
Page 75 of 450

73
2008_en_Chap04_amenagements_ed01-2016
USB port / Jack auxiliary socket
When the USB port is used, the portable device
charges automatically.
While charging, a message is displayed if the
current drawn by the portable device exceeds
the power rating of the vehicle's port.For more information on the use of this
system, refer to the "Audio equipment
and telematics" section.
This connection box, consisting of an USB port
and a JACK auxiliary socket is located on the
centre console.
It allows the connection of portable device,
such as a digital audio player of the iPod
® type
or a USB memory stick.
It reads the audio files which are transmitted to
your audio system and played via the vehicle's
speakers.
You can manage these files using the steering
mounted controls or the audio system control
panel and display them in the instrument panel
screen.
4
Fittings
Page 138 of 450

136
2008_en_Chap07_securite_ed01-2016
Horn
F Press the central part of the multifunction steering wheel.
Audible warning system to alert other road
users to an imminent danger.
Use the horn moderately and only in
situations allowed by the motoring
regulations in the country you are
driving in.
Emergency or
assistance call
This system allows you to make an emergency
or assistance call to the emergency services or
to the dedicated PEUGEOT service.
For more information on the use of this
function, refer to the "Audio equipment and
telematics" section.
Safety
Page 212 of 450

210
2008_en_Chap09_info-pratiques_ed01-2016
Fuse N°Rating Functions
F2 5 ADoor mirrors, headlamps, diagnostic socket.
F9 5 AAlarm.
F10 5 AIndependent telematic unit.
F11 5 AElectrochrome rear view mirror, additional heating, Active City
Brake.
F13 5 AHi-Fi amplifier, parking sensors, reversing camera.
F16 15 AFront 12 V socket.
F17 15 AAudio system (without touch screen).
F18 20 ATouch screen, radio (if touch screen).
On the left
Practical information
Page 217 of 450
215
2008_en_Chap09_info-pratiques_ed01-2016
Some functions, including Stop & Start,
are not available if the battery is not
sufficiently charged.
Starting using another
battery
When your vehicle's battery is discharged, the
engine can be started using a slave battery
(external or on another vehicle) and jump lead
cables or a battery booster.Never try to start the engine by
connecting a battery charger.
Never use a 24 V or higher battery
b o o s t e r.
First check that the slave battery has a
nominal voltage of 12 V and a capacity
at least equal to that of the discharged
battery.
The two vehicles must not be in contact
with each other.
Switch off the electrical consumers on
both vehicles (audio system, wipers,
lighting, ...).
Ensure that the jump lead cables do
not pass close to moving parts of the
engine (cooling fan, belts, ...).
Do not disconnect the (+) terminal when
the engine is running.
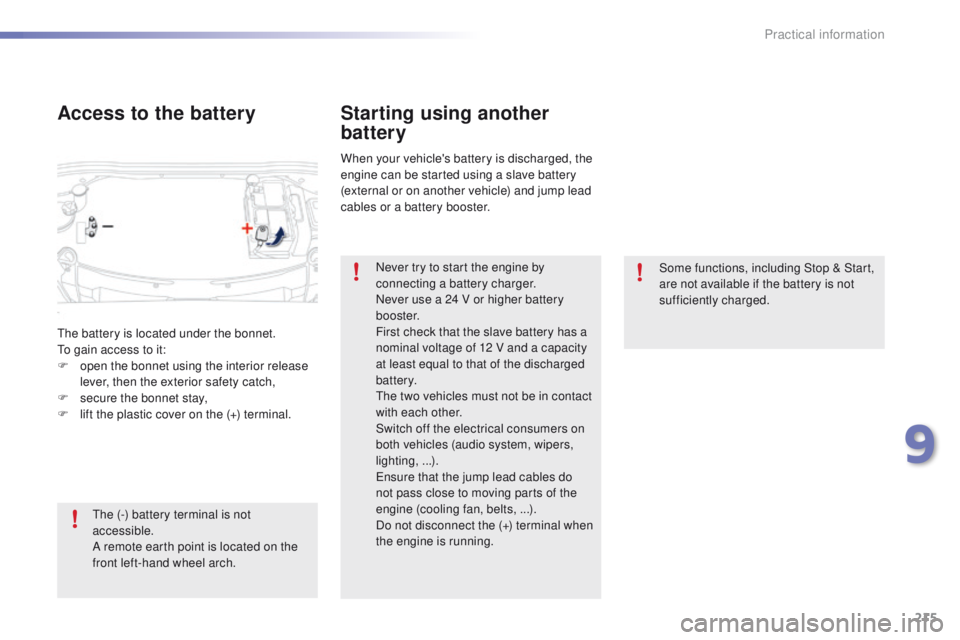
The battery is located under the bonnet.
To gain access to it:
F
o
pen the bonnet using the interior release
lever, then the exterior safety catch,
F
s
ecure the bonnet stay,
F
l
ift the plastic cover on the (+) terminal.
Access to the battery
The (-) battery terminal is not
accessible.
A remote earth point is located on the
front left-hand wheel arch.
9
Practical information
Page 219 of 450

217
2008_en_Chap09_info-pratiques_ed01-2016
Follow the instructions for use provided
by the manufacturer of the charger.
Never reverse polarities.
It is not necessary to disconnect the
battery.F
S
witch off the ignition.
F
S
witch off all electrical consumers (audio
system, lighting, wipers, ...).
F
S
witch off the charger B before connecting
the cables to the battery, so as to avoid any
dangerous sparks.
F
E
nsure that the charger cables are in good
condition.
F R aise the plastic cover, if your vehicle has
one, on the (+) terminal.
F
C
onnect the charger B cables as follows:
-
t
he positive (+) red cable to the (+)
terminal of the battery A ,
-
t
he negative (-) black cable to the earth
point C on the vehicle.
F
A
t the end of the charging operation, switch
off the charger B before disconnecting the
cables from the battery A .
Disconnecting the battery
In order to maintain an adequate state
of charge for starting the engine, it is
recommended that the battery be disconnected
if the vehicle is taken out of service for a long
period.
Wait 2 minutes after switching off the ignition
before disconnecting the battery:
F
c
lose all openings (doors, boot, windows,
roof),
F
s
witch off all electrical consumers (audio
system, wipers, lighting, ...),
F
s
witch off the ignition and wait for
4
minutes.
Having exposed the battery, it is only
necessary to disconnect the (+) terminal.
If you envisage charging your vehicle's
battery yourself, use only a charger
compatible with lead-acid batteries of a
nominal voltage of 12 V.
If this label is present, it is essential
to use only a 12 V charger, to avoid
causing irreversible damage to the
electrical components related to the
Stop & Start system.
9
Practical information