Peugeot 206 CC Dag 2003 Owner's Manual
Manufacturer: PEUGEOT, Model Year: 2003, Model line: 206 CC Dag, Model: Peugeot 206 CC Dag 2003Pages: 131, PDF Size: 1.96 MB
Page 111 of 131
30-06-2003
PRACTICAL INFORMATION
108
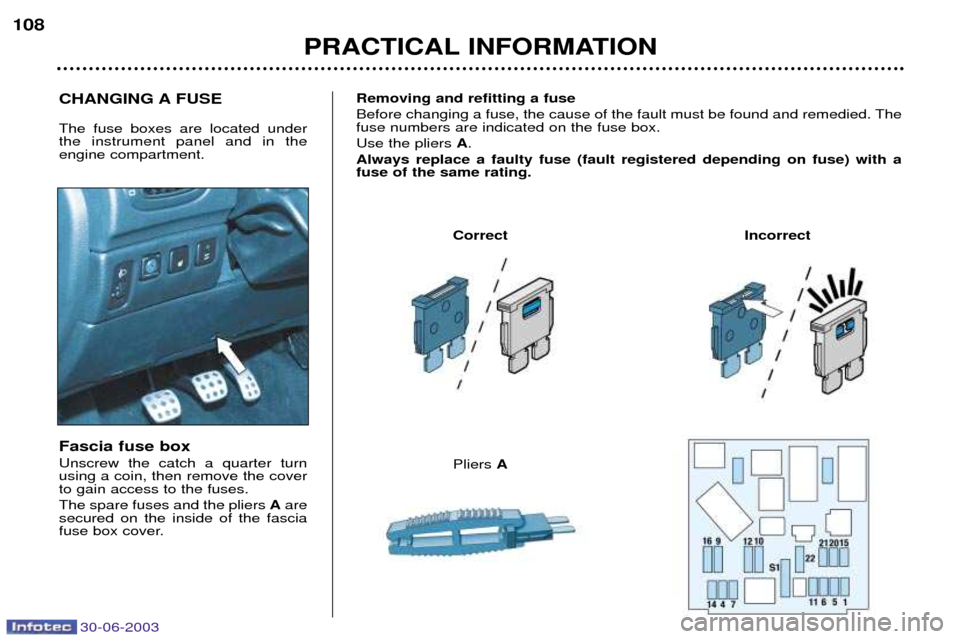
Fascia fuse box Unscrew the catch a quarter turn using a coin, then remove the coverto gain access to the fuses. The spare fuses and the pliers
Aare
secured on the inside of the fascia
fuse box cover. Removing and refitting a fuse
Before changing a fuse, the cause of the fault must be found and remedied. The fuse numbers are indicated on the fuse box. Use the pliers
A.
Always replace a faulty fuse (fault registered depending on fuse) with a fuse of the same rating.
Correct Incorrect
CHANGING A FUSE The fuse boxes are located under the instrument panel and in theengine compartment.
Pliers A
Page 112 of 131
30-06-2003
PRACTICAL INFORMATION
108
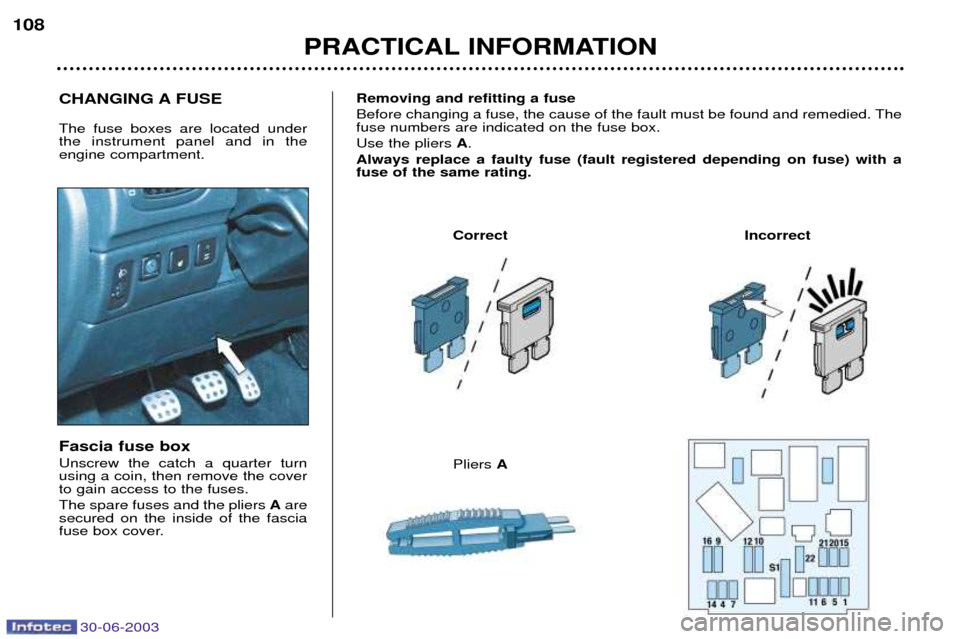
Fascia fuse box Unscrew the catch a quarter turn using a coin, then remove the coverto gain access to the fuses. The spare fuses and the pliers
Aare
secured on the inside of the fascia
fuse box cover. Removing and refitting a fuse
Before changing a fuse, the cause of the fault must be found and remedied. The fuse numbers are indicated on the fuse box. Use the pliers
A.
Always replace a faulty fuse (fault registered depending on fuse) with a fuse of the same rating.
Correct Incorrect
CHANGING A FUSE The fuse boxes are located under the instrument panel and in theengine compartment.
Pliers A
Page 113 of 131
30-06-2003
PRACTICAL INFORMATION109
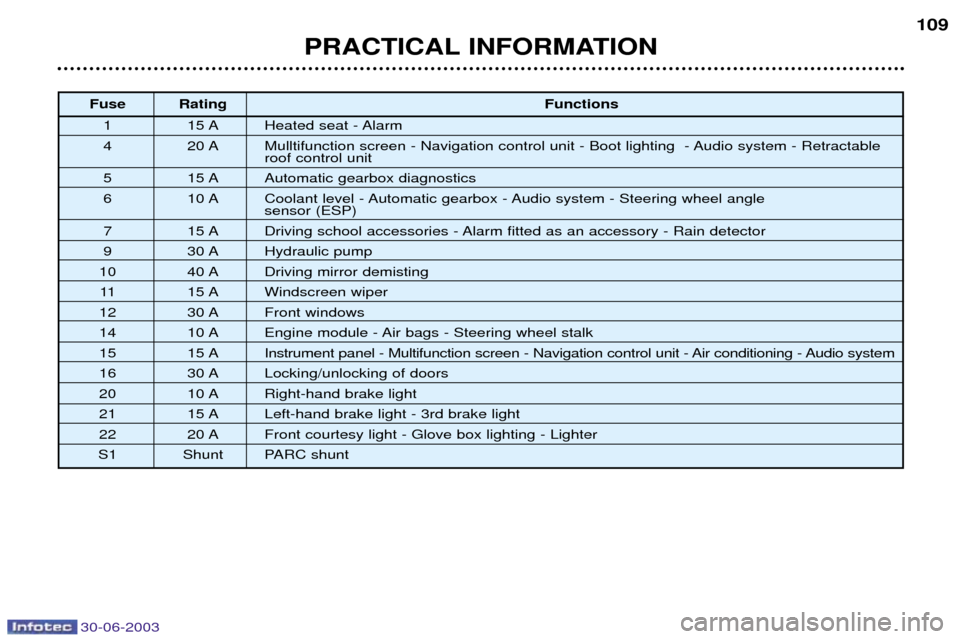
Fuse Rating
Functions
1 15 A Heated seat - Alarm
4 20 A Mulltifunction screen - Navigation control unit - Boot lighting - Audio system - Retractable roof control unit
5 15 A Automatic gearbox diagnostics
6 10 A Coolant level - Automatic gearbox - Audio system - Steering wheel angle sensor (ESP)
7 15 A Driving school accessories - Alarm fitted as an accessory - Rain detector
9 30 A Hydraulic pump
10 40 A Driving mirror demisting 11 15 A Windscreen wiper
12 30 A Front windows
14 10 A Engine module - Air bags - Steering wheel stalk
15 15 A Instrument panel - Multifunction screen - Navigation control unit - Air conditioning - Audio system
16 30 A Locking/unlocking of doors
20 10 A Right-hand brake light
21 15 A Left-hand brake light - 3rd brake light
22 20 A Front courtesy light - Glove box lighting - Lighter
S1 Shunt PARC shunt
Page 114 of 131
30-06-2003
PRACTICAL INFORMATION
110
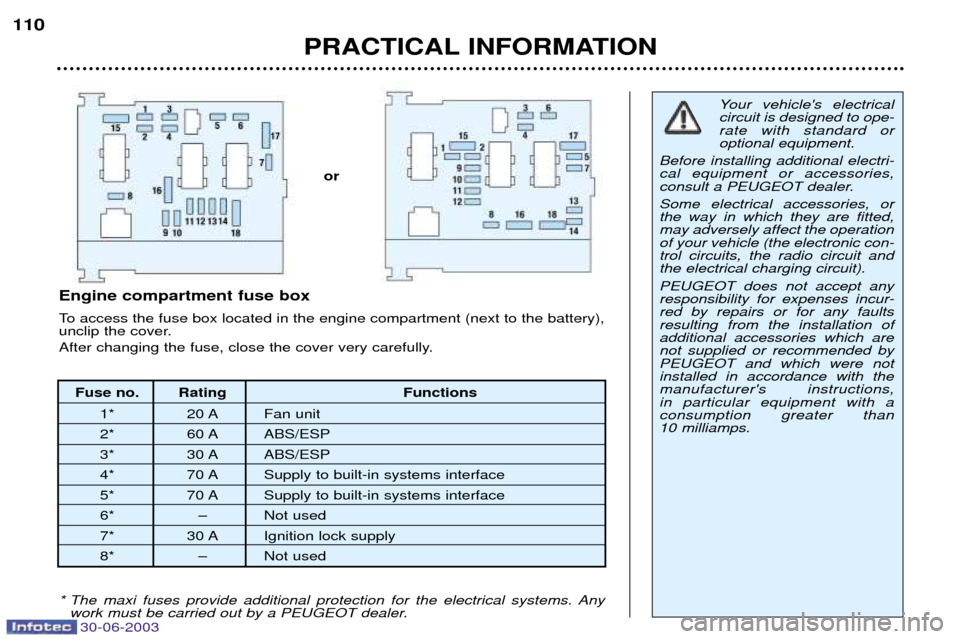
Fuse no. Rating Functions
1* 20 A Fan unit
2* 60 A ABS/ESP
3* 30 A ABS/ESP
4* 70 A Supply to built-in systems interface
5* 70 A Supply to built-in systems interface
6* Ð Not used
7* 30 A Ignition lock supply
8* Ð Not used
Engine compartment fuse box
To access the fuse box located in the engine compartment (next to the battery),
unclip the cover.
After changing the fuse, close the cover very carefully.
Your vehicle's electrical circuit is designed to ope-rate with standard oroptional equipment.
Before installing additional electri-cal equipment or accessories,
consult a PEUGEOT dealer. Some electrical accessories, or the way in which they are fitted,may adversely affect the operationof your vehicle (the electronic con-trol circuits, the radio circuit andthe electrical charging circuit). PEUGEOT does not accept any responsibility for expenses incur-red by repairs or for any faultsresulting from the installation ofadditional accessories which arenot supplied or recommended byPEUGEOT and which were notinstalled in accordance with themanufacturer's instructions, in particular equipment with aconsumption greater than 10 milliamps.
* The maxi fuses provide additional protection for the electrical systems. Any work must be carried out by a PEUGEOT dealer.
or
Page 115 of 131
30-06-2003
PRACTICAL INFORMATION111
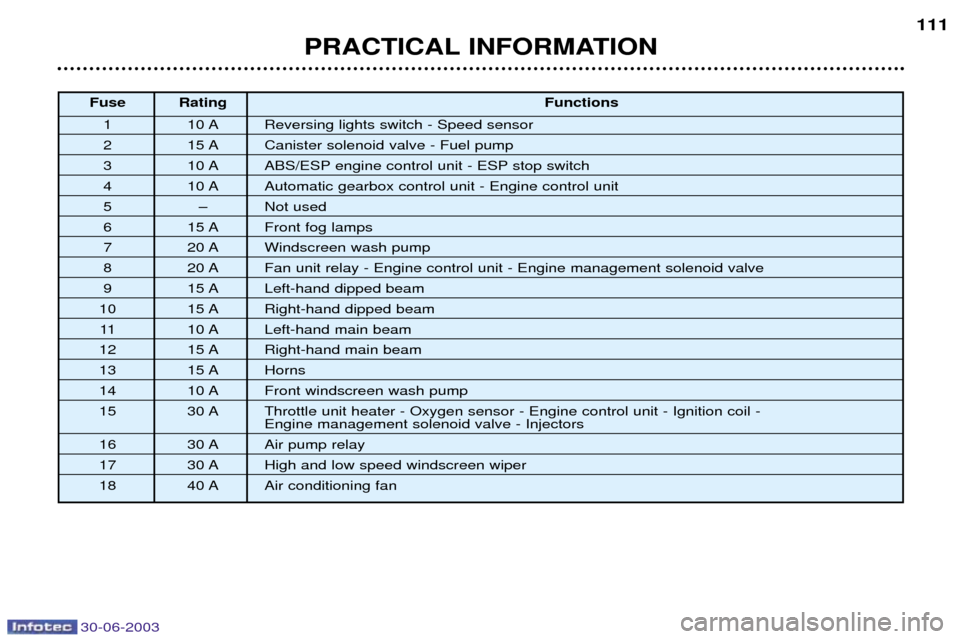
Fuse Rating
Functions
1 10 A Reversing lights switch - Speed sensor
2 15 A Canister solenoid valve - Fuel pump
3 10 A ABS/ESP engine control unit - ESP stop switch
4 10 A Automatic gearbox control unit - Engine control unit
5 Ð Not used
6 15 A Front fog lamps
7 20 A Windscreen wash pump
8 20 A Fan unit relay - Engine control unit - Engine management solenoid valve
9 15 A Left-hand dipped beam
10 15 A Right-hand dipped beam
11 10 A Left-hand main beam
12 15 A Right-hand main beam
13 15 A Horns
14 10 A Front windscreen wash pump
15 30 A Throttle unit heater - Oxygen sensor - Engine control unit - Ignition coil -
Engine management solenoid valve - Injectors
16 30 A Air pump relay
17 30 A High and low speed windscreen wiper
18 40 A Air conditioning fan
Page 116 of 131
30-06-2003
PRACTICAL INFORMATION
112
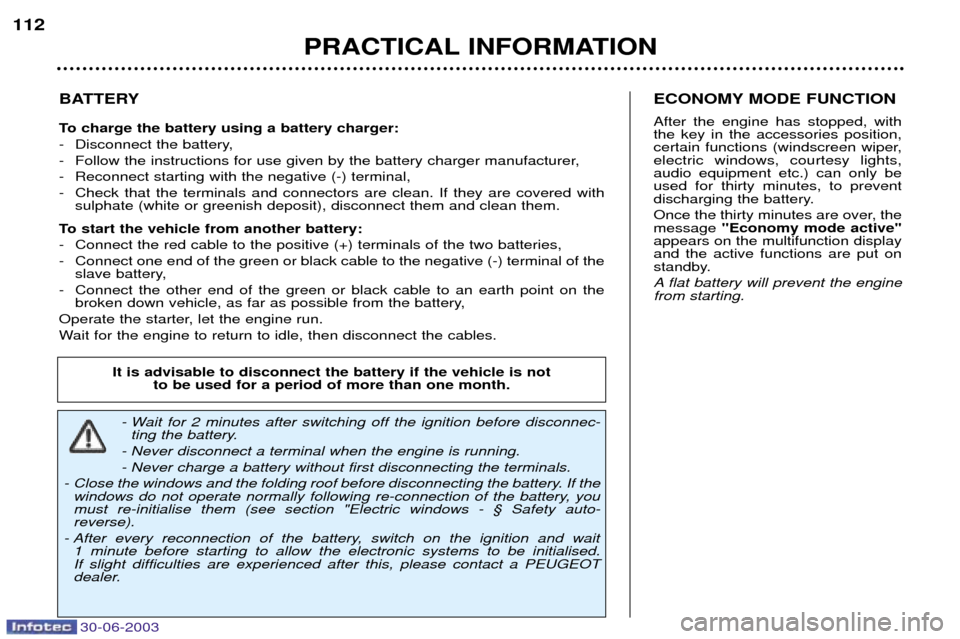
BATTERY
To charge the battery using a battery charger:
- Disconnect the battery,
- Follow the instructions for use given by the battery charger manufacturer,
- Reconnect starting with the negative (-) terminal,
- Check that the terminals and connectors are clean. If they are covered with
sulphate (white or greenish deposit), disconnect them and clean them.
To start the vehicle from another battery:
- Connect the red cable to the positive (+) terminals of the two batteries,
- Connect one end of the green or black cable to the negative (-) terminal of the slave battery,
- Connect the other end of the green or black cable to an earth point on the broken down vehicle, as far as possible from the battery,
Operate the starter, let the engine run.
Wait for the engine to return to idle, then disconnect the cables. ECONOMY MODE FUNCTION After the engine has stopped, with the key in the accessories position,
certain functions (windscreen wiper,electric windows, courtesy lights,audio equipment etc.) can only beused for thirty minutes, to prevent
discharging the battery.
Once the thirty minutes are over, the message
"Economy mode active"
appears on the multifunction displayand the active functions are put on
standby.
A flat battery will prevent the engine from starting.
- Wait for 2 minutes after switching off the ignition before disconnec- ting the battery.
- Never disconnect a terminal when the engine is running.
- Never charge a battery without first disconnecting the terminals.
- Close the windows and the folding roof before disconnecting the battery. If the windows do not operate normally following re-connection of the battery, you must re-initialise them (see section "Electric windows - ¤ Safety auto-reverse).
- After every reconnection of the battery, switch on the ignition and wait 1 minute before starting to allow the electronic systems to be initialised. If slight difficulties are experienced after this, please contact a PEUGEOT
dealer. It is advisable to disconnect the battery if the vehicle is not
to be used for a period of more than one month.
Page 117 of 131
30-06-2003
PRACTICAL INFORMATION113
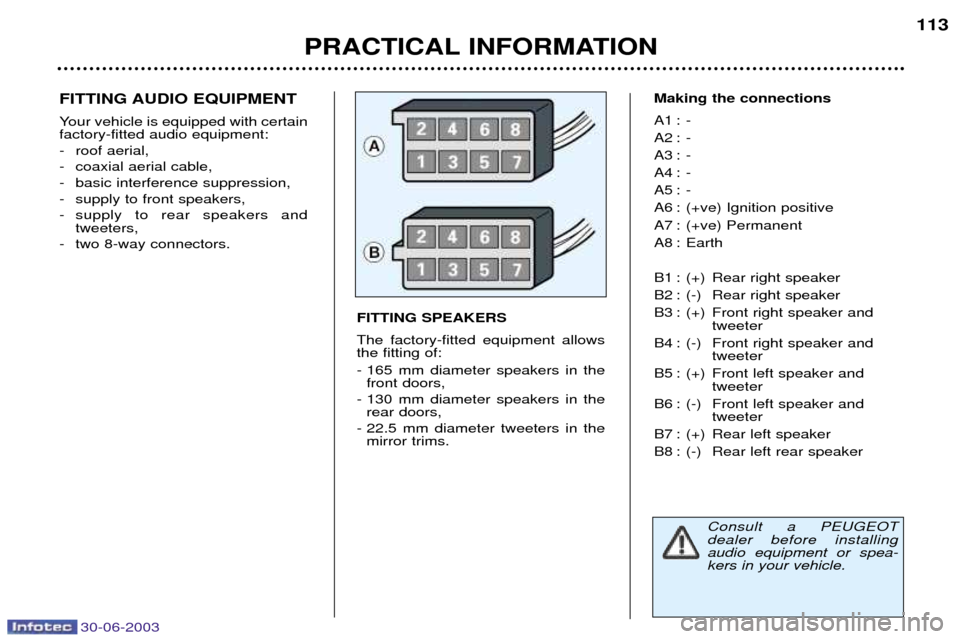
FITTING AUDIO EQUIPMENT
Your vehicle is equipped with certain factory-fitted audio equipment:
- roof aerial,
- coaxial aerial cable,
- basic interference suppression,
- supply to front speakers,
- supply to rear speakers and
tweeters,
- two 8-way connectors. Making the connections
A1 : -
A2 : -
A3 : -
A4 : -
A5 : -
A6 : (+ve) Ignition positive
A7 : (+ve) Permanent
A8 : Earth
B1 : (+) Rear right speaker
B2 : (-) Rear right speaker
B3 : (+) Front right speaker and
tweeter
B4 : (-) Front right speaker and tweeter
B5 : (+) Front left speaker and tweeter
B6 : (-) Front left speaker and tweeter
B7 : (+) Rear left speaker
B8 : (-) Rear left rear speaker
FITTING SPEAKERS The factory-fitted equipment allows the fitting of:
- 165 mm diameter speakers in the
front doors,
- 130 mm diameter speakers in the rear doors,
- 22.5 mm diameter tweeters in the mirror trims.
Consult a PEUGEOT dealer before installingaudio equipment or spea-kers in your vehicle.
Page 118 of 131
30-06-2003
PRACTICAL INFORMATION
114
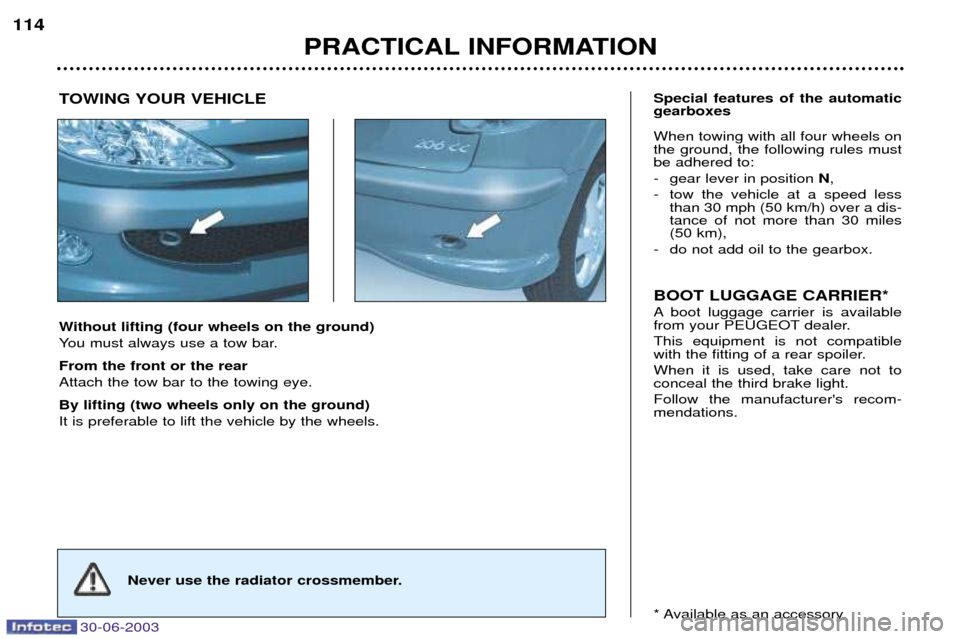
Without lifting (four wheels on the ground)
You must always use a tow bar. From the front or the rear Attach the tow bar to the towing eye. By lifting (two wheels only on the ground) It is preferable to lift the vehicle by the wheels. Special features of the automatic gearboxes When towing with all four wheels on the ground, the following rules mustbe adhered to:
- gear lever in position
N,
- tow the vehicle at a speed less than 30 mph (50 km/h) over a dis- tance of not more than 30 miles(50 km),
- do not add oil to the gearbox. BOOT LUGGAGE CARRIER*
A boot luggage carrier is available
from your PEUGEOT dealer. This equipment is not compatible
with the fitting of a rear spoiler. When it is used, take care not to conceal the third brake light. Follow the manufacturer's recom- mendations.
* Available as an accessory.
TOWING YOUR VEHICLE
Never use the radiator crossmember.
Page 119 of 131

30-06-2003
PRACTICAL INFORMATION115
TOWING A TRAILER,
CARAVAN, BOAT etc.
Only use original PEUGEOT tow bars that have been tested andapproved from the design stage of
your vehicle. The tow bar must be
fitted by a PEUGEOT dealer.
Your vehicle is primarily designed for transporting people and luggagebut it may also be used for towing a
trailer. Driving with a trailer subjects the towing vehicle to more significantstress and its driver must beparticularly careful. Air density decreases with altitude, thus reducing engine performance.Above 1000 metres, the maximumtowing load must be reduced by 10% and so on for every 1000 metres of altitude.Driving advice Distribution of loads :
Distribute
the load in the trailer so that the heaviest items are as close as pos-sible to the axle and the nose weightapproaches the maximum permittedwithout exceeding it. Cooling :
Towing a trailer on a slope increases the temperature of the coolant. As the fan is electrically controlled, its cooling capacity is not dependenton the engine speed.
On the contrary, use a high gear to lower the engine speed and reduceyour speed. The maximum towing load on a long slope depends on the gradient andthe outside temperature. In all cases, pay attention to the coolant temperature. If the warning light comes on, stop
the vehicle and switch off the engineas soon as possible. Tyres : Check the tyre pressures of the tow-
ing vehicle and of the trailer, observ-ing the recommended pressures. Braking :
Towing increases the braking distance. Lights : Check the electrical signalling on the
trailer. Side wind :
Take into acount the increased sensitivity to side wind.
Page 120 of 131
30-06-2003
PRACTICAL INFORMATION
116
BODYWORK MAINTENANCE
To preserve the paintwork and the plastic trim on your vehicle, we rec-ommend that you wash them regu-
larly.
- by hand: there are no specific pre-
cautions to take;
- using an automatic car wash: repeated use of poorly maintained automatic car washes can lead tothe appearance of microscopicscratches which give the paint-work a matt appearance (espe-cially visible on dark colours);
- using a high pressure washer: always follow the recommenda-tions on the equipment (pressureand spraying distance). If there are damaged areas on the vehicle (painted bumpers orheadlamps), it is not recommend-ed to direct the high pressure jet
onto them. Wash these areas byhand. Also avoid the entry of water into the locks.
For all questions relating to themaintenance of your vehicle, con-tact an approved dealer who canadvise you on quality productsselected by our departments. Clean off bird droppings,resinous deposits, tarstains and grease marks assoon as possible; (these all
contain substances which cancause serious damage to thepaintwork).
- Do not use a dry or abrasive cloth, or detergent or solventproducts to clean the doublelens, complex surface head-lamps as they are fitted withpolycarbonate glass covered in aprotective finish.
- Do not use petrol, oil or cloth stain removers to clean thebodywork and plastic parts ofyour vehicle.
- To prevent the development of bodywork corrosion as a result ofaccidental damage (stone chips,scratches etc.), have them
repaired swiftly.