seats Peugeot 206 Dag 2002.5 Owner's Manual
[x] Cancel search | Manufacturer: PEUGEOT, Model Year: 2002.5, Model line: 206 Dag, Model: Peugeot 206 Dag 2002.5Pages: 156, PDF Size: 2.01 MB
Page 1 of 156
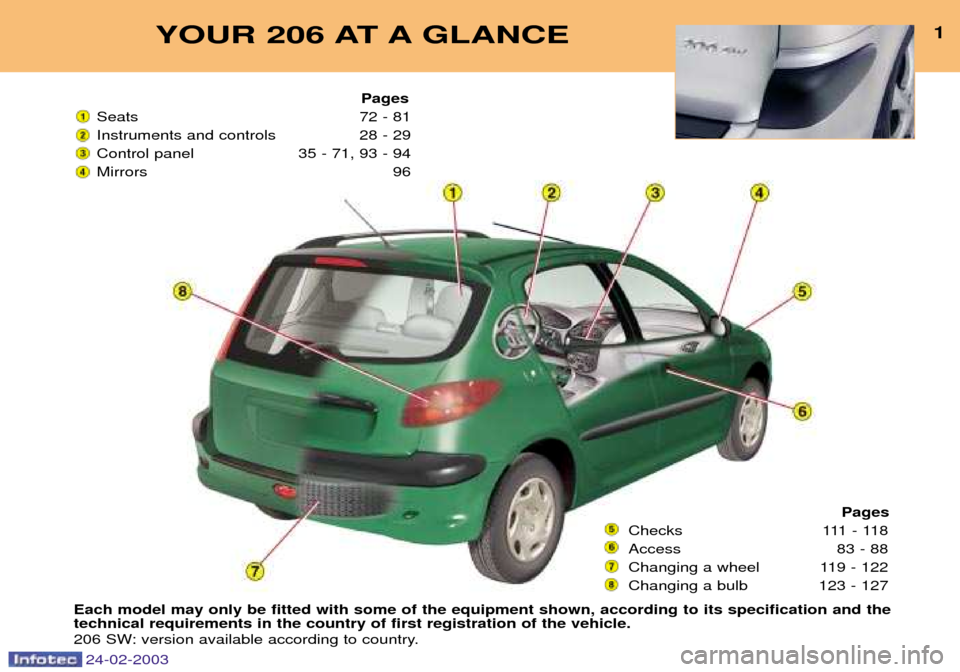
YOUR 206 AT A GLANCE1
Each model may only be fitted with some of the equipment shown, according to its specification and the technical requirements in the country of first registration of the vehicle.
206 SW: version available according to country. Pages
Seats 72 - 81
Instruments and controls 28 - 29
Control panel 35 - 71, 93 - 94
Mirrors 96
Pages
Checks 111 - 118
Access 83 - 88
Changing a wheel 119 - 122
Changing a bulb 123 - 127
24-02-2003
Page 3 of 156
24-02-2003
3YOUR 206 AT A GLANCE
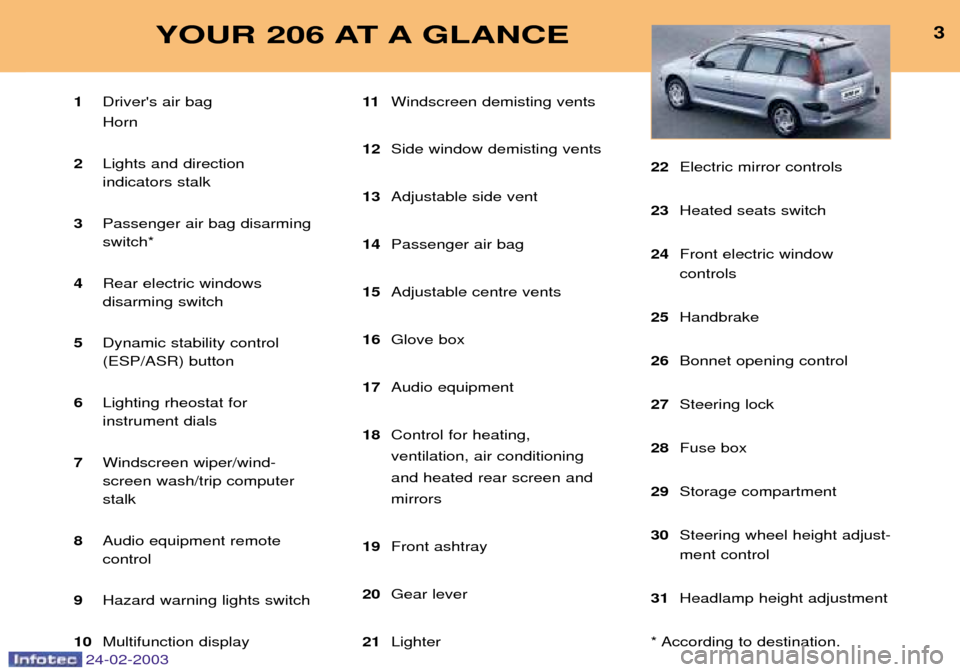
1Driver's air bag Horn
2 Lights and direction indicators stalk
3 Passenger air bag disarmingswitch*
4 Rear electric windows disarming switch
5 Dynamic stability control(ESP/ASR) button
6 Lighting rheostat for instrument dials
7 Windscreen wiper/wind-screen wash/trip computerstalk
8 Audio equipment remotecontrol
9 Hazard warning lights switch
10 Multifunction display 11
Windscreen demisting vents
12 Side window demisting vents
13 Adjustable side vent
14 Passenger air bag
15 Adjustable centre vents
16 Glove box
17 Audio equipment
18 Control for heating, ventilation, air conditioningand heated rear screen andmirrors
19 Front ashtray
20 Gear lever
21 Lighter 22
Electric mirror controls
23 Heated seats switch
24 Front electric window controls
25 Handbrake
26 Bonnet opening control
27 Steering lock
28 Fuse box
29 Storage compartment
30 Steering wheel height adjust-ment control
31 Headlamp height adjustment
* According to destination.
Page 8 of 156
72
9YOUR 206 AT A GLANCE
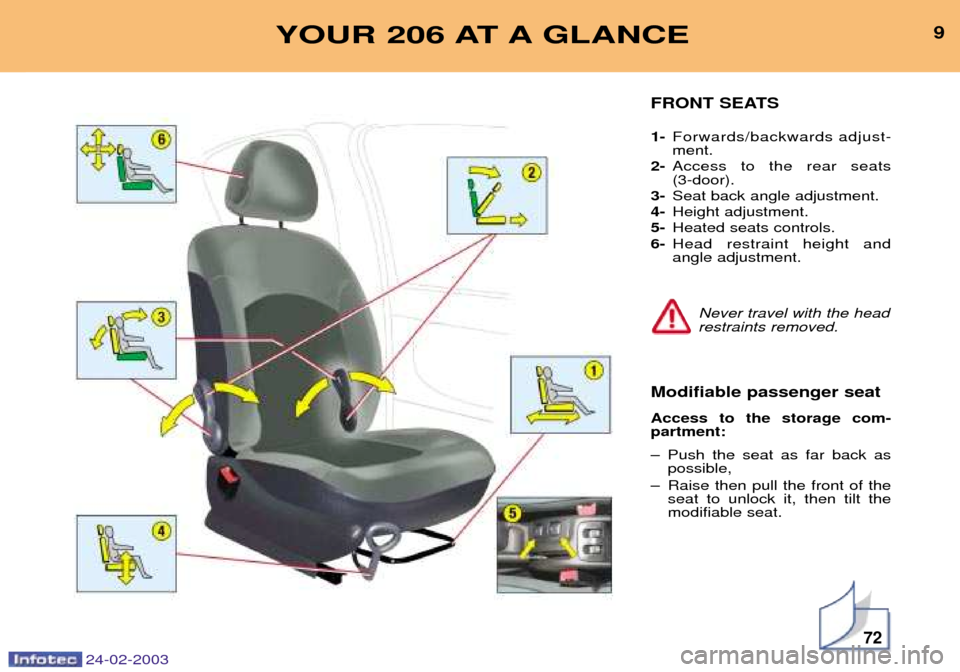
FRONT SEATS 1-Forwards/backwards adjust- ment.
2- Access to the rear seats (3-door).
3- Seat back angle adjustment.
4- Height adjustment.
5- Heated seats controls.
6- Head restraint height andangle adjustment.
Never travel with the head
restraints removed.
Modifiable passenger seat Access to the storage com- partment:
Ð Push the seat as far back as possible,
Ð Raise then pull the front of the seat to unlock it, then tilt the modifiable seat.
24-02-2003
Page 9 of 156
Tonneau
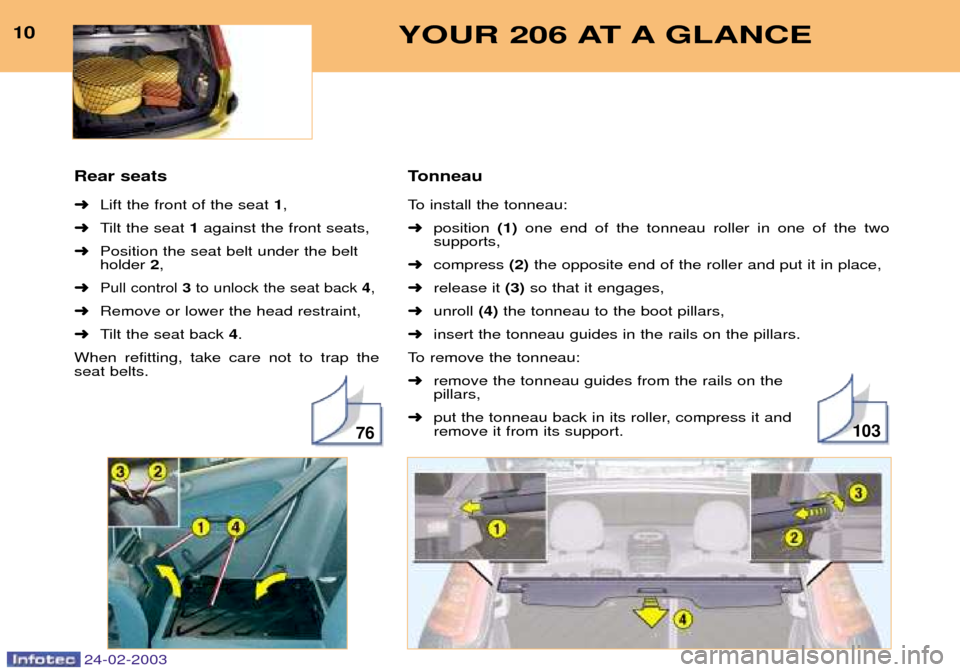
To install the tonneau: ➜position (1)one end of the tonneau roller in one of the two
supports,
➜ compress (2)the opposite end of the roller and put it in place,
➜ release it (3)so that it engages,
➜ unroll (4)the tonneau to the boot pillars,
➜ insert the tonneau guides in the rails on the pillars.
To remove the tonneau:➜ remove the tonneau guides from the rails on the pillars,
➜ put the tonneau back in its roller, compress it andremove it from its support.
Rear seats ➜
Lift the front of the seat 1,
➜ Tilt the seat 1against the front seats,
➜ Position the seat belt under the belt holder 2,
➜
Pull control 3to unlock the seat back 4,
➜ Remove or lower the head restraint,
➜ Tilt the seat back 4.
When refitting, take care not to trap theseat belts.
10376
10YOUR 206 AT A GLANCE
24-02-2003
Page 65 of 156

24-02-2003
VENTILATION 1. Windscreen de-icing or demisting vents.
2 . Front window de-icing or demisting vents.
3 . Side vents.
4 . Centre vents.
5 . Air outlet to front footwells.
6 . Air outlet to rear footwells.
Advice on operation
Ð Place the air flow control at a level sufficient to ensure correct renewal of air in the passenger compartment. The ''OFF''
position cuts off all the air circulation in the passenger compartment. Note: only use the ''OFF''position occasionally (risk of condensation).
Ð Select the air distribution most suited to your requirements and the climatic conditions.
Ð Gradually adjust the temperature setting for your comfort.
Ð Position the outside air control to the left; the "Outside Air" position.
Ð For perfectly even air distribution, take care not to obstruct the exterior air intake grille on the bonnet, the vents and the air ducts under the front seats. Check that the pollen filter is in good condition.
YOUR 206 IN DETAIL 65
Page 73 of 156
24-02-2003
YOUR 206 IN DETAIL73
6. Head restraint height
adjustment
To raise the restraint, pull it upwards.
The adjustment is correctwhen the upper edge of thehead restraint is level withthe top of the head.
The head restraint has a framewith notches, which prevent thehead restraint dropping down(this is a safety device in theevent of an impact).
To lower the head restraint, it is necessary to push simultaneously:
Ð the button located on the left guide at the base of the head restraint,
Ð the head restraint downwards.
To remove the head restraint, press the lug.
Never drive with thehead restraints removed;they must be in placeand correctly adjusted. Rear head restraints These have a high position for when they are in use and a lowposition for when they are stored.They are removable.
To lower the head restraints, press the lug.
To remove them, pull upwards as far as the stop then press therelease control.FRONT SEATS
1. Forwards-backwards
adjustment Lift the control and slide the seat forwards or backwards.
2. Access to rear seats (3 door) Pull one of the two handles to fold the seat back and move the seatforwards. On repositioning, theseat returns to its initial position It is impossible to access the rear seats if the front seat is in thereclining position.
3. Seat back angle adjustment Push one of the two handles
towards the rear.
4. Seat height adjustment Pull the handle upwards. Remove your weight from the seat to raise, or press on the seat
to lower.
5. Heated seats switch Press the switch. The tempera-
ture is controlled automatically. Press the switch again to stop operation.
Page 76 of 156
24-02-2003
YOUR 206 IN DETAIL73
6. Head restraint height
adjustment
To raise the restraint, pull it upwards.
The adjustment is correctwhen the upper edge of thehead restraint is level withthe top of the head.
The head restraint has a framewith notches, which prevent thehead restraint dropping down(this is a safety device in theevent of an impact).
To lower the head restraint, it is necessary to push simultaneously:
Ð the button located on the left guide at the base of the head restraint,
Ð the head restraint downwards.
To remove the head restraint, press the lug.
Never drive with thehead restraints removed;they must be in placeand correctly adjusted. Rear head restraints These have a high position for when they are in use and a lowposition for when they are stored.They are removable.
To lower the head restraints, press the lug.
To remove them, pull upwards as far as the stop then press therelease control.FRONT SEATS
1. Forwards-backwards
adjustment Lift the control and slide the seat forwards or backwards.
2. Access to rear seats (3 door) Pull one of the two handles to fold the seat back and move the seatforwards. On repositioning, theseat returns to its initial position It is impossible to access the rear seats if the front seat is in thereclining position.
3. Seat back angle adjustment Push one of the two handles
towards the rear.
4. Seat height adjustment Pull the handle upwards. Remove your weight from the seat to raise, or press on the seat
to lower.
5. Heated seats switch Press the switch. The tempera-
ture is controlled automatically. Press the switch again to stop operation.
Page 77 of 156
24-02-2003
YOUR 206 IN DETAIL
76
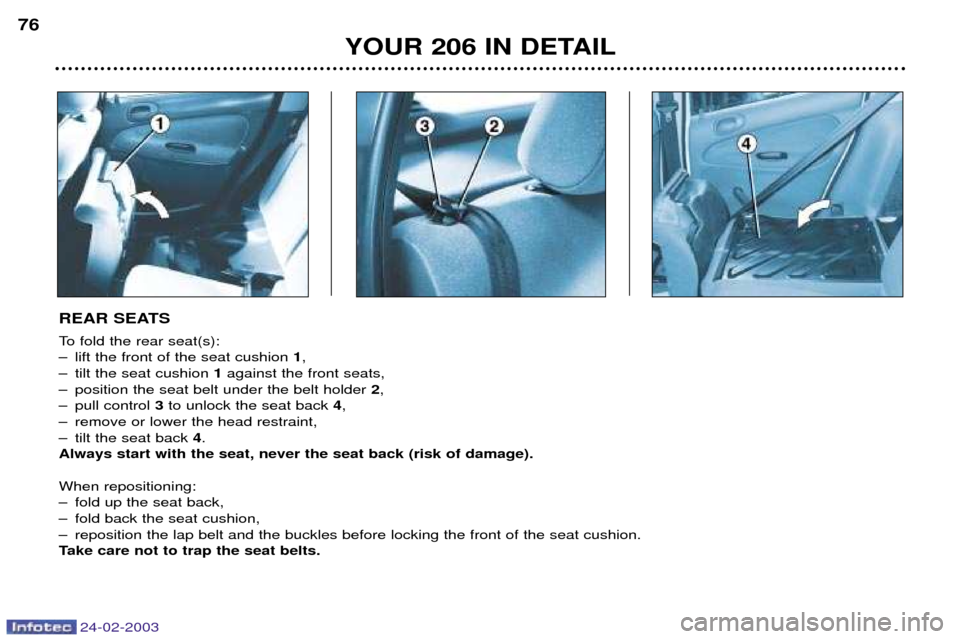
REAR SEATS
To fold the rear seat(s):
Ð lift the front of the seat cushion
1,
Ð tilt the seat cushion 1against the front seats,
Ð position the seat belt under the belt holder 2,
Ð pull control 3to unlock the seat back 4,
Ð remove or lower the head restraint,
Ð tilt the seat back 4.
Always start with the seat, never the seat back (risk of damage). When repositioning:
Ð fold up the seat back,
Ð fold back the seat cushion,
Ð reposition the lap belt and the buckles before locking the front of the seat cushion.
Take care not to trap the seat belts.
Page 78 of 156
24-02-2003
YOUR 206 IN DETAIL77
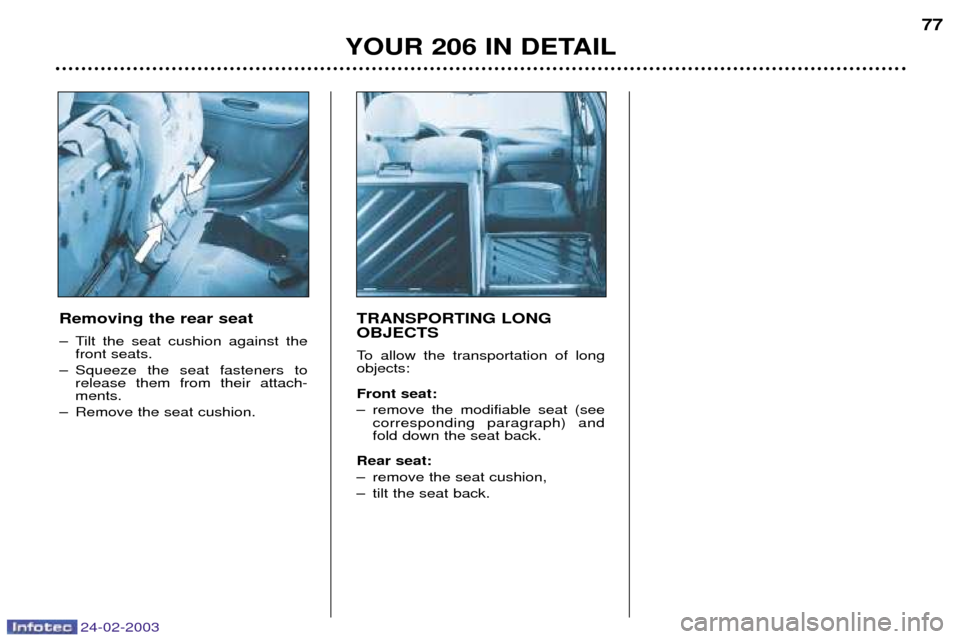
Removing the rear seat
Ð Tilt the seat cushion against the front seats.
Ð Squeeze the seat fasteners to release them from their attach- ments.
Ð Remove the seat cushion. TRANSPORTING LONG OBJECTS
To allow the transportation of long objects: Front seat:
Ð remove the modifiable seat (see
corresponding paragraph) and fold down the seat back.
Rear seat:
Ð remove the seat cushion,
Ð tilt the seat back.
Page 79 of 156
24-02-2003
YOUR 206 IN DETAIL
78
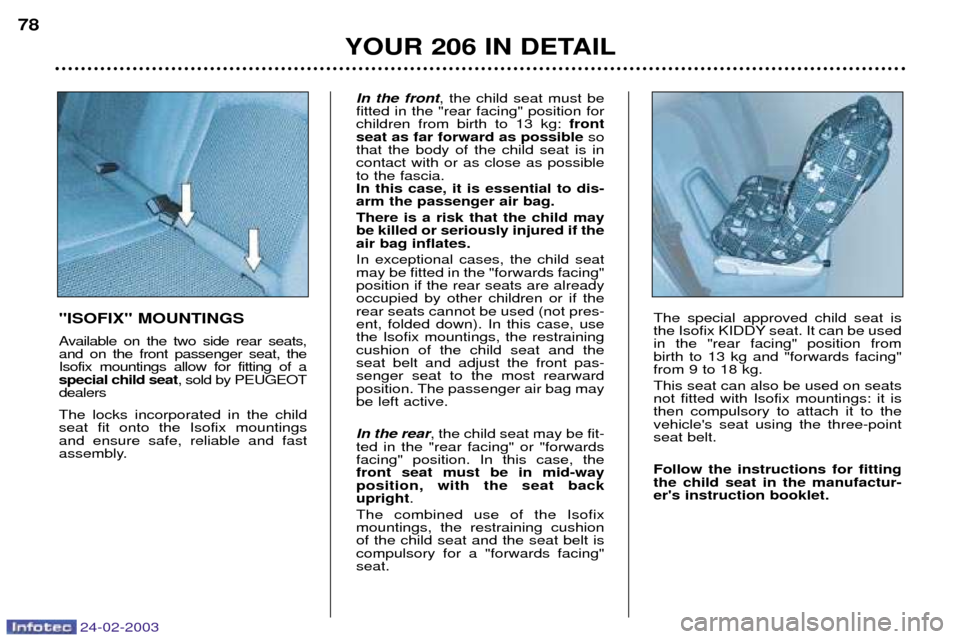
"ISOFIX" MOUNTINGS
Available on the two side rear seats, and on the front passenger seat, theIsofix mountings allow for fitting of aspecial child seat , sold by PEUGEOT
dealers The locks incorporated in the child seat fit onto the Isofix mountingsand ensure safe, reliable and fast
assembly. In the front
, the child seat must be
fitted in the "rear facing" position forchildren from birth to 13 kg: front
seat as far forward as possible so
that the body of the child seat is incontact with or as close as possibleto the fascia.In this case, it is essential to dis-arm the passenger air bag. There is a risk that the child may be killed or seriously injured if theair bag inflates. In exceptional cases, the child seat may be fitted in the "forwards facing"position if the rear seats are alreadyoccupied by other children or if therear seats cannot be used (not pres-ent, folded down). In this case, usethe Isofix mountings, the restrainingcushion of the child seat and theseat belt and adjust the front pas-senger seat to the most rearward
position. The passenger air bag maybe left active. In the rear , the child seat may be fit-
ted in the "rear facing" or "forwards facing" position. In this case, thefront seat must be in mid-wayposition, with the seat backupright .
The combined use of the Isofixmountings, the restraining cushionof the child seat and the seat belt iscompulsory for a "forwards facing"seat. The special approved child seat is
the Isofix KIDDY seat. It can be usedin the "rear facing" position frombirth to 13 kg and "forwards facing"from 9 to 18 kg. This seat can also be used on seats not fitted with Isofix mountings: it isthen compulsory to attach it to thevehicle's seat using the three-pointseat belt. Follow the instructions for fitting the child seat in the manufactur-er's instruction booklet.