tailgate PEUGEOT 3008 2020 User Guide
[x] Cancel search | Manufacturer: PEUGEOT, Model Year: 2020, Model line: 3008, Model: PEUGEOT 3008 2020Pages: 308, PDF Size: 10.1 MB
Page 41 of 308
39
Access
2It is possible to interrupt the operation of
the tailgate at any point.
Pressing one of these controls again
interrupts the movement that is underway.
Following the interruption of a movement,
pressing one of these controls again reverses
the movement.
Hands-free function (“Hands-Free
Tailgate Access”)
With the electronic key on your person , this
function opens, closes or stops the movement of
the tailgate with a “kicking” movement below the
rear bumper.
The "Hands-Free Tailgate/Access" function is set via the Driving / Vehicle
touch screen menu.
Ensure that you are steady on your feet
before performing the “kicking”
movement.
Take care not to touch the exhaust system
which may be hot - risk of burns!
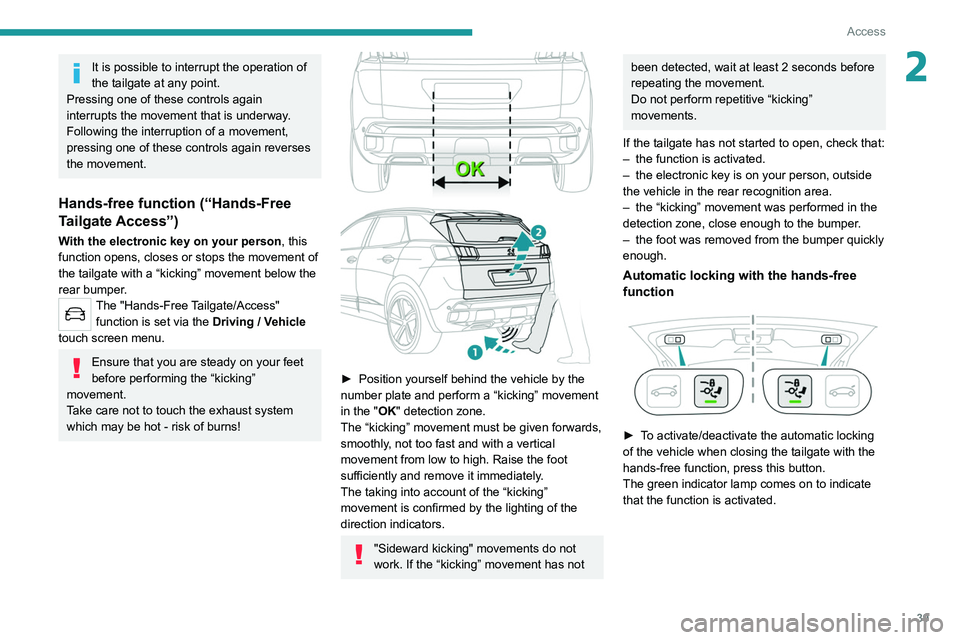
► Position yourself behind the vehicle by the
number plate and perform a “kicking” movement
in the
"OK" detection zone.
The “kicking” movement must be given forwards,
smoothly, not too fast and with a vertical
movement from low to high. Raise the foot
sufficiently and remove it immediately.
The taking into account of the “kicking”
movement is confirmed by the lighting of the
direction indicators.
"Sideward kicking" movements do not
work. If the “kicking” movement has not
been detected, wait at least 2 seconds before
repeating the movement.
Do not perform repetitive “kicking”
movements.
If the tailgate has not started to open, check that:
–
the function is activated.
–
the electronic key is on your person, outside
the vehicle in the rear recognition area.
–
the “kicking” movement was performed in the
detection zone, close enough to the bumper
.
–
the foot was removed from the bumper quickly
enough.
Automatic locking with the hands-free
function
► To activate/deactivate the automatic locking
of the vehicle when closing the tailgate with the
hands-free function, press this button.
The green indicator lamp comes on to indicate
that the function is activated.
Page 42 of 308
40
Access
Recommendations on the hands-free
function ("Hands-Free Tailgate Access")
If it does not work, check that the electronic key
is not exposed to a source of electromagnetic
interference (e.g. smartphone).
The function may be deactivated or affected if
there is rain or snow.
The function may not work correctly with a
prosthetic leg.
In some circumstances, the tailgate may open or
close by itself, particularly when:
–
hitching up or removing a trailer;
–
fitting or removing a bicycle carrier;
–
loading or unloading bicycles on / from a
bicycle carrier;
–
depositing or lifting something behind the
vehicle;
–
an animal approaches the rear bumper;
–
washing the vehicle;
–
maintenance is performed on the vehicle;
–
accessing the spare wheel.
T
o avoid such operating problems, keep the
electronic key away from the recognition zone or
deactivate the hands-free function.
The installation of a towing device may disturb the detection system.
Memorising an opening
position
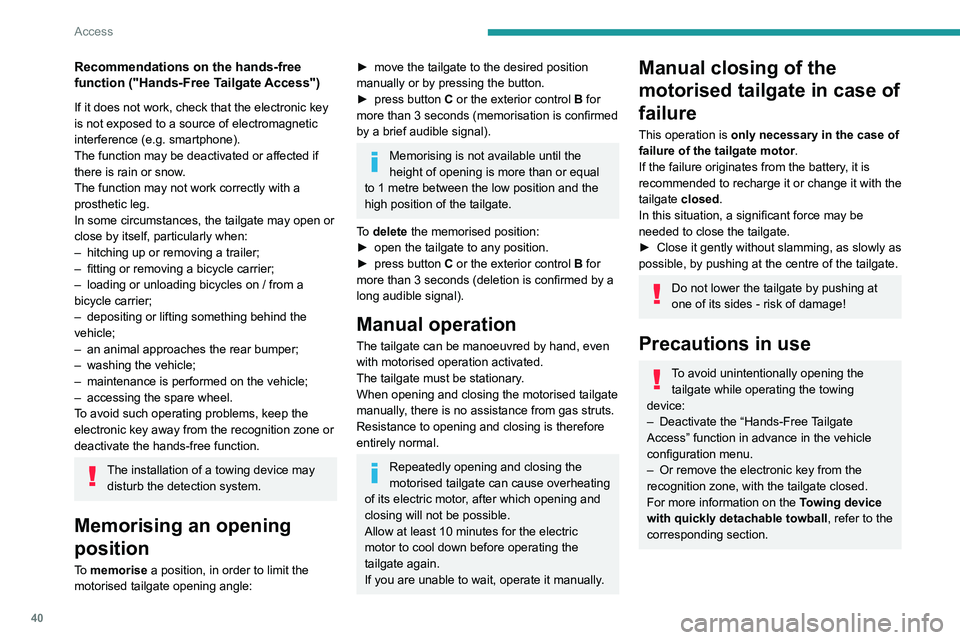
To memorise a position, in order to limit the
motorised tailgate opening angle:
► move the tailgate to the desired position
manually or by pressing the button.
►
press button
C or the exterior control B for
more than 3 seconds (memorisation is confirmed
by a brief audible signal).
Memorising is not available until the
height of opening is more than or equal
to 1 metre between the low position and the
high position of the tailgate.
To delete the memorised position:
►
open the tailgate to any position.
►
press button
C or the exterior control B for
more than 3 seconds (deletion is confirmed by a
long audible signal).
Manual operation
The tailgate can be manoeuvred by hand, even
with motorised operation activated.
The tailgate must be stationary.
When opening and closing the motorised tailgate
manually, there is no assistance from gas struts.
Resistance to opening and closing is therefore
entirely normal.
Repeatedly opening and closing the
motorised tailgate can cause overheating
of its electric motor, after which opening and
closing will not be possible.
Allow at least 10 minutes for the electric
motor to cool down before operating the
tailgate again.
If you are unable to wait, operate it manually.
Manual closing of the
motorised tailgate in case of
failure
This operation is only necessary in the case of
failure of the tailgate motor .
If the failure originates from the battery, it is
recommended to recharge it or change it with the
tailgate closed.
In this situation, a significant force may be
needed to close the tailgate.
►
Close it gently without slamming, as slowly as
possible, by pushing at the centre of the tailgate.
Do not lower the tailgate by pushing at
one of its sides - risk of damage!
Precautions in use
To avoid unintentionally opening the tailgate while operating the towing
device:
–
Deactivate the “Hands-Free
Tailgate
Access” function in advance in the vehicle
configuration menu.
–
Or remove the electronic key from the
recognition zone, with the tailgate closed.
For more information on the T
owing device
with quickly detachable towball , refer to the
corresponding section.
In wintry conditions
To avoid any operating problems, remove
the snow or wait until the ice melts before
requesting motorised opening of the tailgate.
When washing
When washing the vehicle in an
automatic car wash, do not forget to lock
the vehicle to prevent any risk of unwanted
opening.
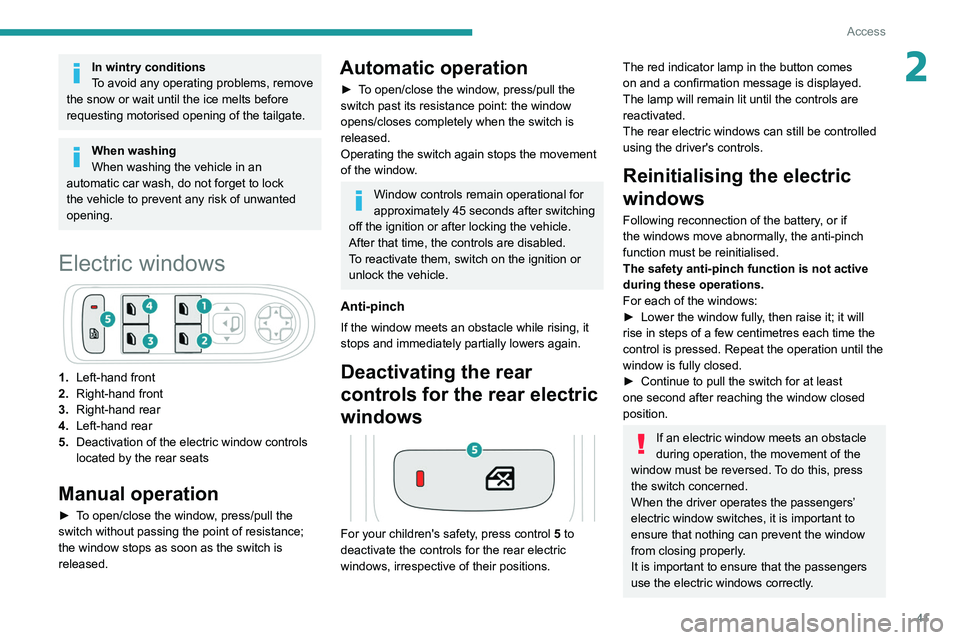
Electric windows
1. Left-hand front
2. Right-hand front
3. Right-hand rear
4. Left-hand rear
5. Deactivation of the electric window controls
located by the rear seats
Manual operation
► To open/close the window, press/pull the
switch without passing the point of resistance;
the window stops as soon as the switch is
released.
Page 43 of 308
41
Access
2In wintry conditions
To avoid any operating problems, remove
the snow or wait until the ice melts before
requesting motorised opening of the tailgate.
When washing
When washing the vehicle in an
automatic car wash, do not forget to lock
the vehicle to prevent any risk of unwanted
opening.
Electric windows
1. Left-hand front
2. Right-hand front
3. Right-hand rear
4. Left-hand rear
5. Deactivation of the electric window controls
located by the rear seats
Manual operation
► To open/close the window, press/pull the
switch without passing the point of resistance;
the window stops as soon as the switch is
released.
Automatic operation
► To open/close the window, press/pull the
switch past its resistance point: the window
opens/closes completely when the switch is
released.
Operating the switch again stops the movement
of the window.
Window controls remain operational for
approximately 45 seconds after switching
off the ignition or after locking the vehicle.
After that time, the controls are disabled.
To reactivate them, switch on the ignition or
unlock the vehicle.
Anti-pinch
If the window meets an obstacle while rising, it
stops and immediately partially lowers again.
Deactivating the rear
controls for the rear electric
windows
For your children's safety, press control 5 to
deactivate the controls for the rear electric
windows, irrespective of their positions.
The red indicator lamp in the button comes
on and a confirmation message is displayed.
The lamp will remain lit until the controls are
reactivated.
The rear electric windows can still be controlled
using the driver's controls.
Reinitialising the electric
windows
Following reconnection of the battery, or if
the windows move abnormally, the anti-pinch
function must be reinitialised.
The safety anti-pinch function is not active
during these operations.
For each of the windows:
►
Lower the window fully
, then raise it; it will
rise in steps of a few centimetres each time the
control is pressed. Repeat the operation until the
window is fully closed.
►
Continue to pull the switch for at least
one second after reaching the window closed
position.
If an electric window meets an obstacle
during operation, the movement of the
window must be reversed. To do this, press
the switch concerned.
When the driver operates the passengers’
electric window switches, it is important to
ensure that nothing can prevent the window
from closing properly.
It is important to ensure that the passengers
use the electric windows correctly.
Page 160 of 308
158
Driving
Obstacles may appear further away than
they actually are.
It is important to monitor the sides of the
vehicle during the manoeuvre, using the
mirrors.
Parking sensors also provide additional
information about the area around the vehicle.
180° view
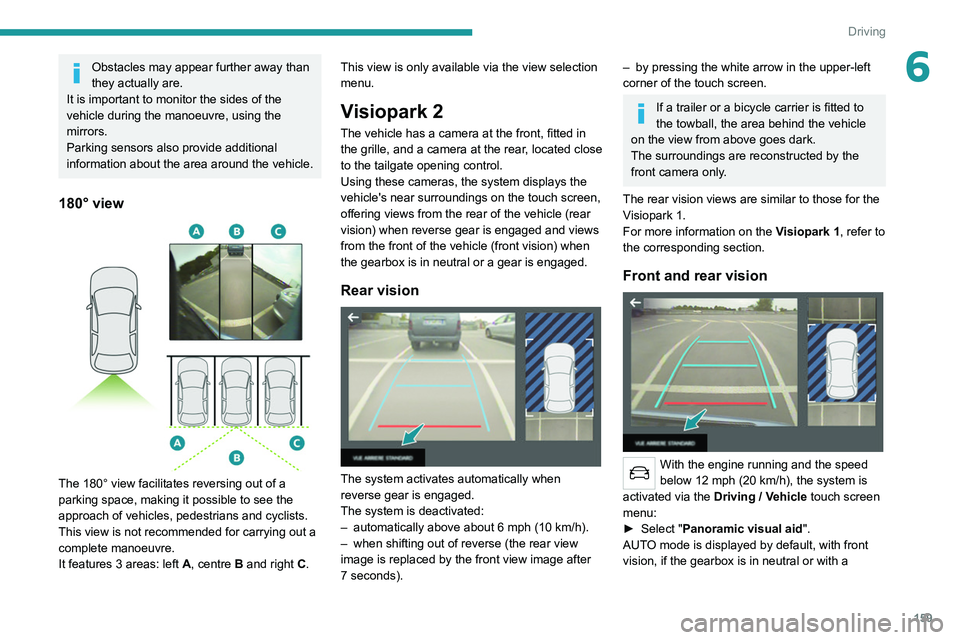
The 180° view facilitates reversing out of a
parking space, making it possible to see the
approach of vehicles, pedestrians and cyclists.
This view is not recommended for carrying out a
complete manoeuvre.
It features 3 areas: left A, centre B and right C.
the system is activated when the vehicle has
already moved, the view from above can be fully
displayed.
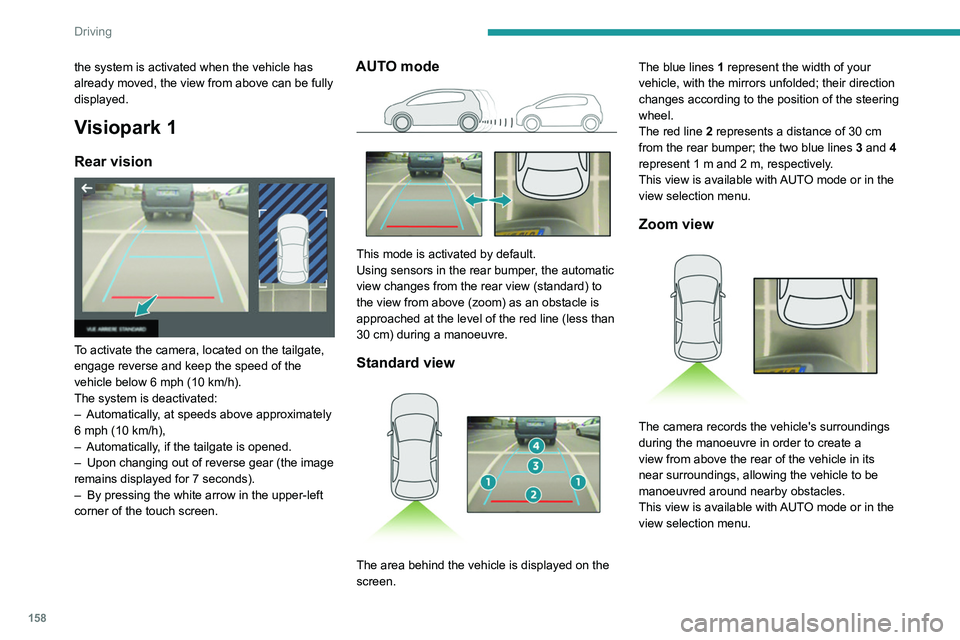
Visiopark 1
Rear vision
To activate the camera, located on the tailgate,
engage reverse and keep the speed of the
vehicle below 6 mph (10
km/h).
The system is deactivated:
–
Automatically
, at speeds above approximately
6 mph (10
km/h),
–
Automatically
, if the tailgate is opened.
–
Upon changing out of reverse gear (the image
remains displayed for 7
seconds).
–
By pressing the white arrow in the upper-left
corner of the touch screen.
AUTO mode
This mode is activated by default.
Using sensors in the rear bumper, the automatic
view changes from the rear view (standard) to
the view from above (zoom) as an obstacle is
approached at the level of the red line (less than
30
cm) during a manoeuvre.
Standard view
The area behind the vehicle is displayed on the
screen. The blue lines
1 represent the width of your
vehicle, with the mirrors unfolded; their direction
changes according to the position of the steering
wheel.
The red line 2 represents a distance of 30 cm
from the rear bumper; the two blue lines 3 and 4
represent 1 m and 2 m, respectively.
This view is available with AUTO mode or in the
view selection menu.
Zoom view
The camera records the vehicle's surroundings
during the manoeuvre in order to create a
view from above the rear of the vehicle in its
near surroundings, allowing the vehicle to be
manoeuvred around nearby obstacles.
This view is available with AUTO mode or in the
view selection menu.
Page 161 of 308
159
Driving
6Obstacles may appear further away than
they actually are.
It is important to monitor the sides of the
vehicle during the manoeuvre, using the
mirrors.
Parking sensors also provide additional
information about the area around the vehicle.
180° view
The 180° view facilitates reversing out of a
parking space, making it possible to see the
approach of vehicles, pedestrians and cyclists.
This view is not recommended for carrying out a
complete manoeuvre.
It features 3 areas: left A, centre B and right C. This view is only available via the view selection
menu.
Visiopark 2
The vehicle has a camera at the front
, fitted in
the grille, and a camera at the rear, located close
to the tailgate opening control.
Using these cameras, the system displays the
vehicle's near surroundings on the touch screen,
offering views from the rear of the vehicle (rear
vision) when reverse gear is engaged and views
from the front of the vehicle (front vision) when
the gearbox is in neutral or a gear is engaged.
Rear vision
The system activates automatically when
reverse gear is engaged.
The system is deactivated:
–
automatically above about 6 mph (10
km/h).
–
when shifting out of reverse (the rear view
image is replaced by the front view image after
7 seconds).
– by pressing the white arrow in the upper-left
corner of the touch screen.
If a trailer or a bicycle carrier is fitted to
the towball, the area behind the vehicle
on the view from above goes dark.
The surroundings are reconstructed by the
front camera only.
The rear vision views are similar to those for the
Visiopark 1.
For more information on the Visiopark 1, refer to
the corresponding section.
Front and rear vision
With the engine running and the speed
below 12 mph (20 km/h), the system is
activated via the Driving
/ Vehicle touch screen
menu:
►
Select "
Panoramic visual aid".
AUTO mode is displayed by default, with front
vision, if the gearbox is in neutral or with a
Page 175 of 308
173
Practical information
7Before disconnecting the nozzle from the
charging connector:
►
If the vehicle is unlocked, lock it and then
unlock it .
►
If the vehicle is locked, unlock it.
The red indicator lamp in the flap goes out to
confirm that the charging nozzle is unlocked.
►
Within
30 seconds, remove the charging
nozzle.
Domestic charging (mode 2)
The end of charging is confirmed by the fixed
lighting of the green CHARGE indicator lamp on
the control unit and by the fixed lighting of the
green light guides in the flap.
►
After disconnection, remove the protective
cover from the nozzle and close the charging
flap.
►
Disconnect the control unit's charging cable
from the domestic socket.
Accelerated charging (mode 3)
The end of charging is confirmed by the
accelerated charging unit (Wallbox) and by the
fixed lighting of the green light guides in the flap.
►
After disconnection, replace the nozzle on the
charging unit and close the charging flap.
Deferred charging
By default, charging begins when the nozzle
is connected. Deferred charging can be
programmed.
Settings
► In the Hybrid touch screen menu,
select the Charge tab.
►
Set the charging start time.
►
Press
OK.
The setting is saved in the system.
You can also programme the deferred charging function using a smartphone, via
the MyPeugeot
application.
For more information on Remotely operable
features , refer to the corresponding section.
Activation
► Connect the vehicle to the desired charging
equipment.
► Press this button in the flap within one
minute to activate the system (confirmed
by the light guides coming on in blue).
Towing device
Distribution of loads
► Distribute the load in the trailer so that the
heaviest items are as close as possible to the
axle, and the nose weight approaches the
maximum permitted without exceeding it.
Air density decreases with altitude, thus reducing
engine performance.
The maximum load which
can be towed must be reduced by 10% per
1,000
metres of altitude.
Use towing devices and their genuine
wiring harnesses approved by
PEUGEOT. It is recommended that the
installation be performed by a PEUGEOT
dealer or a qualified workshop.
If not fitted by a PEUGEOT dealer, it must
still be fitted in accordance with the vehicle
manufacturer's instructions.
Important: with a motorised tailgate and its
"Hands-Free Tailgate Access" function, if a
towing device is fitted outside the PEUGEOT
dealer network, it is essential to visit a
PEUGEOT dealer or a qualified workshop
to recalibrate the detection system - risk of
"Hands-Free Tailgate Access" function failure.
Certain driving or manoeuvring aid functions
are automatically deactivated if an approved
towing system is used.
Observe the maximum authorised
towable weight, indicated on the vehicle's
registration certificate, the manufacturer's
label as well as in the Technical data section
of this guide.
Complying with the maximum authorised
nose weight (towball) also includes the
use of accessories (bicycle carriers, tow
boxes, etc.).
Observe the legislation in force in the
country in which you are driving.
Page 176 of 308
174
Practical information
After use
When travelling without a trailer or
load carrier, remove the towball and fit the
protective plug into the carrier, to provide
clear visibility of the number plate and/or its
lighting.
Fitting the towball
► Below the rear bumper, remove the protective
plug 2 from the carrier 1.
► Insert the end of the towball 5 into the carrier
1 and push it upwards; it will lock into position
automatically.
Vehicle equipped with motorised
tailgate with "Hands-Free Tailgate
Access" function
To avoid unwanted opening of the tailgate
when using the towing device:
–
deactivate this function in advance in your
vehicle's configuration menu,
–
or move the electronic key away from the
recognition zone, with the tailgate closed.
Towing device with quickly detachable towball
Presentation
This genuine towing device can be fitted and
removed with no need for tools.
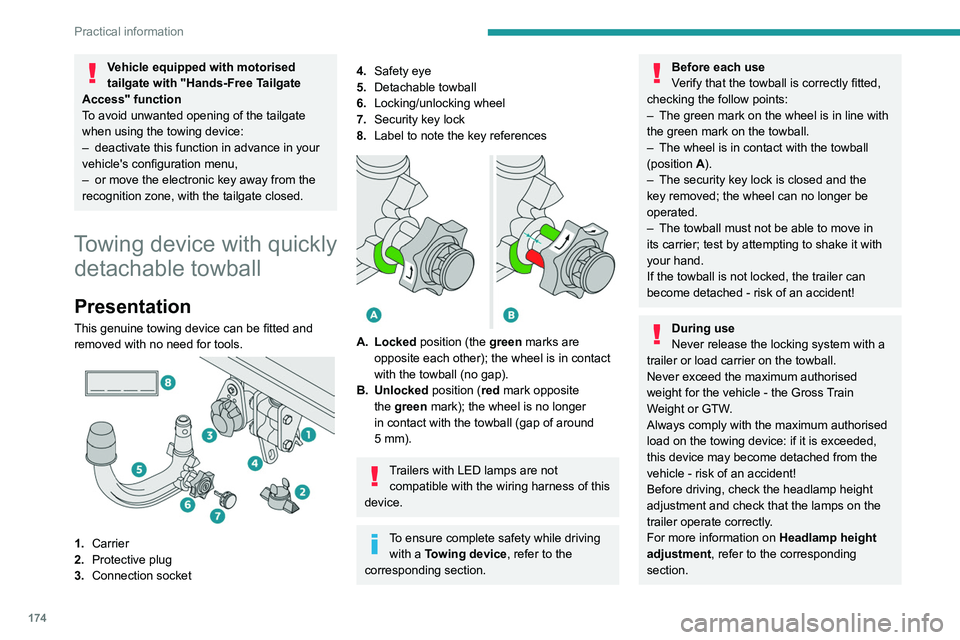
1. Carrier
2. Protective plug
3. Connection socket
4.Safety eye
5. Detachable towball
6. Locking/unlocking wheel
7. Security key lock
8. Label to note the key references
A. Locked position (the green marks are
opposite each other); the wheel is in contact
with the towball (no gap).
B. Unlocked position (red mark opposite the green mark); the wheel is no longer
in contact with the towball (gap of around
5
mm).
Trailers with LED lamps are not compatible with the wiring harness of this
device.
To ensure complete safety while driving with a Towing device , refer to the
corresponding section.
Before each use
Verify that the towball is correctly fitted,
checking the follow points:
–
The green mark on the wheel is in line with
the green mark on the towball.
–
The wheel is in contact with the towball
(position A
).
–
The security key lock is closed and the
key removed; the wheel can no longer be
operated.
–
The towball must not be able to move in
its carrier; test by attempting to shake it with
your hand.
If the towball is not locked, the trailer can
become detached - risk of an accident!
During use
Never release the locking system with a
trailer or load carrier on the towball.
Never exceed the maximum authorised
weight for the vehicle - the Gross Train
Weight or GTW.
Always comply with the maximum authorised
load on the towing device: if it is exceeded,
this device may become detached from the
vehicle - risk of an accident!
Before driving, check the headlamp height
adjustment and check that the lamps on the
trailer operate correctly.
For more information on Headlamp height
adjustment, refer to the corresponding
section.
Page 189 of 308
187
Practical information
7The system only registers AdBlue® top-ups of
5
litres or more.
If the AdBlue® tank is completely empty
– which is confirmed by the message
"Top up
AdBlue: Starting impossible" – it is
essential to add at least 5 litres.
Free-wheeling
In certain situations, you must allow the vehicle
to free-wheel (while being towed, on a rolling
road, in an automatic car wash, or being
transported by rail or sea freight, etc.).
The procedure varies according to the type of
gearbox and parking brake.
With a manual gearbox and
electric parking brake
/
Release procedure
► With the engine running and while depressing
the brake pedal, move the gear selector to the
neutral position.
►
While depressing the brake pedal, switch off
the ignition.
►
Release the brake pedal, then switch on the
ignition again.
►
While depressing the brake pedal, press the
control lever to release the parking brake. ►
Release the brake pedal, then switch off the
ignition.
Reverting to normal operation
► While depressing the brake pedal, start the
engine.
With an automatic gearbox
and electric parking brake
/
Release procedure
► With the vehicle stationary and the engine
running, select mode N and switch off the
ignition.
Within 5
seconds:
►
Switch on the ignition again.
►
While depressing the brake pedal, move the
push selector forwards or backwards to confirm
mode
N.
►
While depressing the brake pedal, press the
control lever to release the parking brake.
►
Release the brake pedal, switch off the
ignition.
If the 5-second time limit is exceeded, the
gearbox engages mode P
; it is then necessary to
restart the procedure.
Reverting to normal operation
► While depressing the brake pedal, restart the
engine.
Keyless Entry and Starting
You must not depress the brake pedal
while switching the ignition on or off. If you do,
the engine will start, requiring you to restart
the procedure.
Advice on care and maintenance
General recommendations
Observe the following recommendations to avoid
damaging your vehicle.
Exterior
Never use a high-pressure jet wash in
the engine compartment, due to the risk
of damaging electrical components.
Do not wash the vehicle in strong sunshine or
extremely cold conditions.
When washing the vehicle at an
automatic roller-brush car wash, be sure
to lock the doors and, depending on version,
remove the electronic key and deactivate the
“hands-free” function (“Hands-Free Tailgate
Access”).
When using a pressure washer, hold the
lance at least 30 cm from the vehicle
(particularly when cleaning areas containing
chipped paint, sensors or seals).
Page 192 of 308
190
In the event of a breakdown
Warning triangle
As a safety precaution, before leaving your
vehicle to set up and install the triangle, switch
on the hazard warning lamps and put on your
high visibility vest.
Storage compartment
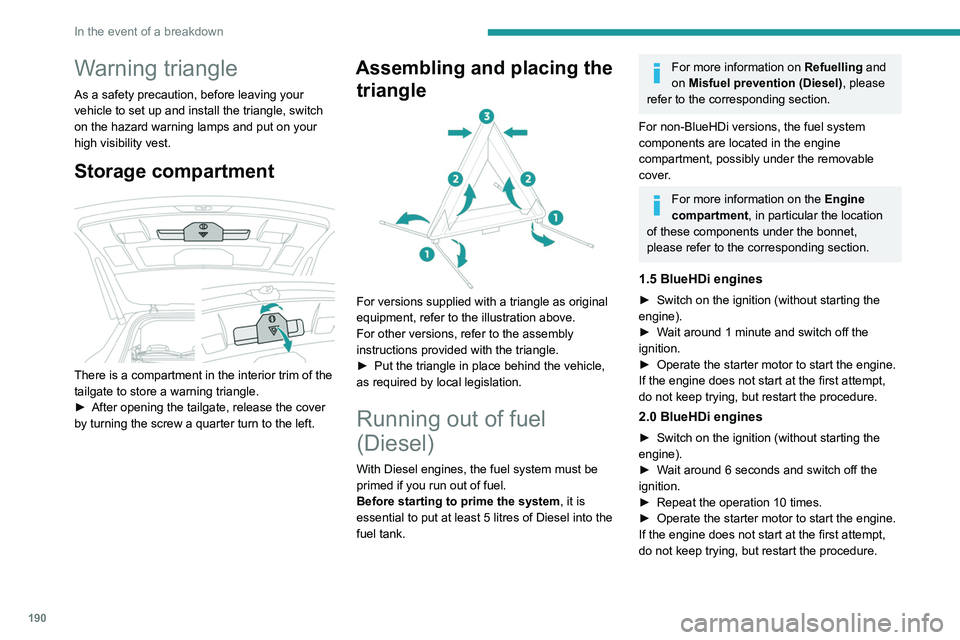
There is a compartment in the interior trim of the
tailgate to store a warning triangle.
►
After opening the tailgate, release the cover
by turning the screw a quarter turn to the left.
Assembling and placing the triangle
For versions supplied with a triangle as original
equipment, refer to the illustration above.
For other versions, refer to the assembly
instructions provided with the triangle.
►
Put the triangle in place behind the vehicle,
as required by local legislation.
Running out of fuel
(Diesel)
With Diesel engines, the fuel system must be
primed if you run out of fuel.
Before starting to prime the system, it is
essential to put at least 5 litres of Diesel into the
fuel tank.
For more information on Refuelling and
on Misfuel prevention (Diesel), please
refer to the corresponding section.
For non-BlueHDi versions, the fuel system
components are located in the engine
compartment, possibly under the removable
cover.
For more information on the Engine
compartment, in particular the location
of these components under the bonnet,
please refer to the corresponding section.
1.5 BlueHDi engines
► Switch on the ignition (without starting the
engine).
►
W
ait around 1 minute and switch off the
ignition.
►
Operate the starter motor to start the engine.
If the engine does not start at the first attempt,
do not keep trying, but restart the procedure.
2.0 BlueHDi engines
► Switch on the ignition (without starting the
engine).
►
W
ait around 6 seconds and switch off the
ignition.
►
Repeat the operation 10
times.
►
Operate the starter motor to start the engine.
If the engine does not start at the first attempt,
do not keep trying, but restart the procedure.
2.0 HDi engines
► Open the bonnet and then, if necessary,
unclip the cover to access the priming pump.
► Loosen the degassing bolt.
► Operate the priming pump until fuel
appears in the transparent tube.
► Retighten the degassing bolt.
► Operate the starter motor until the engine
starts (if the engine does not start at the first
attempt, wait around 15 seconds before trying
again).
► If the engine does not start after a few
attempts, operate the priming pump again, then
the starter motor.
► Put the cover back in place and clip it in, then
close the bonnet.
Tool kit
Set of tools supplied with the vehicle.
Its content depends on your vehicle's equipment:
– Temporary puncture repair kit.
– Spare wheel.
Accessing the tools
Page 206 of 308
204
In the event of a breakdown
To replace this type of bulb, you can also contact a PEUGEOT dealer or a qualified
workshop.
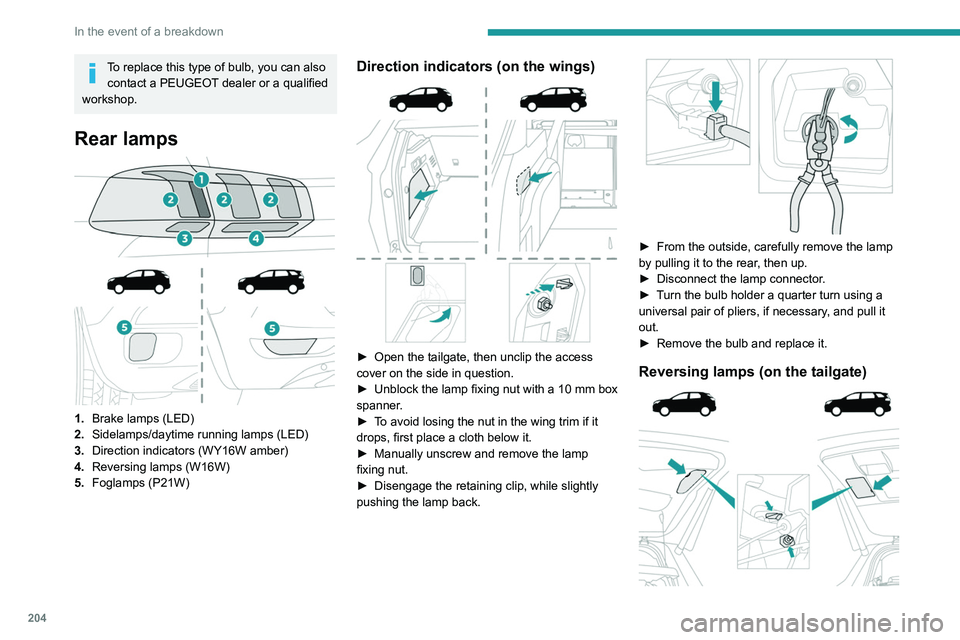
Rear lamps
1. Brake lamps (LED)
2. Sidelamps/daytime running lamps (LED)
3. Direction indicators (WY16W amber)
4. Reversing lamps (W16W)
5. Foglamps (P21W)
Direction indicators (on the wings)
► Open the tailgate, then unclip the access
cover on the side in question.
►
Unblock the lamp fixing nut with a 10
mm box
spanner.
►
T
o avoid losing the nut in the wing trim if it
drops, first place a cloth below it.
►
Manually unscrew and remove the lamp
fixing nut.
►
Disengage the retaining clip, while slightly
pushing the lamp back.
► From the outside, carefully remove the lamp
by pulling it to the rear , then up.
►
Disconnect the lamp connector
.
►
T
urn the bulb holder a quarter turn using a
universal pair of pliers, if necessary, and pull it
out.
►
Remove the bulb and replace it.
Reversing lamps (on the tailgate)