warning Peugeot 306 C Dag 2001 User Guide
[x] Cancel search | Manufacturer: PEUGEOT, Model Year: 2001, Model line: 306 C Dag, Model: Peugeot 306 C Dag 2001Pages: 133, PDF Size: 2.05 MB
Page 33 of 133
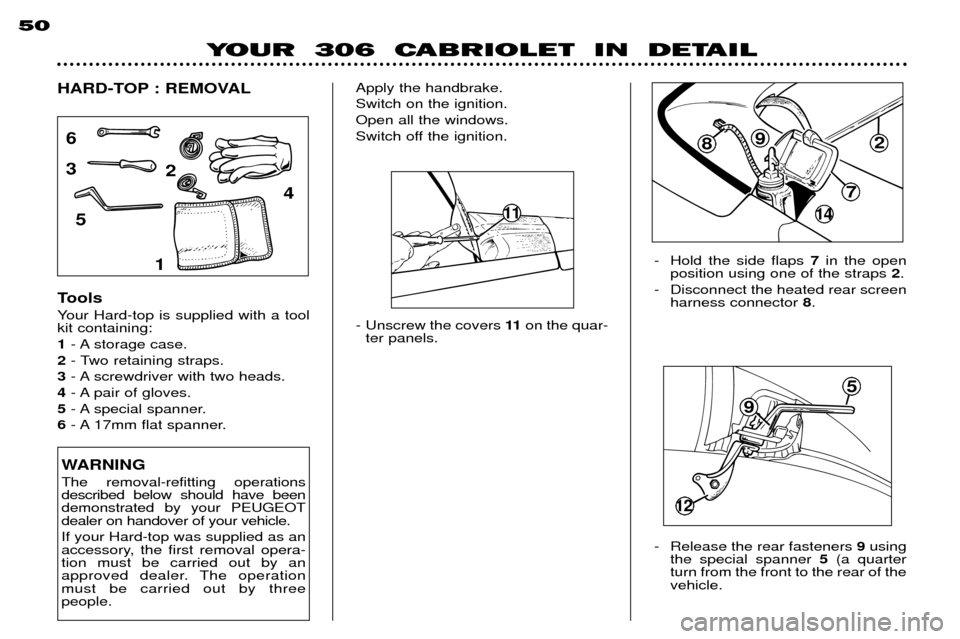
- Hold the side flaps 7in the open
position using one of the straps 2.
- Disconnect the heated rear screen harness connector 8.
HARD-TOP : REMOVAL
Tools
Your Hard-top is supplied with a tool kit containing: 1
- A storage case.
2 - Two retaining straps.
3 - A screwdriver with two heads.
4 - A pair of gloves.
5 - A special spanner.
6 - A 17mm flat spanner.
6
3
5 1 4
2
11
98
7
2
5
9
12
14
Apply the handbrake. Switch on the ignition.Open all the windows.
Switch off the ignition.
- Unscrew the covers
11on the quar-
ter panels.
- Release the rear fasteners 9using
the special spanner 5(a quarter
turn from the front to the rear of the vehicle.
WARNING The removal-refitting operations described below should have beendemonstrated by your PEUGEOTdealer on handover of your vehicle. If your Hard-top was supplied as an
accessory, the first removal opera-tion must be carried out by an
approved dealer. The operationmust be carried out by three people.
Y
OUR 306 CABRIOLET IN DETAIL
50
Page 35 of 133
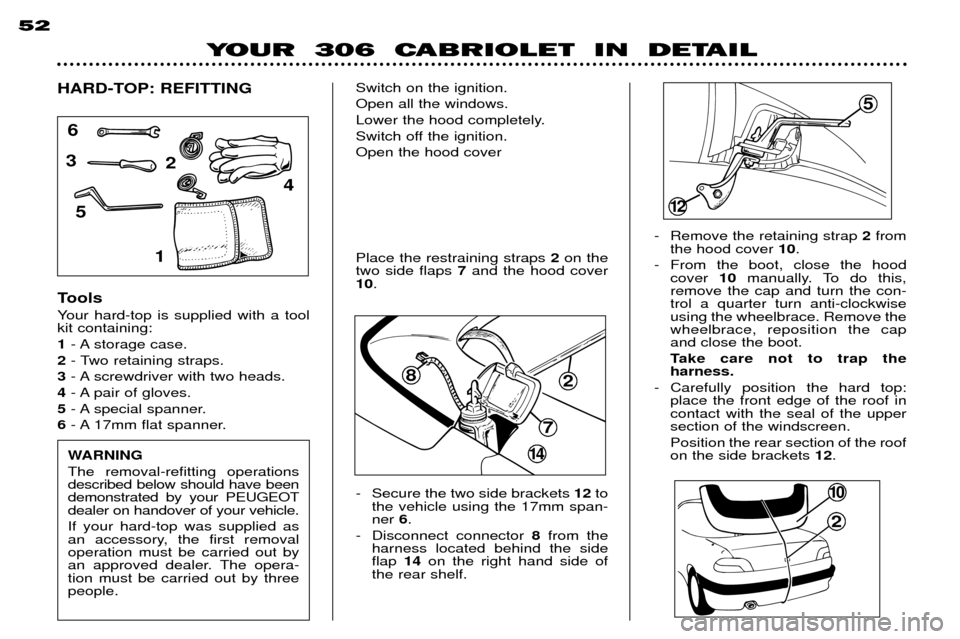
- Secure the two side brackets 12to
the vehicle using the 17mm span- ner 6.
- Disconnect connector 8from the
harness located behind the sideflap 14on the right hand side of
the rear shelf. - Remove the retaining strap
2from
the hood cover 10.
- From the boot, close the hood cover 10manually. To do this,
remove the cap and turn the con-trol a quarter turn anti-clockwiseusing the wheelbrace. Remove thewheelbrace, reposition the capand close the boot.
Take care not to trap the harness.
- Carefully position the hard top: place the front edge of the roof incontact with the seal of the uppersection of the windscreen. Position the rear section of the roof on the side brackets 12.
Place the restraining straps
2on the
two side flaps 7and the hood cover
10 .
HARD-TOP: REFITTING
Tools
Your hard-top is supplied with a tool kit containing: 1
- A storage case.
2 - Two retaining straps.
3 - A screwdriver with two heads.
4 - A pair of gloves.
5 - A special spanner.
6 - A 17mm flat spanner.
6
3
5 1 4
2
10
14
2
82
7
5
12
Switch on the ignition. Open all the windows.
Lower the hood completely.
Switch off the ignition.Open the hood cover
WARNING The removal-refitting operations described below should have beendemonstrated by your PEUGEOTdealer on handover of your vehicle. If your hard-top was supplied as
an accessory, the first removaloperation must be carried out by
an approved dealer. The opera-tion must be carried out by threepeople.
Y OUR 306 CABRIOLET IN DETAIL
52
Page 66 of 133
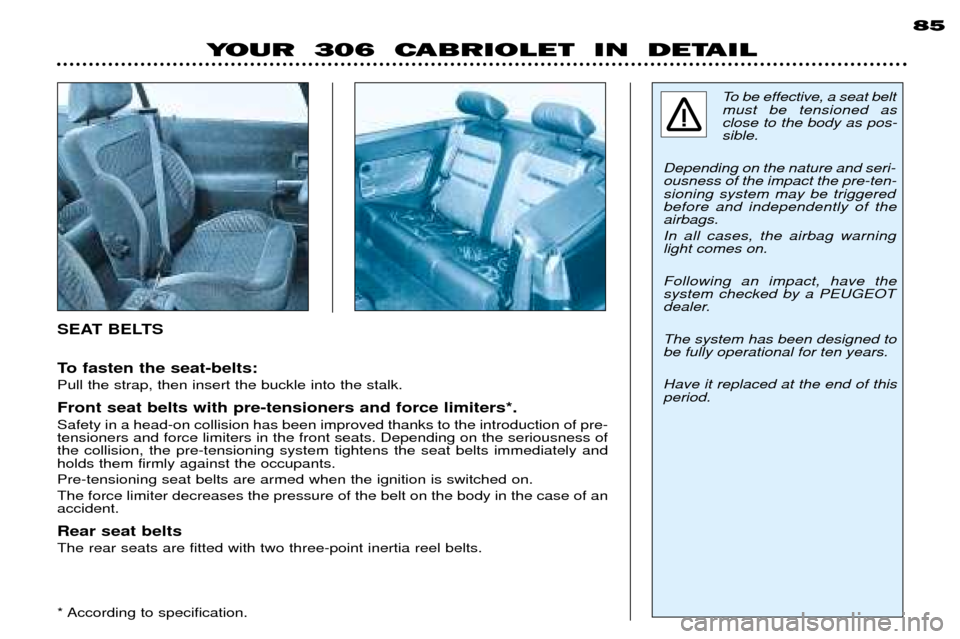
To fasten the seat-belts: Pull the strap, then insert the buckle into the stalk. Front seat belts with pre-tensioners and force limiters*. Safety in a head-on collision has been improved thanks to the introduction of pre- tensioners and force limiters in the front seats. Depending on the seriousness ofthe collision, the pre-tensioning system tightens the seat belts immediately andholds them firmly against the occupants. Pre-tensioning seat belts are armed when the ignition is switched on.The force limiter decreases the pressure of the belt on the body in the case of an accident. Rear seat belts The rear seats are fitted with two three-point inertia reel belts.
* According to specification.To be effective, a seat belt must be tensioned asclose to the body as pos-sible.
Depending on the nature and seri-ousness of the impact the pre-ten-sioning system may be triggeredbefore and independently of theairbags. In all cases, the airbag warning light comes on. Following an impact, have the system checked by a PEUGEOT
dealer. The system has been designed to be fully operational for ten years. Have it replaced at the end of this period. 85
YOUR 306 CABRIOLET IN DETAIL
SEAT BELTS
Page 75 of 133
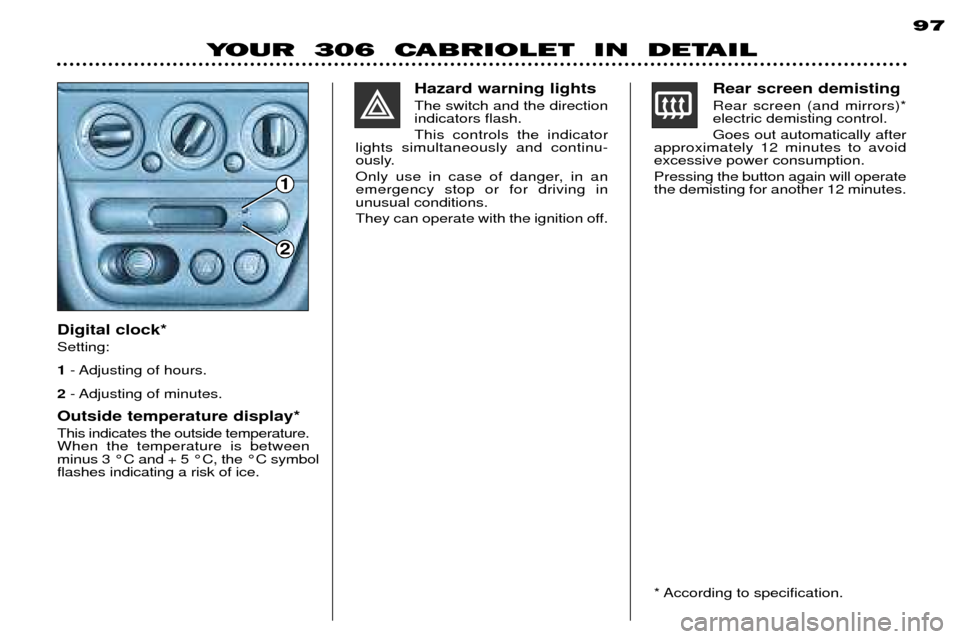
Digital clock* Setting: 1- Adjusting of hours.
2 - Adjusting of minutes.
Outside temperature display* This indicates the outside temperature. When the temperature is betweenminus 3 ¡C and + 5 ¡C, the ¡C symbolflashes indicating a risk of ice.
1
2
YOUR 306 CABRIOLET IN DETAIL 97
Rear screen demisting Rear screen (and mirrors)* electric demisting control. Goes out automatically after
approximately 12 minutes to avoid excessive power consumption. Pressing the button again will operate the demisting for another 12 minutes.
* According to specification.
Hazard warning lights The switch and the direction indicators flash. This controls the indicator
lights simultaneously and continu-
ously.
Only use in case of danger, in an emergency stop or for driving inunusual conditions.
They can operate with the ignition off.
Page 82 of 133
103
DRIVING YOUR 306 CABRIOLET
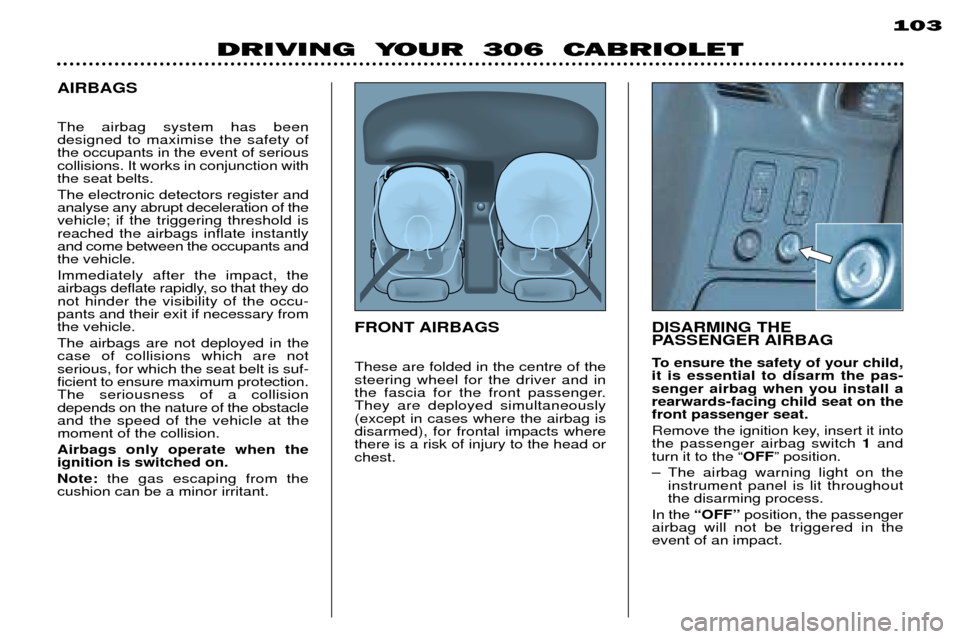
AIRBAGSFRONT AIRBAGS
The airbag system has been designed to maximise the safety ofthe occupants in the event of seriouscollisions. It works in conjunction withthe seat belts. The electronic detectors register and analyse any abrupt deceleration of thevehicle; if the triggering threshold isreached the airbags inflate instantlyand come between the occupants andthe vehicle. Immediately after the impact, the
airbags deflate rapidly, so that they donot hinder the visibility of the occu-pants and their exit if necessary fromthe vehicle. The airbags are not deployed in the case of collisions which are notserious, for which the seat belt is suf-ficient to ensure maximum protection.The seriousness of a collisiondepends on the nature of the obstacleand the speed of the vehicle at themoment of the collision. Airbags only operate when the ignition is switched on. Note:
the gas escaping from the
cushion can be a minor irritant. These are folded in the centre of the steering wheel for the driver and in
the fascia for the front passenger.They are deployed simultaneously(except in cases where the airbag isdisarmed), for frontal impacts wherethere is a risk of injury to the head orchest. DISARMING THE
PASSENGER AIRBAG
To ensure the safety of your child, it is essential to disarm the pas-senger airbag when you install arearwards-facing child seat on thefront passenger seat.
Remove the ignition key, insert it into the passenger airbag switch
1and
turn it to the Ò OFFÓ position.
Ð The airbag warning light on the instrument panel is lit throughoutthe disarming process.
In the ÒOFFÓ position, the passenger
airbag will not be triggered in theevent of an impact.
Page 84 of 133
105
DRIVING YOUR 306 CABRIOLET
WARNING For the front and side airbags to be fully effective, observe the following safety rules:
¥ Wear a correctly adjusted seat belt.
¥ Sit in a normal upright position.
¥ Do not leave an accessory, or any other object between the occupants of the front seats and the airbags. It could hamper the operation of the airbags or injure the occupants.
¥ All work on the airbag system is strictly forbidden unless it is carried out by qualified personnel of the PEUGEOT network.
¥ After an accident or if the vehicle has been stolen or broken into, have the airbag systems checked.
¥ The airbag systems have been designed to be fully operational for 10 years after the vehicle has been registered. Have them replaced by a PEUGEOT dealer after this period.
¥ Front airbags
¥ Do not drive holding the steering wheel by its spokes or resting your hands on the centre part of the wheel.
¥ Smoke as little as possible; deployment of the airbags can cause burns or the risk of injury from a cigarette or pipe.
¥ Never remove or pierce the steering wheel or hit it violently. ¥ Side airbags
¥ Never put covers on the front seats.
¥ Do not fix or glue anything to the front seat backrests. This could cause injury to the chest or arms when the side airbag inflates.
¥ Do not sit with the upper part of the body any nearer to the door than necessary.
Page 86 of 133
105
DRIVING YOUR 306 CABRIOLET
WARNING For the front and side airbags to be fully effective, observe the following safety rules:
¥ Wear a correctly adjusted seat belt.
¥ Sit in a normal upright position.
¥ Do not leave an accessory, or any other object between the occupants of the front seats and the airbags. It could hamper the operation of the airbags or injure the occupants.
¥ All work on the airbag system is strictly forbidden unless it is carried out by qualified personnel of the PEUGEOT network.
¥ After an accident or if the vehicle has been stolen or broken into, have the airbag systems checked.
¥ The airbag systems have been designed to be fully operational for 10 years after the vehicle has been registered. Have them replaced by a PEUGEOT dealer after this period.
¥ Front airbags
¥ Do not drive holding the steering wheel by its spokes or resting your hands on the centre part of the wheel.
¥ Smoke as little as possible; deployment of the airbags can cause burns or the risk of injury from a cigarette or pipe.
¥ Never remove or pierce the steering wheel or hit it violently. ¥ Side airbags
¥ Never put covers on the front seats.
¥ Do not fix or glue anything to the front seat backrests. This could cause injury to the chest or arms when the side airbag inflates.
¥ Do not sit with the upper part of the body any nearer to the door than necessary.
Page 93 of 133
88
1
YOUR 306 CABRIOLET AT A GLANCE9
9
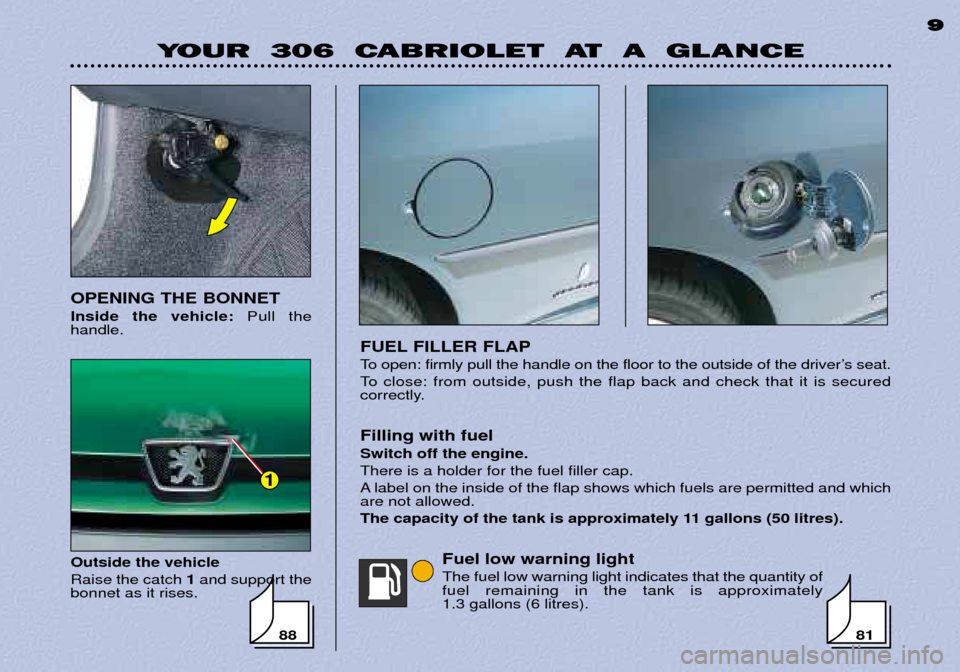
FUEL FILLER FLAP
To open: firmly pull the handle on the floor to the outside of the driverÕs seat.
To close: from outside, push the flap back and check that it is secured
correctly. Filling with fuel Switch off the engine. There is a holder for the fuel filler cap.
A label on the inside of the flap shows which fuels are permitted and which are not allowed.
The capacity of the tank is approximately 11 gallons (50 litres).
Fuel low warning light The fuel low warning light indicates that the quantity of fuel remaining in the tank is approximately 1.3 gallons (6 litres).
Outside the vehicle Raise the catch 1and support the
bonnet as it rises.
OPENING THE BONNET Inside the vehicle:
Pull the
handle.
81
Page 113 of 133

MAINTENANCE OF YOUR 306 CABRIOLET29
For your safety, always change the wheel: - on level, stabIe and
non-slippery ground,
- with the handbrake applied,
- with first gear or reverse engaged (position Pfor the
automatic gearbox).
Never go underneath a vehicle which is supported only by a jack.(Use a ramp).
To fit the wheel After positioning the wheel, pre- tighten the bolts using the wheel-brace. Lower the jack and remove it.Fully tighten the wheel bolts using the wheelbrace. Fit the wheel trim starting with the section by the valve and press intoplace using the palm of the hand.
Removing the wheel Park the vehicle on level, stable and non-slippery ground. Apply the handbrake, engage first gear or reverse (position
Pfor the
automatic gearbox). Remove the wheel trim by using the wheelbrace and pulling next to thevalve.
Warning: your wheel trims are fitted
with dummy nuts. Do not use them to remove your wheel trims. Loosen the wheel bolts. Place the jack in the location designed for it, as close as possible to the wheelto be changed. Ensure that the whole of the base of the jack is in contact with the ground. Extend the jack, fully loosen the wheel bolts and remove the wheel. Refitting the wheel in the carrier
Raise the wheel, then the carrier, and resecure it on the hook. Do not forget to fully tighten the spare wheel carrier securing bolt.
After changing the wheel:
- have the tightening of the bolts
and the tyre pressure checked by a PEUGEOT dealer as soonas possible,
- have the punctured wheel repaired and refit it to the vehi-cle as soon as possible.
Page 115 of 133
ATTENTIONVOIR NOTICE
WARNING READ
INSTRUCTIONS
H7 UV
MAINTENANCE OF YOUR 306 CABRIOLET
32
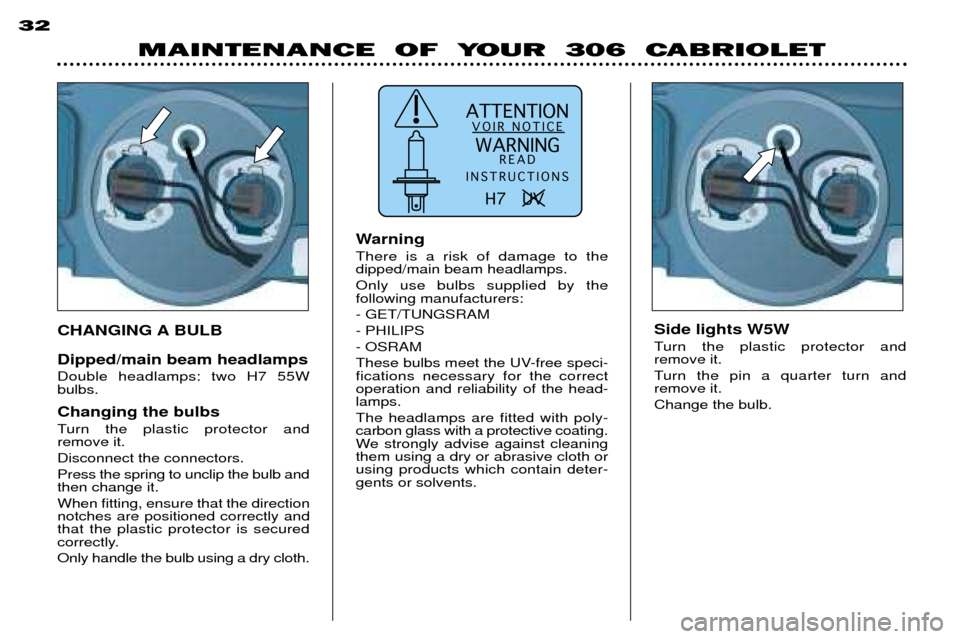
Side lights W5W
Turn the plastic protector and remove it.
Turn the pin a quarter turn and remove it. Change the bulb.
Warning There is a risk of damage to the dipped/main beam headlamps. Only use bulbs supplied by the following manufacturers: - GET/TUNGSRAM- PHILIPS- OSRAM
These bulbs meet the UV-free speci- fications necessary for the correctoperation and reliability of the head-lamps. The headlamps are fitted with poly- carbon glass with a protective coating.
We strongly advise against cleaningthem using a dry or abrasive cloth orusing products which contain deter-gents or solvents.
CHANGING A BULB Dipped/main beam headlamps Double headlamps: two H7 55W bulbs. Changing the bulbs
Turn the plastic protector and remove it. Disconnect the connectors.Press the spring to unclip the bulb and then change it. When fitting, ensure that the direction notches are positioned correctly andthat the plastic protector is secured
correctly. Only handle the bulb using a dry cloth.