window Peugeot 307 Break Dag 2002 User Guide
[x] Cancel search | Manufacturer: PEUGEOT, Model Year: 2002, Model line: 307 Break Dag, Model: Peugeot 307 Break Dag 2002Pages: 128, PDF Size: 2.64 MB
Page 71 of 128
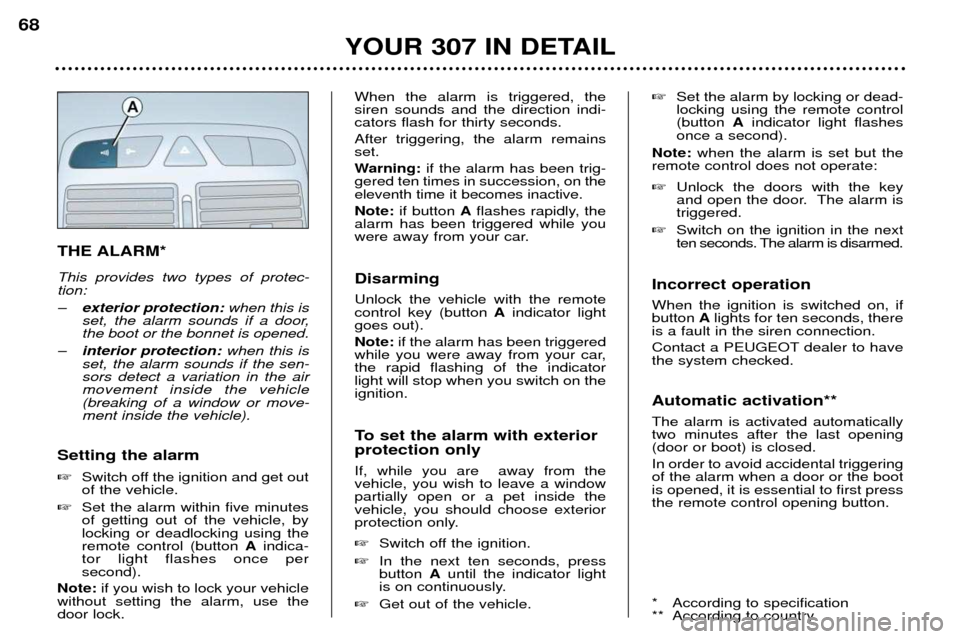
THE ALARM* This provides two types of protec- tion: Ðexterior protection: when this is
set, the alarm sounds if a door, the boot or the bonnet is opened.
Ð interior protection: when this is
set, the alarm sounds if the sen-sors detect a variation in the airmovement inside the vehicle(breaking of a window or move-ment inside the vehicle).
Setting the alarm Switch off the ignition and get out of the vehicle.
Set the alarm within five minutesof getting out of the vehicle, bylocking or deadlocking using theremote control (button Aindica-
tor light flashes once persecond).
Note: if you wish to lock your vehicle
without setting the alarm, use thedoor lock. When the alarm is triggered, thesiren sounds and the direction indi-cators flash for thirty seconds. After triggering, the alarm remains set.
Warning:
if the alarm has been trig-
gered ten times in succession, on the eleventh time it becomes inactive. Note: if button Aflashes rapidly, the
alarm has been triggered while you
were away from your car. Disarming Unlock the vehicle with the remote control key (button Aindicator light
goes out). Note: if the alarm has been triggered
while you were away from your car, the rapid flashing of the indicatorlight will stop when you switch on theignition.
To set the alarm with exterior protection only If, while you are away from the vehicle, you wish to leave a windowpartially open or a pet inside thevehicle, you should choose exterior
protection only. Switch off the ignition.
In the next ten seconds, press button Auntil the indicator light
is on continuously.
Get out of the vehicle.
Set the alarm by locking or dead-locking using the remote control(button Aindicator light flashes
once a second).
Note: when the alarm is set but the
remote control does not operate: Unlock the doors with the key
and open the door. The alarm istriggered.
Switch on the ignition in the next
ten seconds. The alarm is disarmed.
Incorrect operation When the ignition is switched on, if button Alights for ten seconds, there
is a fault in the siren connection.
Contact a PEUGEOT dealer to have the system checked. Automatic activation** The alarm is activated automatically two minutes after the last opening(door or boot) is closed. In order to avoid accidental triggering of the alarm when a door or the bootis opened, it is essential to first pressthe remote control opening button.
* According to specification
** According to country
YOUR 307 IN DETAIL
68
Page 81 of 128
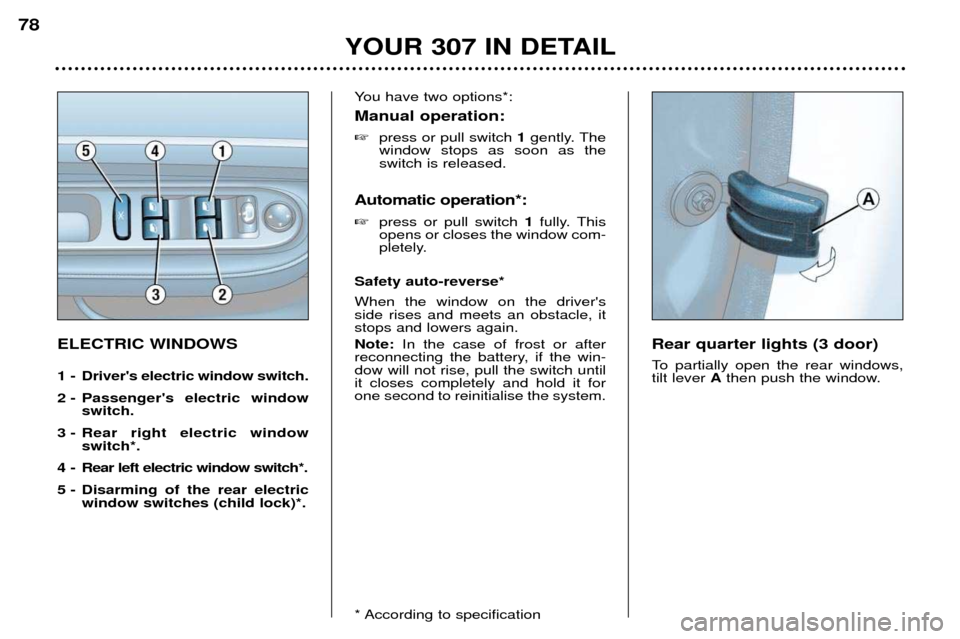
ELECTRIC WINDOWS
1 - Driver's electric window switch.
2 - Passenger's electric windowswitch.
3 - Rear right electric window switch*.
4 - Rear left electric window switch*.
5 - Disarming of the rear electric window switches (child lock)*. You have two options*: Manual operation:
press or pull switch 1gently. The
window stops as soon as the switch is released.
Automatic operation*: press or pull switch 1fully. This
opens or closes the window com-
pletely.
Safety auto-reverse* When the window on the driver's side rises and meets an obstacle, itstops and lowers again. Note: In the case of frost or after
reconnecting the battery, if the win- dow will not rise, pull the switch untilit closes completely and hold it forone second to reinitialise the system.
* According to specification Rear quarter lights (3 door)
To partially open the rear windows, tilt lever
Athen push the window.
YOUR 307 IN DETAIL
78
Page 112 of 128
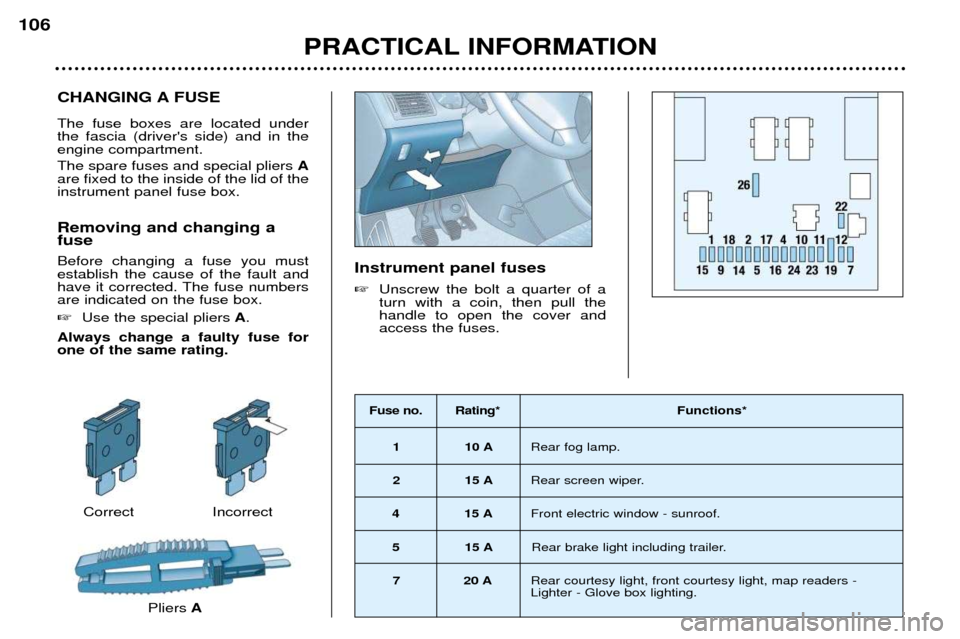
CHANGING A FUSE The fuse boxes are located under the fascia (driver's side) and in theengine compartment. The spare fuses and special pliers A
are fixed to the inside of the lid of the instrument panel fuse box. Removing and changing a fuse Before changing a fuse you must establish the cause of the fault and
have it corrected. The fuse numbersare indicated on the fuse box. Use the special pliers A.
Always change a faulty fuse for one of the same rating.
PRACTICAL INFORMATION
106
CorrectPliersAIncorrect Fuse no. Rating* Functions*
1 10 A Rear fog lamp.
2 15 A Rear screen wiper.
4 15 A Front electric window - sunroof.
5 15 A Rear brake light including trailer.
7 20 A Rear courtesy light, front courtesy light, map readers - Lighter - Glove box lighting.
Instrument panel fuses Unscrew the bolt a quarter of a turn with a coin, then pull thehandle to open the cover andaccess the fuses.
Page 115 of 128
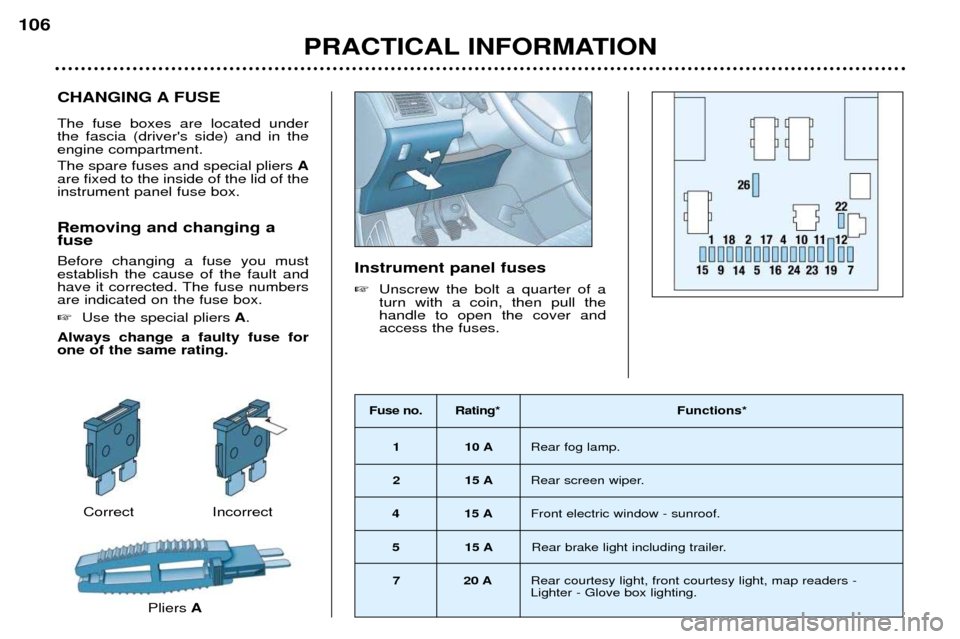
CHANGING A FUSE The fuse boxes are located under the fascia (driver's side) and in theengine compartment. The spare fuses and special pliers A
are fixed to the inside of the lid of the instrument panel fuse box. Removing and changing a fuse Before changing a fuse you must establish the cause of the fault and
have it corrected. The fuse numbersare indicated on the fuse box. Use the special pliers A.
Always change a faulty fuse for one of the same rating.
PRACTICAL INFORMATION
106
CorrectPliersAIncorrect Fuse no. Rating* Functions*
1 10 A Rear fog lamp.
2 15 A Rear screen wiper.
4 15 A Front electric window - sunroof.
5 15 A Rear brake light including trailer.
7 20 A Rear courtesy light, front courtesy light, map readers - Lighter - Glove box lighting.
Instrument panel fuses Unscrew the bolt a quarter of a turn with a coin, then pull thehandle to open the cover andaccess the fuses.
Page 116 of 128
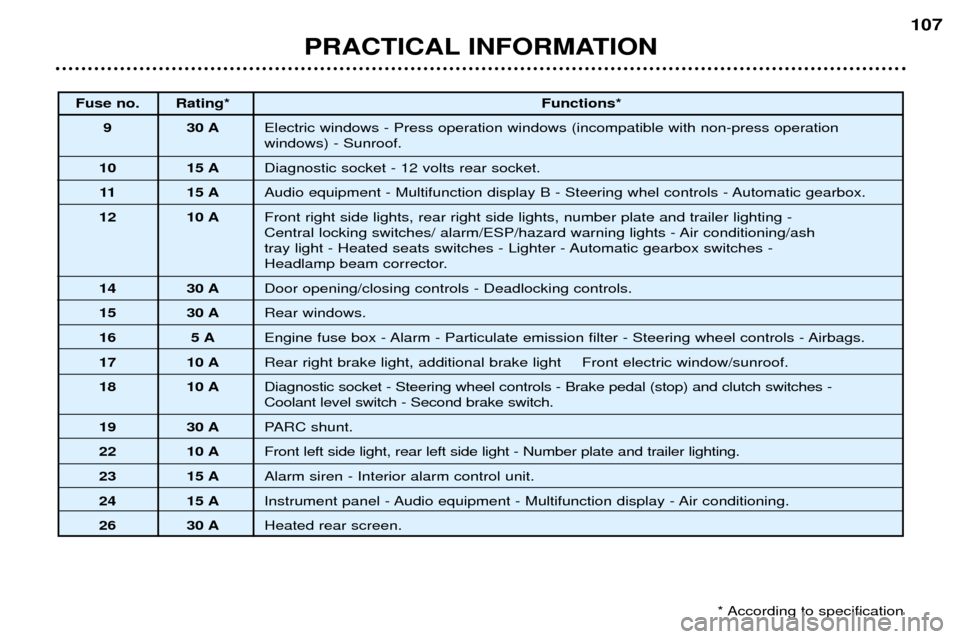
PRACTICAL INFORMATION107
Fuse no. Rating*
Functions*
9 30 A Electric windows - Press operation windows (incompatible with non-press operation windows) - Sunroof.
10 15 A Diagnostic socket - 12 volts rear socket.
11 15 A Audio equipment - Multifunction display B - Steering whel controls - Automatic gearbox.
12 10 A Front right side lights, rear right side lights, number plate and trailer lighting -
Central locking switches/ alarm/ESP/hazard warning lights - Air conditioning/ash
tray light - Heated seats switches - Lighter - Automatic gearbox switches -
Headlamp beam corrector.
14 30 A Door opening/closing controls - Deadlocking controls.
15 30 A Rear windows.
16 5 A Engine fuse box - Alarm - Particulate emission filter - Steering wheel controls - Airbags.
17 10 A Rear right brake light, additional brake light Front electric window/sunroof.
18 10 A Diagnostic socket - Steering wheel controls - Brake pedal (stop) and clutch switches - Coolant level switch - Second brake switch.
19 30 A PARC shunt.
22 10 A Front left side light, rear left side light - Number plate and trailer lighting.
23 15 A Alarm siren - Interior alarm control unit.
24 15 A Instrument panel - Audio equipment - Multifunction display - Air conditioning.
26 30 A Heated rear screen.
* According to specification
Page 117 of 128
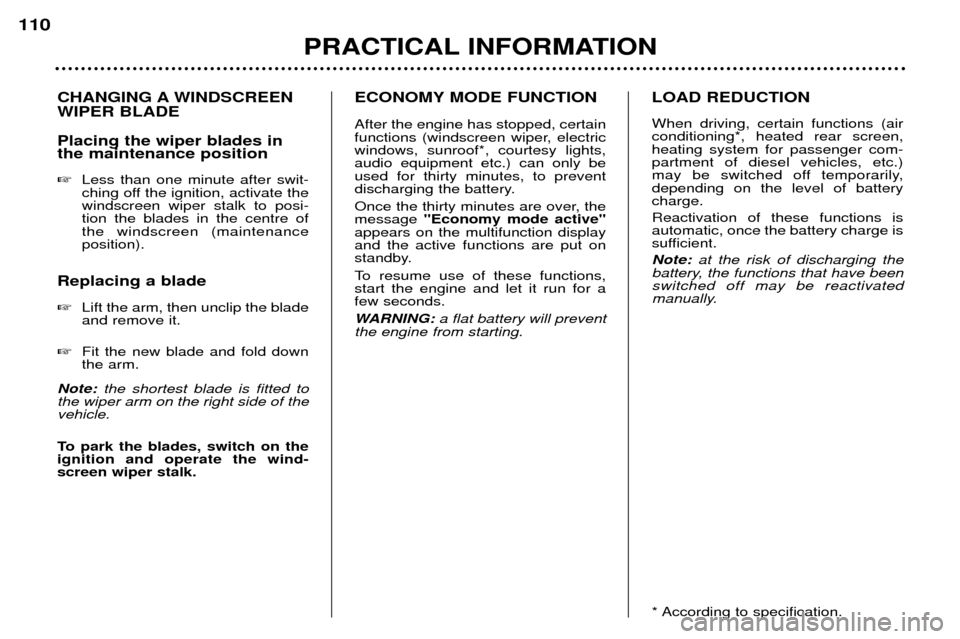
CHANGING A WINDSCREEN WIPER BLADE Placing the wiper blades in the maintenance position Less than one minute after swit-
ching off the ignition, activate thewindscreen wiper stalk to posi-tion the blades in the centre ofthe windscreen (maintenanceposition).
Replacing a blade Lift the arm, then unclip the blade and remove it.
Fit the new blade and fold downthe arm.
Note: the shortest blade is fitted to
the wiper arm on the right side of thevehicle.
To park the blades, switch on the ignition and operate the wind-screen wiper stalk. ECONOMY MODE FUNCTION After the engine has stopped, certain
functions (windscreen wiper, electricwindows, sunroof*, courtesy lights,audio equipment etc.) can only beused for thirty minutes, to prevent
discharging the battery.
Once the thirty minutes are over, the message
"Economy mode active"
appears on the multifunction displayand the active functions are put on
standby.
To resume use of these functions, start the engine and let it run for afew seconds.
WARNING: a flat battery will prevent
the engine from starting. LOAD REDUCTION When driving, certain functions (air conditioning*, heated rear screen,heating system for passenger com-partment of diesel vehicles, etc.)
may be switched off temporarily,depending on the level of batterycharge. Reactivation of these functions is automatic, once the battery charge is
sufficient. Note:
at the risk of discharging the
battery, the functions that have been switched off may be reactivated
manually.
* According to specification.
PRACTICAL INFORMATION
110
Page 122 of 128

PRACTICAL INFORMATION115
ACCESSORIES FOR YOUR 307
For your PEUGEOT only use accessories and original parts approved by the manufacturer.
These accessories and parts are all adapted to your PEUGEOT, after being tested and approved for reliability and safe-
ty, which PEUGEOT cannot guarantee for other products.
A wide choice of original accessories, approved by PEUGEOT, is available through the dealer network. They all carry
the PEUGEOT guarantee.
Ð Safety : Anti-theft alarms, window engraving, wheel locks, first aid kit, warning triangle, etc.
Ð Comfort : Telephone console, front centre arm rest, covers compatible with side air bags, mats,
boot tray, luggage net, door deflectors, CD storage, under shelf storage...
Ð Communication : Audio system, telephone, hands-free kit, speakers, amplifiers, CD changer, navigation systems, side sun blinds and rear blind....
Ð Customising : Spoiler, alloy wheels, trims, sport exhaust, aluminium or PVC door sills, mud flaps...
Ð Leisure : Tow bar, roof bars, roof box, snow chains, ski carrier, bicycle carrier etc.
Ð Children : Booster seats and child seats...
Ð
Maintenance products: Screenwash, interior and exterior maintenance and cleaning products...
Before installing any electrical accessory on your vehicle, contact a PEUGEOT dealer.