ESP Peugeot 307 SW 2002 User Guide
[x] Cancel search | Manufacturer: PEUGEOT, Model Year: 2002, Model line: 307 SW, Model: Peugeot 307 SW 2002Pages: 137, PDF Size: 1.43 MB
Page 41 of 137

CD CHANGER Selecting CD changer modeAudio RB3 : press the "SRC"button several times in succession.
Audio RD3 : press button R.
Selecting a disc Press buttons "1"to "5" of the CD changer or the radio to select the corresponding disc.
Selecting a track Press button Ito select the next track.
Press button Jto return to the start of the current track or to select the previous track.
Accelerated playPress and hold button Ior Jfor forwards or backwards accelerated play.
Accelerated play stops as soon as the button is released. Shuffle (RDM) When the CD changer is selected: - audio RB3 : press and hold the "SRC" button for two seconds;
- audio RD3 : press and hold button R for two seconds.
The tracks will be played in random sequence. Pressing the button again for two seconds returns you to normal play.
YOUR 307 SW IN DETAIL
48
Page 45 of 137

Manual station search Press the"MAN" button.
Briefly press button Ior Jto increase or decrease the frequency displayed.
By continuing to press the button in the direction selected, you will obtain continuous scrolling of the frequency. The scrolling stops at the first station found as soon as the button is released.Pressing the "MAN"button again returns you to automatic station search.
Manual storing of stations in the memory Select the station required. Press one of the buttons "1"to "6" for more than two seconds.
The sound stops then becomes audible again, confirming that the station has been stored in the memory. Automatic storing of FM stations in the memory (autostore)
Audio RB3 : press and hold the "BND/AST" button for more than two seconds.
Audio RD3 : press and hold button "P" for more than two seconds.
Your radio automatically stores the 6 stations with the strongest signal in FM. These stations are stored in the FMast wave-
band.
If it is not possible to find 6 stations, the remaining memories are empty. Recalling stations stored in the memory For each waveband, briefly press buttons "1" to "6" to recall the corresponding station.
YOUR 307 SW IN DETAIL 43
Page 47 of 137

PTY function: Audio RD3 This allows you to listen to stations broadcasting a specific type of programme (news, culture, sport, rock etc.).With FMselected, press the "TA"button for two seconds to switch this function on or off.
To search for a PTYprogramme:
- select the PTYfunction,
- briefly press button Ior Jto scroll down the list of the various types of programmes offered.
- when the programme of your choice is displayed, keep button Ior Jpressed for two seconds
to carry out an automatic search (after an automatic search the PTYfunction is switched off).
In PTY mode the different types of programmes can be stored in the memory. To do this, press the preselection buttons
"1" to "6" for two seconds.
Briefly press the corresponding button to recall the type of programme stored in the memory.
EON system: Audio RD3
This connects stations which are part of the same network. It enables the broadcast of traffic information by a station that is part of the same network as the station to which you are listening. This service is available when you have selected the TAtraffic information programme or the PTYfunction.
YOUR 307 SW IN DETAIL 45
Page 55 of 137

Manual operation
If you wish, you can make a different
choice from that offered by the sys-
tem by changing a setting. The otherfunctions will still be controlled auto-
matically. Pressing the "AUTO" but-ton returns the system to completelyautomatic operation.
4. Air conditioningPress this button to switch
off the air conditioning. Thesymbol "ECO" is displayed.Automatic operation of the
air conditioning is resumed when the
button is pressed again. The symbol"A/C" is displayed. Note It is quite normal that the condensa- tion created by the air conditioningresults in a flow of water under the
vehicle when it is stationary.
5. Air distribution
Pressing this button several times in successionenables the air flow to bedirected in turn towards:
Ð the windscreen (de-icing or demis- ting), Ð the windscreen and the footwells,
Ð the footwells,
Ð the centre and side vents and the
footwells,
Ð the centre and side vents.
6. Air flow
The flow of air can be increased or reducedby pressing buttons +
or - respectively.
7. Air intake Press this button to enablethe interior air to be recir-culated. Recirculation,
shown on the display,
enables the passenger compartmentto be insulated from exterior odoursand smoke.
Avoid prolonged recirculation of
interior air. To do this, press the but-ton again to resume intake of exte-
rior air. 8. Switching the system off
The "OFF" button enablesthe entire system to be swit-
ched off.
9. Demisting the rear screen Press this button to demistthe rear screen and the mir-
rors. Demisting switches off
automatically. It is possibleto stop operation of the
demisting before it is switched offautomatically by pressing the buttonagain.
Important precaution Operate the air conditioning for 5 to 10 minutes, once or twice a month,
to keep it in good working order. If the system does not produce cold
air, do not use it and contact your
PEUGEOT dealer. Note: to optimise the operation of
the air conditioning, leave the vents open.
YOUR 307 SW IN DETAIL 55
Page 61 of 137

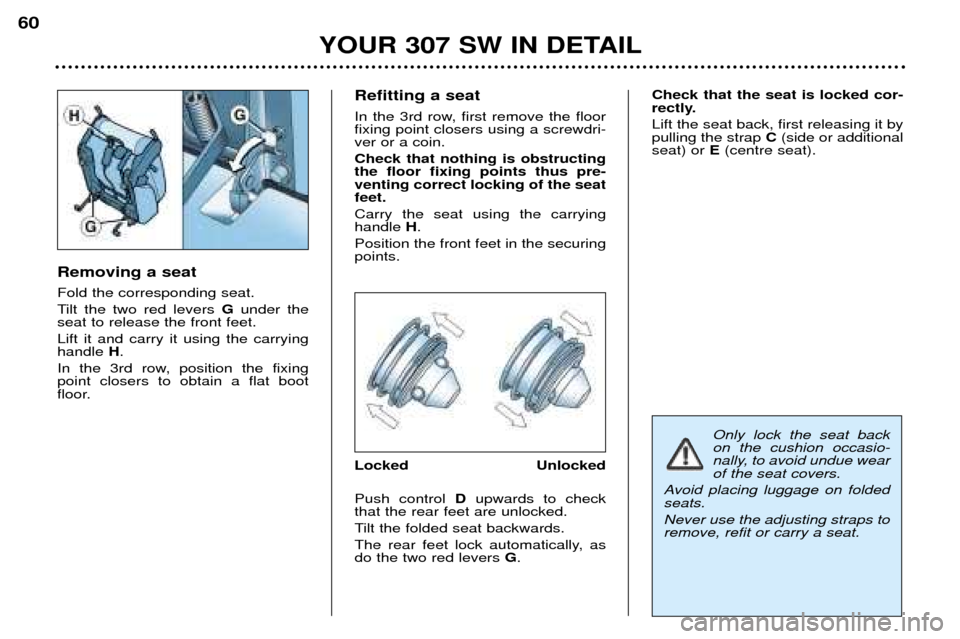
Removing a seat Fold the corresponding seat.
Tilt the two red levers Gunder the
seat to release the front feet.Lift it and carry it using the carrying handle H.
In the 3rd row, position the fixingpoint closers to obtain a flat boot
floor. Refitting a seat
In the 3rd row, first remove the floor fixing point closers using a screwdri-ver or a coin. Check that nothing is obstructing the floor fixing points thus pre-venting correct locking of the seatfeet. Carry the seat using the carrying handle
H.
Position the front feet in the securingpoints.
Locked Unlocked Push control Dupwards to check
that the rear feet are unlocked.
Tilt the folded seat backwards.
The rear feet lock automatically, as do the two red levers G. Check that the seat is locked cor-
rectly. Lift the seat back, first releasing it by pulling the strap
C (side or additional
seat) or E(centre seat).
YOUR 307 SW IN DETAIL
60
Only lock the seat back on the cushion occasio-
nally, to avoid undue wearof the seat covers.
Avoid placing luggage on foldedseats. Never use the adjusting straps to remove, refit or carry a seat.
Page 62 of 137

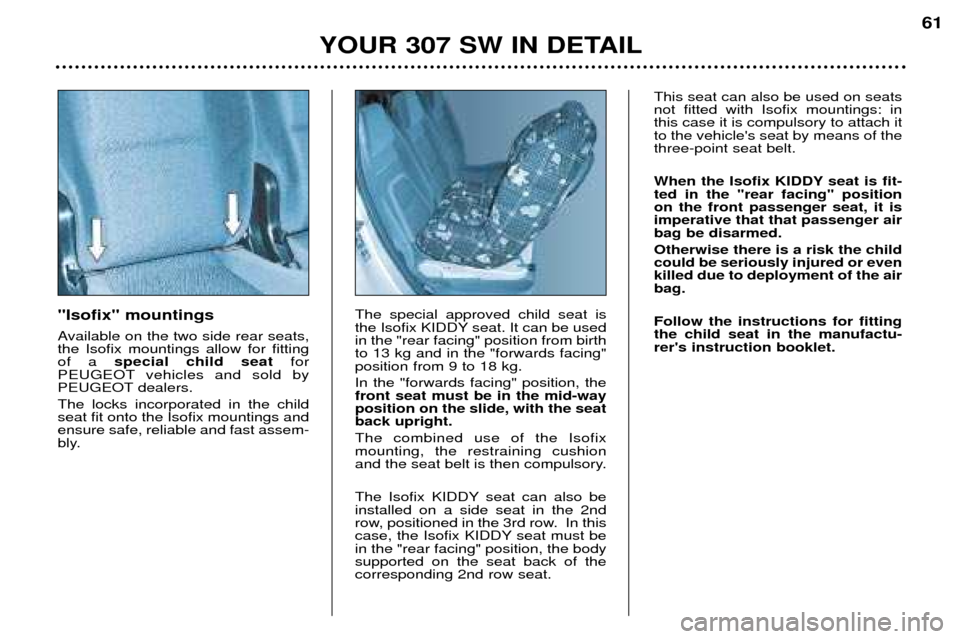
''Isofix'' mountings
Available on the two side rear seats, the Isofix mountings allow for fittingof a special child seat for
PEUGEOT vehicles and sold by
PEUGEOT dealers. The locks incorporated in the child seat fit onto the Isofix mountings andensure safe, reliable and fast assem-
bly. The special approved child seat is
the Isofix KIDDY seat. It can be usedin the "rear facing" position from birthto 13 kg and in the "forwards facing"position from 9 to 18 kg. In the "forwards facing" position, the front seat must be in the mid-wayposition on the slide, with the seatback upright. The combined use of the Isofix mounting, the restraining cushion
and the seat belt is then compulsory.
The Isofix KIDDY seat can also be installed on a side seat in the 2nd
row, positioned in the 3rd row. In this
case, the Isofix KIDDY seat must bein the "rear facing" position, the bodysupported on the seat back of thecorresponding 2nd row seat.
YOUR 307 SW IN DETAIL
61
This seat can also be used on seats not fitted with Isofix mountings: inthis case it is compulsory to attach itto the vehicle's seat by means of thethree-point seat belt.
When the Isofix KIDDY seat is fit- ted in the "rear facing" positionon the front passenger seat, it isimperative that that passenger airbag be disarmed. Otherwise there is a risk the child could be seriously injured or evenkilled due to deployment of the airbag. Follow the instructions for fitting the child seat in the manufactu-rer's instruction booklet.
Page 67 of 137

YOUR 307 SW IN DETAIL
66
3rd row rear seat belts The 3rd row rear seats are fitted with two three-point inertia reel seatbelts.
To put on the seat belt, insert buckle C
then buckle Dinto their respective
stalks.
To remove the seat belt, proceed in
the reverse order, then move buckleD to the location Eprovided.
To be effective, a seat belt must be tightened asclose to the body as pos-sible.
If the seats are fitted with arm-rests, the lap section of the seatbelt must always pass under thearmrest. Do not invert the seat belt buckles as they will not carry out their
function fully. Depending on the nature and the seriousness of the impact, thepre-tensioners may be triggeredbefore and independently of trig-gering of the airbags. In all cases, the airbag warning light comes on. Following a collision, have the system checked by a PEUGEOT
dealer. The system has been designed to be fully operational for ten years. Have it replaced after this period.
Page 86 of 137

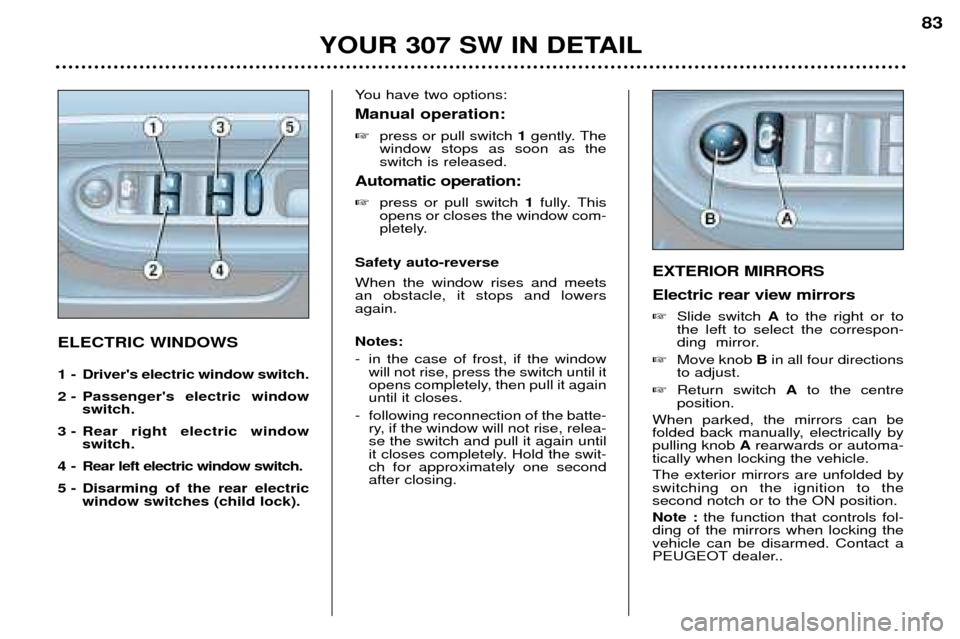
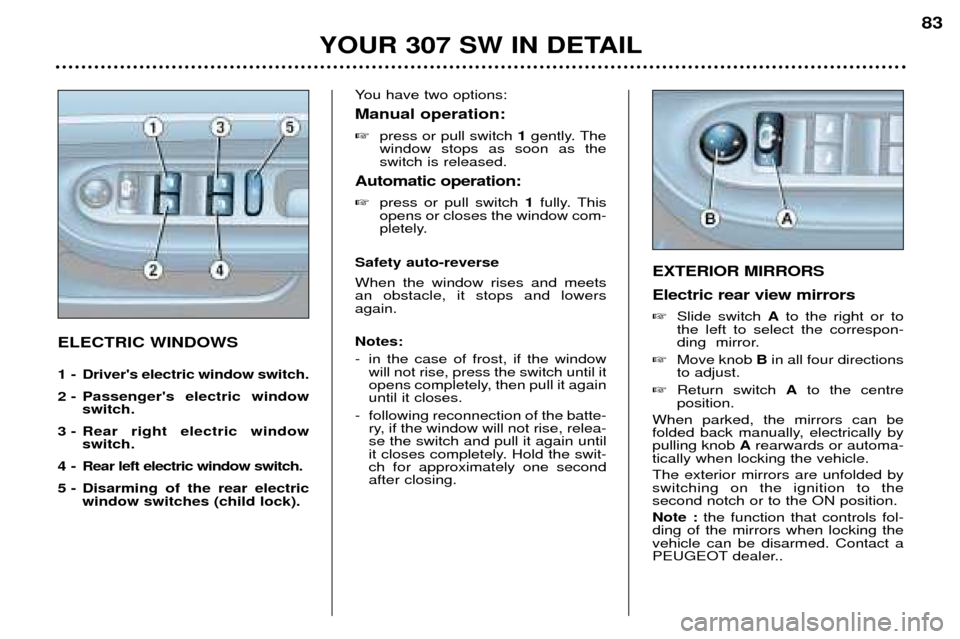
ELECTRIC WINDOWS
1 - Driver's electric window switch.
2 - Passenger's electric windowswitch.
3 - Rear right electric window switch.
4 - Rear left electric window switch.
5 - Disarming of the rear electric window switches (child lock). You have two options: Manual operation: �
press or pull switch 1gently. The
window stops as soon as the switch is released.
Automatic operation: � press or pull switch 1fully. This
opens or closes the window com-
pletely.
Safety auto-reverse When the window rises and meets an obstacle, it stops and lowersagain. Notes:
- in the case of frost, if the window will not rise, press the switch until it
opens completely, then pull it againuntil it closes.
- following reconnection of the batte- ry, if the window will not rise, relea-se the switch and pull it again until
it closes completely. Hold the swit-ch for approximately one secondafter closing.
YOUR 307 SW IN DETAIL 83
EXTERIOR MIRRORS Electric rear view mirrors �
Slide switch Ato the right or to
the left to select the correspon-
ding mirror.
� Move knob Bin all four directions
to adjust.
� Return switch Ato the centre
position.
When parked, the mirrors can be
folded back manually, electrically bypulling knob Arearwards or automa-
tically when locking the vehicle. The exterior mirrors are unfolded by switching on the ignition to thesecond notch or to the ON position. Note : the function that controls fol-
ding of the mirrors when locking the vehicle can be disarmed. Contact a
PEUGEOT dealer..
Page 87 of 137

ELECTRIC WINDOWS
1 - Driver's electric window switch.
2 - Passenger's electric windowswitch.
3 - Rear right electric window switch.
4 - Rear left electric window switch.
5 - Disarming of the rear electric window switches (child lock). You have two options: Manual operation: �
press or pull switch 1gently. The
window stops as soon as the switch is released.
Automatic operation: � press or pull switch 1fully. This
opens or closes the window com-
pletely.
Safety auto-reverse When the window rises and meets an obstacle, it stops and lowersagain. Notes:
- in the case of frost, if the window will not rise, press the switch until it
opens completely, then pull it againuntil it closes.
- following reconnection of the batte- ry, if the window will not rise, relea-se the switch and pull it again until
it closes completely. Hold the swit-ch for approximately one secondafter closing.
YOUR 307 SW IN DETAIL 83
EXTERIOR MIRRORS Electric rear view mirrors �
Slide switch Ato the right or to
the left to select the correspon-
ding mirror.
� Move knob Bin all four directions
to adjust.
� Return switch Ato the centre
position.
When parked, the mirrors can be
folded back manually, electrically bypulling knob Arearwards or automa-
tically when locking the vehicle. The exterior mirrors are unfolded by switching on the ignition to thesecond notch or to the ON position. Note : the function that controls fol-
ding of the mirrors when locking the vehicle can be disarmed. Contact a
PEUGEOT dealer..
Page 95 of 137

YOUR 307 SW IN DETAIL91
BOOT LAYOUT
1 - Grab handles and coat hooks
2 - High load retaining net fastenings The high load retaining net can be fitted in the 2nd or
3rd row. Open the covers of the corresponding upper faste- nings. Fit the ends of the metal bar in these fastenings.Secure the two opaque material strap hooks in the sto-
wing rings on the floor. The rings are located directly below the corresponding upper fastenings. Pull the two straps taut.Secure the two hooks on the elastic parts of the opaque material in these rings. Note: the net must be positioned so that the label can
be seen from the boot. This ensures that the central
seat belt is routed correctly.
3 - 12V Socket for accessories This is a 12 volt socket (lighter type), installed on thetonneau left support.
It is supplied with the ignition off.
4 - Rear armrests with grab handle
5 - Storage nets One of them contains the luggage retaining net. 6 - Tonneau
To install it:
Ð position one end of the tonneau roller in the 2nd row,
Ð compress the opposite end of the roller and position it,
Ð release it to allow it to engage,
Ð unroll the tonneau as far as the boot pillars,
Ð insert the tonneau guides in the rails in the pillars. To remove it:
Ð remove the tonneau guides from the pillar rails,
Ð return the tonneau into its roller,
Ð compress it and remove it from its support at the 2nd row,
To store it, pull it back and place it with the two storage nets, already lowered. Note: the roller has two hooks for securing the lugga-
ge retaining net depending on where it is installed.
7 - Luggage retaining net Secure the net's seven hooks in the stowing rings and
the fastenings on the floor.
8 - Luggage retaining net fastenings ("hammock" version) in the tailgate Fold the net in two. Secure the two centre hooks in the stowing rings on the
floor. Secure the net's remaining four hooks on the boot pillars.
See configuration of the nets (next page)