ESP Peugeot 307 SW Dag 2002.5 Owner's Guide
[x] Cancel search | Manufacturer: PEUGEOT, Model Year: 2002.5, Model line: 307 SW Dag, Model: Peugeot 307 SW Dag 2002.5Pages: 177, PDF Size: 1.99 MB
Page 154 of 177
22-07-2002
PRACTICAL INFORMATION143
For your safety, always change the wheel:
- on level, stable, non-slippery ground,
- with the handbrake on and the ignition switched off,
- with first or reverse gear enga- ged (position Pfor the automatic
gearbox),
- with the vehicle chocked. Never go underneath a vehicle that is supported only by a jack(use a ramp) Never refit the holder under the vehicle without the sparewheel. After changing the wheel:
- have the correct positioning of the punctured wheel, the tighte- ning of the bolts and the tyrepressure checked by a PEUGEOT dealer as soon aspossible.
- have the punctured tyre repai- red and refit it to the vehicle assoon as possible.
- have the correct positioning of the spare wheel checked by a
PEUGEOT dealer.� Store the rest of the tools in the right-hand trim of the boot.
Fitting a wheel �
Position the wheel using the cen- tralising tool 5to assist you.
� Tighten the bolts by hand andremove the centralising tool 5.
� Partly tighten the bolts using thewheelbrace 1.
� Fold the jack 4and remove it.
� Fully tighten the bolts using thewheelbrace 1.
� Replace the wheel trim, startingby placing the wheel trim notchopposite the valve, and press iton using the palm of the hand.
� Put the corresponding tools in
the holder and secure its cover.
� Place the holder on the groundand align the spare wheel on it.
� Pass the notched hook into the
holder cover.
� Refit the wheel under the vehicletightening the winch control nutusing the wheelbrace 1.
� Fully tighten and check that the
wheel is horizontally flush
against the rear floor.
� Close the flap using the lug tolock the winch.
Page 156 of 177
22-07-2002
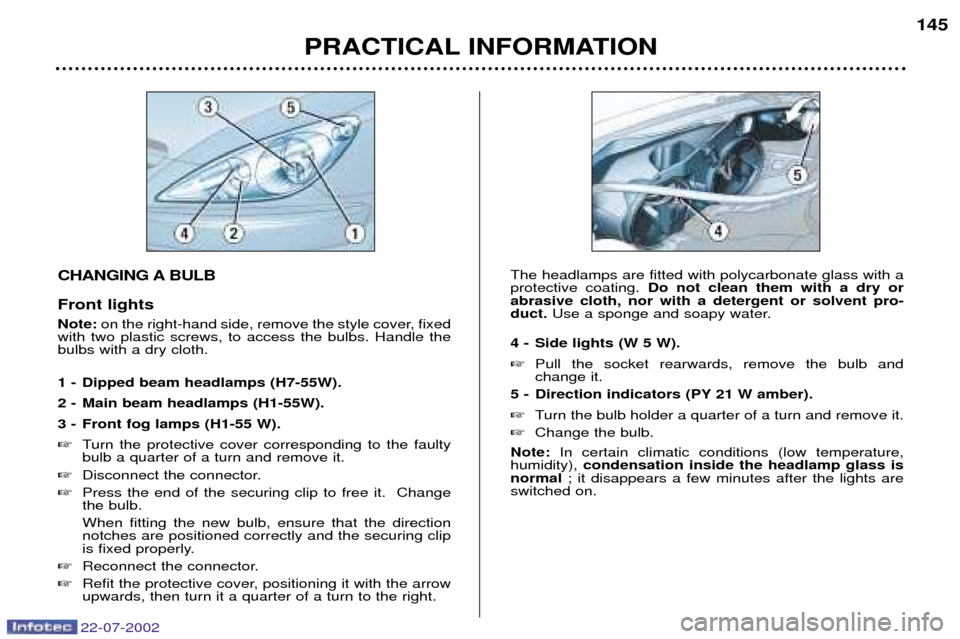
CHANGING A BULB Front lights Note: on the right-hand side, remove the style cover, fixed
with two plastic screws, to access the bulbs. Handle the bulbs with a dry cloth.
1 - Dipped beam headlamps (H7-55W).
2 - Main beam headlamps (H1-55W).
3 - Front fog lamps (H1-55 W).� Turn the protective cover corresponding to the faulty bulb a quarter of a turn and remove it.
� Disconnect the connector.
� Press the end of the securing clip to free it. Changethe bulb. When fitting the new bulb, ensure that the direction notches are positioned correctly and the securing clip
is fixed properly.
� Reconnect the connector.
� Refit the protective cover, positioning it with the arrowupwards, then turn it a quarter of a turn to the right. The headlamps are fitted with polycarbonate glass with aprotective coating.
Do not clean them with a dry or
abrasive cloth, nor with a detergent or solvent pro-duct. Use a sponge and soapy water.
4 - Side lights (W 5 W). � Pull the socket rearwards, remove the bulb and change it.
5 - Direction indicators (PY 21 W amber). � Turn the bulb holder a quarter of a turn and remove it.
� Change the bulb.
Note: In certain climatic conditions (low temperature,
humidity), condensation inside the headlamp glass is
normal ; it disappears a few minutes after the lights are
switched on.
PRACTICAL INFORMATION 145
Page 158 of 177
22-07-2002
PRACTICAL INFORMATION147
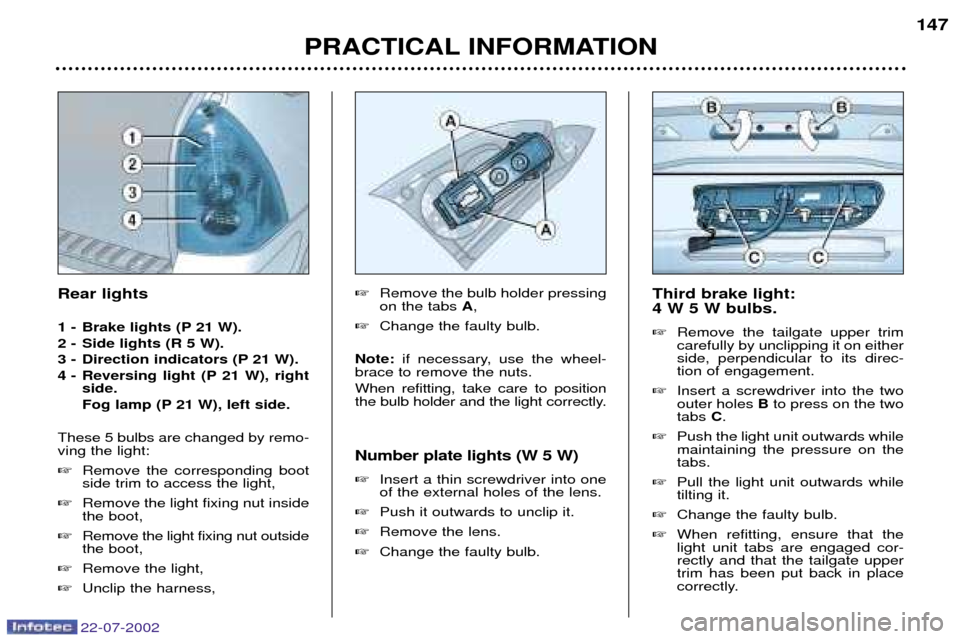
Third brake light: 4 W 5 W bulbs. � Remove the tailgate upper trim carefully by unclipping it on eitherside, perpendicular to its direc-tion of engagement.
� Insert a screwdriver into the twoouter holes Bto press on the two
tabs C.
� Push the light unit outwards whilemaintaining the pressure on thetabs.
� Pull the light unit outwards whiletilting it.
� Change the faulty bulb.
� When refitting, ensure that thelight unit tabs are engaged cor-rectly and that the tailgate uppertrim has been put back in place
correctly.
�Remove the bulb holder pressing on the tabs A,
� Change the faulty bulb.
Note: if necessary, use the wheel-
brace to remove the nuts. When refitting, take care to position
the bulb holder and the light correctly.
Number plate lights (W 5 W) � Insert a thin screwdriver into one of the external holes of the lens.
� Push it outwards to unclip it.
� Remove the lens.
� Change the faulty bulb.
Rear lights
1 - Brake lights (P 21 W).
2 - Side lights (R 5 W).
3 - Direction indicators (P 21 W).
4 - Reversing light (P 21 W), right
side.
Fog lamp (P 21 W), left side.
These 5 bulbs are changed by remo- ving the light: � Remove the corresponding boot side trim to access the light,
� Remove the light fixing nut insidethe boot,
� Remove the light fixing nut outsidethe boot,
� Remove the light,
� Unclip the harness,
Page 160 of 177
22-07-2002
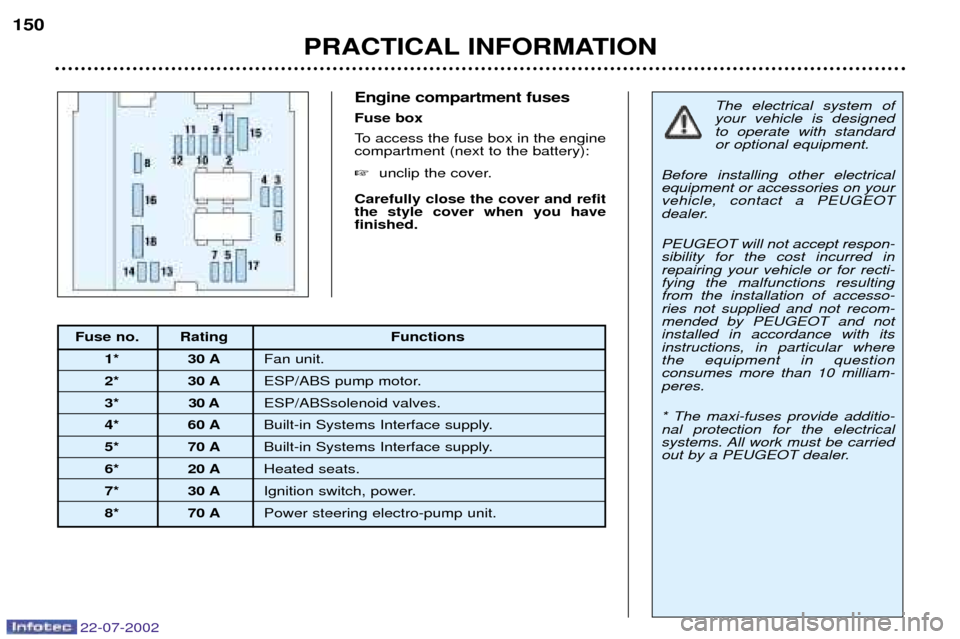
Engine compartment fuses Fuse box
To access the fuse box in the engine compartment (next to the battery): �unclip the cover.
Carefully close the cover and refit the style cover when you havefinished.
PRACTICAL INFORMATION
150
The electrical system of your vehicle is designedto operate with standardor optional equipment.
Before installing other electricalequipment or accessories on yourvehicle, contact a PEUGEOT
dealer. PEUGEOT will not accept respon- sibility for the cost incurred inrepairing your vehicle or for recti-fying the malfunctions resultingfrom the installation of accesso-ries not supplied and not recom-mended by PEUGEOT and notinstalled in accordance with itsinstructions, in particular wherethe equipment in questionconsumes more than 10 milliam-peres. * The maxi-fuses provide additio- nal protection for the electrical
systems. All work must be carried
out by a PEUGEOT dealer.
Fuse no. Rating Functions 1* 30 A Fan unit.
2* 30 A ESP/ABS pump motor.
3* 30 A ESP/ABSsolenoid valves.
4* 60 A Built-in Systems Interface supply.
5* 70 A Built-in Systems Interface supply.
6* 20 A Heated seats.
7* 30 A Ignition switch, power.
8* 70 A Power steering electro-pump unit.
Page 161 of 177
22-07-2002
PRACTICAL INFORMATION151
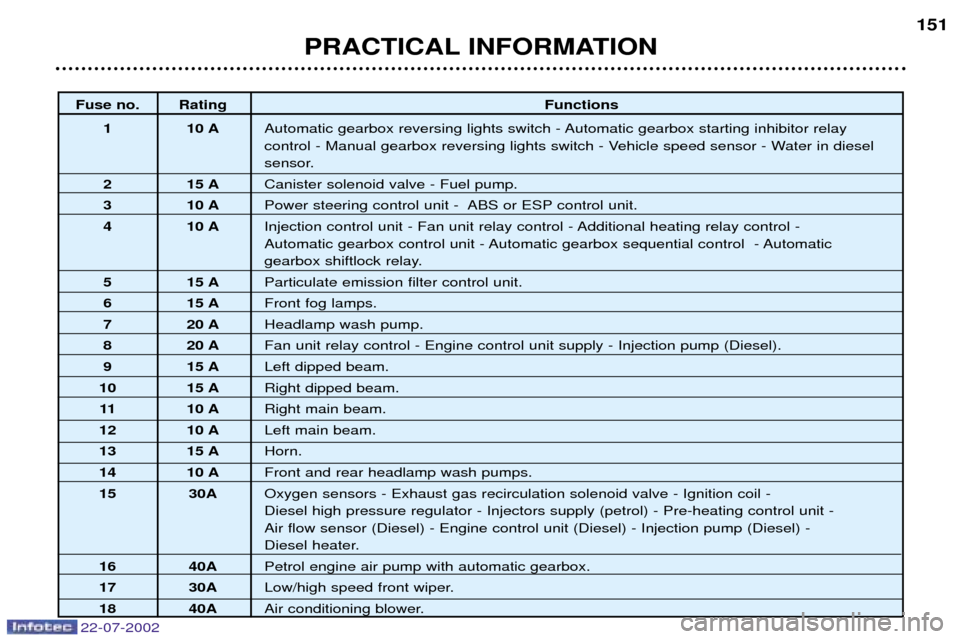
Fuse no. Rating
Functions
1 10 A Automatic gearbox reversing lights switch - Automatic gearbox starting inhibitor relay
control - Manual gearbox reversing lights switch - Vehicle speed sensor - Water in diesel
sensor.
2 15 A Canister solenoid valve - Fuel pump.
3 10 A Power steering control unit - ABS or ESP control unit.
4 10 A Injection control unit - Fan unit relay control - Additional heating relay control -
Automatic gearbox control unit - Automatic gearbox sequential control - Automatic
gearbox shiftlock relay.
5 15 A Particulate emission filter control unit.
6 15 A Front fog lamps.
7 20 A Headlamp wash pump.
8 20 A Fan unit relay control - Engine control unit supply - Injection pump (Diesel).
9 15 A Left dipped beam.
10 15 A Right dipped beam.
11 10 A Right main beam.
12 10 A Left main beam.
13 15 A Horn.
14 10 A Front and rear headlamp wash pumps.
15 30A Oxygen sensors - Exhaust gas recirculation solenoid valve - Ignition coil - Diesel high pressure regulator - Injectors supply (petrol) - Pre-heating control unit - Air flow sensor (Diesel) - Engine control unit (Diesel) - Injection pump (Diesel) -
Diesel heater.
16 40A Petrol engine air pump with automatic gearbox.
17 30A Low/high speed front wiper.
18 40A Air conditioning blower.