Peugeot 308 2015.5 Owner's Manual - RHD (UK, Australia)
Manufacturer: PEUGEOT, Model Year: 2015.5, Model line: 308, Model: Peugeot 308 2015.5Pages: 396, PDF Size: 10.06 MB
Page 271 of 396
269
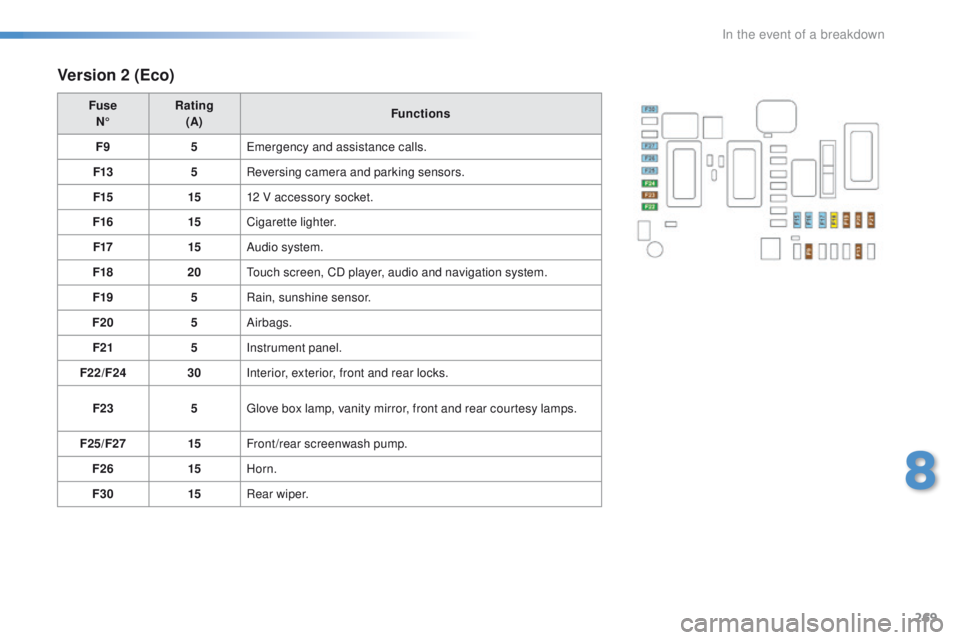
Version 2 (Eco)
FuseN° Rating
(A) Functions
F9 5
em
ergency and assistance calls.
F13 5Reversing camera and parking sensors.
F15 1512 V accessory socket.
F16 15Cigarette lighter.
F17 15Audio system.
F18 20
to
uch screen, CD player, audio and navigation system.
F19 5Rain, sunshine sensor.
F20 5Airbags.
F21 5Instrument panel.
F22/F24 30Interior, exterior, front and rear locks.
F23 5
gl
ove box lamp, vanity mirror, front and rear courtesy lamps.
F25/F27 15Front/rear screenwash pump.
F26 15Horn.
F30 15Rear wiper.
8
In the event of a breakdown
Page 272 of 396
270
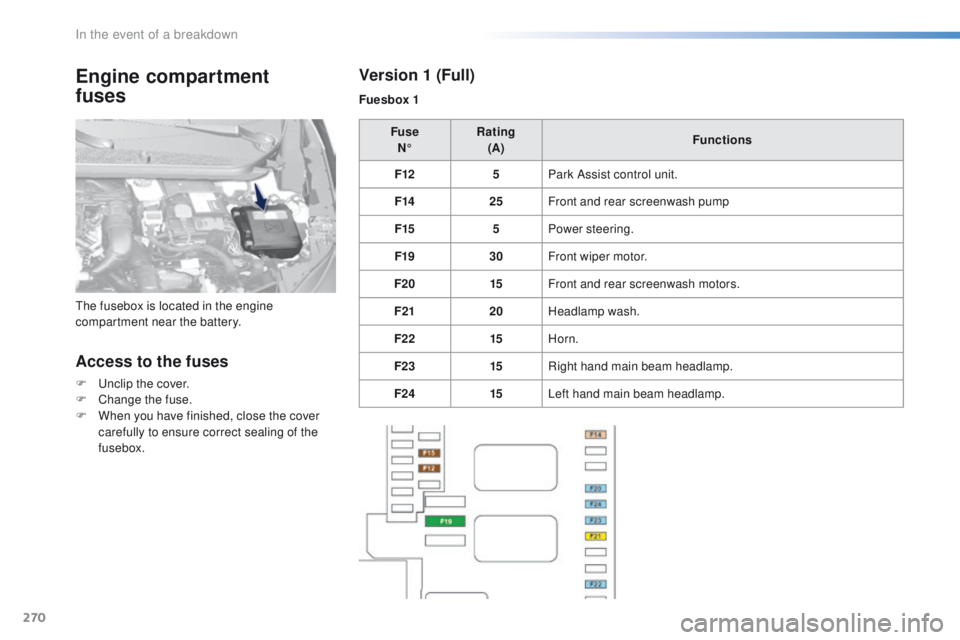
Engine compartment
fuses
Access to the fuses
F unclip the cover.
F C hange the fuse.
F
W
hen you have finished, close the cover
carefully to ensure correct sealing of the
fusebox. Fuse
N° Rating
(A) Functions
F12 5Park Assist control unit.
F14 25Front and rear screenwash pump
F15 5Power steering.
F19 30Front wiper motor.
F20 15Front and rear screenwash motors.
F21 20Headlamp wash.
F22 15Horn.
F23 15Right hand main beam headlamp.
F24 15Left hand main beam headlamp.
th
e fusebox is located in the engine
compartment near the battery.
Version 1 (Full)
Fuesbox 1
In the event of a breakdown
Page 273 of 396
271
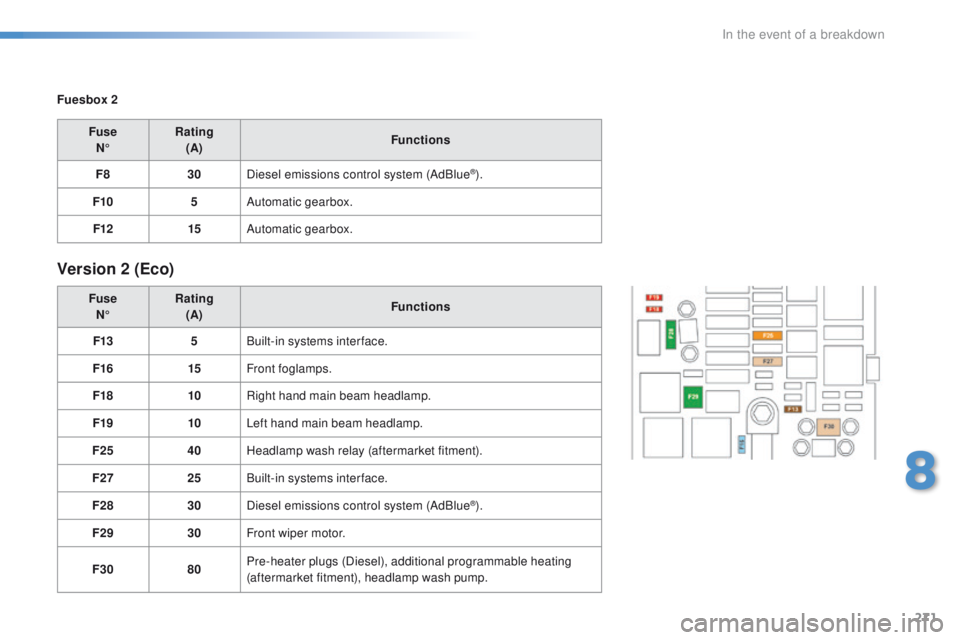
Fuesbox 2FuseN° Rating
(A) Functions
F8 30Diesel emissions control system (AdBlue
®).
F10 5Automatic gearbox.
F12 15Automatic gearbox.
Version 2 (Eco)
Fuse
N° Rating
(A) Functions
F13 5Built-in systems inter face.
F16 15Front foglamps.
F18 10Right hand main beam headlamp.
F19 10Left hand main beam headlamp.
F25 40Headlamp wash relay (aftermarket fitment).
F27 25Built-in systems inter face.
F28 30Diesel emissions control system (AdBlue
®).
F29 30Front wiper motor.
F30 80Pre-heater plugs (Diesel), additional programmable heating
(aftermarket fitment), headlamp wash pump.
8
In the event of a breakdown
Page 274 of 396
272
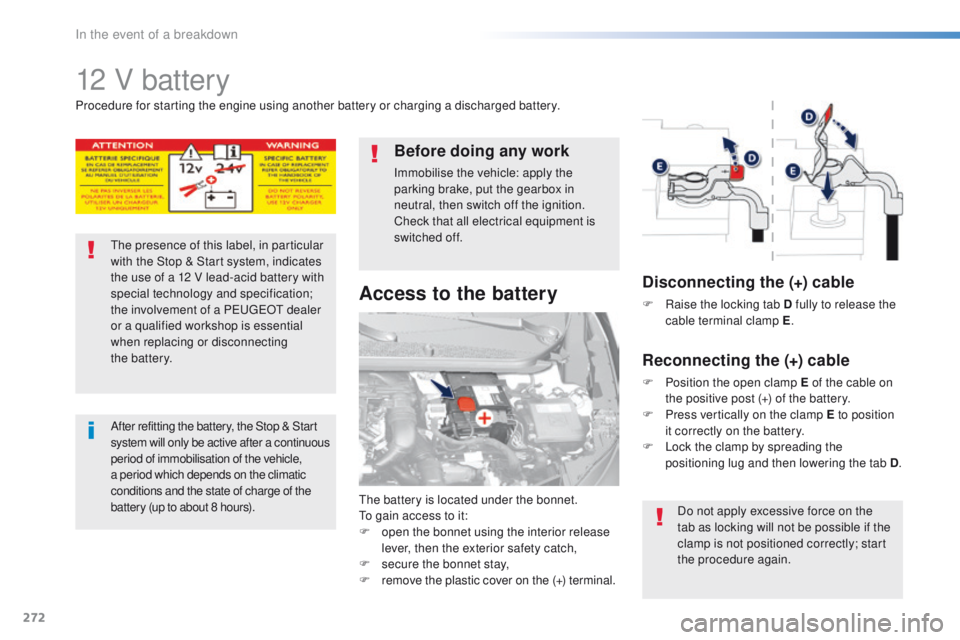
12 V battery
the battery is located under the bonnet.to gain access to it:
F
o
pen the bonnet using the interior release
lever, then the exterior safety catch,
F
s
ecure the bonnet stay,
F
r
emove the plastic cover on the (+) terminal.
Access to the battery
Procedure for starting the engine using another battery or charging a discharged battery.
th
e presence of this label, in particular
with the Stop & Start system, indicates
the use of a 12 V lead-acid battery with
special technology and specification;
the involvement of a P
e
uge
Ot
dealer
or a qualified workshop is essential
when replacing or disconnecting
the
battery.
After refitting the battery, the Stop & Start
s ystem will only be active after a continuous
period of immobilisation of the vehicle,
a period which depends on the climatic
conditions and the state of charge of the
battery (up to about 8 hours).
Before doing any work
Immobilise the vehicle: apply the
parking brake, put the gearbox in
neutral, then switch off the ignition.
Check that all electrical equipment is
switched off.
Disconnecting the (+) cable
F Raise the locking tab D fully to release the cable terminal clamp E .
Reconnecting the (+) cable
F Position the open clamp E of the cable on
the positive post (+) of the battery.
F
P
ress vertically on the clamp E to position
it correctly on the battery.
F
L
ock the clamp by spreading the
positioning lug and then lowering the tab D .
Do not apply excessive force on the
tab as locking will not be possible if the
clamp is not positioned correctly; start
the procedure again.
In the event of a breakdown
Page 275 of 396
273
Starting using another battery
First check that the slave battery has a
nominal voltage of 12 V and a capacity
at least equal to that of the discharged
battery.
Do not try to start the engine by
connecting a battery charger.
Do not disconnect the (+) terminal when
the engine is running.
F
R
emove the plastic cover from
the
(+) terminal, if your vehicle has one.
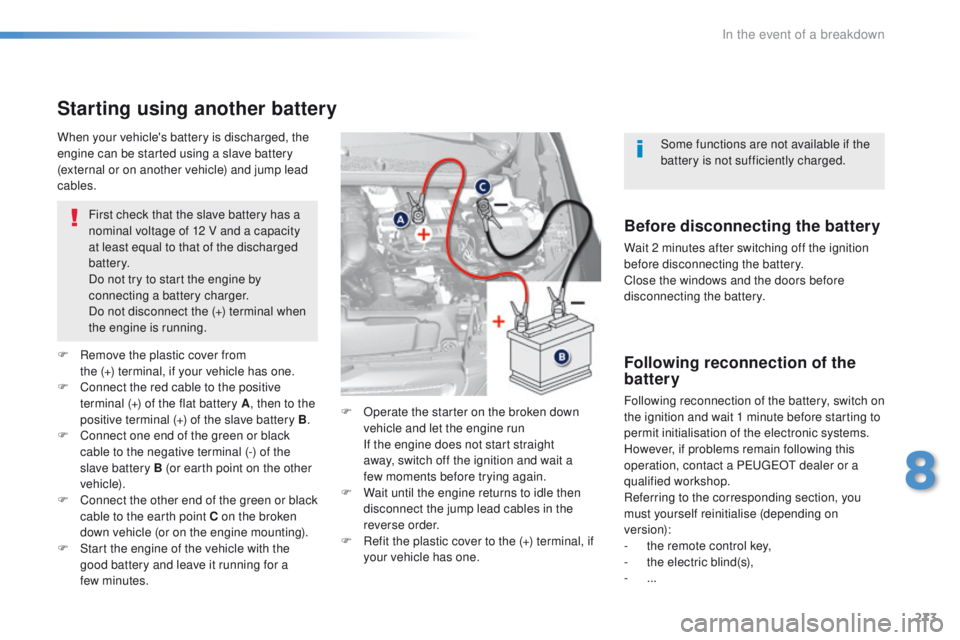
F
C
onnect the red cable to the positive
terminal (+) of the flat battery A , then to the
positive terminal (+) of the slave battery B.
F
C
onnect one end of the green or black
cable to the negative terminal (-) of the
slave battery B (or earth point on the other
vehicle).
F
C
onnect the other end of the green or black
cable to the earth point C on the broken
down vehicle (or on the engine mounting).
F
S
tart the engine of the vehicle with the
good battery and leave it running for a
few
minutes. F
O
perate the starter on the broken down
vehicle and let the engine run
I
f the engine does not start straight
away, switch off the ignition and wait a
few
moments before trying again.
F
W
ait until the engine returns to idle then
disconnect the jump lead cables in the
reverse order.
F
R
efit the plastic cover to the (+) terminal, if
your vehicle has one.
When your vehicle's battery is discharged, the
engine can be started using a slave battery
(external or on another vehicle) and jump lead
cables.Before disconnecting the battery
Wait 2 minutes after switching off the ignition
before disconnecting the battery.
Close the windows and the doors before
disconnecting the battery.
Following reconnection of the
battery
Following reconnection of the battery, switch on
the ignition and wait 1 minute before starting to
permit initialisation of the electronic systems.
However, if problems remain following this
operation, contact a P
e
uge
Ot
dealer or a
qualified workshop.
Referring to the corresponding section, you
must yourself reinitialise (depending on
version):
-
t
he remote control key,
-
t
he electric blind(s),
-
...Some functions are not available if the
battery is not sufficiently charged.
8
In the event of a breakdown
Page 276 of 396
274
the batteries contain harmful substances
such as sulphuric acid and lead. th ey
must be disposed of in accordance
with regulations and must not, in any
circumstances, be discarded with household
waste.
ta
ke used remote control batteries and
vehicle batteries to a special collection point.
It is advisable to disconnect the battery
if the vehicle is to be left unused for
more than one month. Protect your eyes and face before
handling the battery.
All operations on the battery must be
carried out in a well ventilated area and
away from naked flames and sources
of sparks, so as to avoid the risk of
explosion or fire.
Do not try to charge a frozen battery;
the battery must first be thawed out to
avoid the risk of explosion. If the battery
has been frozen, before charging have
it checked by a Pe
ugeOt dealer or a
qualified workshop who will check that
the internal components have not been
damaged and the casing is not cracked,
which could cause a leak of toxic and
corrosive acid.
Do not reverse the polarity and use only
a 12 V charger.
Do not disconnect the terminals while
the engine is running.
Do not charge the batteries without
disconnecting the terminals first.
Wash your hands afterwards.
With Stop & Start, the battery does not
have to be disconnected for charging.
F
D
isconnect the battery from the vehicle.
F
F
ollow the instructions for use provided by
the manufacturer of the charger.
F
C
onnect the battery starting with the
negative terminal (-).
F
C
heck that the terminals and connectors
are clean. If they are covered with sulphate
(whitish or greenish deposit), remove them
and clean them.
Charging the battery using
a battery charger
Do not push the vehicle to start the
engine if your vehicle has an automatic
gearbox.
In the event of a breakdown
Page 277 of 396
275
to w i n gProcedure for having your vehicle towed or for towing another vehicle using a removable towing eye.
Access to the tooling
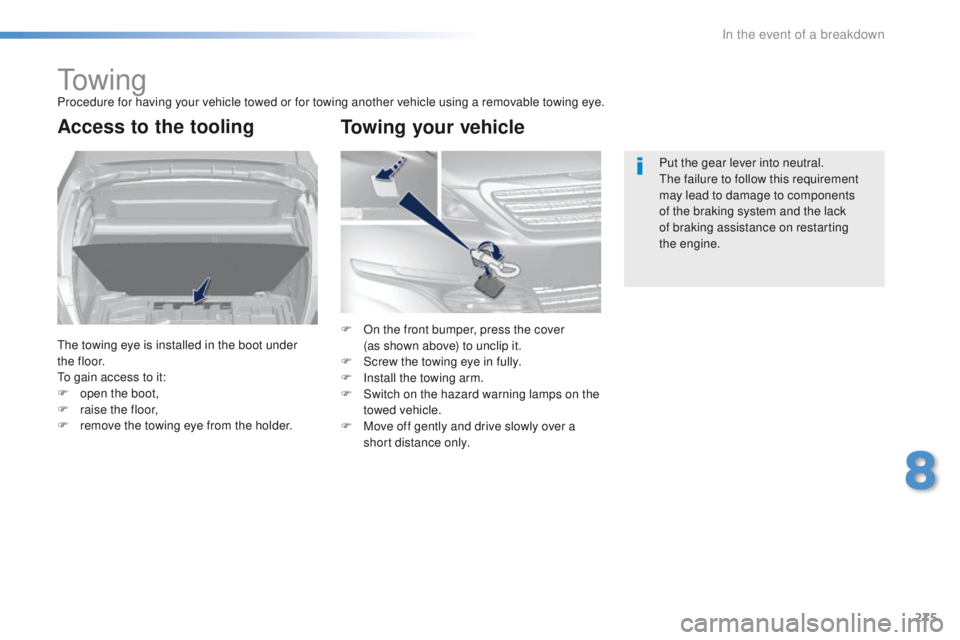
the towing eye is installed in the boot under
t h e f l o o r.
to g
ain access to it:
F
o
pen the boot,
F
r
aise the floor,
F
r
emove the towing eye from the holder. Put the gear lever into neutral.
th
e failure to follow this requirement
may lead to damage to components
of the braking system and the lack
of braking assistance on restarting
the
engine.
F O n the front bumper, press the cover
(as shown above) to unclip it.
F
S
crew the towing eye in fully.
F
I
nstall the towing arm.
F
S
witch on the hazard warning lamps on the
towed vehicle.
F
M
ove off gently and drive slowly over a
short distance only.
Towing your vehicle
8
In the event of a breakdown
Page 278 of 396
276
General recommendations
Observe the legislation in force in your country.ensure that the weight of the towing vehicle is higher than that of the towed vehicle.
th
e driver must remain at the wheel of the towed vehicle and must have a valid driving licence.
When towing a vehicle with all four wheels on the ground, always use an approved towing
arm; rope and straps are prohibited.
th
e towing vehicle must move off gently.
When towing a vehicle with the engine off, there is no longer any power assistance for
braking or steering.
In the following cases, you must always call on a professional recovery service:
-
v
ehicle broken down on a motor way or fast road,
-
f
our-wheel drive vehicle,
-
w
hen it is not possible to put the gearbox into neutral, unlock the steering, or release
the parking brake,
-
t
owing with only two wheels on the ground,
-
w
here there is no approved towing arm available...
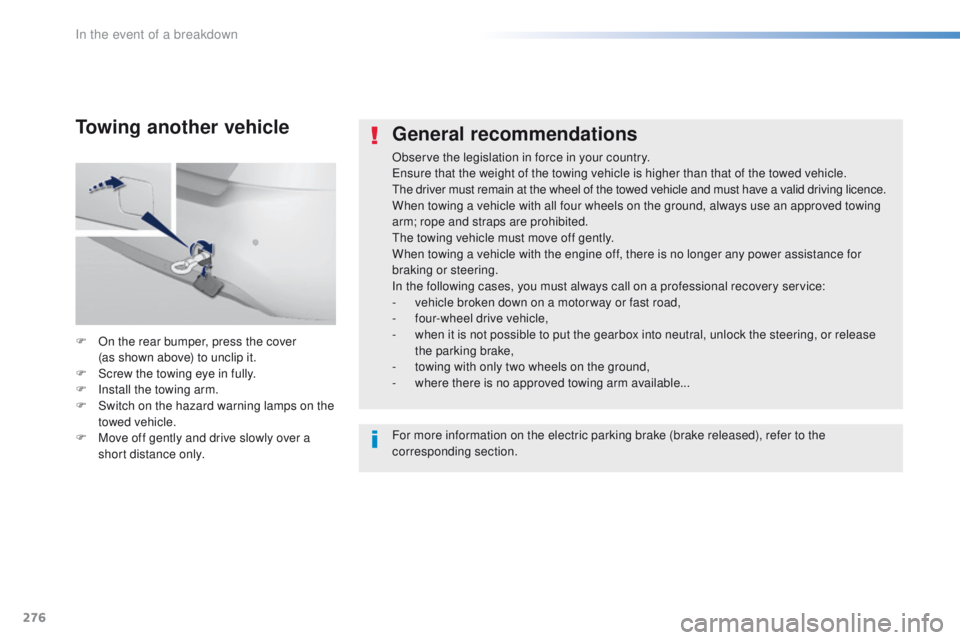
F
O
n the rear bumper, press the cover
(as
shown above) to unclip it.
F
S
crew the towing eye in fully.
F
I
nstall the towing arm.
F
S
witch on the hazard warning lamps on the
towed vehicle.
F
M
ove off gently and drive slowly over a
short distance only.
Towing another vehicle
For more information on the electric parking brake (brake released), refer to the
corresponding section.
In the event of a breakdown
Page 279 of 396
277
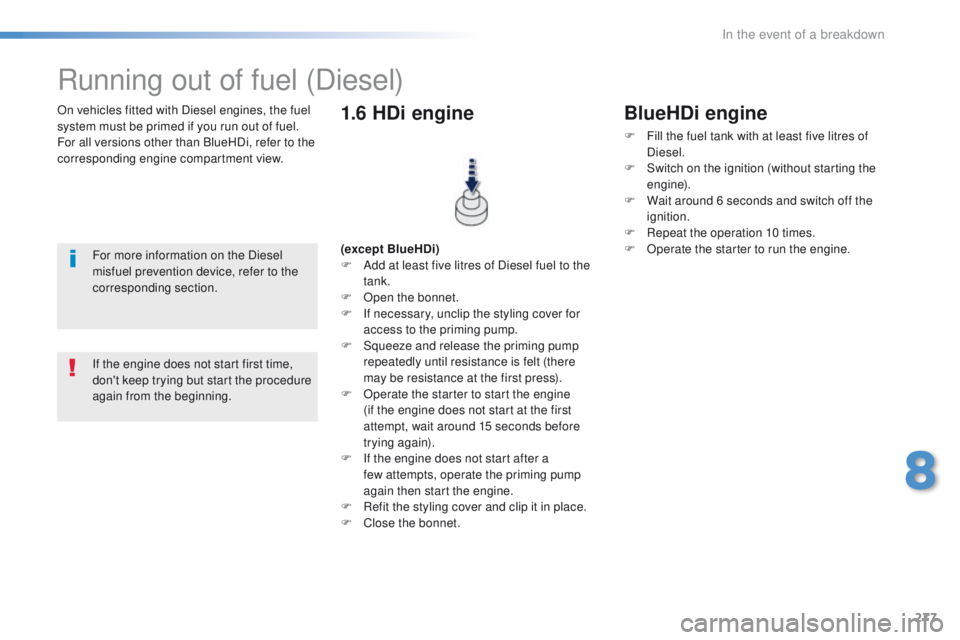
On vehicles fitted with Diesel engines, the fuel
system must be primed if you run out of fuel.
For all versions other than BlueHDi, refer to the
corresponding engine compartment view.
Running out of fuel (Diesel)
For more information on the Diesel
misfuel prevention device, refer to the
corresponding section.(except BlueHDi)
F
A dd at least five litres of Diesel fuel to the
tank.
F
O
pen the bonnet.
F
I
f necessary, unclip the styling cover for
access to the priming pump.
F
S
queeze and release the priming pump
repeatedly until resistance is felt (there
may be resistance at the first press).
F
O
perate the starter to start the engine
(if the engine does not start at the first
attempt, wait around 15 seconds before
trying again).
F
I
f the engine does not start after a
few
attempts, operate the priming pump
again then start the engine.
F
R
efit the styling cover and clip it in place.
F
C
lose the bonnet.
1.6 HDi engine
If the engine does not start first time,
don't keep trying but start the procedure
again from the beginning.
BlueHDi engine
F Fill the fuel tank with at least five litres of Diesel.
F
S
witch on the ignition (without starting the
engine).
F
W
ait around 6 seconds and switch off the
ignition.
F
R
epeat the operation 10 times.
F
O
perate the starter to run the engine.
8
In the event of a breakdown
Page 280 of 396
278
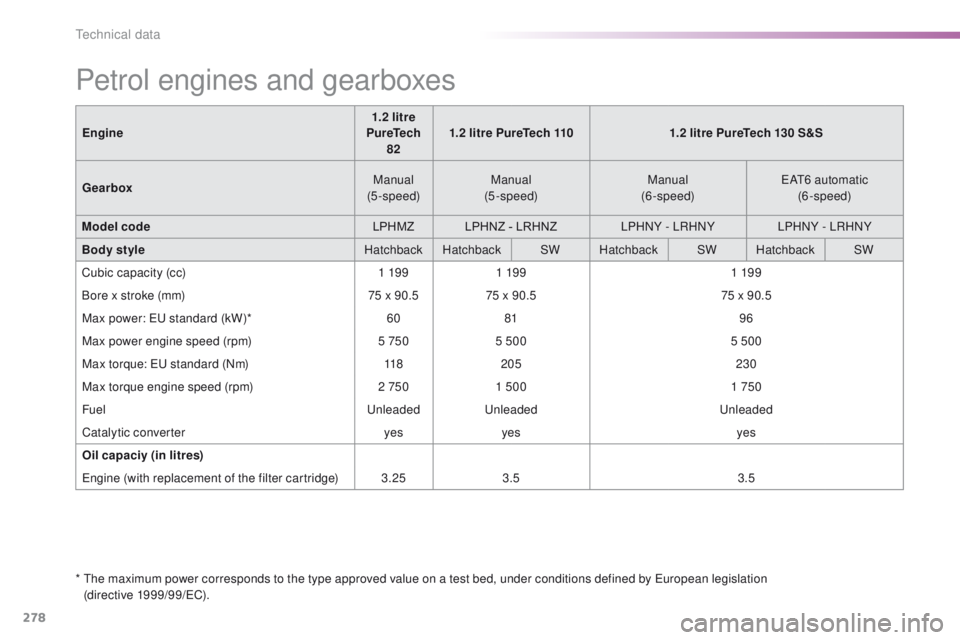
Petrol engines and gearboxes
* the maximum power corresponds to the type approved value on a test bed, under conditions defined by eu ropean legislation
(directive 1999/99/eC ).
Engine
1.2 litre
PureTech 82 1.2 litre PureTech 110
1.2 litre PureTech 130 S&S
Gearbox Manual
(5-speed) Manual
(5-speed) Manual
(6-speed)
eAt6
automatic
(6-speed)
Model code LPHMZLPHNZ - LRHNZ LPHNY - LRHNY LPHNY - LRHNY
Body style Hatchback HatchbackSWHatchback SWHatchback SW
Cubic capacity (cc) 1 19 91 19 9 1 19 9
Bore x stroke (mm) 75 x 90.575 x 90.5 75 x 90.5
Max power: eu standard (kW)*
6081 96
Max power engine speed (rpm) 5 7505 500 5 500
Max torque: eu standard (Nm)
118205 230
Max torque engine speed (rpm) 2 7501 500 1 750
Fuel
u
nleaded
u
nleaded
u
nleaded
Catalytic converter yesyes yes
Oil capaciy (in litres)
en
gine (with replacement of the filter cartridge)
3.253.5 3.5
technical data