buttons PEUGEOT 308 2015 Owners Manual
[x] Cancel search | Manufacturer: PEUGEOT, Model Year: 2015, Model line: 308, Model: Peugeot 308 2015Pages: 344, PDF Size: 12.22 MB
Page 9 of 344
7
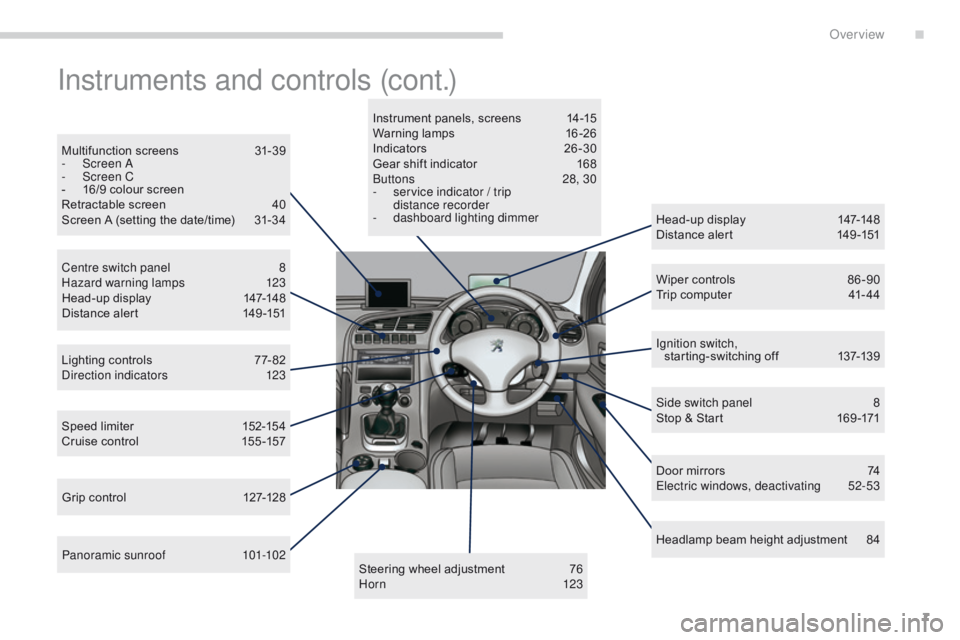
Instruments and controls (cont.)
Head-up display 147-148
Distance alert 1 49 -151
Lighting controls
7
7- 82
Direction indicators
1
23
Speed limiter
1
52-154
Cruise control
1
55 -157 Door mirrors
7
4
Electric windows, deactivating
5
2-53
Side switch panel
8
S
top & Start
1
69 -171
Headlamp beam height adjustment
8
4
Multifunction screens
3
1-39
-
S
creen A
-
S
creen C
-
1
6/9 colour screen
Retractable screen
4
0
Screen A (setting the date/time)
3
1-34
Wiper controls
8
6 -90
Trip computer
4
1- 44
Centre switch panel
8
H
azard warning lamps
1
23
Head-up display
1
47-148
Distance alert
1
49 -151 Ignition switch, starting-switching off
1
37-139
Panoramic sunroof
1
01-102
Grip control
1
27-128 Steering wheel adjustment
7
6
H or n
123
Instrument panels, screens
1
4-15
Warning lamps
1
6-26
Indicators
2
6-30
Gear shift indicator
1
68
Buttons
2
8, 30
-
s
ervice indicator / trip
distance recorder
- d
ashboard lighting dimmer
.
Over view
Page 33 of 344
31
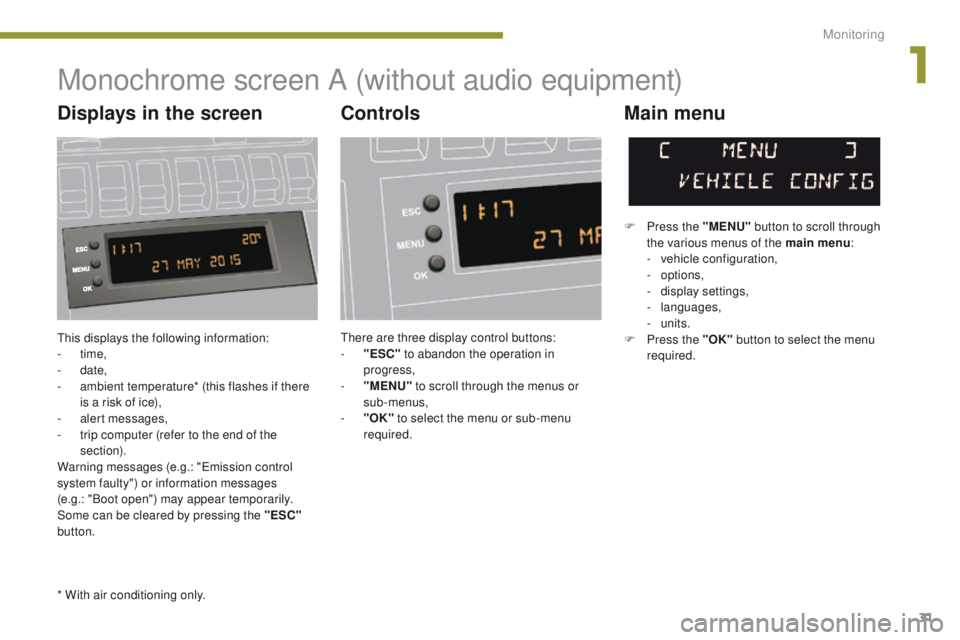
This displays the following information:
- time,
-
date,
-
a
mbient temperature* (this flashes if there
is a risk of ice),
-
a
lert messages,
-
t
rip computer (refer to the end of the
section).
Warning messages (e.g.: "Emission control
system faulty") or information messages
(e.g.: "Boot open") may appear temporarily.
Some can be cleared by pressing the "ESC"
button.
Monochrome screen A (without audio equipment)
Controls Main menu
There are three display control buttons:
-
" ESC" to abandon the operation in
progress,
-
"
MENU" to scroll through the menus or
sub-menus,
-
"O
K" to select the menu or sub-menu
required. F
P
ress the "MENU"
button to scroll through
the various menus of the main menu :
-
v
ehicle configuration,
-
options,
-
d
isplay settings,
-
languages,
- units.
F P ress the "OK" button to select the menu
required.
Displays in the screen
* With air conditioning only.
1
Monitoring
Page 35 of 344
33
Monochrome screen A (with audio equipment)
Controls
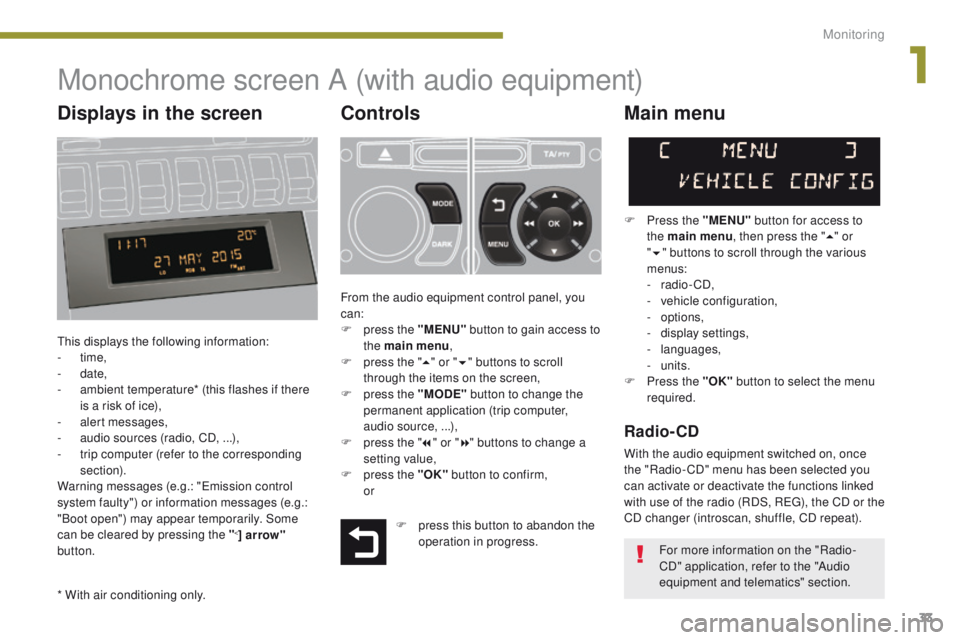
This displays the following information:
- time,
-
date,
-
a
mbient temperature* (this flashes if there
is a risk of ice),
-
a
lert messages,
-
a
udio sources (radio, CD, ...),
-
t
rip computer (refer to the corresponding
section).
Warning messages (e.g.: "Emission control
system faulty") or information messages (e.g.:
"Boot open") may appear temporarily. Some
can be cleared by pressing the "
<] arrow"
button.
Main menu
F Press the "MENU" button for access to
the main menu , then press the " 5" or
" 6 " buttons to scroll through the various
menus:
-
radio - CD,
-
v
ehicle configuration,
-
options,
-
d
isplay settings,
-
languages,
-
units.
F
P
ress the "OK" button to select the menu
required.
From the audio equipment control panel, you
can:
F
p
ress the "MENU" button to gain access to
the main menu ,
F
p
ress the " 5" or " 6" buttons to scroll
through the items on the screen,
F
p
ress the "MODE" button to change the
permanent application (trip computer,
audio source, ...),
F
p
ress the " 7" or " 8" buttons to change a
setting value,
F
p
ress the "OK" button to confirm,
or
Radio- CD
With the audio equipment switched on, once
the "Radio- CD" menu has been selected you
can activate or deactivate the functions linked
with use of the radio (RDS, REG), the CD or the
CD changer (introscan, shuffle, CD repeat).
* With air conditioning only. F
p
ress this button to abandon the
operation in progress. For more information on the "Radio-
CD" application, refer to the "Audio
equipment and telematics" section.
Displays in the screen
1
Monitoring
Page 36 of 344
34
Date and timeLanguages
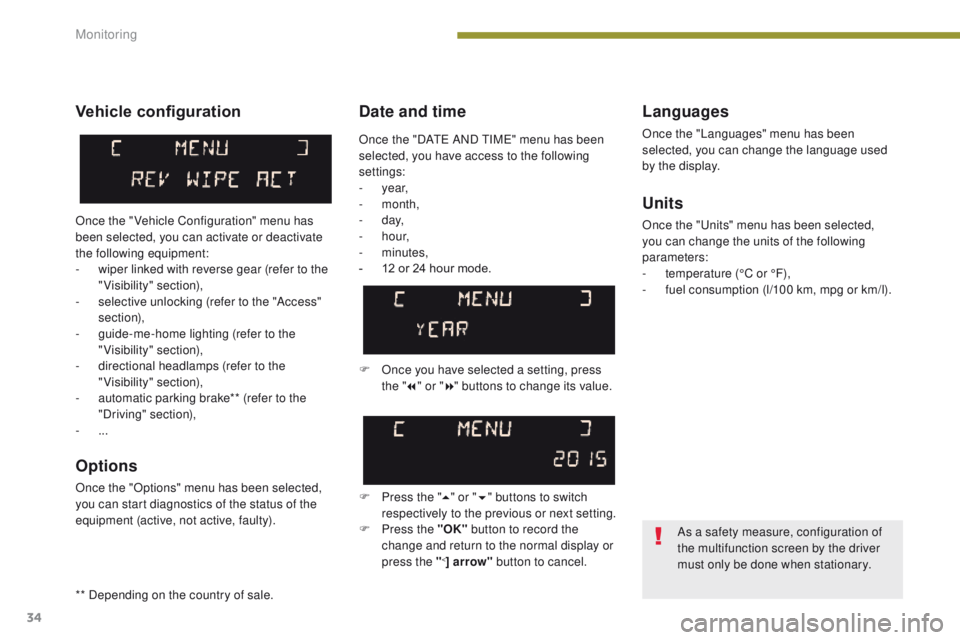
Once the "Languages" menu has been
selected, you can change the language used
by the display.
Units
Once the "Units" menu has been selected,
you can change the units of the following
parameters:
-
t
emperature (°C or °F),
-
f
uel consumption (l/100 km, mpg or km/l).
F
O
nce you have selected a setting, press
the " 7" or " 8" buttons to change its value.
F
P
ress the " 5" or " 6" buttons to switch
respectively to the previous or next setting.
F
P
ress the "OK" button to record the
change and return to the normal display or
press the "
<] arrow" button to cancel.
Vehicle configuration
Once the " Vehicle Configuration" menu has
been selected, you can activate or deactivate
the following equipment:
-
w
iper linked with reverse gear (refer to the
"Visibility" section),
-
s
elective unlocking (refer to the "Access"
section),
-
g
uide-me-home lighting (refer to the
"Visibility" section),
-
d
irectional headlamps (refer to the
"Visibility" section),
-
a
utomatic parking brake** (refer to the
"Driving" section),
-
...
Options
Once the "Options" menu has been selected,
you can start diagnostics of the status of the
equipment (active, not active, faulty).
As a safety measure, configuration of
the multifunction screen by the driver
must only be done when stationary.
Once the "DATE AND TIME" menu has been
selected, you have access to the following
settings:
-
year,
-
month,
-
d ay,
-
h o u r,
-
minutes,
-
1
2 or 24 hour mode.
** Depending on the country of sale.
Monitoring
Page 37 of 344
35
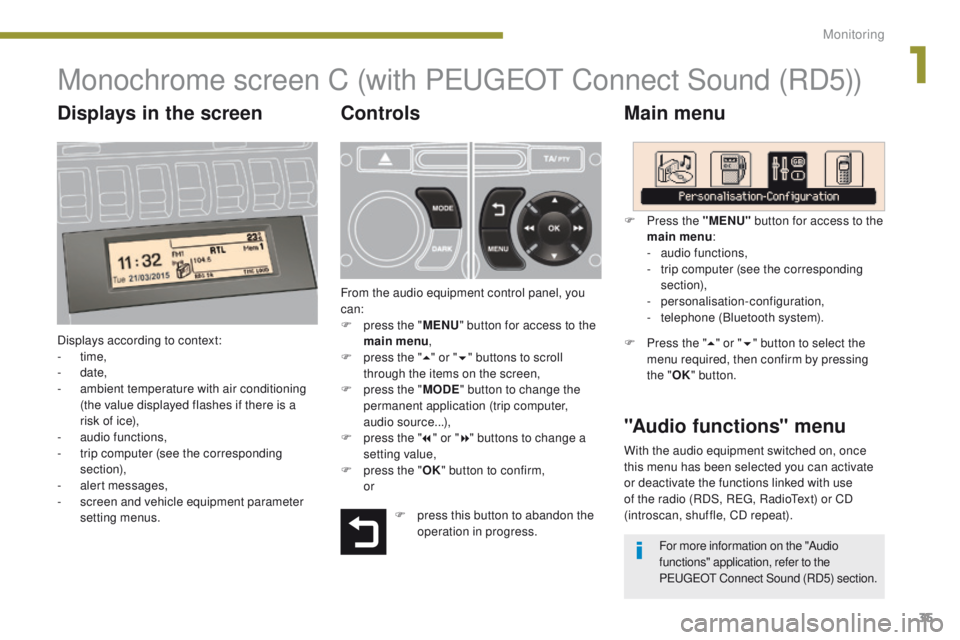
Monochrome screen C (with PEUGEOT Connect Sound (RD5))
Main menu
Displays according to context:
- time,
-
date,
-
a
mbient temperature with air conditioning
(the value displayed flashes if there is a
risk of ice),
-
a
udio functions,
-
t
rip computer (see the corresponding
section),
-
a
lert messages,
-
s
creen and vehicle equipment parameter
setting menus.
"Audio functions" menu
Controls
From the audio equipment control panel, you
can:
F
p
ress the " MENU" button for access to the
main menu ,
F
p
ress the " 5" or " 6" buttons to scroll
through the items on the screen,
F
p
ress the " MODE" button to change the
permanent application (trip computer,
audio source...),
F
p
ress the " 7" or " 8" buttons to change a
setting value,
F
p
ress the " OK" button to confirm,
or F
P
ress the "MENU"
button for access to the
main menu :
-
a
udio functions,
-
t
rip computer (see the corresponding
section),
- personalisation-configuration,
-
t
elephone (Bluetooth system).
F Press the "5" or " 6" button to select the
menu required, then confirm by pressing
the " OK" button.
With the audio equipment switched on, once
this menu has been selected you can activate
or deactivate the functions linked with use
of the radio (RDS, REG, RadioText) or CD
(introscan, shuffle, CD repeat).
F
p
ress this button to abandon the
operation in progress. For more information on the "Audio
functions" application, refer to the
PEUGEOT Connect Sound (RD5) section.
Displays in the screen
1
Monitoring
Page 39 of 344
37
Display configuration
Once this menu has been selected, you have
access to the following settings:
-
b
rightness-video setting,
-
d
ate and time setting,
-
s
election of the units.
Adjusting the date and time
F
P
ress the " 7" or " 8" button to select the
"Display configuration" menu, then the
"OK" button.
F
P
ress the " 5" or " 6" button, to select the
"Adjust date and time" line, then on the
"OK" button.
F
P
ress the " 7" or " 8" button to select the
setting to modify. Confirm by pressing the
"OK"
button then adjust the setting and
confirm again to save the modification.
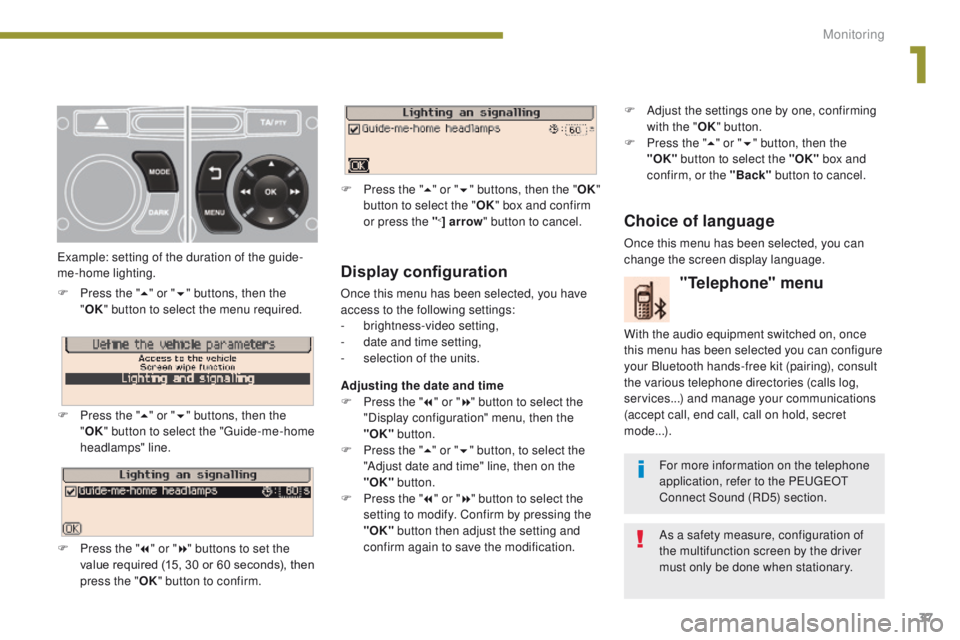
Example: setting of the duration of the guide-
me-home lighting.
F
P
ress the "
5" or " 6" buttons, then the
" OK "
button to select the menu required.
F
P
ress the " 5" or " 6" buttons, then the
" OK " button to select the "Guide-me-home
headlamps" line.
F
P
ress the " 7" or " 8" buttons to set the
value required (15, 30 or 60 seconds), then
press the " OK" button to confirm. F
P
ress the "
5" or " 6" buttons, then the " OK"
button to select the " OK" box and confirm
or press the "
<] arrow " button to cancel.
"Telephone" menu
With the audio equipment switched on, once
this menu has been selected you can configure
your Bluetooth hands-free kit (pairing), consult
the various telephone directories (calls log,
services...) and manage your communications
(accept call, end call, call on hold, secret
mode...).
For more information on the telephone
application, refer to the PEUGEOT
Connect Sound (RD5) section.
As a safety measure, configuration of
the multifunction screen by the driver
must only be done when stationary.
Choice of language
Once this menu has been selected, you can
change the screen display language. F
A
djust the settings one by one, confirming
with the " OK" button.
F
P
ress the "
5" or " 6" button, then the
"OK"
button to select the "OK"
box and
confirm, or the "Back" button to cancel.
1
Monitoring
Page 51 of 344
49
Lost keys
Go to a PEUGEOT dealer with the vehicle's registration document, your personal
identification documents and if possible the key code label.
The PEUGEOT dealer will be able to look up the key code and the transponder code
required to order a new key.Do not throw the remote control
batteries away, they contain metals
which are harmful to the environment.
Take them to an approved collection
point.
Remote control
The high frequency remote control is a sensitive system; do not operate it while it is in your
pocket as there is a possibility that it may unlock the vehicle, without you being aware of it.
Do not repeatedly press the buttons of your remote control out of range and out of sight of
your vehicle. You run the risk of stopping it from working and the remote control would have
to be reinitialised.
No remote control can operate when the key is in the ignition switch, even when the ignition
is switched off, except for reinitialisation.
Locking the vehicle
Driving with the doors locked may make access to the passenger compartment by the
emergency services more difficult in an emergency.
As a safety precaution, never leave children alone in the vehicle, except for a very short period.
In all cases, it is essential to remove the key from the ignition switch when leaving the
vehicle.
Anti-theft protection
Do not make any modifications to the electronic engine immobiliser system; this could
cause malfunctions.
When purchasing a second-hand vehicle
Have the pairing of all of the keys in your possession checked by a PEUGEOT dealer, to
ensure that only your keys can be used to open and start the vehicle.
2
Access
Page 61 of 344
59
Heating and
Ventilation
Controls
The incoming air follows various routes
depending on the controls selected by
the driver, the front passenger and rear
passengers, according to the level of
equipment.
The temperature control enables you to obtain
the level of comfort required by mixing the air of
the various circuits.
The air distribution control enables you to
select the air vents used in the passenger
compartment by the combined use of the
associated buttons.
Air intake
The air circulating in the passenger
compartment is filtered and originates either
from the outside via the grille located at the
base of the windscreen or from the inside in air
recirculation mode.
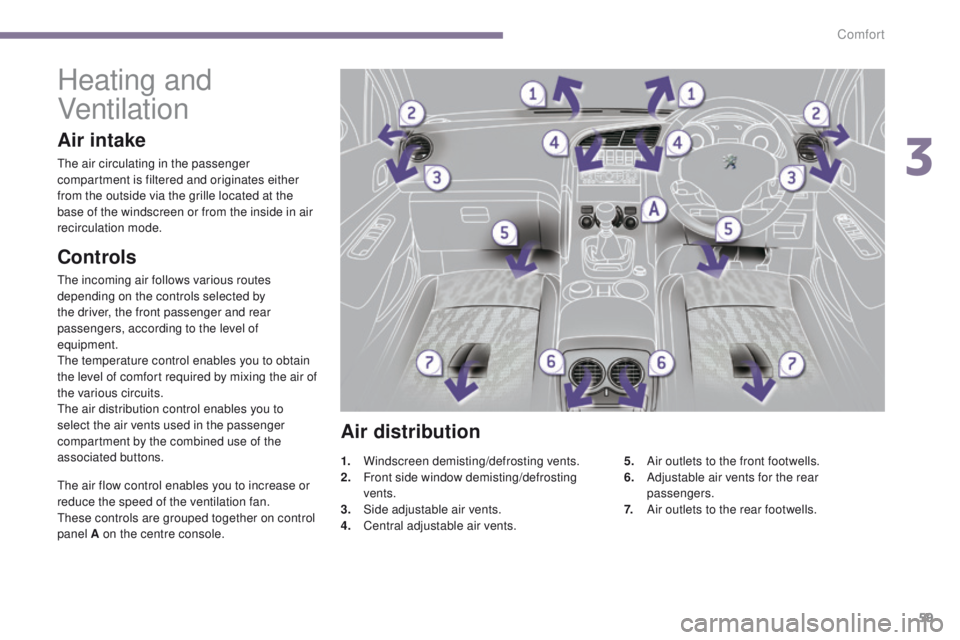
Air distribution
1. Windscreen demisting/defrosting vents.
2. Front side window demisting/defrosting
vents.
3.
S
ide adjustable air vents.
4.
C
entral adjustable air vents. 5. A
ir outlets to the front footwells.
6. A djustable air vents for the rear
passengers.
7.
A
ir outlets to the rear footwells.
The air flow control enables you to increase or
reduce the speed of the ventilation fan.
These controls are grouped together on control
panel A on the centre console.
3
Comfort
Page 67 of 344
65
Manual operation
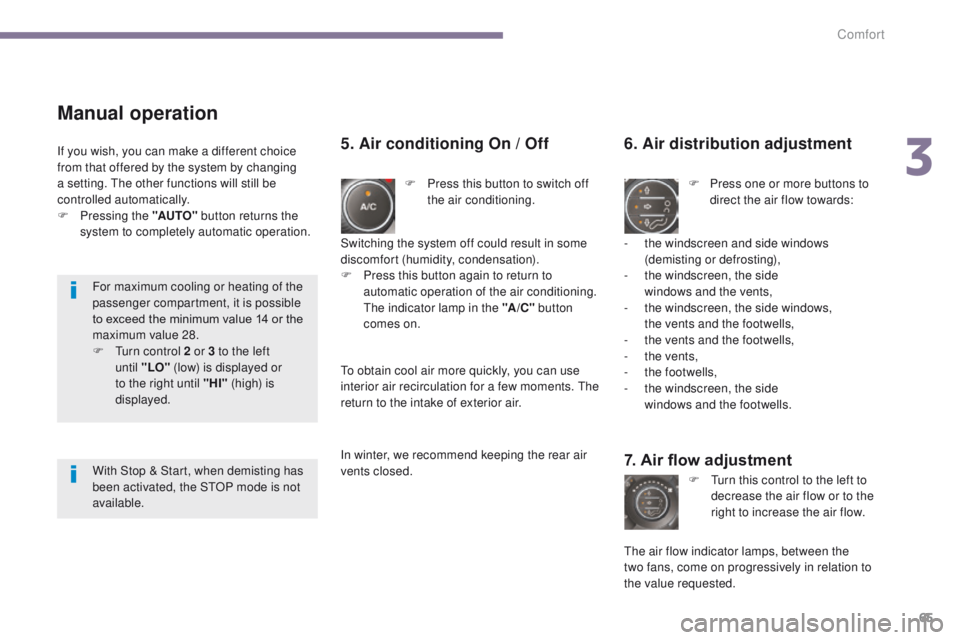
F Press this button to switch off the air conditioning.
6. Air distribution adjustment
F Press one or more buttons to direct the air flow towards:
7. Air flow adjustment
F Turn this control to the left to decrease the air flow or to the
right to increase the air flow.
5. Air conditioning On / Off
- the windscreen and side windows (demisting or defrosting),
-
t
he windscreen, the side
windows and the vents,
-
t
he windscreen, the side windows,
the vents and the footwells,
-
t
he vents and the footwells,
-
t
he vents,
-
t
he footwells,
-
t
he windscreen, the side
windows and the footwells.
The air flow indicator lamps, between the
two
fans, come on progressively in relation to
the value requested.
Switching the system off could result in some
discomfort (humidity, condensation).
F
P
ress this button again to return to
automatic operation of the air conditioning.
The indicator lamp in the "A /C " button
comes on.
If you wish, you can make a different choice
from that offered by the system by changing
a setting. The other functions will still be
controlled automatically.
F
P
ressing the "AUTO"
button returns the
system to completely automatic operation.
To obtain cool air more quickly, you can use
interior air recirculation for a few moments. The
return to the intake of exterior air.
In winter, we recommend keeping the rear air
vents closed.
For maximum cooling or heating of the
passenger compartment, it is possible
to exceed the minimum value 14 or the
maximum value 28.
F
T
urn control 2 or 3 to the left
until
"LO" (low) is displayed or
to the right until "HI" (high) is
displayed.
With Stop & Start, when demisting has
been activated, the STOP mode is not
available.
3
Comfort
Page 101 of 344
99
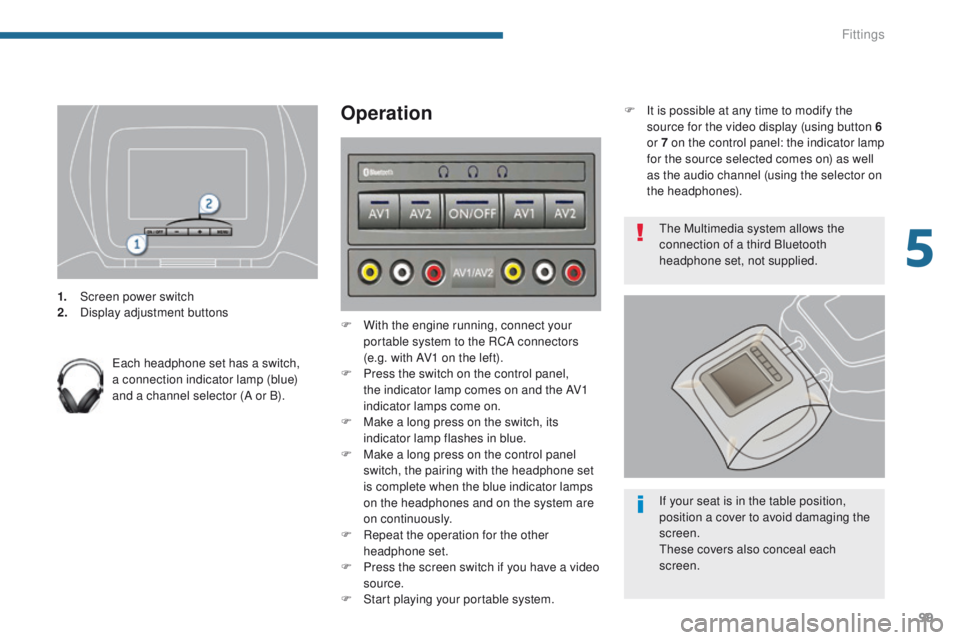
1. Screen power switch
2. Display adjustment buttons
Each headphone set has a switch,
a connection indicator lamp (blue)
and a channel selector (A or B).
Operation
F With the engine running, connect your portable system to the RCA connectors
(e.g. with AV1 on the left).
F
P
ress the switch on the control panel,
the indicator lamp comes on and the AV1
indicator lamps come on.
F
M
ake a long press on the switch, its
indicator lamp flashes in blue.
F
M
ake a long press on the control panel
switch, the pairing with the headphone set
is complete when the blue indicator lamps
on the headphones and on the system are
on continuously.
F
R
epeat the operation for the other
headphone set.
F
P
ress the screen switch if you have a video
source.
F
S
tart playing your portable system. The Multimedia system allows the
connection of a third Bluetooth
headphone set, not supplied.
If your seat is in the table position,
position a cover to avoid damaging the
screen.
These covers also conceal each
screen.
F
I
t is possible at any time to modify the
source for the video display (using button 6
or 7 on the control panel: the indicator lamp
for the source selected comes on) as well
as the audio channel (using the selector on
the headphones).
5
Fittings