ESP Peugeot 308 2016 - RHD (UK, Australia) Owner's Guide
[x] Cancel search | Manufacturer: PEUGEOT, Model Year: 2016, Model line: 308, Model: Peugeot 308 2016Pages: 398, PDF Size: 10.3 MB
Page 91 of 398
89
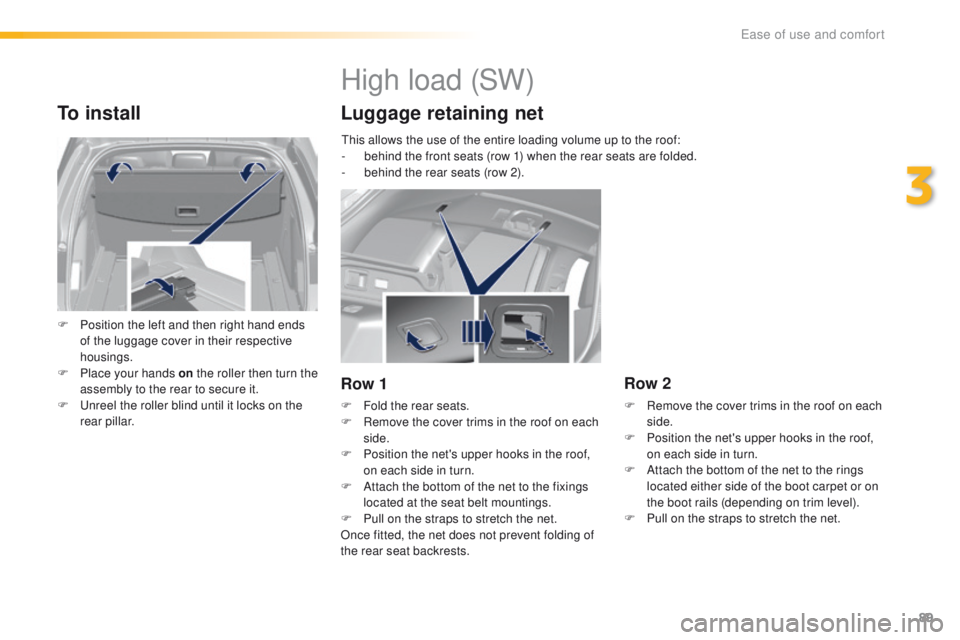
To install
F Position the left and then right hand ends of the luggage cover in their respective
housings.
F
P
lace your hands on the roller then turn the
assembly to the rear to secure it.
F
u
n
reel the roller blind until it locks on the
rear pillar.
High load (SW)
Luggage retaining net
Row 1
F Fold the rear seats.
F R emove the cover trims in the roof on each
side.
F
P
osition the net's upper hooks in the roof,
on each side in turn.
F
A
ttach the bottom of the net to the fixings
located at the seat belt mountings.
F
P
ull on the straps to stretch the net.
Once fitted, the net does not prevent folding of
the rear seat backrests.
Row 2
F Remove the cover trims in the roof on each side.
F
P
osition the net's upper hooks in the roof,
on each side in turn.
F
A
ttach the bottom of the net to the rings
located either side of the boot carpet or on
the boot rails (depending on trim level).
F
P
ull on the straps to stretch the net.
th
is allows the use of the entire loading volume up to the roof:
-
b
ehind the front seats (row 1) when the rear seats are folded.
-
b
ehind the rear seats (row 2).
3
Ease of use and comfort
Page 93 of 398
91
In order for these systems to be fully effective, follow the operation and maintenance
guidelines below:
F t
o o
btain an even air distribution, take care not to obstruct the exterior air intake grilles
located at the base of the windscreen, the nozzles, the vents and the air outlets, as well
as the air extractor located in the boot.
F
D
o not cover the sunshine sensor, located on the dashboard; this is used for regulation
of the air conditioning system.
F
O
perate the air conditioning system for at least 5 to 10 minutes, once or twice a month
to keep it in per fect working order.
F
e
n
sure that the passenger compartment filter is in good condition and have the filter
elements replaced regularly.
W
e recommend the use of a combined passenger compartment filter. t
h
anks to its
special active additive, it contributes to the purification of the air breathed by the
occupants and the cleanliness of the passenger compartment (reduction of allergic
symptoms, bad odours and greasy deposits).
F
t
o e
nsure correct operation of the air conditioning system, you are also advised to have
it checked regularly as recommended in the warranty and maintenance record.
F
I
f the system does not produce cold air, switch it off and contact a P
e
uge
Ot
dealer or
a qualified workshop.
Recommendations for ventilation and air conditioning
If after an extended stop in sunshine,
the interior temperature is very high, first
ventilate the passenger compartment for
a few moments.
Put the air flow control at a setting high
enough to quickly change the air in the
passenger compartment.
th
e air conditioning system does not
contain chlorine and does not present
any danger to the ozone layer.
th
e condensation created by the air
conditioning results in a discharge
of water under the vehicle which is
perfectly normal.
When towing the maximum load on a steep gradient in high temperatures, switching off the
air conditioning increases the available engine power and so improves the towing ability.
Stop & Start
the heating and air conditioning
systems only work when the engine
is running. t
o m
aintain a comfortable
temperature in the passenger
compartment, you can temporarily
deactivate the Stop & Start system
(see the corresponding section).
3
ease of use and comfort
Page 95 of 398
93
Air distribution adjustment
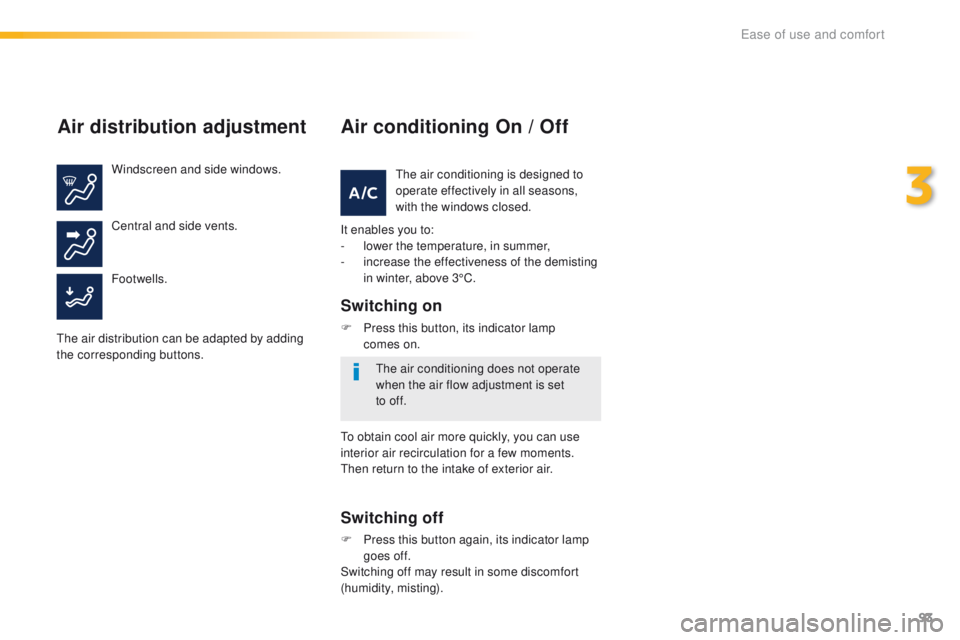
Windscreen and side windows.
Footwells. Central and side vents.
th
e air distribution can be adapted by adding
the corresponding buttons.
Air conditioning On / Off
It enables you to:
- l ower the temperature, in summer,
-
i
ncrease the effectiveness of the demisting
in winter, above 3°C.
Switching on
F Press this button, its indicator lamp comes on.
Switching off
F Press this button again, its indicator lamp goes off.
Switching off may result in some discomfort
(humidity, misting).
th
e air conditioning is designed to
operate effectively in all seasons,
with the windows closed.
th
e air conditioning does not operate
when the air flow adjustment is set
to
off.
to o
btain cool air more quickly, you can use
interior air recirculation for a few moments.
th
en return to the intake of exterior air.
3
Ease of use and comfort
Page 98 of 398
96
Dual-zone digital air conditioning (touch screen)
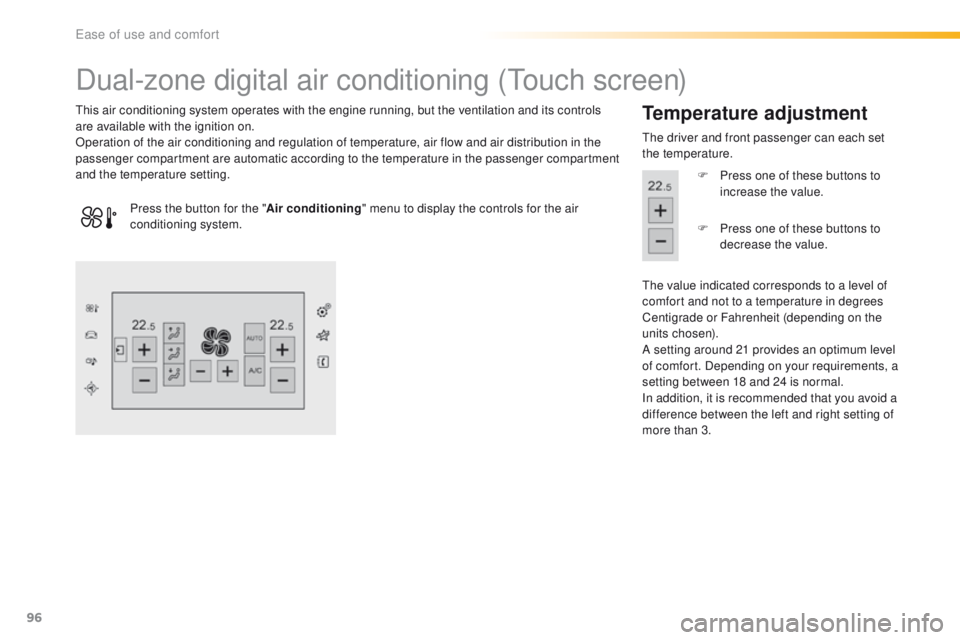
this air conditioning system operates with the engine running, but the ventilation and its controls
are available with the ignition on.
Operation of the air conditioning and regulation of temperature, air flow and air distribution in the
passenger compartment are automatic according to the temperature in the passenger compartment
and the temperature setting.Temperature adjustment
the driver and front passenger can each set
the temperature.
F
P
ress one of these buttons to
increase the value.
th
e value indicated corresponds to a level of
comfort and not to a temperature in degrees
Centigrade or Fahrenheit (depending on the
units chosen).
A setting around 21 provides an optimum level
of comfort. Depending on your requirements, a
setting between 18 and 24 is normal.
In addition, it is recommended that you avoid a
difference between the left and right setting of
more than 3.
Press the button for the "
Air conditioning" menu to display the controls for the air
conditioning system. F
P
ress one of these buttons to
decrease the value.
ease of use and comfort
Page 106 of 398
104
Courtesy lamps
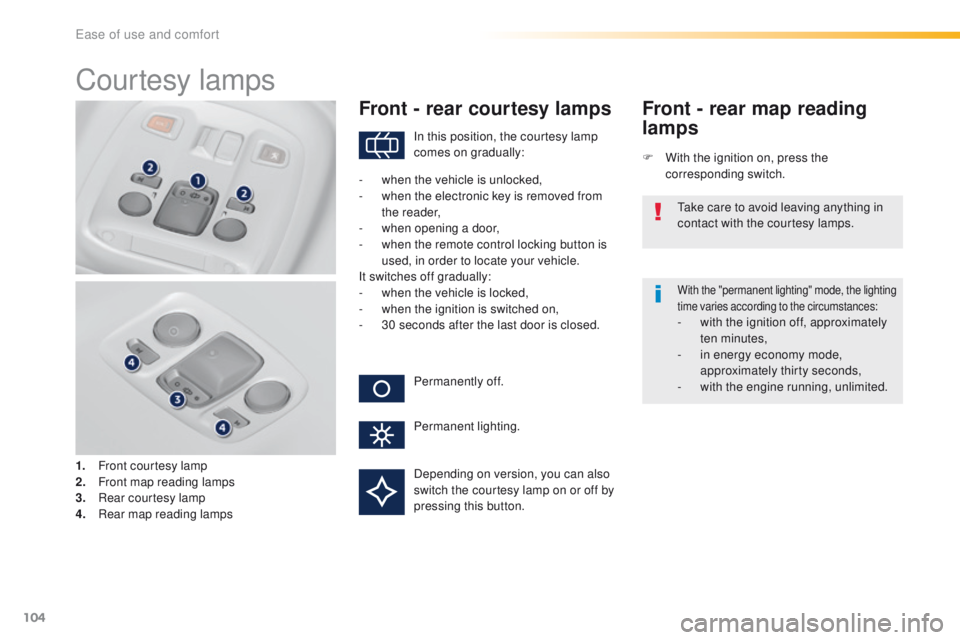
1. Front courtesy lamp
2. Front map reading lamps
3.
R
ear courtesy lamp
4.
R
ear map reading lamps
Front - rear courtesy lamps
F With the ignition on, press the corresponding switch.
Front - rear map reading
lamps
With the "permanent lighting" mode, the lighting
time varies according to the circumstances:
- with the ignition off, approximately ten minutes,
-
i
n energy economy mode,
approximately thirty seconds,
-
w
ith the engine running, unlimited.
In this position, the courtesy lamp
comes on gradually:
Permanently off.
Permanent lighting.
-
w
hen the vehicle is unlocked,
-
w
hen the electronic key is removed from
the reader,
-
w
hen opening a door,
-
w
hen the remote control locking button is
used, in order to locate your vehicle.
It switches off gradually:
-
w
hen the vehicle is locked,
-
w
hen the ignition is switched on,
-
3
0 seconds after the last door is closed.
ta
ke care to avoid leaving anything in
contact with the courtesy lamps.
Depending on version, you can also
switch the courtesy lamp on or off by
pressing this button.
ease of use and comfort
Page 108 of 398
106
Mirrors
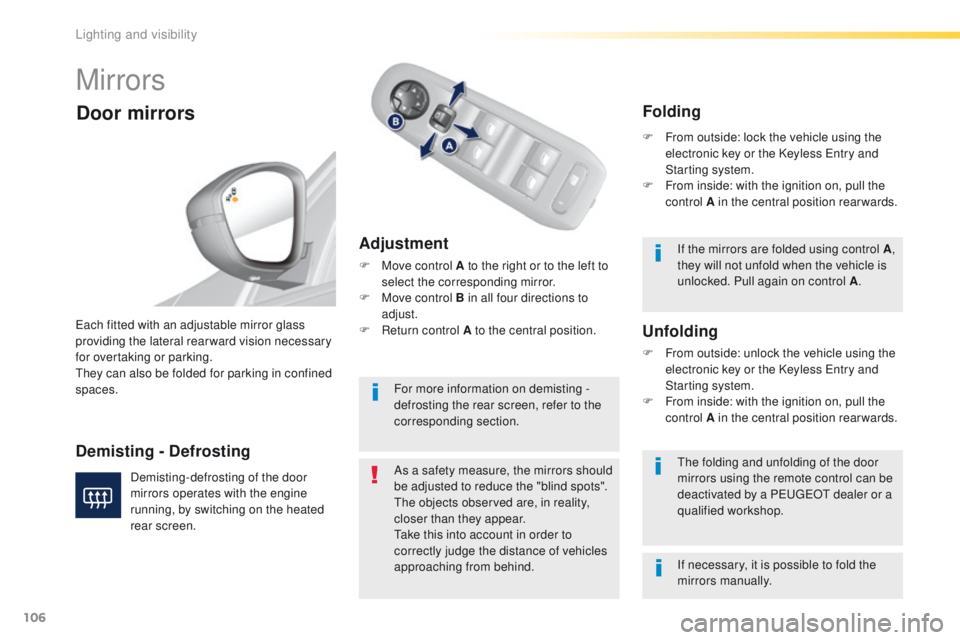
Adjustment
F Move control A to the right or to the left to select the corresponding mirror.
F
M
ove control B in all four directions to
adjust.
F
R
eturn control A to the central position.
ea
ch fitted with an adjustable mirror glass
providing the lateral rear ward vision necessary
for overtaking or parking.
th
ey can also be folded for parking in confined
spaces.
Demisting - Defrosting
Door mirrors
Demisting-defrosting of the door
mirrors operates with the engine
running, by switching on the heated
rear screen. As a safety measure, the mirrors should
be adjusted to reduce the "blind spots".
th
e objects observed are, in reality,
closer than they appear.
ta
ke this into account in order to
correctly judge the distance of vehicles
approaching from behind.th e folding and unfolding of the door
mirrors using the remote control can be
deactivated by a P
e
uge
Ot
dealer or a
qualified workshop.
Unfolding
F From outside: unlock the vehicle using the electronic key or the Keyless en try and
Starting system.
F
F
rom inside: with the ignition on, pull the
control A in the central position rearwards.
Folding
F From outside: lock the vehicle using the electronic key or the Keyless en try and
Starting system.
F
F
rom inside: with the ignition on, pull the
control A in the central position rearwards.
If the mirrors are folded using control A ,
they will not unfold when the vehicle is
unlocked. Pull again on control A .
For more information on demisting -
defrosting the rear screen, refer to the
corresponding section.
If necessary, it is possible to fold the
mirrors manually.
Lighting and visibility
Page 111 of 398
109
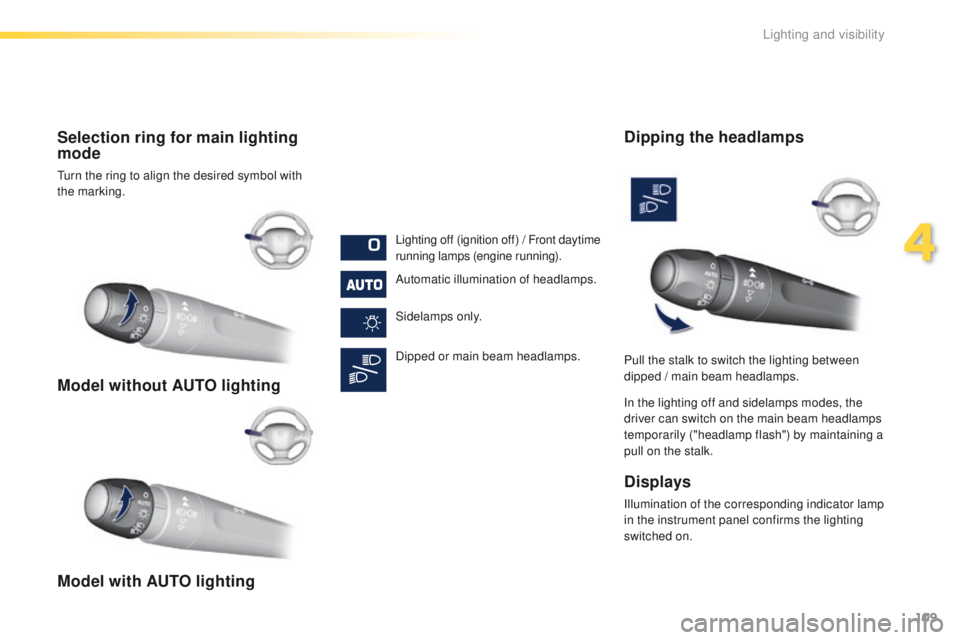
Model without AUTO lighting
Model with AUTO lighting Selection ring for main lighting
mode
turn the ring to align the desired symbol with
the marking.Lighting off (ignition off) / Front daytime
running lamps (engine running).
Automatic illumination of headlamps.
Sidelamps only.
Dipped or main beam headlamps.
Dipping the headlamps
In the lighting off and sidelamps modes, the
driver can switch on the main beam headlamps
temporarily ("headlamp flash") by maintaining a
pull on the stalk.
Displays
Illumination of the corresponding indicator lamp
in the instrument panel confirms the lighting
switched on. Pull the stalk to switch the lighting between
dipped / main beam headlamps.
4
Lighting and visibility
Page 113 of 398
111
In good or rainy weather, both day
and night, the front foglamps and the
rear foglamps are prohibited. In these
situations, the power of their beams
may dazzle other drivers. t
he
y should
only be used in fog or snow.
In these weather conditions, it is your
responsibility to switch on the foglamps
and dipped headlamps manually as the
sunshine sensor may detect sufficient
light.
Do not forget to switch off the front
foglamps and the rear foglamps when
they are no longer needed.Lighting left on audible signal
An audible signal when a front door
is opened warns the driver that the
vehicle's exterior lighting is on, with the
ignition off and in manual lighting mode.
In this case, switching off the lighting
stops the audible signal.
With the ignition off, if the dipped
headlamps remain on, the vehicle goes
into "
eC
O" mode to avoid discharging
the battery.
th
e lighting goes off when you switch
off the ignition, but you can always
switch it on again using the lighting
control stalk.
Direction indicators
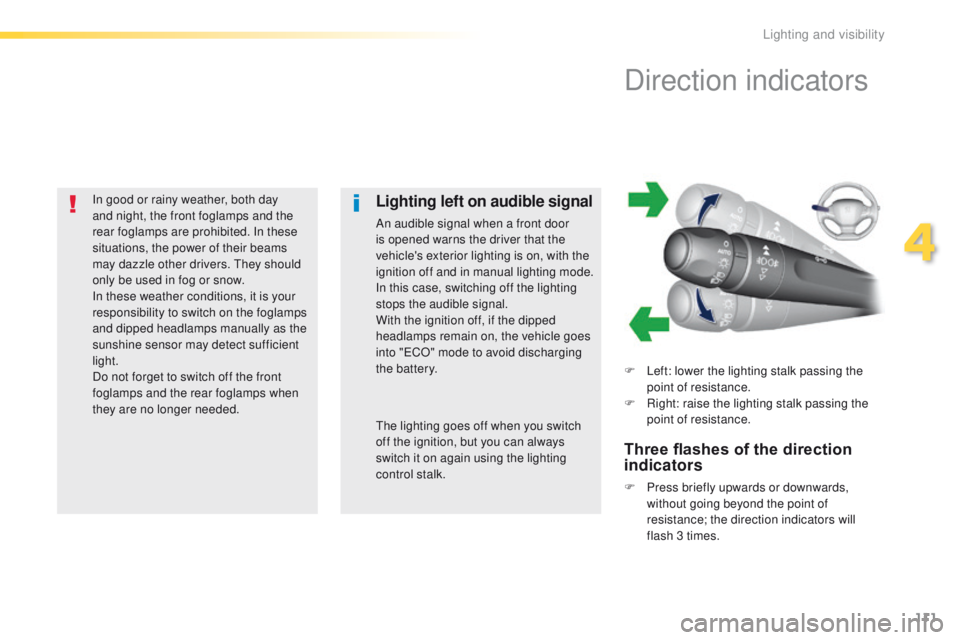
F Left: lower the lighting stalk passing the point of resistance.
F
R
ight: raise the lighting stalk passing the
point of resistance.
Three flashes of the direction
indicators
F Press briefly upwards or downwards, without going beyond the point of
resistance; the direction indicators will
flash 3 times.
4
Lighting and visibility
Page 126 of 398
124
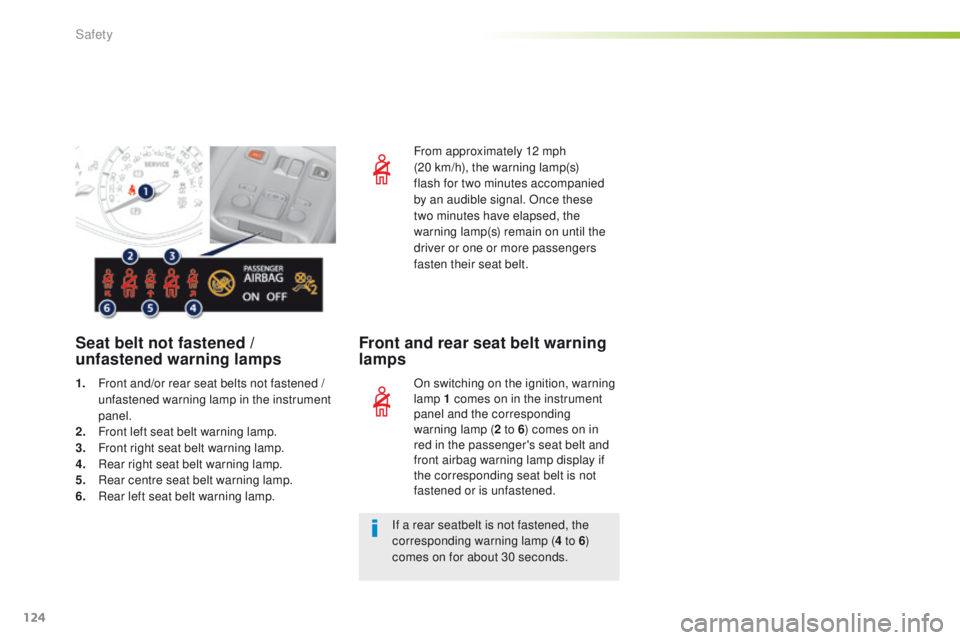
From approximately 12 mph
(20 km/h), the warning lamp(s)
flash for two minutes accompanied
by an audible signal. Once these
two minutes have elapsed, the
warning lamp(s) remain on until the
driver or one or more passengers
fasten their seat belt.
Seat belt not fastened /
u nfastened warning lamps Front and rear seat belt warning
lamps
On switching on the ignition, warning
lamp 1 comes on in the instrument
panel and the corresponding
warning lamp (
2 to 6) comes on in
red in the passenger's seat belt and
front airbag warning lamp display if
the corresponding seat belt is not
fastened or is unfastened.
If a rear seatbelt is not fastened, the
corresponding warning lamp ( 4 to 6)
comes on for about 30 seconds.
1. F
ront and/or rear seat belts not fastened
/
unfastened warning lamp in the instrument
panel.
2.
F
ront left seat belt warning lamp.
3.
F
ront right seat belt warning lamp.
4.
R
ear right seat belt warning lamp.
5.
R
ear centre seat belt warning lamp.
6.
R
ear left seat belt warning lamp.
Safety
Page 127 of 398
125
Advice
Recommendations for children
use a suitable child seat if the passenger is
less than 12 years old or shorter than one
and a half metres.
Never use the same seat belt to secure more
than one person.
Never allow a child to travel on your lap.
For more information on child seats, refer to
the corresponding section.
In order to be effective, a seat belt must:
-
b
e tightened as close to the body as
possible,
-
b
e pulled in front of you with a smooth
movement, checking that it does not
twist,
-
b
e used to restrain only one person,
-
n
ot bear any trace of cuts or fraying,
-
n
ot be converted or modified to avoid
affecting its performance.
In accordance with current safety
regulations, for all repairs on your vehicle's
seat belts, go to a qualified workshop with
the skills and equipment needed, which a
P
e
uge
Ot d
ealer is able to provide.
Have your seat belts checked regularly by a
P
e
uge
Ot
dealer or a qualified workshop,
particularly if the straps show signs of
damage.
Clean the seat belt straps with soapy
water or a textile cleaning product, sold by
P
e
uge
Ot d
ealers.
After folding or moving a seat or rear bench
seat, ensure that the seat belt is positioned
and reeled in correctly.
In the event of an impact
Depending on the nature and
seriousness of the impact , the
pretensioning device may be deployed
before and independently of the airbags.
Deployment of the pretensioners is
accompanied by a slight discharge of
harmless smoke and a noise, due to the
activation of the pyrotechnic cartridge
incorporated in the system.
In all cases, the airbag warning lamp
comes
on.
Following an impact, have the seat belts
system checked, and if necessary replaced,
by a P
e
uge
Ot
dealer or a qualified
workshop.
the
driver must ensure that passengers use
the seat belts correctly and that they are all
fastened before setting off.
Wherever you are seated in the vehicle,
always fasten your seat belt, even for short
journeys.
Do not interchange the seat belt buckles as
they will not fulfil their role fully.
th
e seat belts are fitted with an inertia reel
permitting automatic adjustment of the
length of the strap to your size.
t
h
e seat belt
is stowed automatically when not in use.
Before and after use, ensure that the seat
belt is reeled in correctly.
th
e lower part of the strap must be
positioned as low as possible on the pelvis.th
e upper part must be positioned in the
hollow of the shoulder.
th
e inertia reels are fitted with an automatic
locking device which comes into operation in
the event of a collision, emergency braking
or if the vehicle rolls over. You can release
the device by pulling the strap firmly and
then releasing it so that it reels in slightly.
5
Safety