cruise control PEUGEOT 308 2018 Owners Manual
[x] Cancel search | Manufacturer: PEUGEOT, Model Year: 2018, Model line: 308, Model: Peugeot 308 2018Pages: 360, PDF Size: 12.38 MB
Page 5 of 360
3
bit.ly/helpPSA
.
.
Driving recommendations 151
Anti-theft protection 1 52
Starting / Switching off the engine
with the key
1
52
Starting / Switching off the engine
with
K
eyless Entry and Starting
1
54
Electric parking brake
1
57
Manual gearbox
1
60
Automatic gearbox
1
61
Hill start assist
1
65
Dynamic pack
1
66
Gear shift indicator
1
67
Stop & Start
1
67
Under-inflation detection
1
70
Memorising speeds
1
72
Recognition of speed limit signs and recommendation
172
Speed limiter
1
76
Cruise control
1
78
Adaptive cruise control
1
80
Distance alert and Active Safety Brake
1
89
Fatigue detection system
1
92
Lane Departure Warning System
1
94
Active Lane Departure Warning System
1
95
Blind Spot Monitoring System
2
00
Parking sensors
2
02
Visiopark 1 – Visiopark 2
2
04
Park Assist
2
09Fuel
216
Misfuel prevention (Diesel) 2 16
Compatibility of fuels
2
18
Towing device
2
19
Towbar with quickly detachable towball
2
20
Load reduction mode
2
23
Energy economy mode
2
23
Very cold climate screen
2
24
Snow chains
2
25
Fitting roof bars
2
25
Bonnet
226
Engine compartment
2
28
Checking levels
2
29
Checks
231
AdBlue
® (BlueHDi engines) 2 34
Warning triangle
2
37
Running out of fuel (Diesel)
2
37
Tool kit
2
38
Temporary puncture repair kit
2
40
Spare wheel
2
43
Changing a bulb
2
47
Changing a wiper blade
2
52
Changing a fuse
2
53
12 V battery
2
57
Towing the vehicle
2
61Engine technical data and towed loads
2
63
Petrol engines and towed loads
2
64
Diesel engines and towed loads
2
65
Dimensions
2
68
Identification markings
2
69
Driving
Practical information
In the event of a breakdown Technical data
Alphabetical index
Audio equipment and telematics
PEUGEOT Connect Nav
PEUGEOT Connect Radio
Bluetooth audio system
Access to additional videos
.
Contents
Page 7 of 360
5
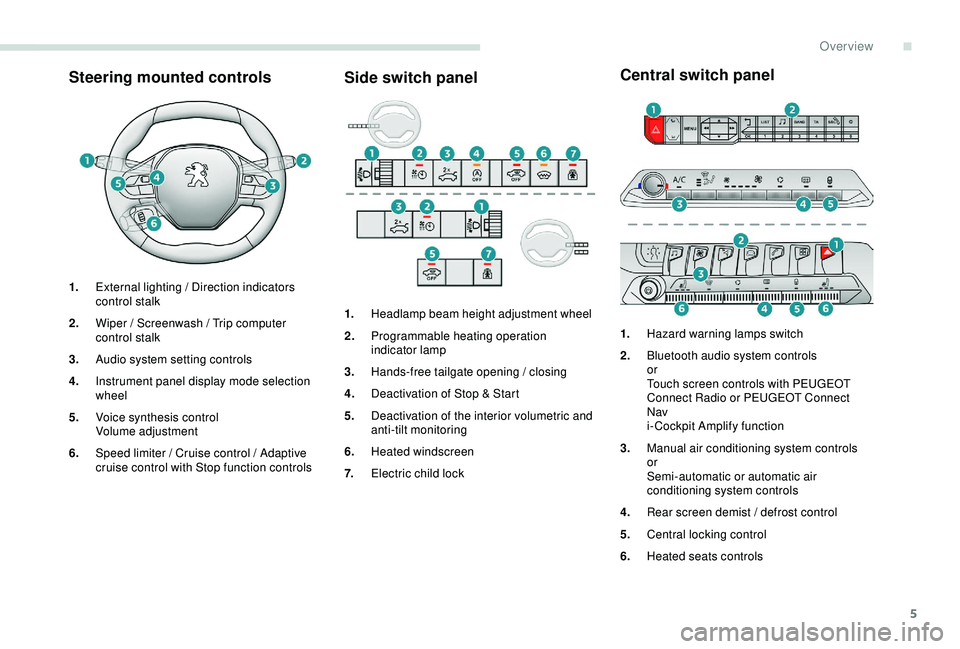
Steering mounted controlsSide switch panelCentral switch panel
1.
External lighting / Direction indicators
control stalk
2. Wiper / Screenwash / Trip computer
control stalk
3. Audio system setting controls
4. Instrument panel display mode selection
wheel
5. Voice synthesis control
Volume adjustment
6. Speed limiter / Cruise control / Adaptive
cruise control with Stop function controls 1.
Headlamp beam height adjustment wheel
2. Programmable heating operation
indicator lamp
3. Hands-free tailgate opening / closing
4. Deactivation of Stop & Start
5. Deactivation of the interior volumetric and
anti-tilt monitoring
6. Heated windscreen
7. Electric child lock 1.
Hazard warning lamps switch
2. Bluetooth audio system controls
or
Touch screen controls with PEUGEOT
Connect Radio or PEUGEOT Connect
Nav
i- Cockpit Amplify function
3. Manual air conditioning system controls
or
Semi-automatic or automatic air
conditioning system controls
4. Rear screen demist / defrost control
5. Central locking control
6. Heated seats controls
.
Over view
Page 8 of 360
6
As a passenger, if you avoid connecting your
multimedia devices (film, music, video game
etc.), you will contribute towards limiting the
consumption of electrical energy, and so of fuel.
Disconnect your portable devices before
leaving the vehicle.
Eco- driving
Eco-driving is a range of everyday practices that allow the motorist to optimise their fuel consumption and CO2 emissions.
Optimise the use of your
gearbox
With a manual gearbox, move off gently
and change up without waiting. During
acceleration change up early.
With an automatic gearbox, give preference
to automatic mode and avoid pressing the
accelerator pedal heavily or suddenly.
The gear shift indicator invites you to engage
the most suitable gear: as soon as the
indication is displayed in the instrument panel,
follow it straight away.
For vehicles fitted with an automatic gearbox,
this indicator appears only in manual mode.
Drive smoothly
Maintain a safe distance between vehicles,
use engine braking rather than the
brake pedal, and press the accelerator
progressively. These practices contribute
towards a reduction in fuel consumption and
CO
2 emissions and also help reduce the
background traffic noise.
If your vehicle has cruise control, make use of
the system at speeds above 25
mph (40 km/h)
when the traffic is flowing well.
Control the use of your electrical
equipment
Before moving off, if the passenger
compartment is too warm, ventilate it by
opening the windows and air vents before
using the air conditioning.
Above 31
mph (50 km/h), close the windows
and leave the air vents open.
Consider using equipment that can help
keep the temperature in the passenger
compartment down (sunroof blind and
window blinds, etc.). Switch off the headlamps and front foglamps
when the ambient light level does not require
their use.
Avoid running the engine before moving off,
particularly in winter; your vehicle will warm up
much faster while driving. Unless it has automatic regulation, switch off
the air conditioning as soon as the desired
temperature has been reached.
Switch off the demisting and defrosting
controls, if these are not automatically
managed.
Switch off the heated seat as soon as possible.
Eco-driving
Page 10 of 360
8
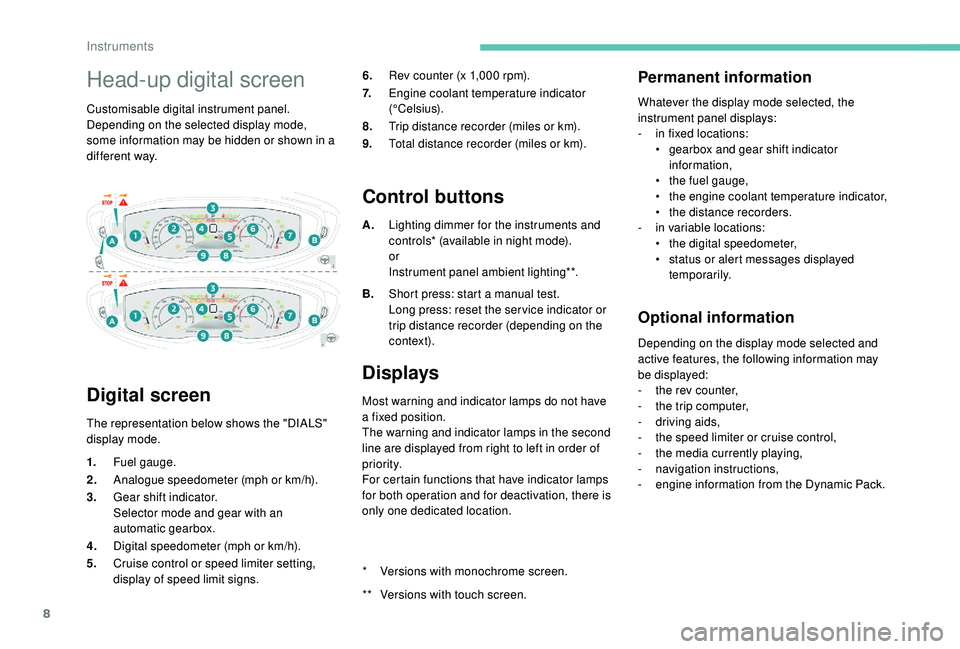
Head-up digital screen
Customisable digital instrument panel.
Depending on the selected display mode,
some information may be hidden or shown in a
different way.
Digital screen
The representation below shows the "DIALS"
display mode.6.
Rev counter (x 1,000 rpm).
7. Engine coolant temperature indicator
(°Celsius).
8. Trip distance recorder (miles or km).
9. Total distance recorder (miles or km).
Control buttons
A.Lighting dimmer for the instruments and
controls* (available in night mode).
or
Instrument panel ambient lighting**.
B. Short press: start a manual test.
Long press: reset the ser vice indicator or
trip distance recorder (depending on the
contex t).
Displays
Most warning and indicator lamps do not have
a fixed position.
The warning and indicator lamps in the second
line are displayed from right to left in order of
priority.
For certain functions that have indicator lamps
for both operation and for deactivation, there is
only one dedicated location.
Permanent information
Whatever the display mode selected, the
instrument panel displays:
-
i
n fixed locations:
•
g
earbox and gear shift indicator
information,
•
t
he fuel gauge,
•
t
he engine coolant temperature indicator,
•
t
he distance recorders.
-
i
n variable locations:
•
t
he digital speedometer,
•
s
tatus or alert messages displayed
temporarily.
Optional information
Depending on the display mode selected and
active features, the following information may
be displayed:
-
t
he rev counter,
-
t
he trip computer,
-
d
riving aids,
-
t
he speed limiter or cruise control,
-
t
he media currently playing,
-
n
avigation instructions,
-
e
ngine information from the Dynamic Pack.
1.
Fuel gauge.
2. Analogue speedometer (mph or km/h).
3. Gear shift indicator.
Selector mode and gear with an
automatic gearbox.
4. Digital speedometer (mph or km/h).
5. Cruise control or speed limiter setting,
display of speed limit signs. *
V
ersions with monochrome screen.
**
V
ersions with touch screen.
Instruments
Page 47 of 360
45
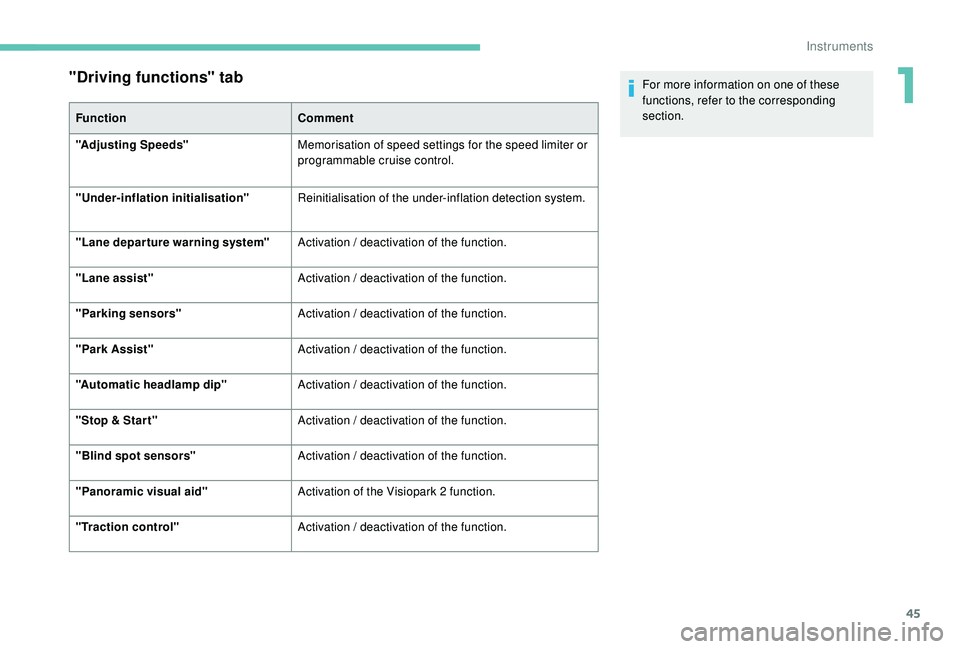
"Driving functions" tab
FunctionComment
"Adjusting Speeds" Memorisation of speed settings for the speed limiter or
programmable cruise control.
"
Under-inflation initialisation" Reinitialisation of the under-inflation detection system.
"Lane departure warning system" Activation / deactivation of the function.
"Lane assist" Activation / deactivation of the function.
"Parking sensors" Activation / deactivation of the function.
"Park Assist" Activation / deactivation of the function.
"Automatic headlamp dip" Activation / deactivation of the function.
"Stop & Star t" Activation / deactivation of the function.
"Blind spot sensors" Activation / deactivation of the function.
"Panoramic visual aid" Activation of the Visiopark 2 function.
"Traction control" Activation / deactivation of the function. For more information on one of these
functions, refer to the corresponding
section.
1
Instruments
Page 104 of 360
102
Refitting
To refit the mat on the driver's side:
F p osition the mat correctly,
F
r
eattach the fixings by pressing,
F
c
heck that the mat is secured correctly.
To avoid any risk of jamming of the pedals:
-
o
nly use mats which are suited to the
fixings already present in the vehicle;
these fixings must be used,
-
n
ever place one mat on top of another.
The use of mats not approved by
PEUGEOT may inter fere with access to
the pedals and hinder the operation of the
cruise control / speed limiter.
The mats approved by PEUGEOT have
two fixings located below the seat.
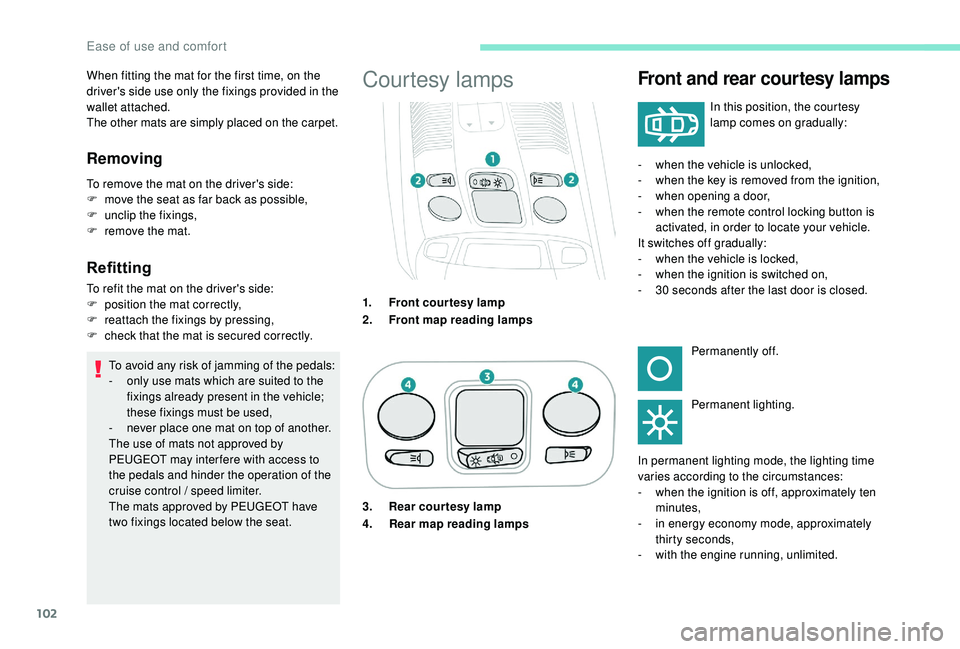
Courtesy lampsFront and rear courtesy lamps
In this position, the courtesy
lamp comes on gradually:
When fitting the mat for the first time, on the
driver's side use only the fixings provided in the
wallet attached.
The other mats are simply placed on the carpet.
Removing
To remove the mat on the driver's side:
F
m ove the seat as far back as possible,
F
un
clip the fixings,
F
r
emove the mat.
1.Front courtesy lamp
2. Front map reading lamps -
w
hen the vehicle is unlocked,
- w hen the key is removed from the ignition,
- w hen opening a door,
-
w
hen the remote control locking button is
activated, in order to locate your vehicle.
It switches off gradually:
-
w
hen the vehicle is locked,
-
w
hen the ignition is switched on,
-
3
0 seconds after the last door is closed.Permanently off.
Permanent lighting.
In permanent lighting mode, the lighting time
varies according to the circumstances:
-
w
hen the ignition is off, approximately ten
minutes,
-
i
n energy economy mode, approximately
thirty seconds,
-
w
ith the engine running, unlimited.
3. Rear courtesy lamp
4.
Rear map reading lamps
Ease of use and comfort
Page 130 of 360
128
Recommendations
Your vehicle is designed principally to
drive on tarmac roads but it allows you to
occasionally drive on other less passable
terrain.
However, it does not permit off-road
driving such as:
-
c
rossing and driving on terrain which
could damage the underbody or strip
away components (fuel pipe, fuel
cooler, etc.) due to obstacles or stones
in particular,
-
d
riving on terrain with steep gradients
and poor grip,
-
c
rossing a stream.
Hill Assist Descent
Control
System that provides assistance when
descending on loose or soft sur faces (gravel,
mud, etc.) or a steep gradient.
This system reduces the risk of slip or loss
of control of the vehicle when descending,
whether going forward or in reverse.
During a descent, it assists the driver in
maintaining a constant speed, depending
on the gear engaged, while progressively
releasing the brakes.For the system to activate, the slope must
be greater than 5%.
The system can be used with the gearbox
in neutral.
Otherwise engage a gear corresponding
to the speed to prevent the engine stalling.
With an automatic gearbox, the system
can be used with the selector at N , D or R.
When the system is regulating, the Active
Safety Brake system is automatically
deactivated. The system is not available:
-
i
f the speed of the vehicle is above
43 mph (70 km/h),
- i f the speed of the vehicle is being
controlled by the Adaptive cruise
control with Stop function, depending
on the type of gearbox.
Switching on
By default, the system is not selected.
The system's status is not saved when the
ignition is switched off.
The driver can select the system when
the engine is running, when the vehicle is
stationary or moving at speeds up to approx.
31
mph (50 km/h).
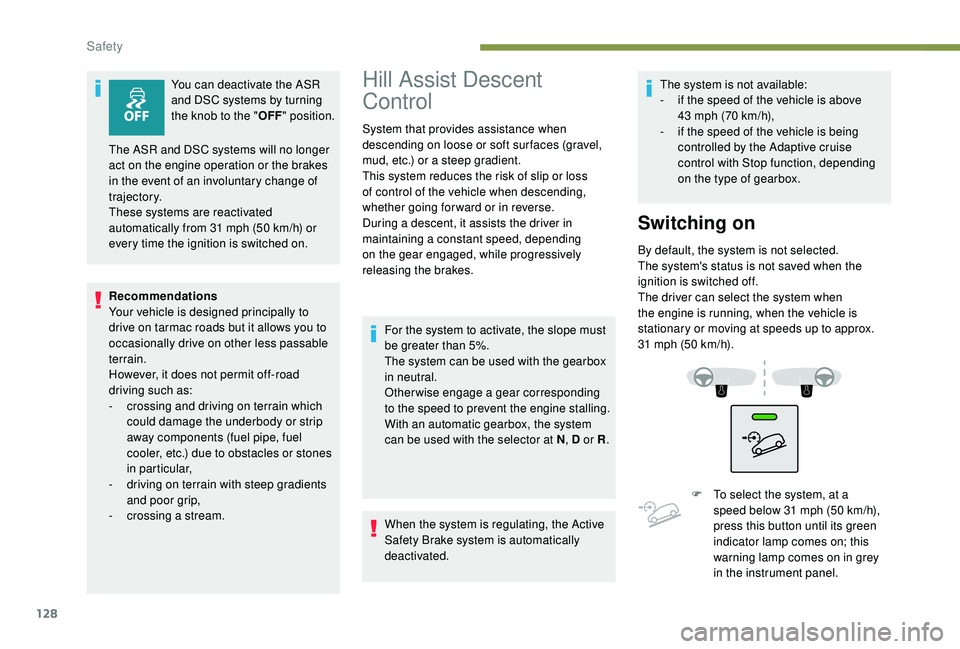
F
T
o select the system, at a
speed below 31
mph (50 km/h),
press this button until its green
indicator lamp comes on; this
warning lamp comes on in grey
in the instrument panel.
You can deactivate the ASR
and DSC systems by turning
the knob to the "
OFF" position.
The ASR and DSC systems will no longer
act on the engine operation or the brakes
in the event of an involuntary change of
trajectory.
These systems are reactivated
automatically from 31
mph (50
km/h) or
every time the ignition is switched on.
Safety
Page 174 of 360
172
Memorising speeds
Linked to the speed limiter/programmable
cruise control, this function allows speed
settings to be registered which will then be
offered as settings for two systems: the speed
limiter (a maximum speed) and the cruise
control (cruising speed).
You can memorise up to 5 speed limits in the
system.
By default, some speed settings are already
memorised.
As a safety measure, the driver must
only modify the speed settings when
stationary.
Memorising speeds
This function can be accessed in the
Vehicle / Driving menu of the touch
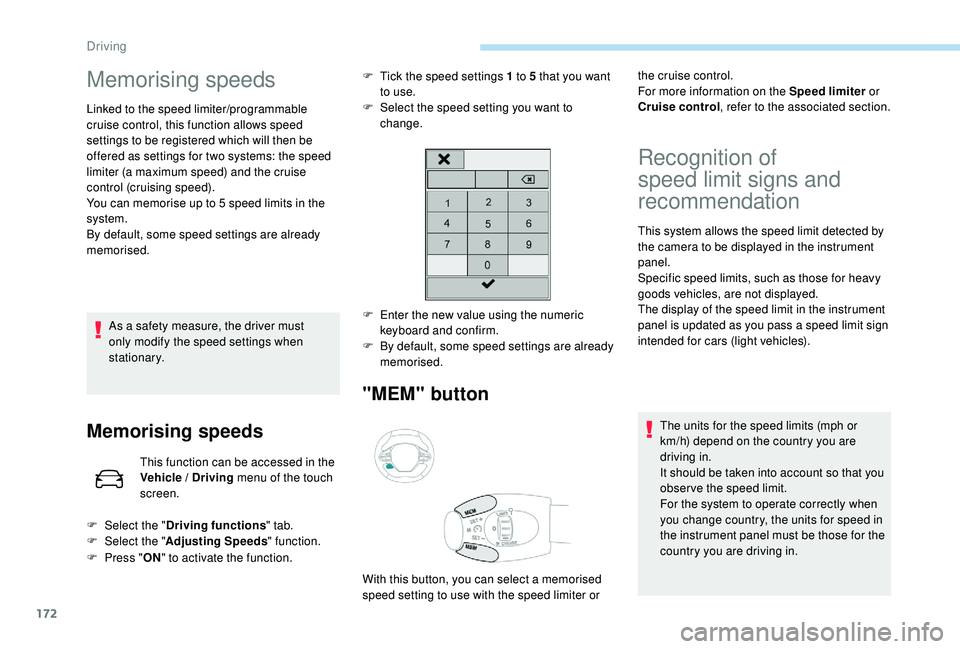
screen. F
T
ick the speed settings 1 to 5 that you want
to use.
F
S
elect the speed setting you want to
change.
"MEM" button
Recognition of
speed limit signs and
recommendation
This system allows the speed limit detected by
the camera to be displayed in the instrument
panel.
Specific speed limits, such as those for heavy
goods vehicles, are not displayed.
The display of the speed limit in the instrument
panel is updated as you pass a speed limit sign
intended for cars (light vehicles).
The units for the speed limits (mph or
km/h) depend on the country you are
driving in.
It should be taken into account so that you
obser ve the speed limit.
For the system to operate correctly when
you change country, the units for speed in
the instrument panel must be those for the
country you are driving in.
F
E
nter the new value using the numeric
keyboard and confirm.
F
B
y default, some speed settings are already
memorised.
F
Sel
ect the " Driving functions " tab.
F
Sel
ect the " Adjusting Speeds " function.
F
P
ress " ON" to activate the function. the cruise control.
For more information on the Speed limiter
or
Cruise control , refer to the associated section.
With this button, you can select a memorised
speed setting to use with the speed limiter or
Driving
Page 176 of 360
174
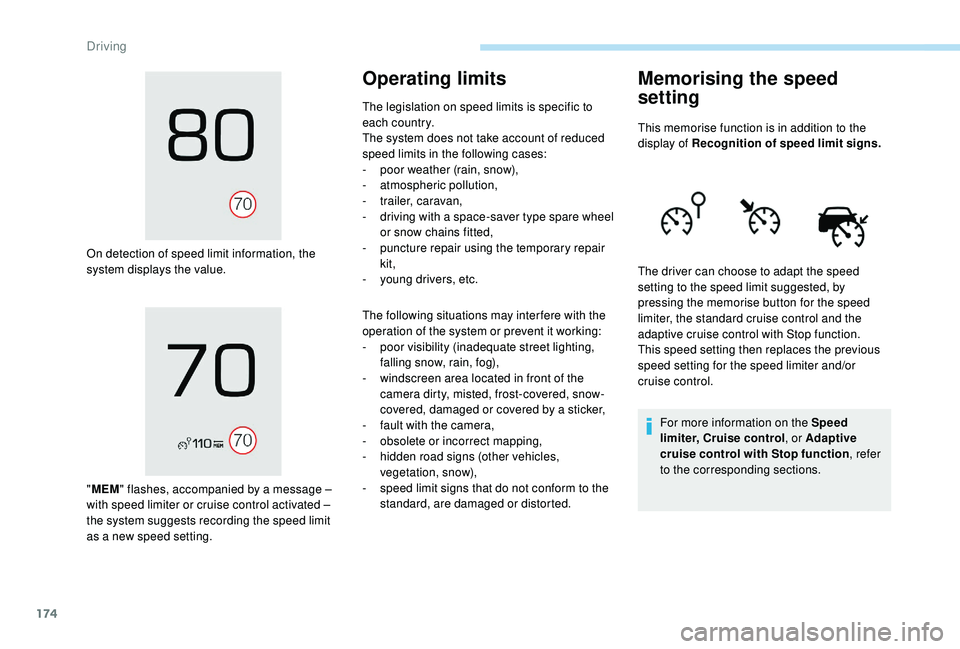
On detection of speed limit information, the
system displays the value.
"MEM " flashes, accompanied by a message
–
with speed limiter or cruise control activated
–
the system suggests recording the speed limit
as a new speed setting.
Operating limits
The legislation on speed limits is specific to
each country.
The system does not take account of reduced
speed limits in the following cases:
-
p
oor weather (rain, snow),
-
a
tmospheric pollution,
-
t
railer, caravan,
-
d
riving with a space-saver type spare wheel
or snow chains fitted,
-
p
uncture repair using the temporary repair
kit,
-
y
oung drivers, etc.
The following situations may inter fere with the
operation of the system or prevent it working:
-
p
oor visibility (inadequate street lighting,
falling snow, rain, fog),
-
w
indscreen area located in front of the
camera dirty, misted, frost-covered, snow-
covered, damaged or covered by a sticker,
-
f
ault with the camera,
-
o
bsolete or incorrect mapping,
-
h
idden road signs (other vehicles,
vegetation, snow),
-
s
peed limit signs that do not conform to the
standard, are damaged or distorted.
Memorising the speed
setting
This memorise function is in addition to the
display of Recognition of speed limit signs.
For more information on the Speed
limiter, Cruise control , or Adaptive
cruise control with Stop function , refer
to the corresponding sections.
The driver can choose to adapt the speed
setting to the speed limit suggested, by
pressing the memorise button for the speed
limiter, the standard cruise control and the
adaptive cruise control with Stop function.
This speed setting then replaces the previous
speed setting for the speed limiter and/or
cruise control.
Driving
Page 177 of 360
175
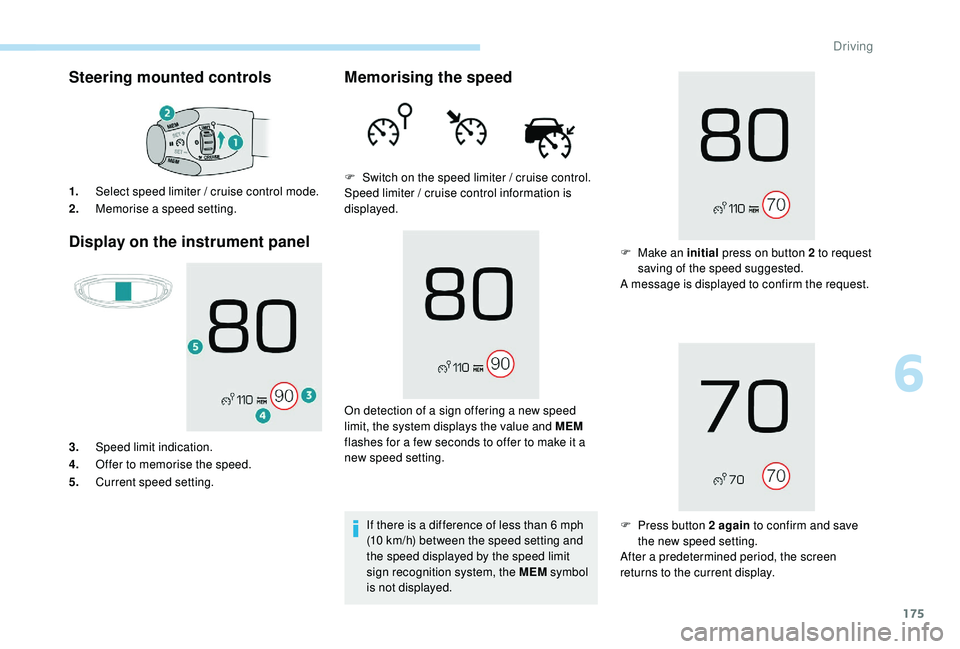
Steering mounted controls
Display on the instrument panel
1. Select speed limiter / cruise control mode.
2. Memorise a speed setting.
3. Speed limit indication.
4. Offer to memorise the speed.
5. Current speed setting.
Memorising the speed
F Switch on the speed limiter / cruise control.
Speed limiter / cruise control information is
displayed.
On detection of a sign offering a new speed
limit, the system displays the value and MEM
flashes for a few seconds to offer to make it a
new speed setting.
If there is a difference of less than 6
mph
(10
km/h) between the speed setting and
the speed displayed by the speed limit
sign recognition system, the MEM symbol
is not displayed. F
M
ake an initial press on button 2 to request
saving of the speed suggested.
A message is displayed to confirm the request.
F
P
ress button 2 again to confirm and save
the new speed setting.
After a predetermined period, the screen
returns to the current display.
6
Driving