tow PEUGEOT 308 2023 User Guide
[x] Cancel search | Manufacturer: PEUGEOT, Model Year: 2023, Model line: 308, Model: PEUGEOT 308 2023Pages: 260, PDF Size: 7.97 MB
Page 54 of 260
52
Ease of use and comfort
Stop & Start
The heating and air conditioning systems
only operate when the engine is running.
Temporarily deactivate the Stop & Start
system to maintain a comfortable temperature
in the passenger compartment.
For more information on the Stop &
Start
system, refer to the corresponding
section.
Rechargeable hybrid vehicles
Intensive use of the air conditioning
reduces the vehicle range in Electric mode.
Ventilation with the ignition on
When the ignition is switched on, the ventilation
system and the air flow 2 and air distribution
3 settings in the passenger compartment are
activated, for a period which depends on the
battery charge.
This function does not include the air
conditioning system.
Dual-zone automatic air
conditioning
This system automatically controls the activation
of the air conditioning system, regulating the
temperature, air flow and air distribution inside
the passenger compartment. This system works with the engine running, but
access to the ventilation and its controls remains
possible with the ignition on.
Press the Climate application button to
display the system controls page.
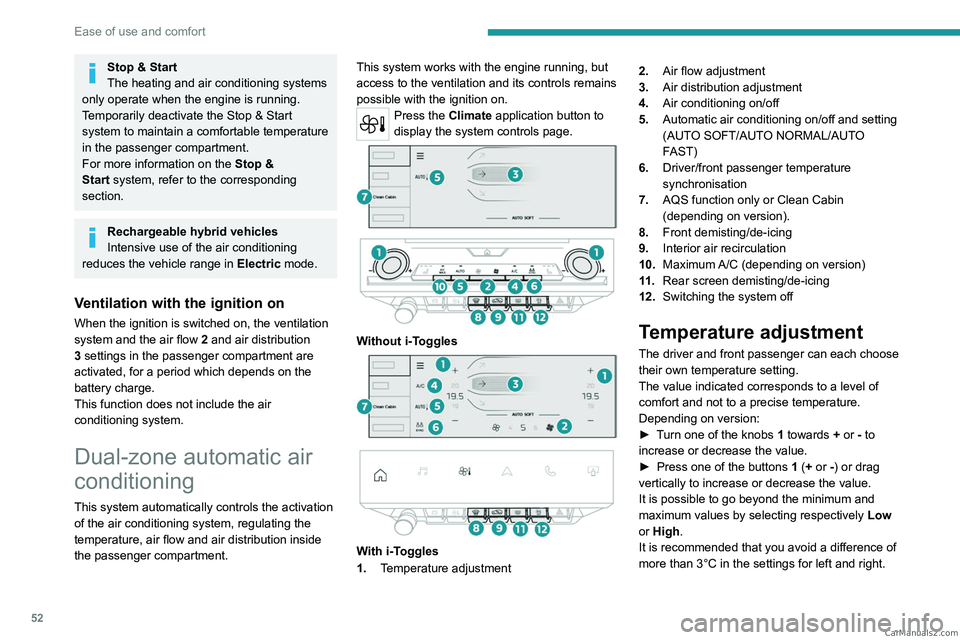
Without i-Toggles
With i-Toggles
1. Temperature adjustment 2.
Air flow adjustment
3. Air distribution adjustment
4. Air conditioning on/off
5. Automatic air conditioning on/off and setting
(AUTO SOFT/AUTO NORMAL/AUTO
FAST)
6. Driver/front passenger temperature
synchronisation
7. AQS function only or Clean Cabin
(depending on version).
8. Front demisting/de-icing
9. Interior air recirculation
10. Maximum A/C (depending on version)
11 . Rear screen demisting/de-icing
12. Switching the system off
Temperature adjustment
The driver and front passenger can each choose
their own temperature setting.
The value indicated corresponds to a level of
comfort and not to a precise temperature.
Depending on version:
►
T
urn one of the knobs 1 towards + or - to
increase or decrease the value.
►
Press one of the buttons
1 (+ or -) or drag
vertically to increase or decrease the value.
It is possible to go beyond the minimum and
maximum values by selecting respectively Low
or High.
It is recommended that you avoid a difference of
more than 3°C in the settings for left and right. CarM an uals 2 .c o m
Page 56 of 260
54
Ease of use and comfort
Clean Cabin function
It includes the AQS (Air Quality System) and
Clean Air functions.
►
T
o activate/deactivate the function, press
button 7.
AQS function
Using an exterior pollution sensor, this function
automatically activates the recirculation of
interior air when a certain level of pollutants in
the exterior
air is detected.
When the air quality returns to a satisfactory
level, recirculation of interior air is automatically
deactivated.
This function is not designed to detect
unpleasant odours.
Recirculation is automatically activated when the
windscreen wash is used or when reverse gear
is engaged.
The function is inactive if the outside temperature
is below 5°C to prevent the risk of misting on the
windscreen and side windows.
Clean Air function
Using an interior pollution sensor, this function
detects fine particles (e.g. cigarette smoke,
mould, bacteria).
The management of the recirculation of
interior
air makes it possible to return to a purified
passenger compartment in just a few minutes,
thanks to the passage of air through the high-
performance passenger compartment filter.
If the air quality appears to be reduced, contact
a PEUGEOT dealer or a qualified workshop
to change the high-performance passenger
compartment filter.
Air conditioning on/off
The air conditioning system is designed to
operate effectively in all seasons, with the
windows closed:
–
It lowers the temperature in summer
.
–
It increase the effectiveness of the demisting,
in winter
, above 3°C.
►
Press button
4-A/C to switch the air
conditioning on/off.
When the system is switched on, the indicator
lamp in the button comes on or “ A/C” changes
colour (depending on version).
Air conditioning does not operate when the air flow is deactivated.
To obtain cool air more quickly, enable interior
air recirculation for a brief period. Then return
to the intake of exterior air.
Switching off the air conditioning may result in
some discomfort (humidity or misting).
Maximum air conditioning
This function automatically adjusts the
temperature setting to the lowest possible, the
air distribution towards the central and side air
vents, the air flow to maximum and, if necessary,
activates interior air recirculation.
► Press this button to activate/deactivate
the function (confirmed by the
illumination/extinction of the indicator lamp).
Once the function is deactivated, the system
returns to the previous settings.
Switching off the air
conditioning system
► Press button 12-OFF.
Its indicator lamp lights up and all the other
indicator lamps of the air conditioning system
go off.
This action deactivates all of the functions of the
air conditioning system.
The temperature is no longer regulated. A slight
flow of air can still be felt, due to the forward
movement of the vehicle.
Interior air recirculation
The intake of exterior air prevents the formation
of mist on the windscreen and side windows.
Recirculating the interior air isolates the
passenger compartment from outside odours
and fumes and allows the desired passenger
compartment temperature to be achieved more
rapidly.
► Press this button to activate/deactivate
the function (confirmed by the
illumination/extinction of the indicator lamp). CarM an uals 2 .c o m
Page 63 of 260
61
Ease of use and comfort
3Shark fin antenna
A ventilation grille is present at the rear of the
roof for cooling the shark fin antenna.
Any ventilation noise produced, with the ignition
on or the engine running, is completely normal.
Boot fittings
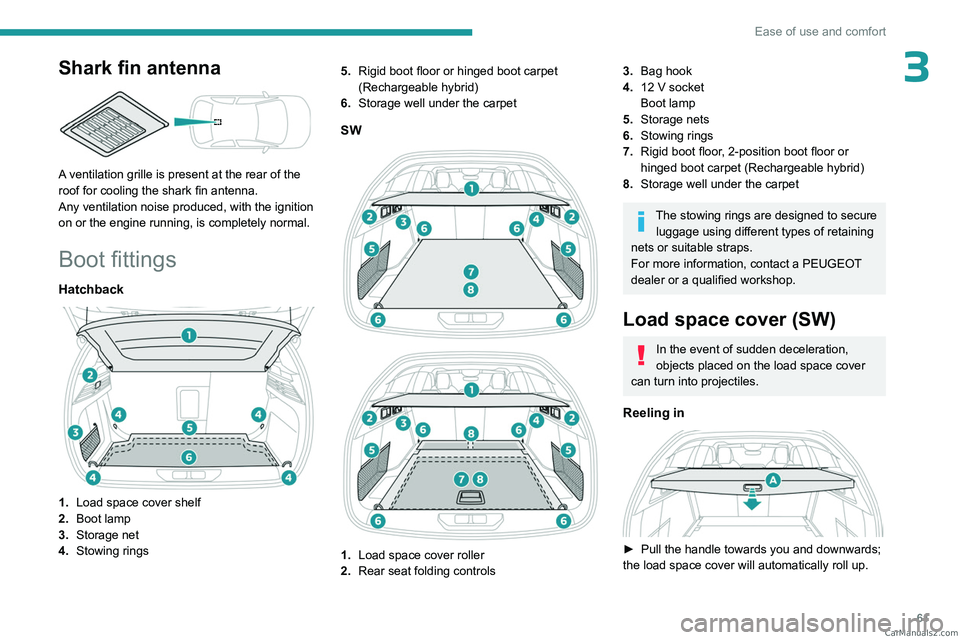
Hatchback
1.Load space cover shelf
2. Boot lamp
3. Storage net
4. Stowing rings 5.
Rigid boot floor or hinged boot carpet
(Rechargeable hybrid)
6. Storage well under the carpet
SW
1. Load space cover roller
2. Rear seat folding controls
3.Bag hook
4. 12
V socket
Boot lamp
5. Storage nets
6. Stowing rings
7. Rigid boot floor, 2-position boot floor or
hinged boot carpet (Rechargeable hybrid)
8. Storage well under the carpet
The stowing rings are designed to secure
luggage using different types of retaining
nets or suitable straps.
For more information, contact a PEUGEOT
dealer or a qualified workshop.
Load space cover (SW)
In the event of sudden deceleration,
objects placed on the load space cover
can turn into projectiles.
Reeling in
► Pull the handle towards you and downwards;
the load space cover will automatically roll up. CarM an uals 2 .c o m
Page 65 of 260
63
Ease of use and comfort
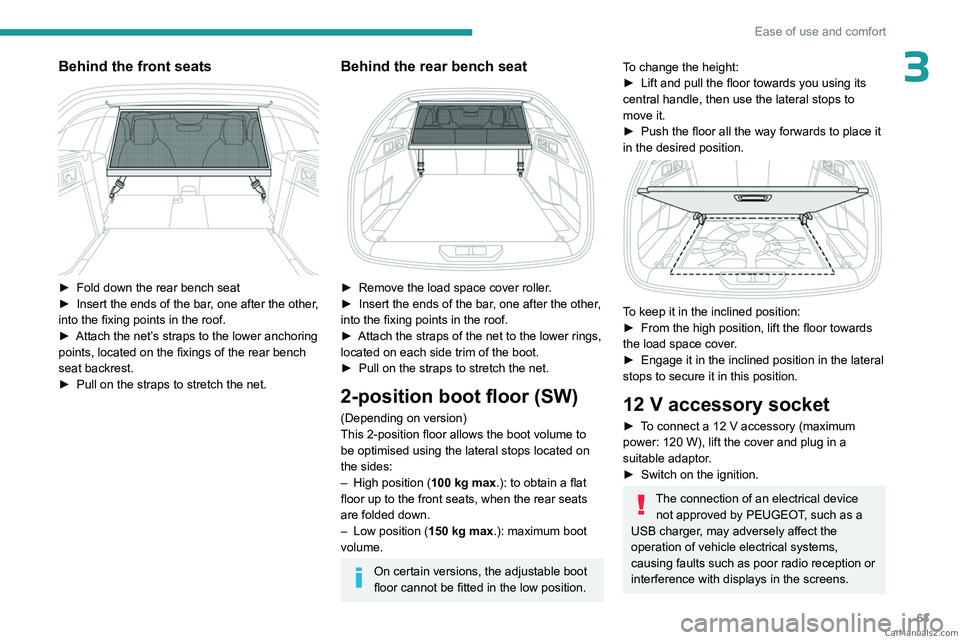
3Behind the front seats
► Fold down the rear bench seat
► Insert the ends of the bar , one after the other,
into the fixing points in the roof.
►
Attach the net’
s straps to the lower anchoring
points, located on the fixings of the rear bench
seat backrest.
►
Pull on the straps to stretch the net.
Behind the rear bench seat
► Remove the load space cover roller .
► Insert the ends of the bar , one after the other,
into the fixing points in the roof.
►
Attach the straps of the net to the lower rings,
located on each side trim of the boot.
►
Pull on the straps to stretch the net.
2-position boot floor (SW)
(Depending on version)
This 2-position floor allows the boot volume to
be optimised using the lateral stops located on
the sides:
–
High position ( 100
kg max.): to obtain a flat
floor up to the front seats, when the rear seats
are folded down.
–
Low position ( 150
kg max.): maximum boot
volume.
On certain versions, the adjustable boot
floor cannot be fitted in the low position.
To change the height:
► Lift and pull the floor towards you using its
central handle, then use the lateral stops to
move it.
►
Push the floor all the way forwards to place it
in the desired position.
To keep it in the inclined position:
► From the high position, lift the floor towards
the load space cover
.
►
Engage it in the inclined position in the lateral
stops to secure it in this position.
12 V accessory socket
► To connect a 12 V accessory (maximum
power: 120 W), lift the cover and plug in a
suitable adaptor.
►
Switch on the ignition.
The connection of an electrical device not approved by PEUGEOT, such as a
USB charger, may adversely affect the
operation of vehicle electrical systems,
causing faults such as poor radio reception or
interference with displays in the screens. CarM an uals 2 .c o m
Page 70 of 260
68
Lighting and visibility
► With the ignition off, pull the lighting control
stalk toward you ("headlamp flash") to activate/
deactivate the function.
Manual guide-me-home lighting goes off
automatically after a period of time.
Welcome lighting
When the vehicle is unlocked in low light
conditions and the "Automatic illumination of
headlamps" function is activated, this system
automatically switches on:
–
On the outside, sidelamps, dipped beam
headlamps and door mirror spotlamps.
–
Inside, courtesy lamps and footwell lighting.
Door mirror spotlamps
These spotlamps facilitate access to the vehicle
by lighting the ground near the front doors.
The spotlamps come on automatically:
–
when the vehicle is unlocked.
–
when a door is opened.
–
when a request to locate the vehicle is
received from the remote control.
They also come on with the welcome lighting
and guide-me-home lighting functions.
They go off automatically after 30 seconds.
Automatic lighting systems - General
recommendations
The automatic lighting systems use a detection
camera, located at the top of the windscreen.
Operating limits
The system may be disrupted or not work
correctly:
–
When visibility conditions are poor
(e.g.
snowfall, heavy rain).
–
If the windscreen is dirty
, misted-up or
masked (e.g.
sticker) in front of the camera.
–
If the vehicle is facing highly reflective signs
or safety barrier reflectors.
The system is not able to detect:
–
Road users that do not have their own
lighting, such as pedestrians.
–
V
ehicles with hidden lighting (e.g. travelling
behind a safety barrier on the motorway).
–
V
ehicles at the top or bottom of a steep
slope, on winding roads, on crossroads.
Maintenance
Clean the windscreen regularly,
particularly the area in front of the camera.
The internal surface of the windscreen can
also become misted around the camera.
In humid and cold weather, demist the
windscreen regularly.
Do not allow snow to accumulate on the
bonnet or roof of the vehicle as this could
obstruct the camera.
Automatic headlamp dipping
For more information, refer to the
General recommendations for
automatic lighting systems.
With the ring of the lighting control stalk in the
"AUTO" position and the function activated on
the touch screen, this system automatically
switches between dipped and main beam
headlamps, according to lighting and traffic
conditions, using a camera located at the top of
the windscreen.
CarM an uals 2 .c o m
Page 72 of 260
70
Lighting and visibility
The driver remains responsible for the vehicle's lighting, its correct use in the
prevailing light, visibility and traffic conditions,
and for compliance with driving and vehicle
regulations.
The system is active from 25 mph
(40 km/h) and deactivates below 12 mph
(20
km/h).
Activation/Deactivation
► Place the ring of the lighting control stalk in
the “AUTO” position.
This indicator lamp comes on in the instrument panel.
It is configured in the Settings > Vehicle
touch screen application.
The state of the system is stored when the
ignition is switched off.
When deactivated, the lighting system changes
to "Automatic illumination of lamps" mode.
It is recommended that you deactivate
the function in foggy or snowy conditions
or in case of heavy mist.
The function temporarily is deactivated when
the system detects thick fog or when the
foglamps are switched on manually. This is
signalled by the indicator lamp going off on
the instrument panel.
Travelling abroad
Vehicles equipped with the Peugeot
Matrix LED Technology 2.0 function:
If planning to use your vehicle in a country
that drives on the other side of the road,
deactivate the function to avoid dazzling
oncoming drivers.
Operation
Using a camera, the system detects the driving
conditions (brightness, lights from oncoming or
followed vehicles, road turns) and adapts the
beams of the main headlamps accordingly.
The modules that make up the main beams
switch on and off gradually, segment by
segment, depending on the driving conditions
detected.
Nominal main beam lighting is restored as soon
as the vehicle is no longer detected by the
system.
If the system is selected but the display
on the instrument panel and the alerts are
not available, the indicator lamp comes on in
grey.
Followed vehicle
When approaching a vehicle from behind, only
those lamp segments directed at the followed
vehicle go off, thereby creating a "tunnel" so as
not to dazzle its driver.
Oncoming vehicle
When an oncoming vehicle approaches, only
those lamp segments directed at this vehicle
go off, thereby creating a "tunnel" during the
duration of the approach.
Entering an illuminated area
At the entrance to an illuminated area (e.g. a
town), the lamp segments are gradually switched CarM an uals 2 .c o m
Page 74 of 260

72
Lighting and visibility
In position 1 or 2, the wiping frequency is
automatically reduced when the speed of
the vehicle drops below 3
mph (5 km/h).
When the speed is above 6
mph (10 km/h)
again, the wiping frequency returns to the
original frequency (fast or normal).
Single wipe
If the wiper control stalk is:
► In the INT or AUTO position, pull the stalk
briefly towards you then release it.
►
In the
0 position, press briefly on the stalk
then release it.
Pressing and holding triggers continuous wiping
at the normal wiping speed.
Windscreen wash
► Pull the wiper control stalk towards you and
hold.
A
final wiping cycle is performed when
screenwashing ends.
The windscreen wash jets are incorporated into the tip of each wiper
arm.
An additional jet is installed below the
midpoint of the arm on the driver's side.
Screenwash fluid is sprayed along the length
of the wiper blade. This improves visibility and
reduces screenwash fluid consumption.
With automatic air conditioning, any
action on the screenwash control results
in temporary closure of the air intake to
protect the passenger compartment from any
odour.
To avoid damaging the wiper blades, do not operate the screenwash if the
screenwash reservoir is empty.
Only operate the screenwash if there is no
risk of the fluid freezing on the windscreen
and hindering visibility. During the winter
period, use "very cold climate" rated products.
Never top up with water.
Rear wiper
► Turn the ring to align the desired symbol with
the marking.
Off
Intermittent wiping
Screenwash-wipe
If the ignition has been switched off with
the rear wiper active, operate the ring to
reactivate wiping when the ignition is switched
on again (unless the ignition was off for less
than 1 minute).
The first rotation of the ring to the screenwash
position triggers a single wipe. If the ring is
then left in the intermittent wiping position, the
rear wiper adopts a wiping speed dependent
on that of the windscreen wipers and the
speed of the vehicle.
Reverse
When reverse gear is engaged, the rear wiper
will come into operation automatically if the front
windscreen wipers are operating.
It is configured in the Settings > Vehicle
touch screen application.
In the event of accumulation of snow or
hard frost or if a bicycle carrier is fitted to
a towing system, deactivate the automatic
rear wiper via the Settings
> Vehicle touch
screen application.
Rear screenwash
► Turn the ring as far as it will go and hold it in
position.
The screenwash and the wiper operate for as
long as the ring remains turned.
A final wiping cycle is performed when screen
washing ends. CarM an uals 2 .c o m
Page 77 of 260

75
Lighting and visibility
4► Unclip the worn wiper blade closest to you
and remove it.
►
Install the new wiper blade and clip it to the
arm.
►
Repeat the procedure for the other wiper
blade.
►
Starting with the wiper blade closest to you,
once again hold each arm by the rigid section,
then guide it carefully onto the windscreen.
Removing/refitting at the rear
► Hold the arm by the rigid section and raise it
as far as possible.
►
Clean the rear screen using screenwash
fluid.
►
Identify the position of the arm on which the
wiper blade is attached.
►
Unclip the worn wiper blade by pulling it
towards the rear screen and remove it.
►
Install the new wiper blade in the same
position of the arm and clip it into position.
►
Once again hold the arm by the rigid section,
then guide it carefully onto the rear screen.
Take care not to use an incorrect position during fitting - risk of damage! CarM an uals 2 .c o m
Page 83 of 260
81
Safety
5Deactivation/reactivation of the ASR
system is indicated by this indicator lamp
on the instrument panel coming on/going out and
the display of a message.
The ASR system is automatically reactivated
every time the ignition is switched off or at
speeds over 31 mph (50 km/h)
Reactivation is manual below 31 mph (50 km/h).
Malfunction
In the event of a malfunction, this warning
lamp lights up on the instrument panel,
accompanied by the display of a message and
an audible signal.
Have it checked by a PEUGEOT dealer or a
qualified workshop.
ASR/DSC
These systems enhance safety during
normal driving, but should not encourage
the driver to take extra risks or drive at high
speed.
It is in conditions of reduced grip (rain, snow,
ice) that the risk of loss of grip increases. It
is therefore important for your safety to keep
these systems activated in all conditions, and
particularly in difficult conditions.
Correct operation of these systems depends
on compliance with the manufacturer's
recommendations relating to the wheels
(tyres and rims), braking and electronic
components, as well as the assembly and
repair procedures provided by PEUGEOT
dealers.
In order to ensure that these systems remain
effective in wintry conditions, the use of snow
or all-season tyres is recommended. All four
wheels must be fitted with tyres approved for
your vehicle.
All tyre specifications are listed on the
tyre/paint label. For more information
on Identification markings , refer to the
corresponding section.
Trailer stability assist (TSA)
When towing, this system reduces the risk of the
vehicle or trailer snaking.
Operation
The system is activated automatically when the
ignition is switched on.
The electronic stability control system (ESC)
must not have any faults.
The vehicle speed must be between 37 and 99
mph (60 and 160
km/h).
If the system detects that the trailer is
snaking, it applies the brakes to stabilise
the trailer and reduces engine power, if
necessary, to slow the vehicle (indicated by the
flashing of this warning lamp on the instrument
panel and the brake lamps coming on).
For more information on weights and towed
loads, refer to the Engine technical data
and towed loads section or your vehicle’s
registration certificate.
To ensure safe driving with a Towing device,
refer to the corresponding section.
Malfunction
If a fault occurs, this warning lamp lights
up on the instrument panel, accompanied
by a message and an audible signal.
To continue towing a trailer, reduce speed and
drive carefully!
Have it checked by a PEUGEOT dealer or a
qualified workshop.
The trailer stability control system provides an extra safety feature under
normal driving conditions, when following the
recommendations for use of trailers and
current legislation in force in your country. It
must not encourage the driver to take extra
risks, such as using a trailer in unsuitable
conditions of operation (e.g.
excessive load,
exceeded nose weight, worn or under-inflated
tyres, faulty braking system) or driving at
excessive speed.
In certain cases, the system may not detect
trailer snaking, particularly with a light trailer.
When driving on slippery or poor surfaces, the
system may not be able to prevent sudden
trailer snaking. CarM an uals 2 .c o m
Page 92 of 260
90
Safety
► Remove and stow the head restraint before
installing the child seat on this seat (refit it once
the child seat has been removed).
►
Pass the strap of the child seat behind the
seat backrest, centring it between the openings
for the head restraint rods.
►
Secure the upper strap hook to ring
B
.
►
T
ighten the upper strap.
When fitting an ISOFIX child seat to the
left-hand rear seat of the bench seat,
before fitting the seat, first move the centre
rear seat belt towards the middle of the
vehicle, so as to avoid the seat interfering
with the operation of the seat belt.
An incorrectly installed child seat in a vehicle compromises the child's safety in
the event of an accident.
Strictly observe the fitting instructions
provided in the user guide supplied with the
child seat.
For information about the options for
fitting ISOFIX child seats in your vehicle,
refer to the summary table.
Recommended ISOFIX child seats
Also consult the user guide from the child seat’s manufacturer to find out how to
install and remove the seat.
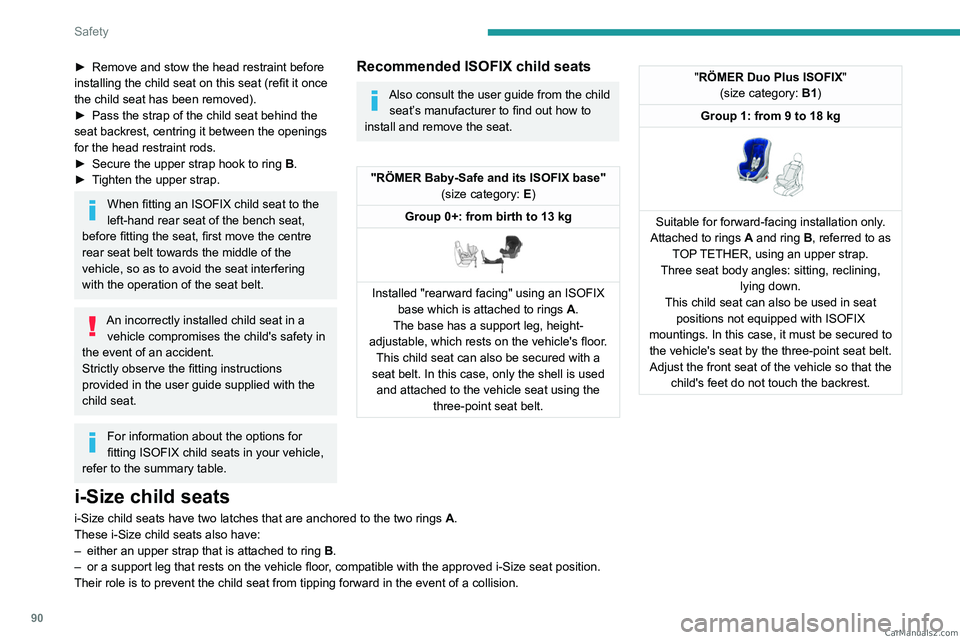
"RÖMER Baby-Safe and its ISOFIX base" (size category: E)
Group 0+: from birth to 13 kg
Installed "rearward facing" using an ISOFIX base which is attached to rings A .
The base has a support leg, height-
adjustable, which rests on the vehicle's floor. This child seat can also be secured with a
seat belt. In this case, only the shell is used and attached to the vehicle seat using the three-point seat belt.
"RÖMER Duo Plus ISOFIX "
(size category: B1)
Group 1: from 9 to 18 kg
Suitable for forward-facing installation only.
Attached to rings A and ring B, referred to as
TOP TETHER, using an upper strap.
Three seat body angles: sitting, reclining, lying down.
This child seat can also be used in seat positions not equipped with ISOFIX
mountings. In this case, it must be secured to the vehicle's seat by the three-point seat belt. Adjust the front seat of the vehicle so that the child's feet do not touch the backrest.
i-Size child seats
i-Size child seats have two latches that are anchored to the two rings A.
These i-Size child seats also have:
–
either an upper strap that is attached to ring B
.
–
or a support leg that rests on the vehicle floor
, compatible with the approved i-Size seat position.
Their role is to prevent the child seat from tipping forward in the even\
t of a collision. CarM an uals 2 .c o m