lock Peugeot 308 CC 2014 Owner's Manual
[x] Cancel search | Manufacturer: PEUGEOT, Model Year: 2014, Model line: 308 CC, Model: Peugeot 308 CC 2014Pages: 268, PDF Size: 15.33 MB
Page 4 of 268
2
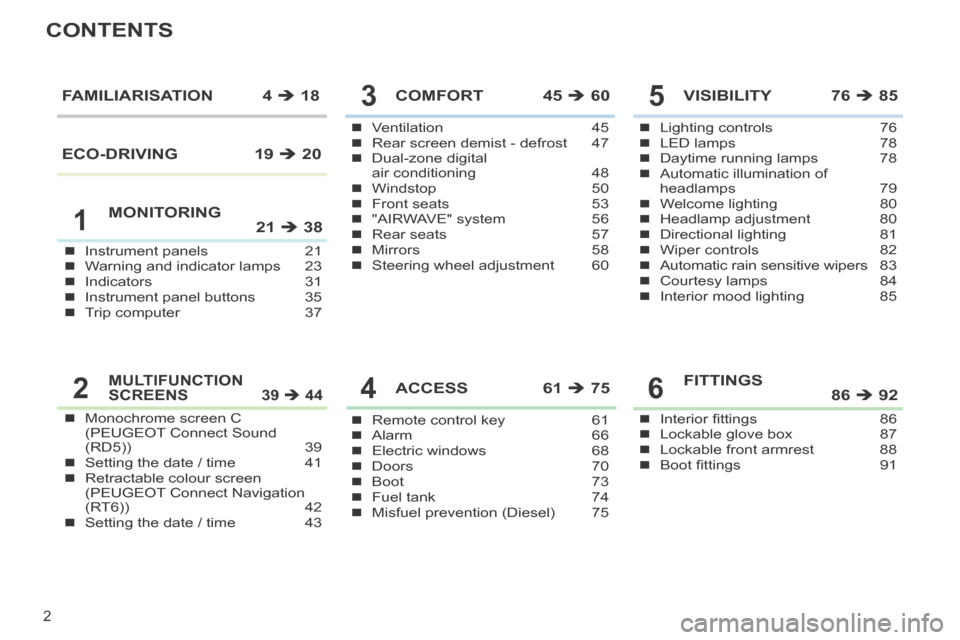
CONTENTS
Instrument panels 21Warning and indicator lamps 23Indicators 31Instrument panel buttons 35Trip computer 37
Ventilation 45Rear screen demist - defrost 47Dual-zone digital air conditioning 48Windstop 50Front seats 53"AIRWAVE" system 56Rear seats 57Mirrors 58Steering wheel adjustment 60
COMFORT 45 60
Remote control key 61Alarm 66Electric windows 68Doors 70Boot 73Fuel tank 74Misfuel prevention (Diesel) 75
ACCESS 61 75
Lighting controls 76LED lamps 78Daytime running lamps 78Automatic illumination of headlamps 79Welcome lighting 80Headlamp adjustment 80Directional lighting 81Wiper controls 82Automatic rain sensitive wipers 83Courtesy lamps 84Interior mood lighting 85
VISIBILITY 76 85FAMILIARISATION 4 18
MONITORING 21 38
Monochrome screen C (PEUGEOT Connect Sound (RD5)) 39Setting the date / time 41Retractable colour screen (PEUGEOT Connect Navigation (RT6)) 42Setting the date / time 43
MULTIFUNCTION SCREENS 39 44
Interior fi ttings 86Lockable glove box 87Lockable front armrest 88Boot fi ttings 91
FITTINGS 86 92
1
5
4
3
26
ECO-DRIVING 19 20
Page 7 of 268
61 85 74
80
5
FAMILIARISATION
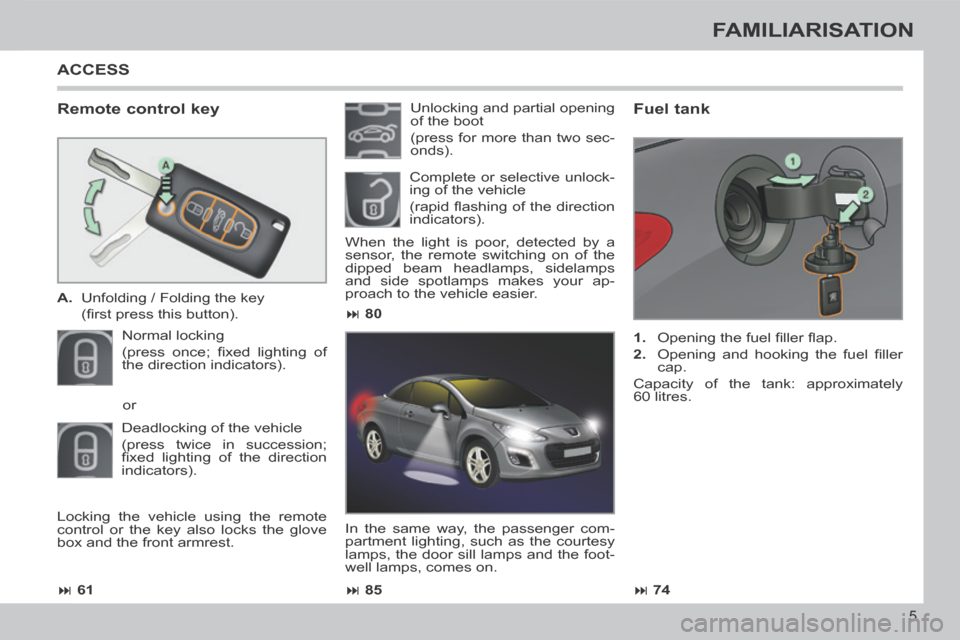
Remote control key
A. Unfolding / Folding the key
(fi rst press this button).
Normal locking
(press once; fi xed lighting of
the direction indicators).
Fuel tank
1. Opening the fuel fi ller fl ap.
2. Opening and hooking the fuel fi ller cap.
Capacity of the tank: approximately
60 litres.
Unlocking and partial opening
of the boot
(press for more than two sec-
onds).
When the light is poor, detected by a
sensor, the remote switching on of the
dipped beam headlamps, sidelamps
and side spotlamps makes your ap-
proach to the vehicle easier.
In the same way, the passenger com-
partment lighting, such as the courtesy
lamps, the door sill lamps and the foot-
well lamps, comes on.
or
Deadlocking of the vehicle
(press twice in succession;
fi xed lighting of the direction
indicators).
ACCESS
Complete or selective unlock-
ing of the vehicle
(rapid fl ashing of the direction
indicators).
Locking the vehicle using the remote
control or the key also locks the glove
box and the front armrest.
Page 8 of 268
!
!
i
!
6
FAMILIARISATION
ACCESS
Retractable roof
The operation of the roof is the ex-
clusive responsibility of the driver.
To avoid any risk of injury when
operating the roof, ensure that no
one is standing near the moving
parts.
You are strongly advised not to op-
erate the roof in strong winds. When washing your vehicle:
- lock the vehicle using the re-
mote control or the key,
- avoid spraying the upper part of the windows,
- keep the end of the high pres- sure nozzle at least 1 metre
from the windows and door
seals.
When the vehicle has been washed
or after rain, wait until the roof has
dried before opening it. It is preferable to operate the roof
with the engine running and the ve-
hicle stationary. Wait until the end of
operation message appears in the
multifunction screen before moving
off.
The operation can only be carried
out when moving if the speed is be-
low 6 mph (10 km/h), and you are
driving smoothly on level ground.
Preliminary conditions
Start the engine
You must ensure that:
- the electric windows are initialised (see the corresponding section),
- the ambient temperature is higher than -15 °C.
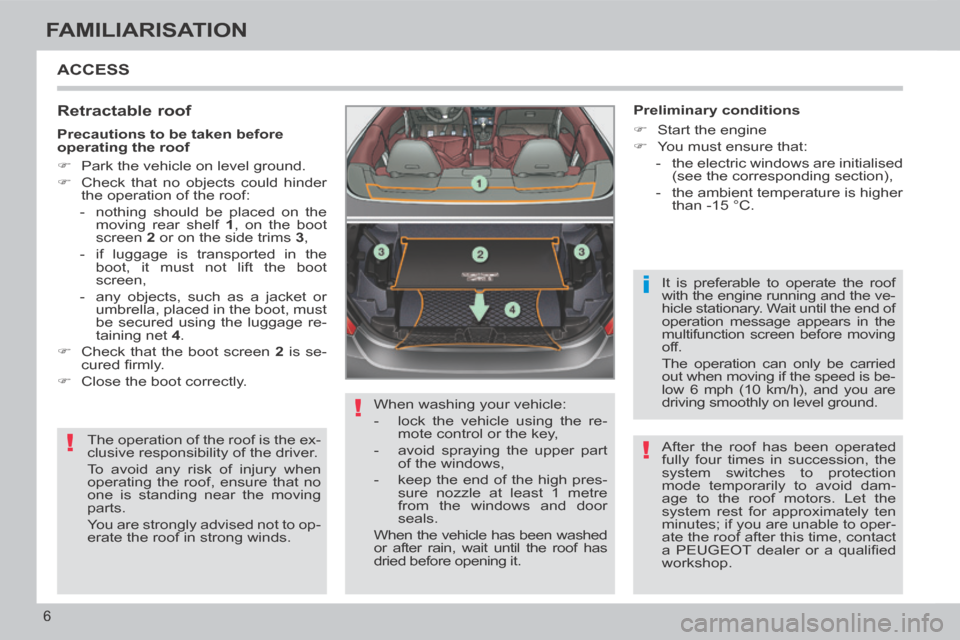
Precautions to be taken before
operating the roof
Park the vehicle on level ground.
Check that no objects could hinder
the operation of the roof:
- nothing should be placed on the moving rear shelf 1 , on the boot
screen 2 or on the side trims 3 ,
- if luggage is transported in the boot, it must not lift the boot
screen,
- any objects, such as a jacket or umbrella, placed in the boot, must
be secured using the luggage re-
taining net 4 .
Check that the boot screen 2 is se-
cured fi rmly.
Close the boot correctly.
After the roof has been operated
fully four times in succession, the
system switches to protection
mode temporarily to avoid dam-
age to the roof motors. Let the
system rest for approximately ten
minutes; if you are unable to oper-
ate the roof after this time, contact
a PEUGEOT dealer or a qualifi ed
workshop.
Page 9 of 268
!
i
!
i
!
7
FAMILIARISATION
ACCESS
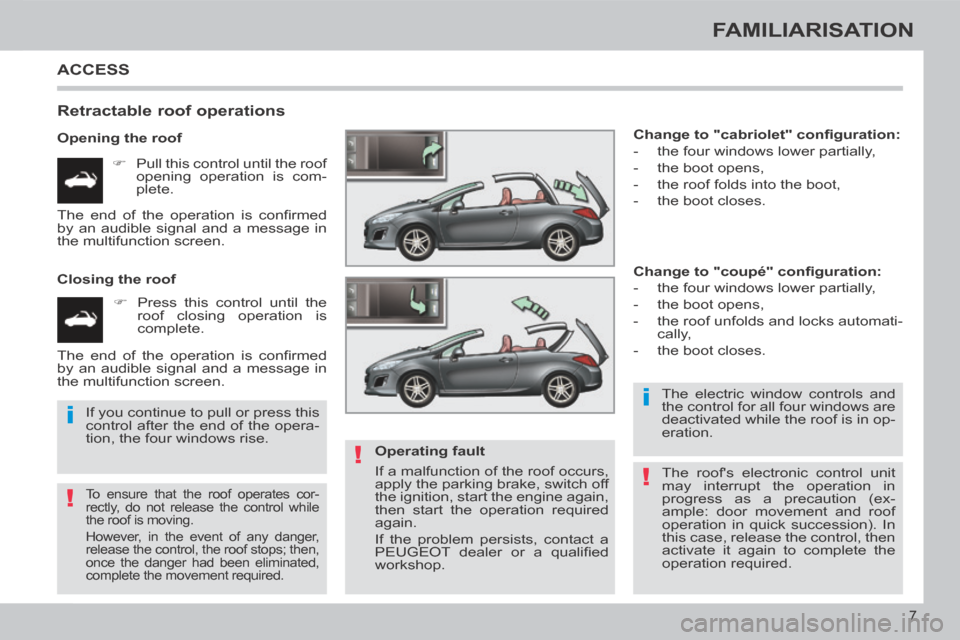
Retractable roof operations
Opening the roof Pull this control until the roof opening operation is com-
plete.
Closing the roof Press this control until the roof closing operation is
complete. Change to "cabriolet" confi guration:
- the four windows lower partially,
- the boot opens,
- the roof folds into the boot,
- the boot closes.
Change to "coupé" confi guration:
- the four windows lower partially,
- the boot opens,
- the roof unfolds and locks automati-
cally,
- the boot closes.
To ensure that the roof operates cor-
rectly, do not release the control while
the roof is moving.
However, in the event of any danger,
release the control, the roof stops; then,
once the danger had been eliminated,
complete the movement required.
Operating fault
If a malfunction of the roof occurs,
apply the parking brake, switch off
the ignition, start the engine again,
then start the operation required
again.
If the problem persists, contact a
PEUGEOT dealer or a qualifi ed
workshop. The electric window controls and
the control for all four windows are
deactivated while the roof is in op-
eration.
The end of the operation is confi rmed
by an audible signal and a message in
the multifunction screen.
The end of the operation is confi rmed
by an audible signal and a message in
the multifunction screen.
If you continue to pull or press this
control after the end of the opera-
tion, the four windows rise.
The roof's electronic control unit
may interrupt the operation in
progress as a precaution (ex-
ample: door movement and roof
operation in quick succession). In
this case, release the control, then
activate it again to complete the
operation required.
Page 10 of 268
87, 88
85
56
233
179
8
FAMILIARISATION
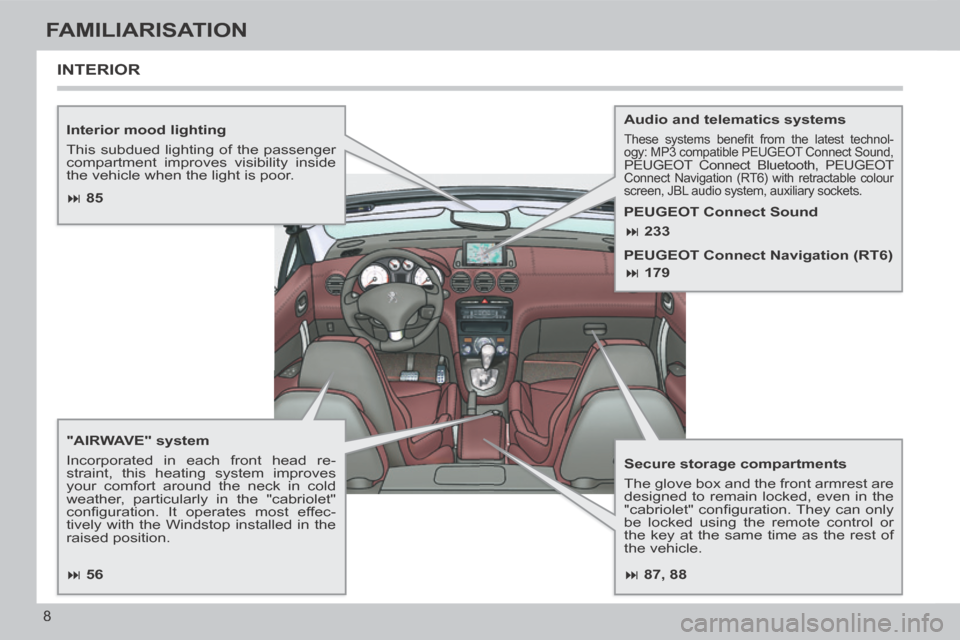
Interior mood lighting
This subdued lighting of the passenger
compartment improves visibility inside
the vehicle when the light is poor.
"AIRWAVE" system
Incorporated in each front head re-
straint, this heating system improves
your comfort around the neck in cold
weather, particularly in the "cabriolet"
confi guration. It operates most effec-
tively with the Windstop installed in the
raised position. Audio and telematics systems These systems benefi t from the latest technol-
ogy: MP3 compatible PEUGEOT Connect Sound,
PEUGEOT Connect Bluetooth, PEUGEOT Connect Navigation (RT6) with retractable colour
screen, JBL audio system, auxiliary sockets.
Secure storage compartments
The glove box and the front armrest are
designed to remain locked, even in the
"cabriolet" confi guration. They can only
be locked using the remote control or
the key at the same time as the rest of
the vehicle.
INTERIOR
PEUGEOT Connect Sound
PEUGEOT Connect Navigation (RT6)
Page 12 of 268
10
FAMILIARISATION
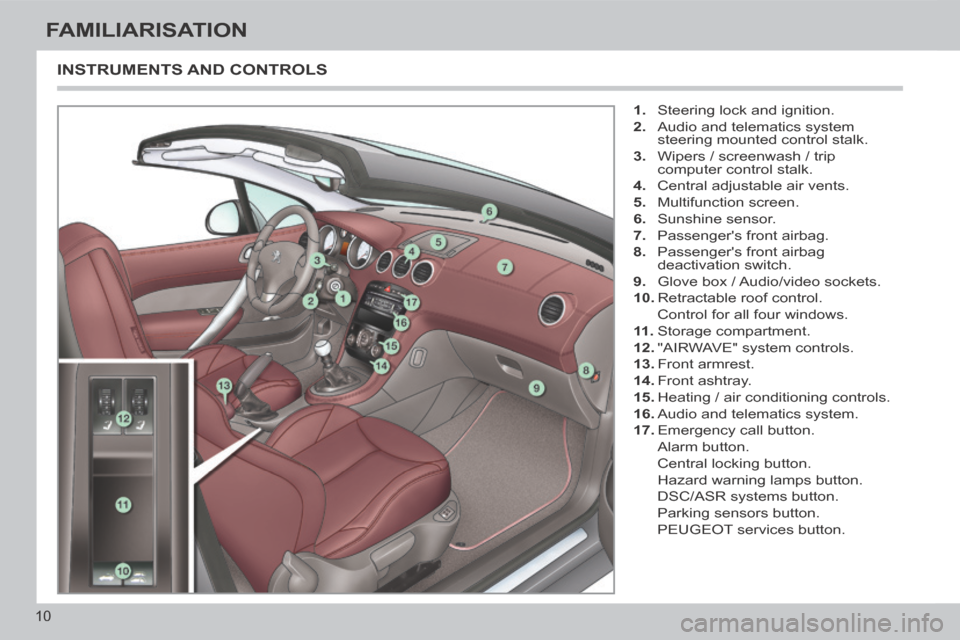
INSTRUMENTS AND CONTROLS
1. Steering lock and ignition.
2. Audio and telematics system steering mounted control stalk.
3. Wipers / screenwash / trip computer control stalk.
4. Central adjustable air vents.
5. Multifunction screen.
6. Sunshine sensor.
7. Passenger's front airbag.
8. Passenger's front airbag deactivation switch.
9. Glove box / Audio/video sockets.
10. Retractable roof control.
Control for all four windows.
11 . Storage compartment.
12. "AIRWAVE" system controls.
13. Front armrest.
14. Front ashtray.
15. Heating / air conditioning controls.
16. Audio and telematics system.
17. Emergency call button.
Alarm button.
Central locking button.
Hazard warning lamps button.
DSC/ASR systems button.
Parking sensors button.
PEUGEOT services button.
Page 14 of 268
!i
88
60
55
57
56
12
FAMILIARISATION
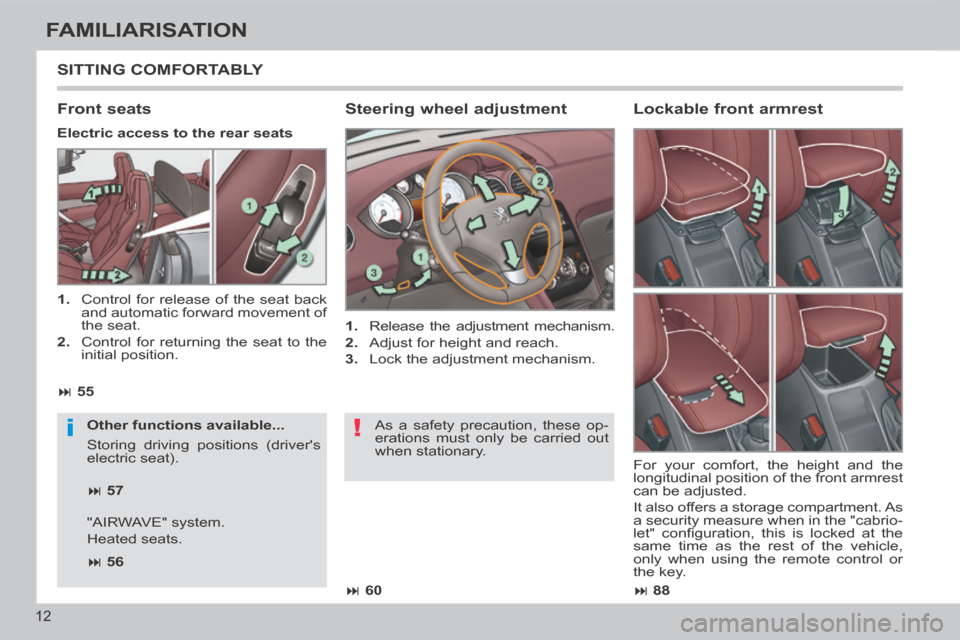
SITTING COMFORTABLY
Steering wheel adjustment
1. Release the adjustment mechanism.
2. Adjust for height and reach.
3. Lock the adjustment mechanism.
Front seats
Other functions available...
Storing driving positions (driver's
electric seat).
Electric access to the rear seats
Lockable front armrest
For your comfort, the height and the
longitudinal position of the front armrest
can be adjusted.
It also offers a storage compartment. As
a security measure when in the "cabrio-
let" confi guration, this is locked at the
same time as the rest of the vehicle,
only when using the remote control or
the key.
As a safety precaution, these op-
erations must only be carried out
when stationary.
1. Control for release of the seat back
and automatic forward movement of
the seat.
2. Control for returning the seat to the initial position.
"AIRWAVE" system.
Heated seats.
Page 17 of 268
21 23
177 177
67
71
95
129
15
FAMILIARISATION
* Depending on version.
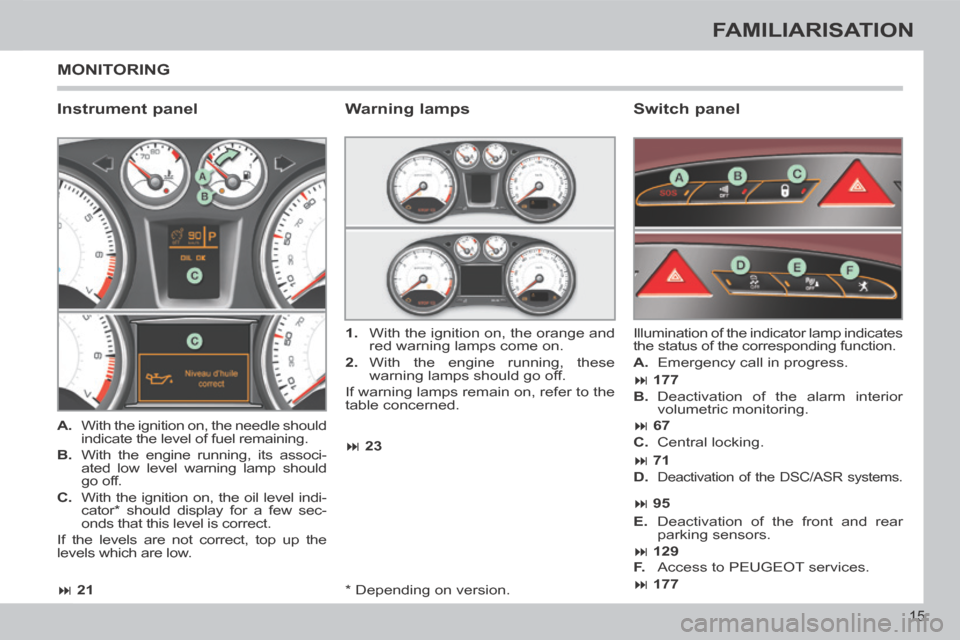
MONITORING
Instrument panel Switch panel
A. With the ignition on, the needle should
indicate the level of fuel remaining.
B. With the engine running, its associ- ated low level warning lamp should
go off.
C. With the ignition on, the oil level indi- cator * should display for a few sec-
onds that this level is correct.
If the levels are not correct, top up the
l evels which are low. Illumination of the indicator lamp indicates
the status of the corresponding function.
A. Emergency call in progress.
1. With the ignition on, the orange and
red warning lamps come on.
2. With the engine running, these warning lamps should go off.
If warning lamps remain on, refer to the
table concerned.
Warning lamps
B. Deactivation of the alarm interior volumetric monitoring.
C. Central locking.
D.
Deactivation of the DSC/ASR systems.
E. Deactivation of the front and rear parking sensors.
F. Access to PEUGEOT services.
Page 28 of 268
1
26
MONITORING
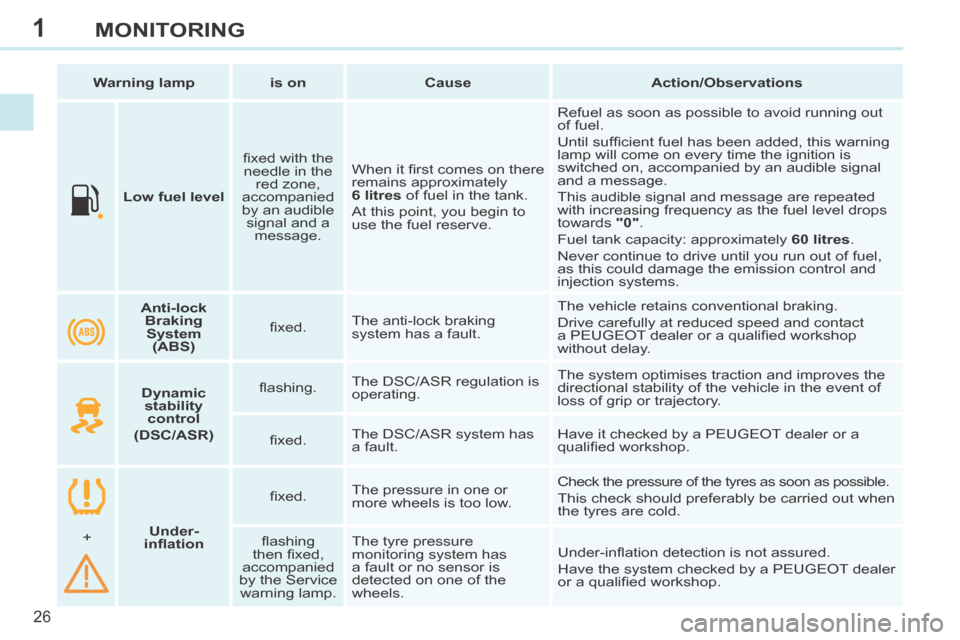
Low fuel level fi xed with the
needle in the red zone,
accompanied
by an audible signal and a message. When it fi rst comes on there
remains approximately
6 litres of fuel in the tank.
At this point, you begin to
use the fuel reserve. Refuel as soon as possible to avoid running out
of fuel.
Until suffi cient fuel has been added, this warning
lamp will come on every time the ignition is
switched on, accompanied by an audible signal
and a message.
This audible signal and message are repeated
with increasing frequency as the fuel level drops
towards
"0" .
Fuel tank capacity: approximately 60 litres .
Never continue to drive until you run out of fuel,
as this could damage the emission control and
injection systems.
Warning lamp
is on Cause Action/Observations
Anti-lock
Braking System (ABS) fi xed.
The anti-lock braking
system has a fault. The vehicle retains conventional braking.
Drive carefully at reduced speed and contact
a PEUGEOT dealer or a qualifi ed workshop
without delay.
Dynamic
stability control
(DSC/ASR) fl ashing.
The DSC/ASR regulation is
operating. The system optimises traction and improves the
directional stability of the vehicle in the event of
loss of grip or trajectory.
fi xed. The DSC/ASR system has
a fault. Have it checked by a PEUGEOT dealer or a
qualifi ed workshop.
Under-
infl ation fi xed.
The pressure in one or
more wheels is too low. Check the pressure of the tyres as soon as possible.
This check should preferably be carried out when
the tyres are cold.
+ fl ashing
then fi xed,
accompanied
by the Service warning lamp. The tyre pressure
monitoring system has
a fault or no sensor is
detected on one of the
wheels.
Under-infl ation detection is not assured.
Have the system checked by a PEUGEOT dealer
or a qualifi ed workshop.
Page 36 of 268
1
i
i
34
MONITORING
Following this operation, if you wish
to disconnect the battery, lock the
vehicle and wait at least fi ve minutes
for the zero reset to be registered.
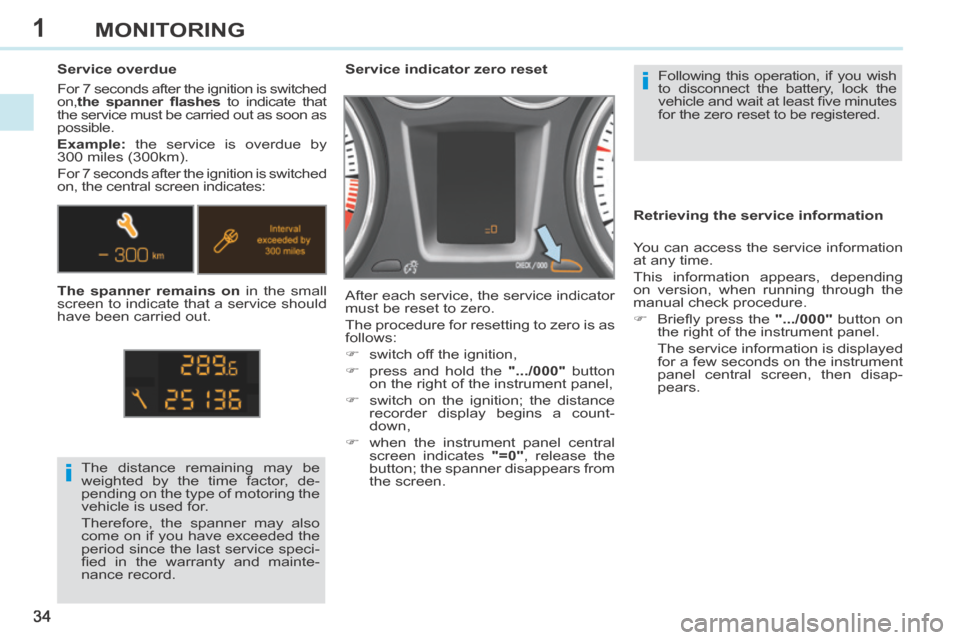
Service indicator zero reset
After each service, the service indicator
must be reset to zero.
The procedure for resetting to zero is as
follows:
switch off the ignition,
press and hold the
".../000" button
on the right of the instrument panel,
switch on the ignition; the distance recorder display begins a count-
down,
when the instrument panel central screen indicates "=0" , release the
button; the spanner disappears from
the screen.
The distance remaining may be
weighted by the time factor, de-
pending on the type of motoring the
vehicle is used for.
Therefore, the spanner may also
come on if you have exceeded the
period since the last service speci-
fi ed in the warranty and mainte-
nance record.
Service overdue
For 7 seconds after the ignition is switched
on,
the spanner fl ashes to indicate that
the service must be carried out as soon as
possible.
Example: the service is overdue by
300 miles (300km).
For 7 seconds after the ignition is switched
on, the central screen indicates:
The spanner remains on in the small
screen to indicate that a service should
have been carried out. Retrieving the service information
You can access the service information
at any time.
This information appears, depending
on version, when running through the
manual check procedure.
Briefl y press the
".../000" button on
the right of the instrument panel.
The service information is displayed for a few seconds on the instrument
panel central screen, then disap-
pears.