steering wheel PEUGEOT 4008 2017 Owners Manual
[x] Cancel search | Manufacturer: PEUGEOT, Model Year: 2017, Model line: 4008, Model: PEUGEOT 4008 2017Pages: 368, PDF Size: 12.22 MB
Page 4 of 368
.
.
4008_en_Chap00a_sommaire_ed01-2016
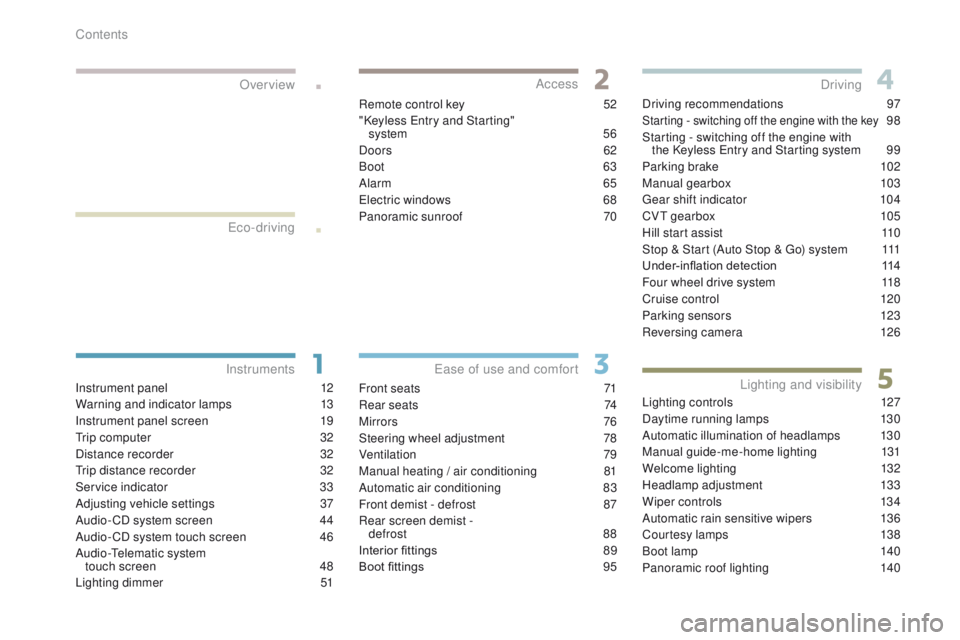
Instrument panel 12
Warning and indicator lamps
1
3
Instrument panel screen
1
9
tr
ip computer
3
2
Distance recorder
3
2
tr
ip distance recorder
3
2
Service indicator
3
3
Adjusting vehicle settings
3
7
Audio- CD system screen
4
4
Audio- CD system touch screen
4
6
Audio-
te
lematic system
touch screen
4
8
Lighting dimmer
5
1Remote control key
5
2
"Keyless e
n
try and Starting"
system
5
6
Doors 62
Boot
6
3
Alarm
65
el
ectric windows
6
8
Panoramic sunroof
7
0
Front seats 7 1
Rear seats
7
4
Mirrors
76
Steering wheel adjustment
7
8
Ventilation
7
9
Manual heating / air conditioning
8
1
Automatic air conditioning
8
3
Front demist - defrost
87
R
ear screen demist - defrost
88
Interior fittings
8
9
Boot fittings
9
5Driving recommendations
9
7
Starting - switching off the engine with the key 98
S
tarting - switching off the engine with the Keyless
e
n
try and Starting system
9
9
Parking brake
1
02
Manual gearbox
1
03
ge
ar shift indicator
1
04
CV
t
gearbox
1
05
Hill start assist
1
10
Stop & Start (Auto Stop &
g
o
) system
1
11
Under-inflation detection
1
14
Four wheel drive system
1
18
Cruise control
1
20
Parking sensors
1
23
Reversing camera
1
26
Lighting controls
1
27
Daytime running lamps
1
30
Automatic illumination of headlamps
1
30
Manual guide-me-home lighting
1
31
Welcome lighting
1
32
Headlamp adjustment
1
33
Wiper controls
1
34
Automatic rain sensitive wipers
1
36
Courtesy lamps
1
38
Boot lamp
1
40
Panoramic roof lighting
1
40
Over view
e
co-driving
Instruments Access
ea
se of use and comfort Driving
Lighting and visibility
Contents
Page 9 of 368
7
4008_en_Chap00b_vue-ensemble_ed01-2016
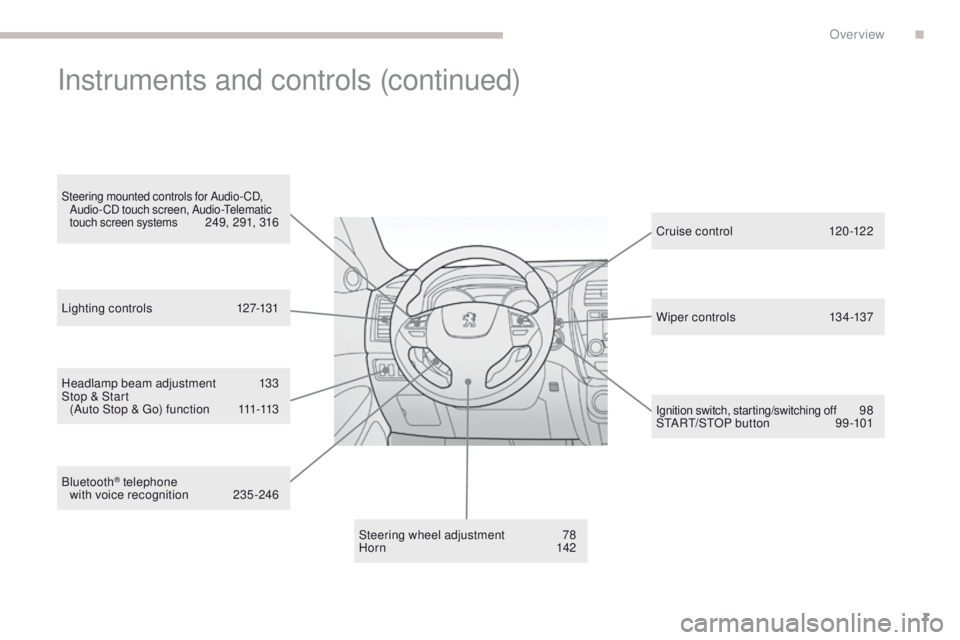
Headlamp beam adjustment 133
Stop & Start (Auto Stop &
g
o
) function
1
11-113
Steering wheel adjustment
7
8
Hor n
142Cr uise c ontrol
12
0 -12 2
Ignition switch, starting/switching off 98
StA
Rt/
StO
P button
9
9 -101
Instruments and controls (continued)
Lighting controls 1 27-131
Bluetooth
® telephone
with voice recognition 2 35 -246 W iper c ontrols
13
4 -137
Steering mounted controls for Audio- CD,
Audio-CD touch screen, Audio-te lematic
touch screen systems
249, 291, 316
.
Over view
Page 23 of 368
21
4008_en_Chap01_Instruments-de-bord_ed01-2016
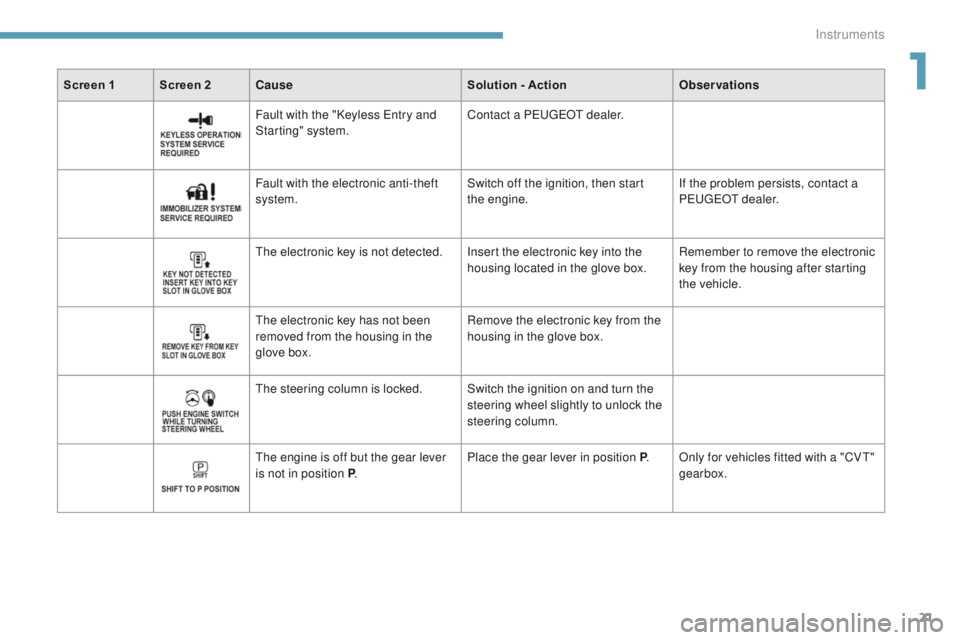
Screen 1 Screen 2Cause Solution - ActionObservations
Fault with the "Keyless e
n
try and
Starting" system. Contact a P
e
uge
Ot
dealer.
Fault with the electronic anti-theft
system. Switch off the ignition, then start
the
engine.If the problem persists, contact a
P
e
uge
Ot d
ealer.
th
e electronic key is not detected. Insert the electronic key into the housing located in the glove box. Remember to remove the electronic
key from the housing after starting
the vehicle.
th
e electronic key has not been
removed from the housing in the
glove box. Remove the electronic key from the
housing in the glove box.
th
e steering column is locked. Switch the ignition on and turn the steering wheel slightly to unlock the
steering column.
th
e engine is off but the gear lever
is not in position P . Place the gear lever in position P
. Only for vehicles fitted with a "CV
t"
g
earbox.
1
Instruments
Page 24 of 368
22
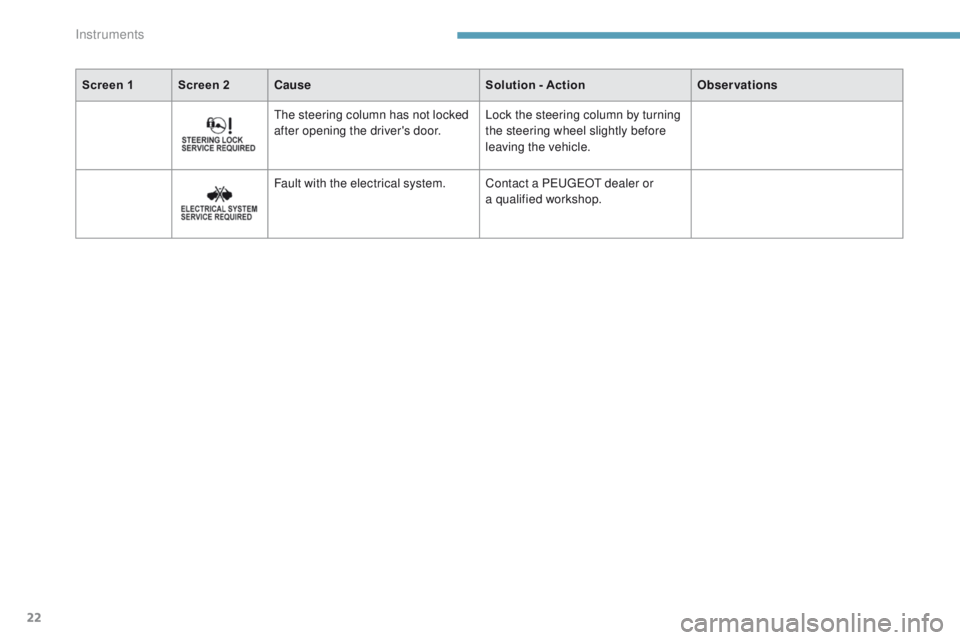
Screen 1 Screen 2Cause Solution - ActionObservations
th
e steering column has not locked
after opening the driver's door. Lock the steering column by turning
the steering wheel slightly before
leaving the vehicle.
Fault with the electrical system. Contact a P
e
uge
Ot
dealer or
a qualified workshop.
Instruments
Page 80 of 368
78
4008_en_Chap03_Ergonomie-et-confort_ed01-2016
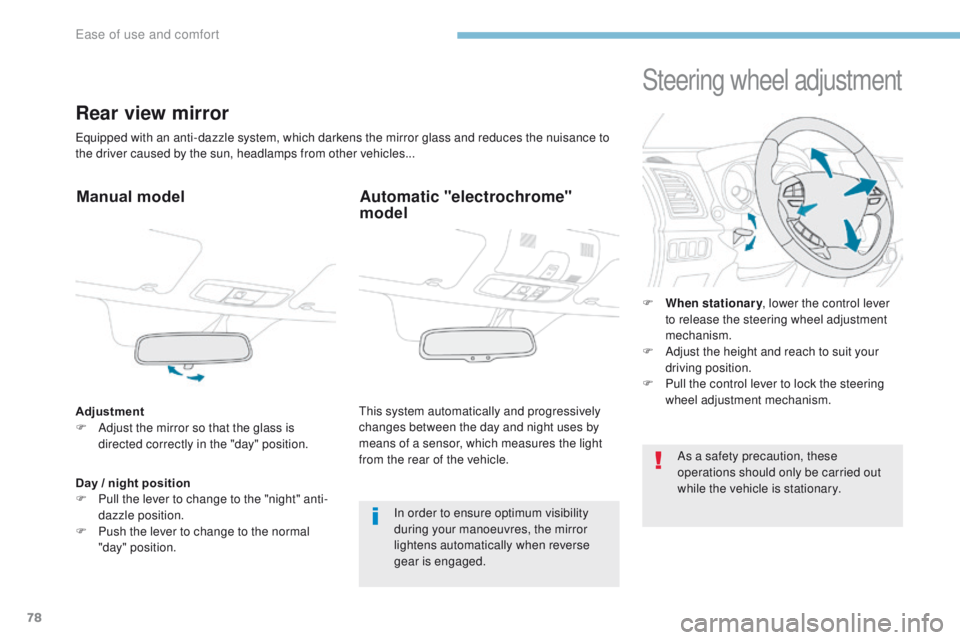
Rear view mirror
equipped with an anti-dazzle system, which darkens the mirror glass and reduces the nuisance to
the driver caused by the sun, headlamps from other vehicles...
Manual model
Adjustment
F A djust the mirror so that the glass is
directed correctly in the "day" position.
In order to ensure optimum visibility
during your manoeuvres, the mirror
lightens automatically when reverse
gear is engaged.
Day / night position
F
P
ull the lever to change to the "night" anti-
dazzle position.
F
P
ush the lever to change to the normal
"day" position.
Automatic "electrochrome"
model
this system automatically and progressively
changes between the day and night uses by
means of a sensor, which measures the light
from the rear of the vehicle.
Steering wheel adjustment
F When stationary , lower the control lever
to release the steering wheel adjustment
mechanism.
F
A
djust the height and reach to suit your
driving position.
F
P
ull the control lever to lock the steering
wheel adjustment mechanism.
As a safety precaution, these
operations should only be carried out
while the vehicle is stationary.
Ease of use and comfort
Page 100 of 368
98
4008_en_Chap04_conduite_ed01-2016
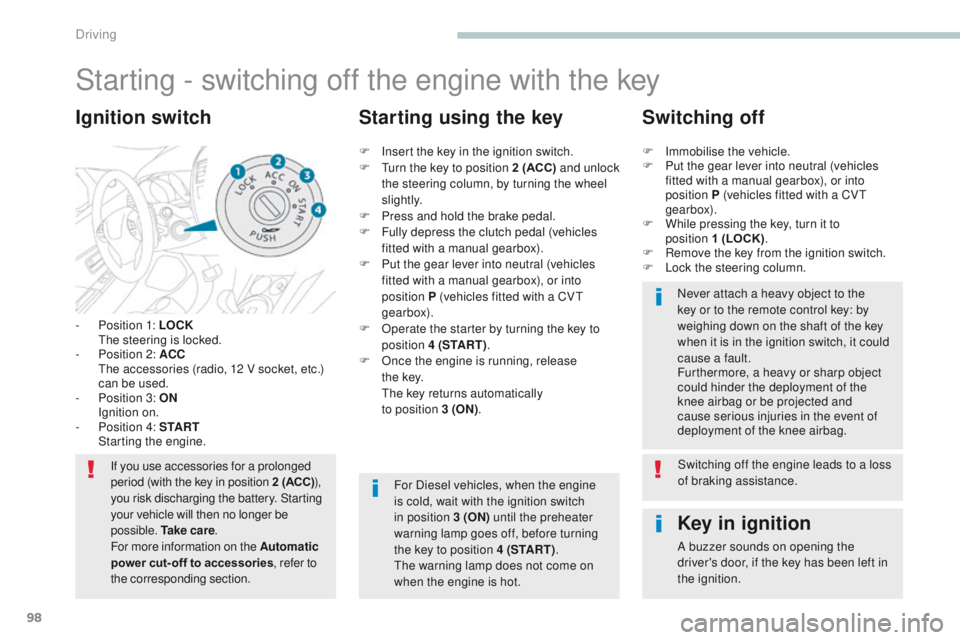
Starting - switching off the engine with the key
- Position 1: LOCK the steering is locked.
-
P
osition 2: ACC
t
h
e accessories (radio, 12 V socket, etc.)
can be used.
-
P
osition 3: ON
I
gnition on.
-
P
osition 4: S TA R T
S
tarting the engine.
Ignition switch
If you use accessories for a prolonged
period (with the key in position 2 (ACC) ),
you risk discharging the battery. Starting
your vehicle will then no longer be
possible. Ta k e c a r e .
For more information on the Automatic
power cut- off to accessories, refer to
the corresponding section.
Key in ignition
A buzzer sounds on opening the
driver's door, if the key has been left in
the ignition.
F
I
nsert the key in the ignition switch.
F
t
u
rn the key to position 2 (ACC)
and unlock
the steering column, by turning the wheel
s li g ht l y.
F
P
ress and hold the brake pedal.
F
F
ully depress the clutch pedal (vehicles
fitted with a manual gearbox).
F
P
ut the gear lever into neutral (vehicles
fitted with a manual gearbox), or into
position P (vehicles fitted with a CV
t
gearbox).
F
O
perate the starter by turning the key to
position 4 (S TA R T ) .
F
O
nce the engine is running, release
t h e
key.
t
h
e key returns automatically
to position 3 (ON) .
Starting using the key Switching off
F Immobilise the vehicle.
F
P ut the gear lever into neutral (vehicles
fitted with a manual gearbox), or into
position P (vehicles fitted with a CV
t
gearbox).
F
W
hile pressing the key, turn it to
position 1 (LOCK) .
F
R
emove the key from the ignition switch.
F
L
ock the steering column.Never attach a heavy object to the
key or to the remote control key: by
weighing down on the shaft of the key
when it is in the ignition switch, it could
cause a fault.
Furthermore, a heavy or sharp object
could hinder the deployment of the
knee airbag or be projected and
cause serious injuries in the event of
deployment of the knee airbag.
For Diesel vehicles, when the engine
is cold, wait with the ignition switch
in position 3 (ON) until the preheater
warning lamp goes off, before turning
the key to position 4 (S TA R T ) .
th
e warning lamp does not come on
when the engine is hot. Switching off the engine leads to a loss
of braking assistance.
Driving
Page 102 of 368
100
4008_en_Chap04_conduite_ed01-2016
For Diesel vehicles, when
the engine is cold, starting
does not take place until the
pre-heater warning lamp has
gone of f.
If one of the starting conditions is not
met, a reminder message appears in
the instrument panel screen. In some
circumstances, it is necessary to
turn the steering wheel slightly while
pressing the "
START/STOP " button
to assist unlocking of the steering;
a message warns you when this is
needed.
th
e presence of the electronic key in
the defined zone is essential. For safety
reasons, do not leave this area when
the engine is running.
Switching off using the
electronic key
If the vehicle is not immobilised, the
engine will not switch off.
th
is message is displayed
when the driver's door is
opened and the vehicle is not
in "OFF" mode.
F
P
ress the " START/STOP " button again to
change to "OFF" mode.
F
Imm
obilise the vehicle.
F
P
lace the gear lever in neutral for vehicles
fitted with a manual gearbox, or on P for
vehicles fitted with a CV
t
gearbox.
F
W
ith the electronic key inside the vehicle,
press the " START/STOP " button.
the
engine switches off.
th
e steering locks when a door is opened or on
locking the vehicle.
ea
ch attempt at starting takes around
15
seconds. If the engine does not start, press
the " START/STOP " button once more to try
again.
the presence of the electronic key
in the vehicle is essential only for
switching on the ignition and for starting
the engine. Once the engine has
started, make sure that the electronic
key remains with the vehicle until the
end of the journey: otherwise you would
not be able to lock the vehicle.
Switching off the engine leads to a loss
of braking assistance.
Driving
Page 117 of 368
115
4008_en_Chap04_conduite_ed01-2016
Under-inflation alert
the alert is given by the fixed
illumination of this warning lamp and
the display of a message.
F
R
educe speed immediately, avoid sudden
steering movements or harsh brake
applications.
F
S
top as soon as it is safe to do so.
th
e loss of pressure detected does not
always lead to visible deformation of the
tyre. Do not rely on just a visual check.
th
e alert is maintained until the
reference pressure is reinitialised after
the inflation, repair or replacement of
the tyres concerned. In the event of
the repair or replacement of tyres, the
sensor identifiers must be registered in
the system by a P
e
uge
Ot
dealer or a
qualified workshop.
th
e spare wheel does not have
a sensor, so there is no need to
reinitialise the system for driving with
the spare wheel fitted.
F
I f you have a compressor (the one in the
temporary puncture repair kit, for example),
check the four tyre pressures when cold.
I
f it is not possible to check the tyre
pressures immediately, drive carefully at
reduced speed.
or
F
I
n the event of a puncture, use the
temporary puncture repair kit or the spare
wheel (depending on equipment).
Reinitialising the reference
pressure
Before reinitialising the system, ensure
that the pressures in the four tyres are
suitable for the conditions of use of the
vehicle and are as specified on the tyre
pressure label.
th
e under-inflation detection system
cannot warn of an incorrect pressure at
the time of reinitialisation.
th
e system must be reinitialised after any
adjustment of tyre pressures and after
changing one or more wheels.
4
Driving
Page 118 of 368
116
4008_en_Chap04_conduite_ed01-2016
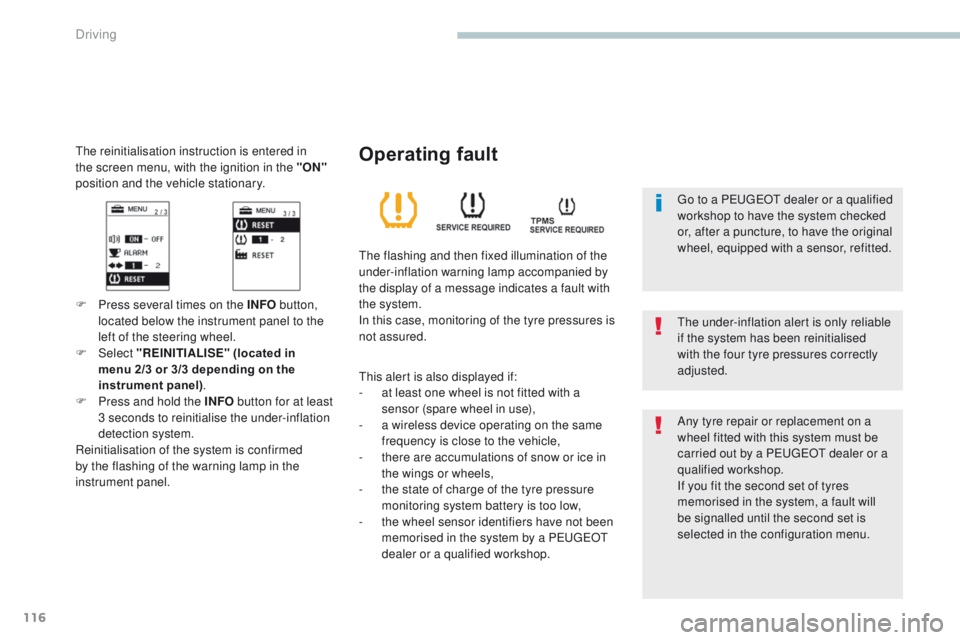
the reinitialisation instruction is entered in
the screen menu, with the ignition in the "ON"
position and the vehicle stationary.
F Press several times on the INFO button,
located below the instrument panel to the
left of the steering wheel.
F
Select "REINITIALISE" (located in
menu
2/3 or 3/3 depending on the
instrument panel) .
F
P
ress and hold the INFO button for at least
3 seconds to reinitialise the under-inflation
detection system.
Reinitialisation of the system is confirmed
by the flashing of the warning lamp in the
instrument panel.
th
e under-inflation alert is only reliable
if the system has been reinitialised
with the four tyre pressures correctly
adjusted.
Operating fault
the flashing and then fixed illumination of the
under-inflation warning lamp accompanied by
the display of a message indicates a fault with
the system.
In this case, monitoring of the tyre pressures is
not assured.
th
is alert is also displayed if:
-
a
t least one wheel is not fitted with a
sensor (spare wheel in use),
-
a w
ireless device operating on the same
frequency is close to the vehicle,
-
t
here are accumulations of snow or ice in
the wings or wheels,
-
t
he state of charge of the tyre pressure
monitoring system battery is too low,
-
t
he wheel sensor identifiers have not been
memorised in the system by a P
e
uge
Ot
dealer or a qualified workshop. Any tyre repair or replacement on a
wheel fitted with this system must be
carried out by a P
e
uge
Ot
dealer or a
qualified workshop.
If you fit the second set of tyres
memorised in the system, a fault will
be signalled until the second set is
selected in the configuration menu.
go t
o a P
e
uge
Ot
dealer or a qualified
workshop to have the system checked
or, after a puncture, to have the original
wheel, equipped with a sensor, refitted.
Driving
Page 122 of 368
120
4008_en_Chap04_conduite_ed01-2016
Cruise control
System which automatically maintains the vehicle speed at the value programmed by the driver, without any action on the accelerator pedal.
th
e cruise control is switched on manually:
the vehicle speed must be at least 25 mph
(40 km/h) and second gear or higher must be
engaged in the case of a manual gearbox.
th
e cruise control is switched off manually, by
an action on the brake or clutch pedal or if the
ASC system is triggered.
th
e programmed speed can be exceeded
temporarily by pressing the accelerator pedal.
th
e cruise control cannot, in any
circumstances, take the place of the
need to comply with speed limits or of
the vigilance of the driver.
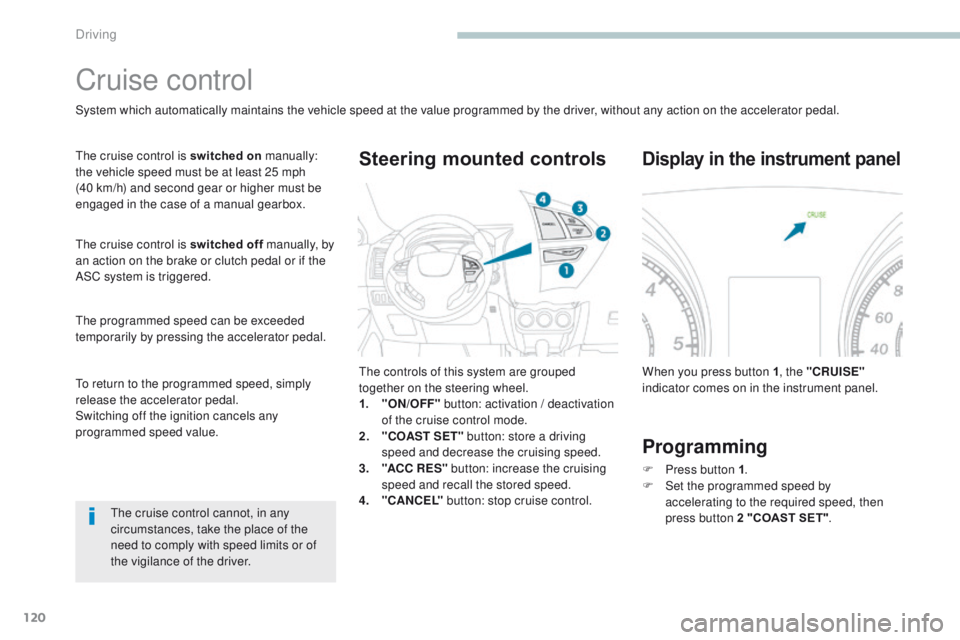
th
e controls of this system are grouped
together on the steering wheel.
1.
"
ON/OFF" button: activation / deactivation
of the cruise control mode.
2.
"
COAST SET" button: store a driving
speed and decrease the cruising speed.
3.
"A
CC R ES" button: increase the cruising
speed and recall the stored speed.
4.
"C
ANCEL" button: stop cruise control.
Steering mounted controls
When you press button 1 , the "CRUISE"
indicator comes on in the instrument panel.
Display in the instrument panel
Programming
F Press button 1 .
F S et the programmed speed by
accelerating
to the required speed, then
press button 2 "COAST SET" .
to r
eturn to the programmed speed, simply
release the accelerator pedal.
Switching off the ignition cancels any
programmed speed value.
Driving