seat adjustment PEUGEOT 5008 2016 Owners Manual
[x] Cancel search | Manufacturer: PEUGEOT, Model Year: 2016, Model line: 5008, Model: PEUGEOT 5008 2016Pages: 364, PDF Size: 12.98 MB
Page 4 of 364
.
.
5008_en_Chap00a_sommaire_ed01-2015
Interior fittings 99
Centre console 1 01
Rear multimedia
1
04
Panoramic sunroof
1
06
Boot fittings 5 -seat version
1
08
Boot fittings 7-seat version
1
09
Fittings
Child seats 1 15
Deactivating the passenger's front airbag 1 17
ISOFIX mountings
1
27
Child lock
1
34
Child safety
Over view
Instrument panels 1
4
Indicator and warning lamps 1 6
Indicators
2
7
Distance recorders
3
1
Screen A without audio equipment
3
2
Screen A with audio equipment
3
4
Screen C (PEUGEOT Connect Sound (RD5))
3
6
16/9 retractable colour screen (PEUGEOT Connect Navigation (RT6))
3
9
Trip computer
4
2
Monitoring
Heating and Ventilation 6 0
Manual air conditioning 6 2
Rear screen demist - defrost
6
4
Dual-zone digital air conditioning
6
5
Front seats
6
8
Rear seats, 2
nd row 7 3
Access to the 3rd row 7 5
Rear seats, 3rd row 7 6
Seat modularity 7 8
Mirrors
7
9
Steering wheel adjustment
8
1
Comfort
Remote control key 4 6
Alarm 5 1
Electric windows
5
3
Doors
55
Boot
5
8
Access
Lighting controls 8 2
Daytime running lamps 8 6
Automatic illumination of headlamps
87
H
eadlamp beam adjustment
8
9
Directional lighting
9
0
Wiper controls
9
1
Automatic rain sensitive wipers
9
4
Courtesy lamps
9
6
Interior mood lighting
9
7
Visibility
Eco-driving
Contents
Page 70 of 364
68
5008_en_Chap03_confort_ed01-2015
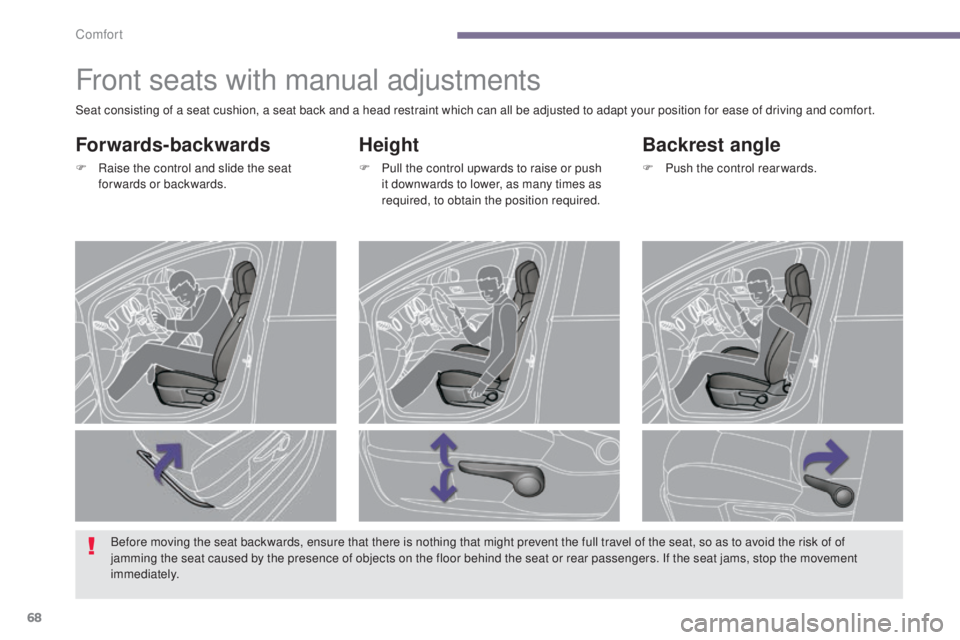
Front seats with manual adjustments
Height
F Pull the control upwards to raise or push it downwards to lower, as many times as
required, to obtain the position required.
Backrest angle
F Push the control rearwards.
Forwards-backwards
F Raise the control and slide the seat forwards or backwards.
Seat consisting of a seat cushion, a seat back and a head restraint which can all be adjusted to adapt your position for ease of driving and comfort.
Before moving the seat backwards, ensure that there is nothing that might prevent the full travel of the seat, so as to avoid the risk of of
jamming the seat caused by the presence of objects on the floor behind the seat or rear passengers. If the seat jams, stop the movement
immediately.
Comfort
Page 72 of 364
70
5008_en_Chap03_confort_ed01-2015
Before moving the seat backwards,
ensure that there is nothing that might
prevent the full travel of the seat, so
as to avoid the risk of of jamming the
seat caused by the presence of objects
on the floor behind the seat or rear
passengers. If the seat jams, stop the
movement immediately. The electric functions of the driver's
seat are active for approximately one
minute after opening the front door.
They are deactivated approximately one
minute after the ignition is switched off
and in economy mode.
To reactivate them, switch on the
ignition.F
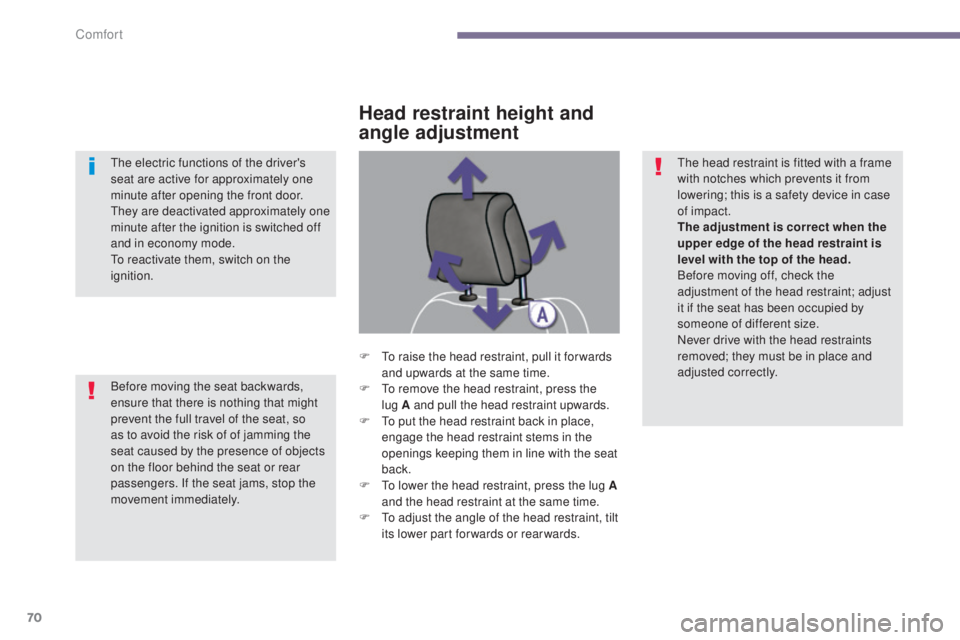
T
o raise the head restraint, pull it for wards
and upwards at the same time.
F T o remove the head restraint, press the
lug A and pull the head restraint upwards.
F
T
o put the head restraint back in place,
engage the head restraint stems in the
openings keeping them in line with the seat
back.
F
T
o lower the head restraint, press the lug A
and the head restraint at the same time.
F
T
o adjust the angle of the head restraint, tilt
its lower part forwards or rearwards.
Head restraint height and
angle adjustment
The head restraint is fitted with a frame
with notches which prevents it from
lowering; this is a safety device in case
of impact.
The adjustment is correct when the
upper edge of the head restraint is
level with the top of the head.
Before moving off, check the
adjustment of the head restraint; adjust
it if the seat has been occupied by
someone of different size.
Never drive with the head restraints
removed; they must be in place and
adjusted correctly.
Comfort
Page 73 of 364
71
5008_en_Chap03_confort_ed01-2015
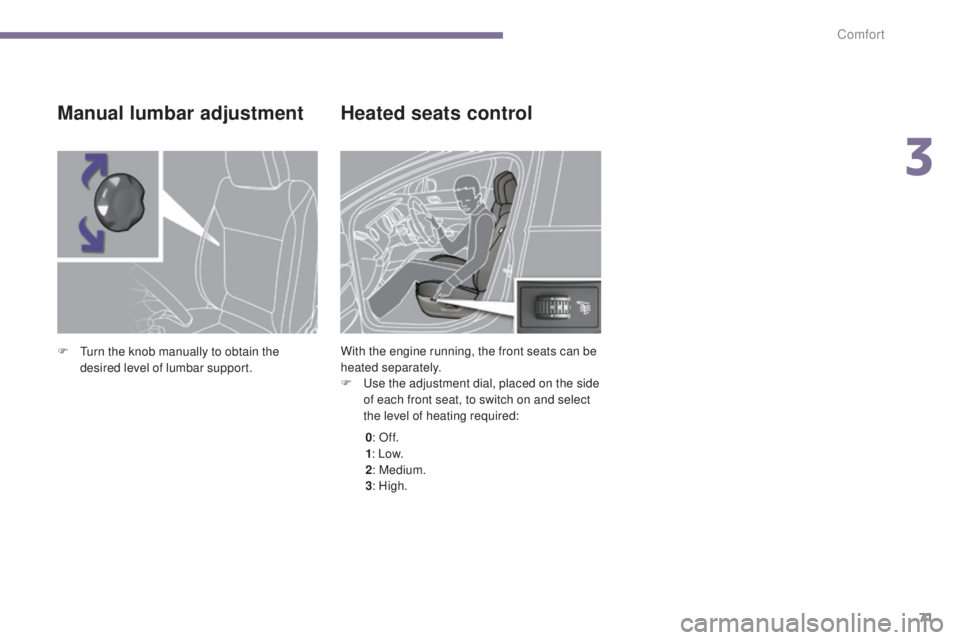
Heated seats control
With the engine running, the front seats can be
heated separately.
F
U
se the adjustment dial, placed on the side
of each front seat, to switch on and select
the level of heating required:
0 : Of f.
1 : Low.
2 : Medium.
3 : High.
Manual lumbar adjustment
F Turn the knob manually to obtain the
desired level of lumbar support.
3
Comfort
Page 75 of 364
73
5008_en_Chap03_confort_ed01-2015
2nd row seats
Forwards-backwards adjustment
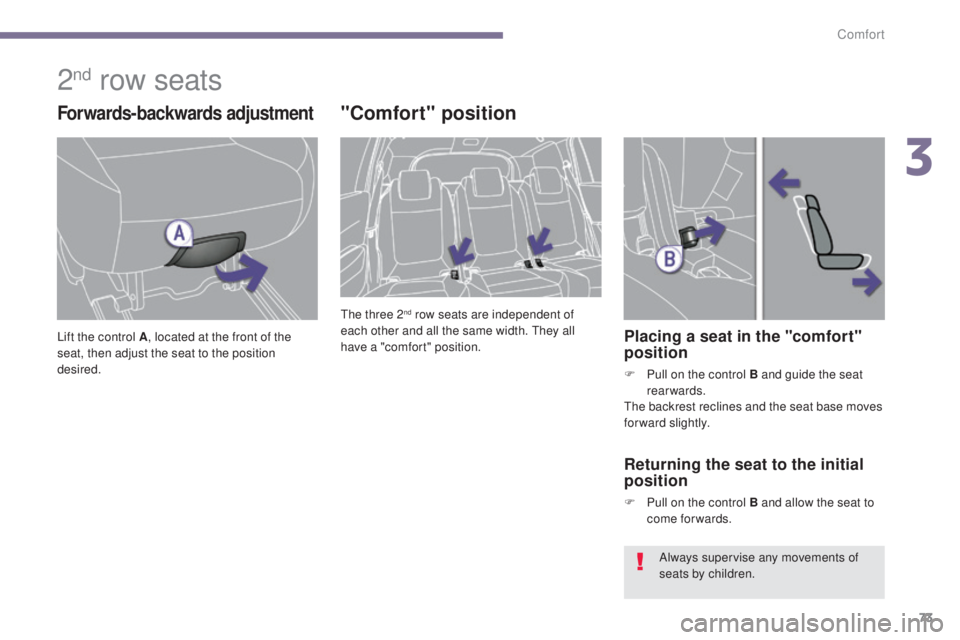
Lift the control A, located at the front of the
seat, then adjust the seat to the position
desired.
"Comfort" position
The three 2nd row seats are independent of
each other and all the same width. They all
have a "comfort" position.
Placing a seat in the "comfort"
position
F Pull on the control B and guide the seat rearwards.
The backrest reclines and the seat base moves
forward slightly.
Returning the seat to the initial
position
F Pull on the control B and allow the seat to come forwards.
Always supervise any movements of
seats by children.
3
Comfort
Page 91 of 364
89
5008_en_Chap04_visibilite_ed01-2015
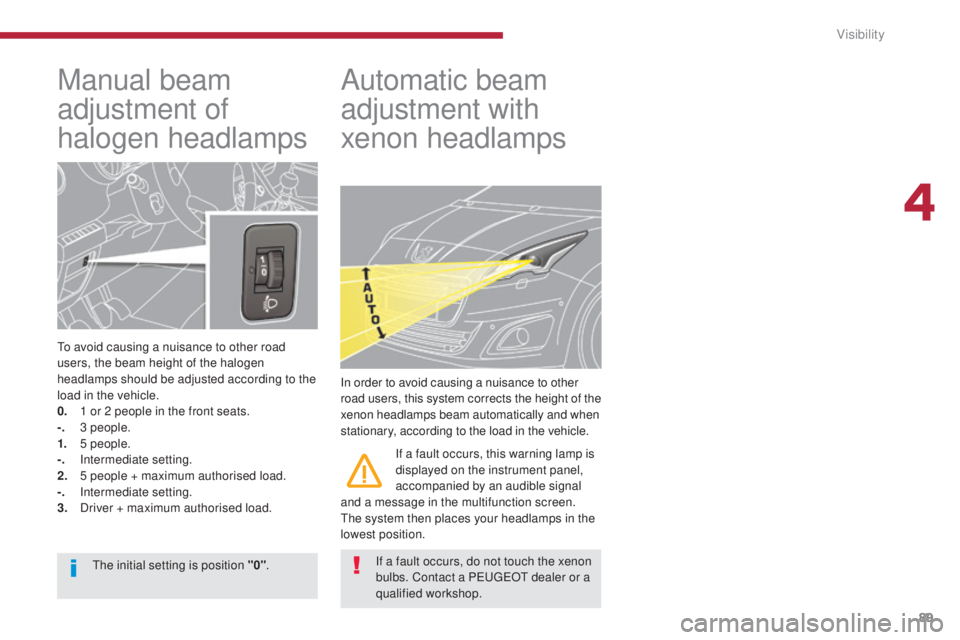
Manual beam
adjustment of
halogen headlamps
To avoid causing a nuisance to other road
users, the beam height of the halogen
headlamps should be adjusted according to the
load in the vehicle.
0.
1 o
r 2 people in the front seats.
-.
3
people.
1.
5
people.
-.
I
ntermediate setting.
2.
5 p
eople + maximum authorised load.
-.
I
ntermediate setting.
3.
D
river + maximum authorised load.
Automatic beam
adjustment with
xenon headlamps
In order to avoid causing a nuisance to other
road users, this system corrects the height of the
xenon headlamps beam automatically and when
stationary, according to the load in the vehicle. If a fault occurs, this warning lamp is
displayed on the instrument panel,
accompanied by an audible signal
and a message in the multifunction screen.
The system then places your headlamps in the
lowest position.
If a fault occurs, do not touch the xenon
bulbs. Contact a PEUGEOT dealer or a
qualified workshop.
The initial setting is position "0"
.
4
Visibility
Page 105 of 364
103
5008_en_Chap05_amenagements_ed01-2015
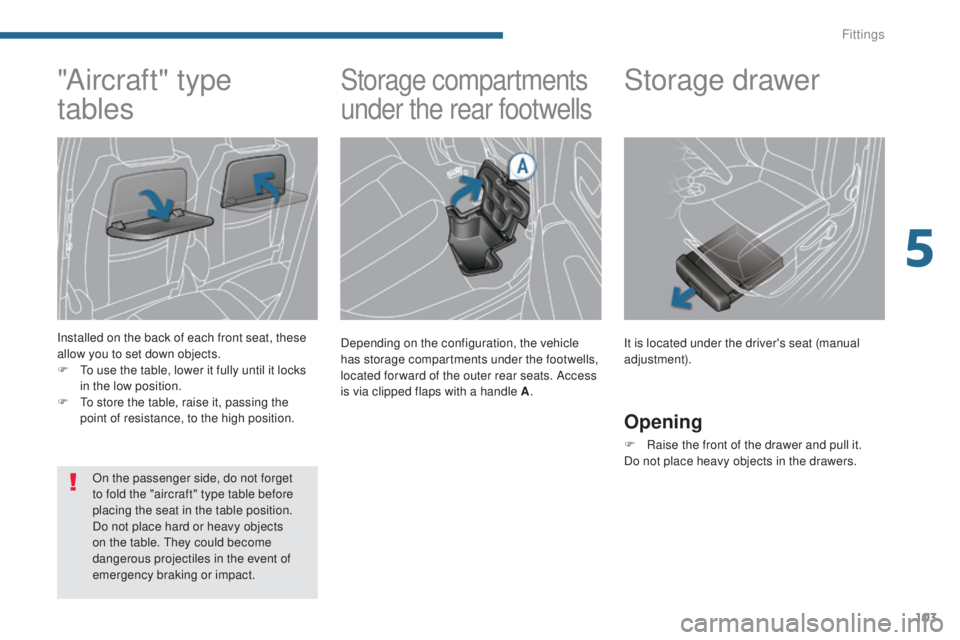
Storage compartments
under the rear footwells
Depending on the configuration, the vehicle
has storage compartments under the footwells,
located for ward of the outer rear seats. Access
is via clipped flaps with a handle A.
"Aircraft" type
tables
Installed on the back of each front seat, these
allow you to set down objects.
F
T
o use the table, lower it fully until it locks
in the low position.
F
T
o store the table, raise it, passing the
point of resistance, to the high position.
On the passenger side, do not forget
to fold the "aircraft" type table before
placing the seat in the table position.
Do not place hard or heavy objects
on the table. They could become
dangerous projectiles in the event of
emergency braking or impact.
Storage drawer
Opening
F Raise the front of the drawer and pull it.
Do not place heavy objects in the drawers. It is located under the driver's seat (manual
adjustment).
5
Fittings
Page 107 of 364
105
5008_en_Chap05_amenagements_ed01-2015
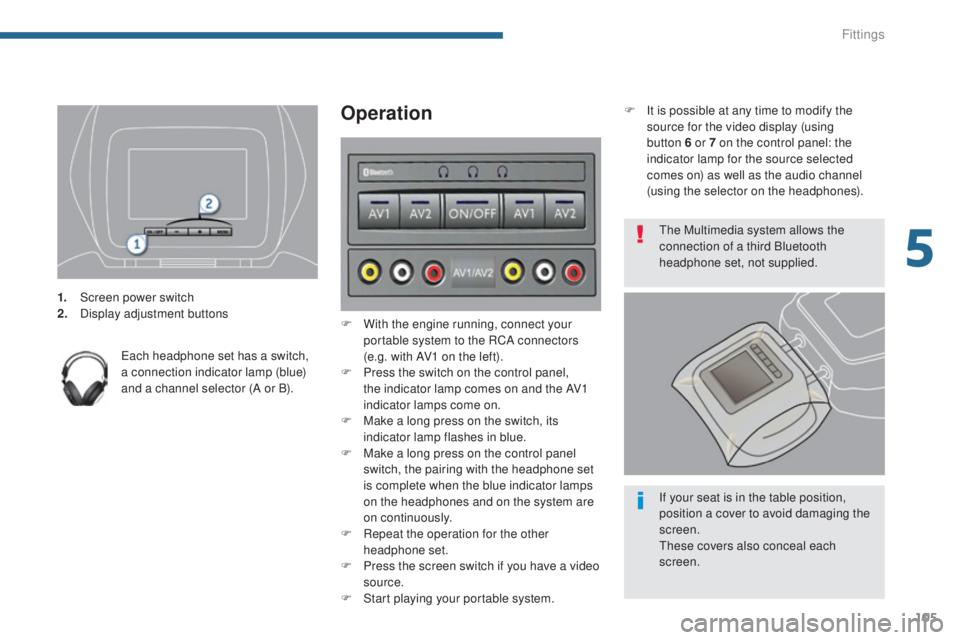
1. Screen power switch
2. Display adjustment buttons
Each headphone set has a switch,
a connection indicator lamp (blue)
and a channel selector (A or B).
Operation
F With the engine running, connect your portable system to the RCA connectors
(e.g. with AV1 on the left).
F
P
ress the switch on the control panel,
the indicator lamp comes on and the AV1
indicator lamps come on.
F
M
ake a long press on the switch, its
indicator lamp flashes in blue.
F
M
ake a long press on the control panel
switch, the pairing with the headphone set
is complete when the blue indicator lamps
on the headphones and on the system are
on continuously.
F
R
epeat the operation for the other
headphone set.
F
P
ress the screen switch if you have a video
source.
F
S
tart playing your portable system. F
I
t is possible at any time to modify the
source for the video display (using
button 6 or 7 on the control panel: the
indicator lamp for the source selected
comes on) as well as the audio channel
(using the selector on the headphones).
The Multimedia system allows the
connection of a third Bluetooth
headphone set, not supplied.
If your seat is in the table position,
position a cover to avoid damaging the
screen.
These covers also conceal each
screen.
5
Fittings
Page 123 of 364
121
5008_en_Chap06_securite-enfants_ed01-2015
Installing a child seat with a support leg
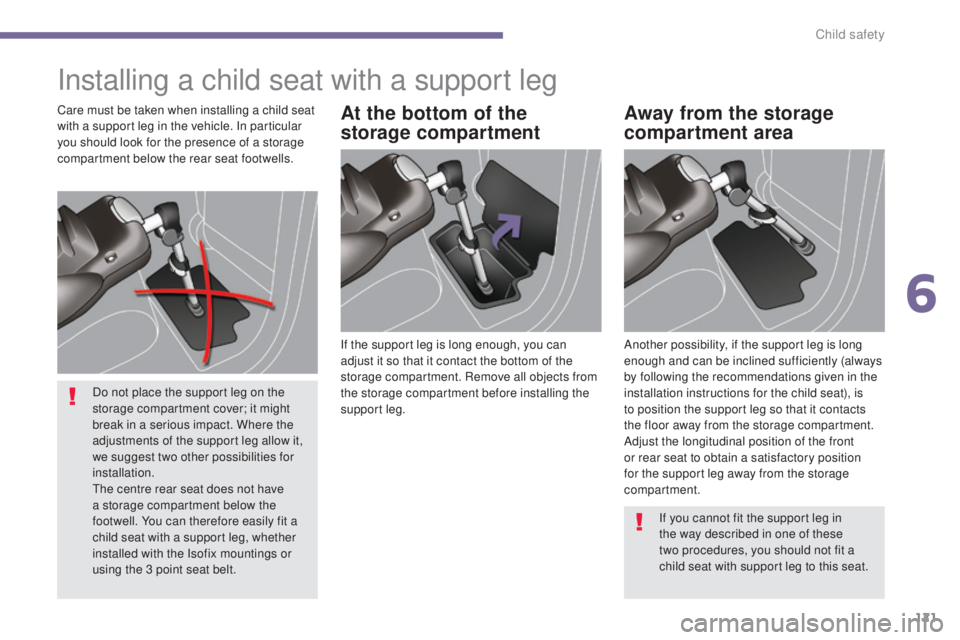
If the support leg is long enough, you can
adjust it so that it contact the bottom of the
storage compartment. Remove all objects from
the storage compartment before installing the
support leg.Another possibility, if the support leg is long
enough and can be inclined sufficiently (always
by following the recommendations given in the
installation instructions for the child seat), is
to position the support leg so that it contacts
the floor away from the storage compartment.
Adjust the longitudinal position of the front
or rear seat to obtain a satisfactory position
for the support leg away from the storage
compartment.
Care must be taken when installing a child seat
with a support leg in the vehicle. In particular
you should look for the presence of a storage
compartment below the rear seat footwells.
If you cannot fit the support leg in
the way described in one of these
two procedures, you should not fit a
child seat with support leg to this seat.
Do not place the support leg on the
storage compartment cover; it might
break in a serious impact. Where the
adjustments of the support leg allow it,
we suggest two other possibilities for
installation.
The centre rear seat does not have
a storage compartment below the
footwell. You can therefore easily fit a
child seat with a support leg, whether
installed with the Isofix mountings or
using the 3 point seat belt.
At the bottom of the
storage compartment
Away from the storage
compartment area
6
Child safety
Page 141 of 364
139
5008_en_Chap07_securite_ed01-2015
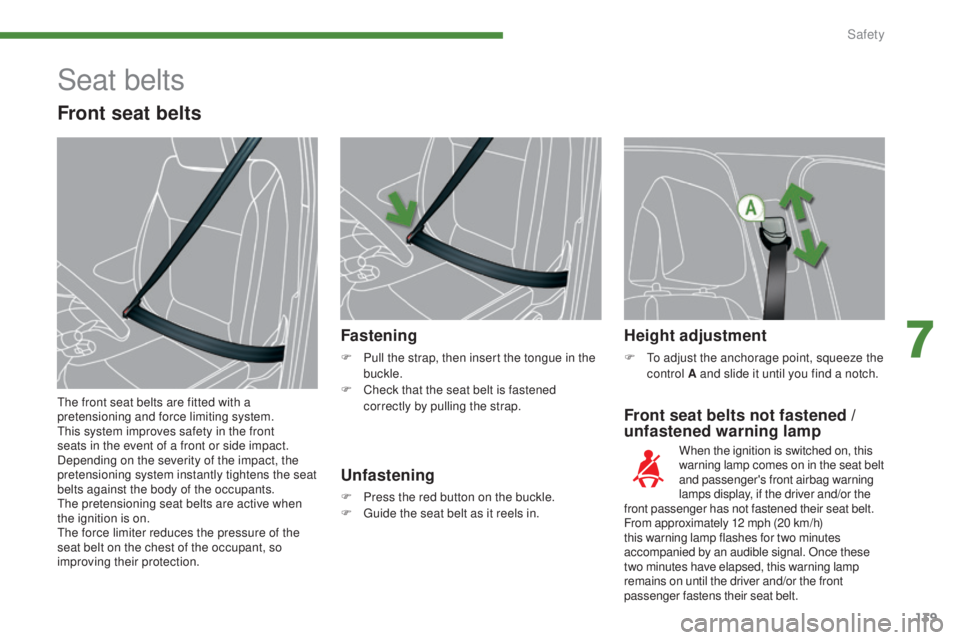
Front seat belts not fastened /
u nfastened warning lamp
Fastening
F Pull the strap, then insert the tongue in the
buckle.
F
C
heck that the seat belt is fastened
correctly by pulling the strap.
Height adjustment
F To adjust the anchorage point, squeeze the control A and slide it until you find a notch.
When the ignition is switched on, this
warning lamp comes on in the seat belt
and passenger's front airbag warning
lamps display, if the driver and/or the
front passenger has not fastened their seat belt.
From approximately 12 mph (20 km/h)
this warning lamp flashes for two minutes
accompanied by an audible signal. Once these
two minutes have elapsed, this warning lamp
remains on until the driver and/or the front
passenger fastens their seat belt.
Unfastening
F Press the red button on the buckle.
F
G uide the seat belt as it reels in.
Seat belts
Front seat belts
The front seat belts are fitted with a
pretensioning and force limiting system.
This system improves safety in the front
seats in the event of a front or side impact.
Depending on the severity of the impact, the
pretensioning system instantly tightens the seat
belts against the body of the occupants.
The pretensioning seat belts are active when
the ignition is on.
The force limiter reduces the pressure of the
seat belt on the chest of the occupant, so
improving their protection.
7
Safety