seat adjustment Peugeot 508 2014 Owner's Manual - RHD (UK, Australia)
[x] Cancel search | Manufacturer: PEUGEOT, Model Year: 2014, Model line: 508, Model: Peugeot 508 2014Pages: 352, PDF Size: 13.51 MB
Page 4 of 352
.
Contents
Instrument panel 22
Indicator and warning lamps 23
Gauges and indicators 33
Trip computer 38
Setting the date and time 41
Monitoring
Familiarisation
Remote control key
43
Alarm 53
Electric windows 55
Boot 57
Motorised tailgate (SW) 58
Sunroof 61
Panoramic sunroof (SW) 63
Fuel tank 64
Diesel misfuel prevention 65
Access
Front seats 67
Rear seats 72
M i r r o r s 74
Steering wheel adjustment 76
Interior fi ttings 77
Boot fi ttings (Saloon) 80
Boot fi ttings (SW) 81
Heating and Ventilation 86
Manual air conditioning 88
Dual-zone digital air conditioning 90
Quad-zone digital air conditioning 93
Rear screen demist - defrost 98
Programmable Heating / Ventilation 99
Comfort
Starting-switching off the engine 101
Electric parking brake 103
Manual parking brake 110
Manual gearbox 111
Gear shift indicator 112
Automatic gearbox 113
6-speed electronic gear control gearbox 117
Stop & Start 121
Hill start assist 124
Head-up display 125
Speed limiter 128
Cruise control 130
Parking sensors 132
Parking space sensors 134
Driving
Lighting controls 136
Automatic illumination of headlamps 141
Headlamp adjustment 144
Directional lighting 145
Wiper controls 147
Automatic rain sensitive wipers 149
Courtesy lamps 151
Interior mood lighting 152
Visibility
Eco-driving 20
Page 11 of 352
.
9
Familiarisation
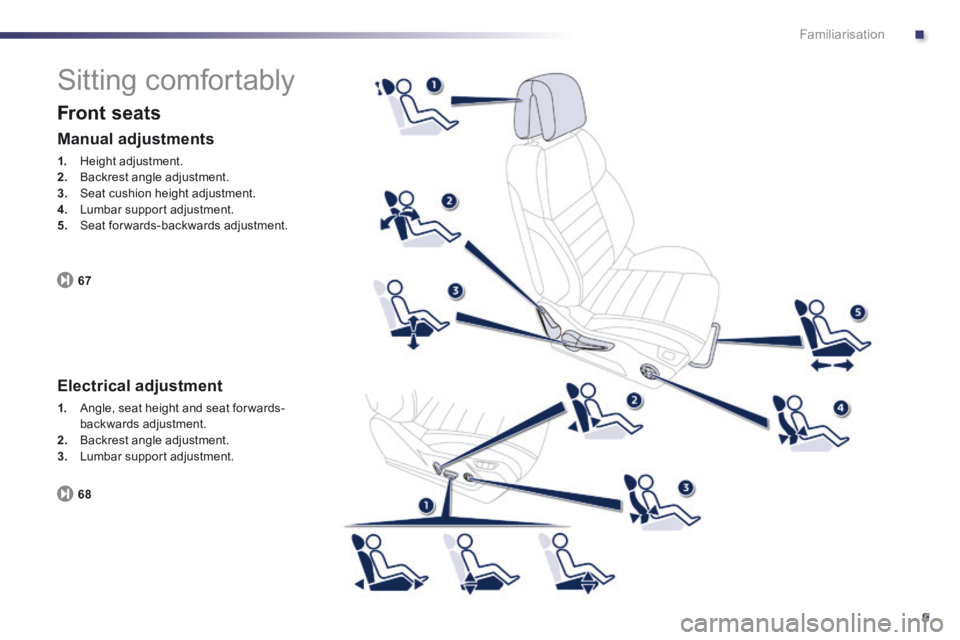
Sitting comfortably
Front seats
67
Manual adjustments
1. Height adjustment. 2. Backrest angle adjustment. 3. Seat cushion height adjustment. 4. Lumbar support adjustment. 5. Seat forwards-backwards adjustment.
Electrical adjustment
1. Angle, seat height and seat forwards-backwards adjustment. 2. Backrest angle adjustment. 3. Lumbar support adjustment.
68
Page 14 of 352
12
Familiarisation
Sitting comfortably
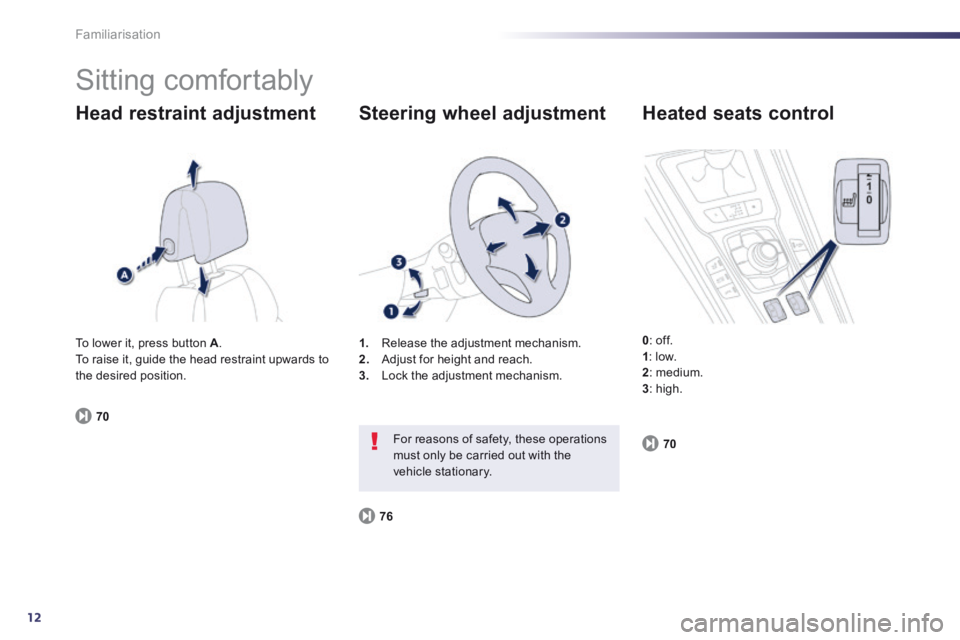
Head restraint adjustment
70
1. Release the adjustment mechanism. 2. Adjust for height and reach. 3. Lock the adjustment mechanism.
Steering wheel adjustment
76
For reasons of safety, these operations must only be carried out with the vehicle stationary.
Heated seats control
0 : off. 1 : low. 2 : medium. 3 : high.
To lower it, press button A . To raise it, guide the head restraint upwards to the desired position.
70
Page 15 of 352
.
13
Familiarisation
Sitting comfortably
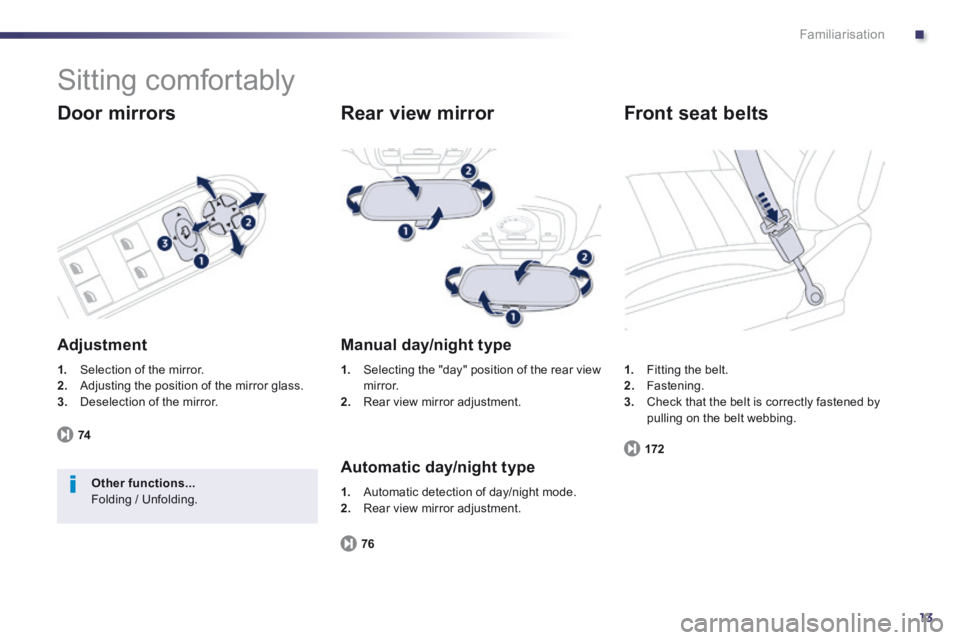
Door mirrors
Adjustment
1. Selection of the mirror. 2. Adjusting the position of the mirror glass. 3. Deselection of the mirror.
74
Other functions... Folding / Unfolding.
Rear view mirror
Manual day/night type
1. Selecting the "day" position of the rear view m i r r o r. 2. Rear view mirror adjustment.
Automatic day/night type
76
1. Automatic detection of day/night mode. 2. Rear view mirror adjustment.
1. Fitting the belt. 2. Fastening. 3. Check that the belt is correctly fastened by pulling on the belt webbing.
Front seat belts
172
Page 69 of 352
3
67
Comfort
Front seats
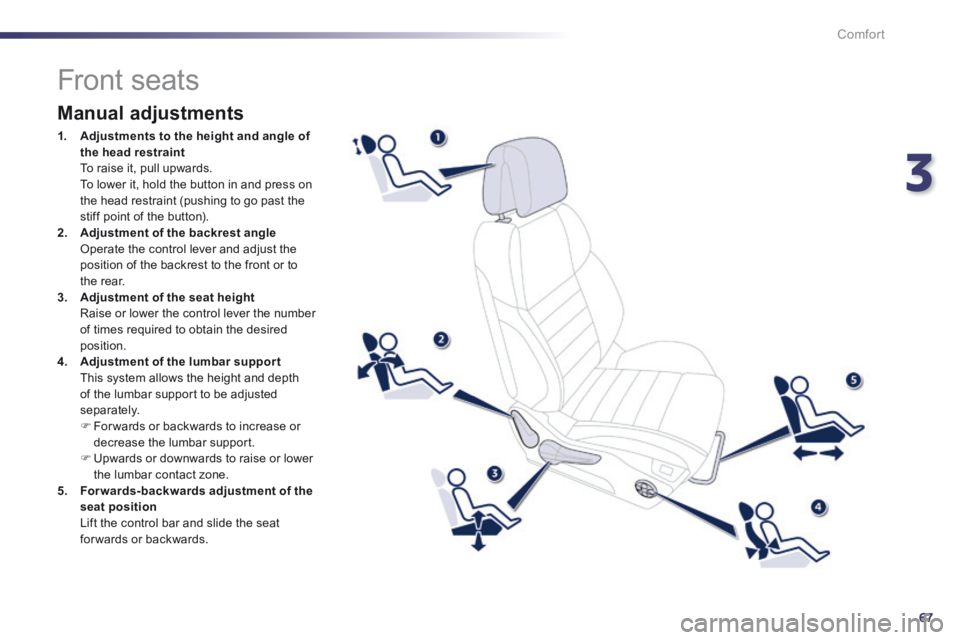
Manual adjustments
1. Adjustments to the height and angle of the head restraint To raise it, pull upwards. To lower it, hold the button in and press on the head restraint (pushing to go past the stiff point of the button). 2. Adjustment of the backrest angle Operate the control lever and adjust the position of the backrest to the front or to the rear. 3. Adjustment of the seat height Raise or lower the control lever the number of times required to obtain the desired position. 4. Adjustment of the lumbar suppor t This system allows the height and depth of the lumbar support to be adjusted separately. For wards or backwards to increase or
decrease the lumbar support. Upwards or downwards to raise or lower the lumbar contact zone. 5. Forwards-backwards adjustment of the seat position Lift the control bar and slide the seat for wards or backwards.
Page 70 of 352
68
Comfort
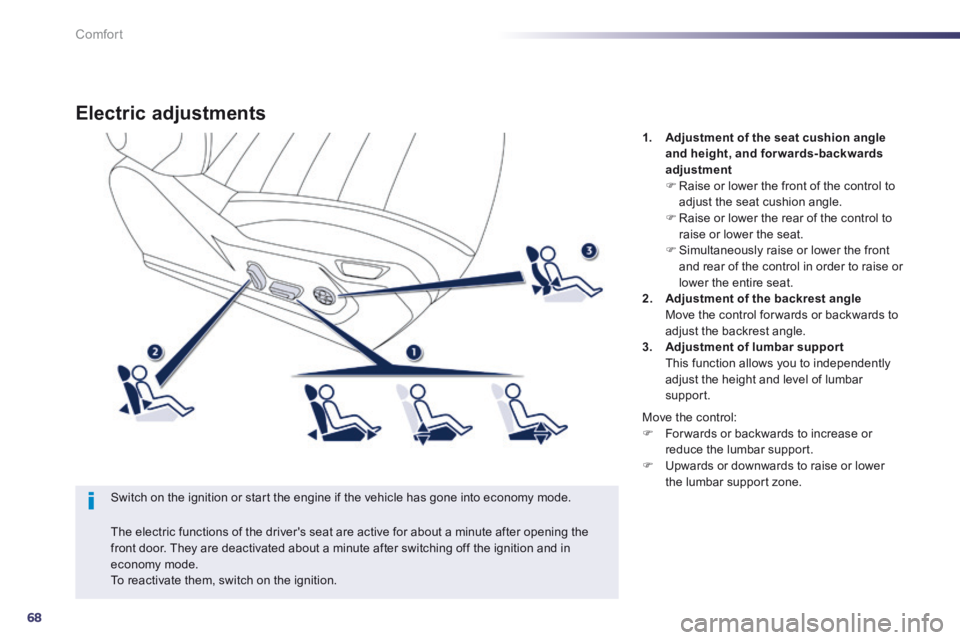
Electric adjustments
Switch on the ignition or start the engine if the vehicle has gone into economy mode.
1. Adjustment of the seat cushion angle and height, and forwards-backwards adjustment Raise or lower the front of the control to adjust the seat cushion angle. Raise or lower the rear of the control to
raise or lower the seat. Simultaneously raise or lower the front and rear of the control in order to raise or lower the entire seat. 2. Adjustment of the backrest angle Move the control for wards or backwards to adjust the backrest angle. 3. Adjustment of lumbar support This function allows you to independently adjust the height and level of lumbar support.
The electric functions of the driver's seat are active for about a minute after opening the front door. They are deactivated about a minute after switching off the ignition and in economy mode. To reactivate them, switch on the ignition.
Move the control: For wards or backwards to increase or reduce the lumbar support. Upwards or downwards to raise or lower the lumbar support zone.
Page 71 of 352
3
69
Comfort
Storing driving positions
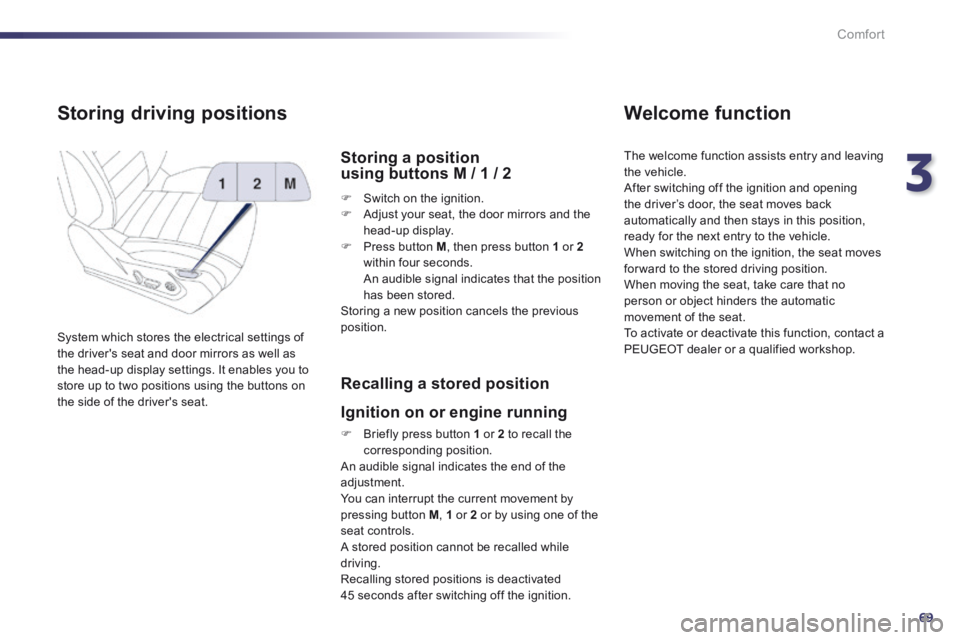
System which stores the electrical settings of the driver's seat and door mirrors as well as the head-up display settings. It enables you to store up to two positions using the buttons on the side of the driver's seat.
Storing a position using buttons M / 1 / 2
Switch on the ignition. Adjust your seat, the door mirrors and the head-up display. Press button M , then press button 1 or 2within four seconds. An audible signal indicates that the position has been stored. Storing a new position cancels the previous position.
Recalling a stored position
Ignition on or engine running
Briefly press button 1 or 2 to recall the corresponding position. An audible signal indicates the end of the adjustment. You can interrupt the current movement by pressing button M , 1 or 2 or by using one of the seat controls.
A stored position cannot be recalled while driving. Recalling stored positions is deactivated 45 seconds after switching off the ignition.
Welcome function
The welcome function assists entry and leaving the vehicle. After switching off the ignition and opening the driver’s door, the seat moves back automatically and then stays in this position, ready for the next entry to the vehicle. When switching on the ignition, the seat moves for ward to the stored driving position. When moving the seat, take care that no person or object hinders the automatic movement of the seat. To activate or deactivate this function, contact a PEUGEOT dealer or a qualified workshop.
Page 72 of 352
70
Comfort
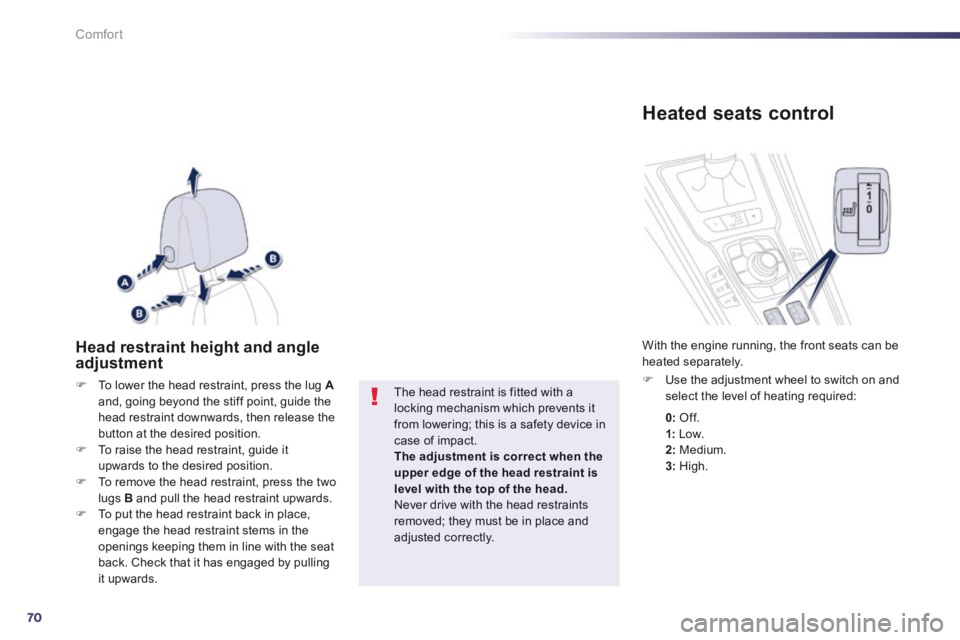
Head restraint height and angle adjustment
To lower the head restraint, press the lug Aand, going beyond the stiff point, guide the head restraint downwards, then release the button at the desired position. To raise the head restraint, guide it upwards to the desired position. To remove the head restraint, press the two lugs B and pull the head restraint upwards. To put the head restraint back in place, engage the head restraint stems in the openings keeping them in line with the seat back. Check that it has engaged by pulling it upwards.
The head restraint is fitted with a locking mechanism which prevents it from lowering; this is a safety device in
case of impact. The adjustment is correct when the upper edge of the head restraint is level with the top of the head. Never drive with the head restraints removed; they must be in place and adjusted correctly.
Heated seats control
Use the adjustment wheel to switch on and select the level of heating required:
With the engine running, the front seats can be heated separately.
0: Of f.
1: Low. 2: Medium. 3: High.
Page 95 of 352
3
93
Comfort
Quad-zone digital air conditioning
Automatic operation
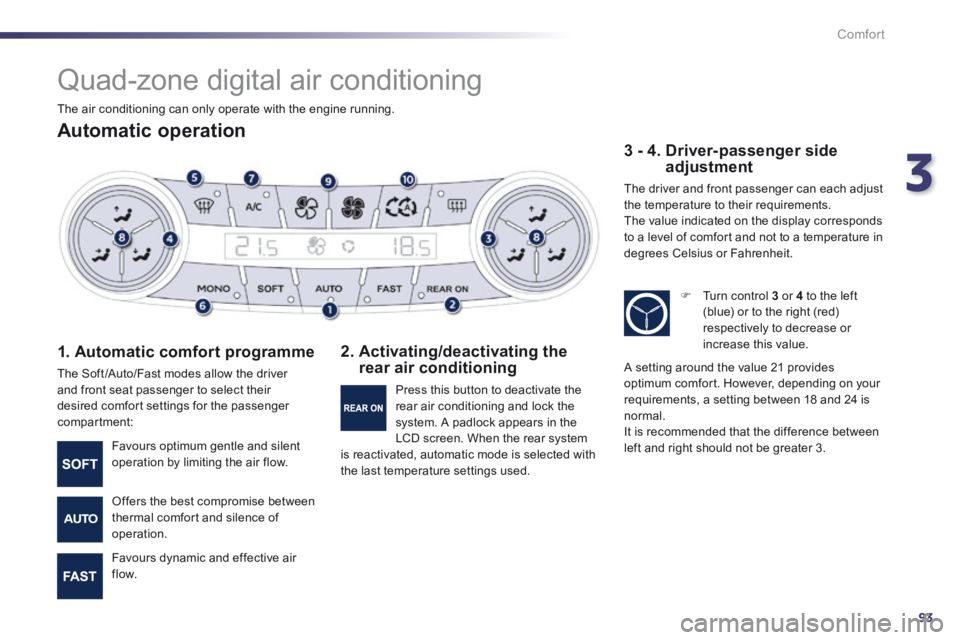
1. Automatic comfort programme
The Soft /Auto/Fast modes allow the driver and front seat passenger to select their desired comfort settings for the passenger compartment:
2. Activating/deactivating the rear air conditioning
3 - 4. Driver-passenger side adjustment
The driver and front passenger can each adjust the temperature to their requirements. The value indicated on the display corresponds to a level of comfort and not to a temperature in degrees Celsius or Fahrenheit.
Favours optimum gentle and silent operation by limiting the air flow.
Offers the best compromise between thermal comfort and silence of operation.
Favours dynamic and effective air f low.
Press this button to deactivate the rear air conditioning and lock the system. A padlock appears in the LCD screen. When the rear system is reactivated, automatic mode is selected with the last temperature settings used.
Turn control 3 or 4 to the left (blue) or to the right (red) respectively to decrease or increase this value.
A setting around the value 21 provides optimum comfort. However, depending on your requirements, a setting between 18 and 24 is normal. It is recommended that the difference between left and right should not be greater 3.
The air conditioning can only operate with the engine running.
Page 175 of 352
7
173
Safety
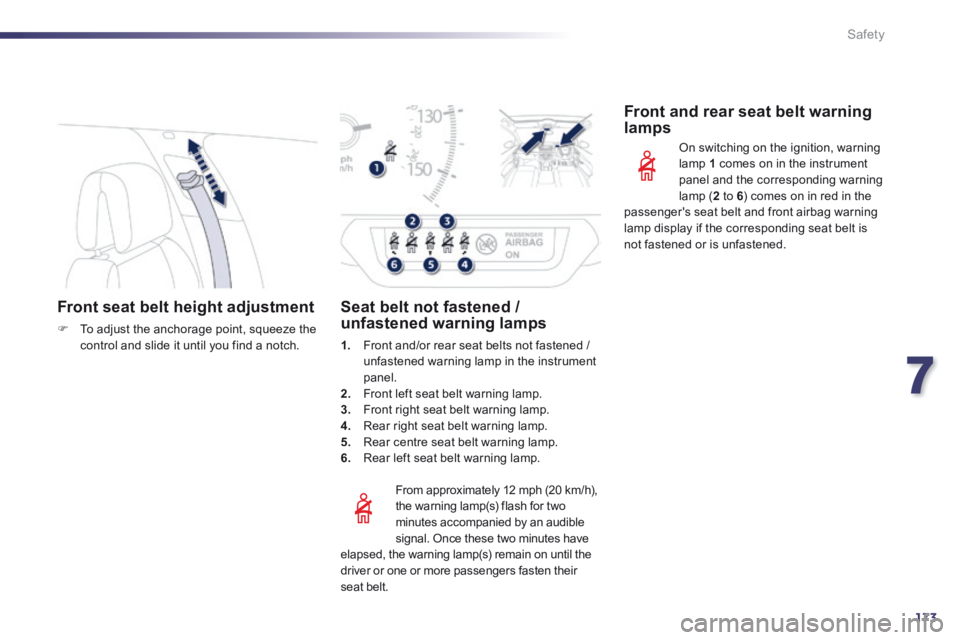
Front seat belt height adjustment
To adjust the anchorage point, squeeze the control and slide it until you find a notch.
From approximately 12 mph (20 km/h), the warning lamp(s) flash for two minutes accompanied by an audible signal. Once these two minutes have elapsed, the warning lamp(s) remain on until the driver or one or more passengers fasten their seat belt.
Seat belt not fastened / unfastened warning lamps
1. Front and/or rear seat belts not fastened / unfastened warning lamp in the instrument panel. 2. Front left seat belt warning lamp. 3. Front right seat belt warning lamp. 4. Rear right seat belt warning lamp. 5. Rear centre seat belt warning lamp. 6. Rear left seat belt warning lamp.
Front and rear seat belt warning lamps
On switching on the ignition, warning lamp 1 comes on in the instrument panel and the corresponding warning lamp (2 to 6 ) comes on in red in the passenger's seat belt and front airbag warning
lamp display if the corresponding seat belt is not fastened or is unfastened.