bonnet Peugeot 508 2019 User Guide
[x] Cancel search | Manufacturer: PEUGEOT, Model Year: 2019, Model line: 508, Model: Peugeot 508 2019Pages: 320, PDF Size: 10.09 MB
Page 162 of 320

160
The cruise control operates by day and
night, in fog or moderate rainfall.
However, it is strongly recommended that
you always keep a safe distance from
vehicles ahead, according to the driving
conditions, the weather and the road
sur face.
Use the cruise control only where the
driving conditions allow running at a
constant speed and keeping an adequate
safety distance.
Do not activate the cruise control in urban
areas where pedestrians are likely to
cross the road, in heavy traffic, on winding
or steep roads, on slippery or flooded
roads, when there is snowfall, if the front
bumper or windscreen is damaged or
when the brake lamps have failed.
In certain circumstances, it may not
be possible for the speed setting to be
maintained or even attained: loaded
vehicle, ascending a steep hill, etc.The system is not intended for the
following situations:
-
i
f the front end of the vehicle has
been modified (addition of long-range
headlamps, painting of the front
bumper),
-
d
riving on a racing circuit,
-
r
unning on a rolling road,
-
u
se of snow chains, non-slip covers or
studded tyres.
The use of mats not approved by
PEUGEOT may inter fere with the
operation of the cruise control.
To avoid any risk of jamming the pedals:
-
e
nsure that the mat is secured
c o r r e c t l y,
-
n
ever place one mat on top of another.The following situations may interfere with
the operation of the system or prevent it
from working:
-
d
riving on a winding road,
-
p
oor visibility (inadequate street
lighting, falling snow, heavy rain, dense
f o g , e t c .),
-
d
azzle (headlamps of an oncoming
vehicle, low sun, reflections on a damp
road, leaving a tunnel, alternating
shade and light, etc.),
-
c
amera or radar obstructed (mud, frost,
snow, condensation, etc.).
In these situations, detection performance
may be reduced.
Operation of the radar, located in the
front bumper, may be impaired by the
accumulation of dirt (dust, mud, etc.) or in
certain weather conditions (snow, frost,
e t c .) .
Do not stick any items to the radar's
protective cover.
Clean the front bumper regularly.
Clean the windscreen regularly,
particularly the area in front of the
detection camera.
Do not allow snow to accumulate on the
bonnet or roof of the vehicle, as this could
obscure the camera.
Driving
Page 168 of 320
166
This system is a driving aid that includes three
functions:
-
D
istance Alert (alert if there is a risk of
collision),
-
I
ntelligent emergency braking assistance,
-
A
ctive Safety Brake (automatic emergency
b r ak ing).
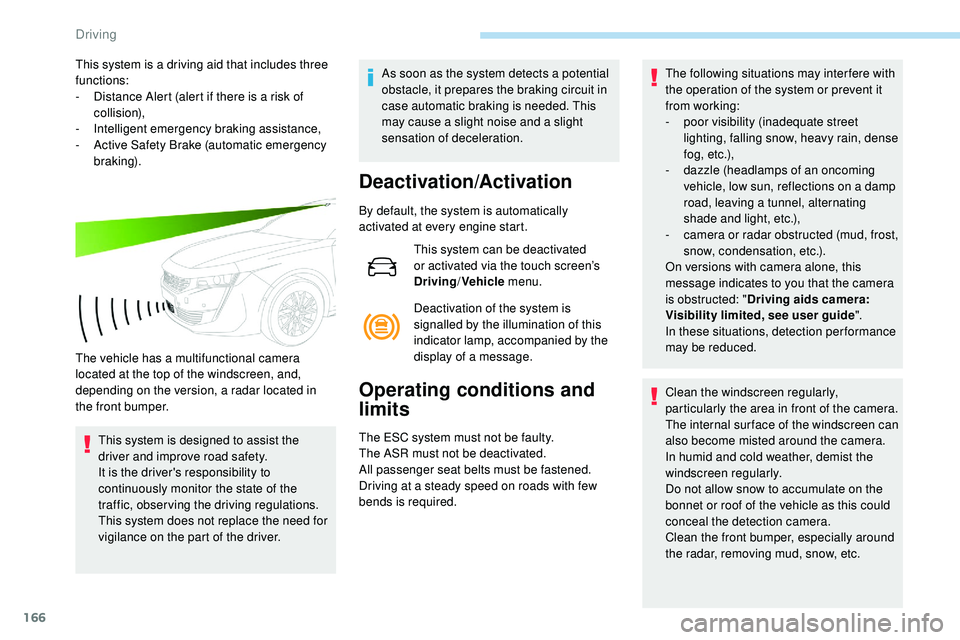
The vehicle has a multifunctional camera
located at the top of the windscreen, and,
depending on the version, a radar located in
the front bumper. This system is designed to assist the
driver and improve road safety.
It is the driver's responsibility to
continuously monitor the state of the
traffic, observing the driving regulations.
This system does not replace the need for
vigilance on the part of the driver. As soon as the system detects a potential
obstacle, it prepares the braking circuit in
case automatic braking is needed. This
may cause a slight noise and a slight
sensation of deceleration.
Deactivation/Activation
By default, the system is automatically
activated at every engine start.
This system can be deactivated
or activated via the touch screen’s
Driving/Vehicle menu.
Deactivation of the system is
signalled by the illumination of this
indicator lamp, accompanied by the
display of a message.
Operating conditions and
limits
The ESC system must not be faulty.
The ASR must not be deactivated.
All passenger seat belts must be fastened.
Driving at a steady speed on roads with few
bends is required. The following situations may interfere with
the operation of the system or prevent it
from working:
-
p
oor visibility (inadequate street
lighting, falling snow, heavy rain, dense
f o g , e t c .),
-
d
azzle (headlamps of an oncoming
vehicle, low sun, reflections on a damp
road, leaving a tunnel, alternating
shade and light, etc.),
-
c
amera or radar obstructed (mud, frost,
snow, condensation, etc.).
On versions with camera alone, this
message indicates to you that the camera
is obstructed: " Driving aids camera:
Visibility limited, see user guide".
In these situations, detection performance
may be reduced.
Clean the windscreen regularly,
particularly the area in front of the camera.
The internal sur face of the windscreen can
also become misted around the camera.
In humid and cold weather, demist the
windscreen regularly.
Do not allow snow to accumulate on the
bonnet or roof of the vehicle as this could
conceal the detection camera.
Clean the front bumper, especially around
the radar, removing mud, snow, etc.
Driving
Page 172 of 320
170
After three first level alerts, the system triggers
a new alert with the message "Take a break!",
accompanied by a more pronounced audible
signal. When the system interprets the behaviour of
the vehicle as indicating a certain fatigue or
inattention threshold on the part of the driver,
it triggers the first level of alert.
The driver is then alerted by the message
" Ta k e c a r e ! ", accompanied by an audible
signal.
Active Blind Spot
Monitoring System
In addition to the fixed warning lamp in the door
mirror on the side in question, a correction of
trajectory will be felt if you attempt to cross a
lane marking with the direction indicators on,
to
help you avoid a collision.
This system is the combination of the Active
Lane Keeping Assistance and Blind Spot
Detection.
These two functions must be activated and in
operation.
The speed of the vehicle must be between
40
and 87 mph (65 and 140 km/h) inclusive.
These functions are especially suitable for
driving on motor ways and main roads.
For more information on the Active Lane
Keeping Assistance and Blind Spot
Detection , refer to the corresponding sections.
This system is a driving aid which cannot,
in any circumstances, replace the need for
vigilance on the part of the driver.
In certain driving conditions (poor road
sur face or strong winds), the system may
give alerts independent of the driver's
level of vigilance. The following situations may interfere with
the operation of the system or prevent it
from working:
-
p
oor visibility (inadequate lighting of
the roadway, falling snow, heavy rain,
dense fog, etc.),
-
d
azzle (headlamps of an oncoming
vehicle, low sun, reflections on a damp
road, leaving a tunnel, alternating
shade and light, etc.),
-
w
indscreen area located in front of the
camera: dirty, misted up, frost-covered,
snow-covered, damaged or covered by
a s t i c ke r,
-
l
ane markings absent, worn, hidden
(snow, mud) or multiple (roadworks,
e t c .),
-
c
lose to the vehicle ahead (lane
markings not detected),
-
r
oads that are narrow, winding, etc.
Clean the windscreen regularly,
particularly the area in front of the camera.
The internal sur face of the windscreen can
also become misted around the camera.
In humid and cold weather, demist the
windscreen regularly.
Do not allow snow to accumulate on the
bonnet or roof of the vehicle as this could
conceal the detection camera.
Driving
Page 206 of 320
204
Maximum authorised load distributed over
the transverse roof bars, for a load height
not exceeding 40 cm (with the exception
of
bicycle carriers):
-
Hatchback: 65 kg.
-
SW: 80 kg .
For more information, contact a
PEUGEOT dealer or a qualified workshop.
If the height exceeds 40
cm, adapt the
speed of the vehicle to the profile of the
road to avoid damaging the roof bars and
the vehicle's fixing points.
For transporting objects which are longer
than the vehicle, refer to local legislation.
Recommendations
Distribute the load uniformly, taking care
to avoid overloading one of the sides.
Arrange the heaviest part of the load as
close as possible to the roof.
Secure the load firmly.
Drive gently: the vehicle will be more
susceptible to the effects of side winds
and its stability may be affected.
Regularly check the correct locking of the
roof bars, at least before each trip.
Remove the roof bars once they are no
longer needed.
If you use a roof box, contact a PEUGEOT
dealer or a qualified workshop to obtain
the compatible fixing parts. Sunroof
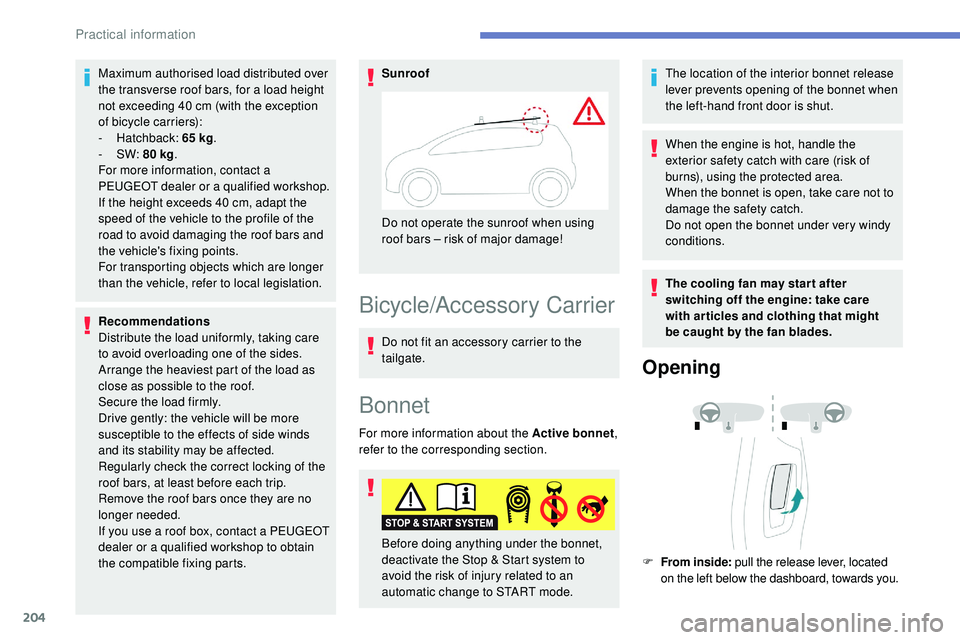
Do not operate the sunroof when using
roof bars – risk of major damage!
Bicycle/Accessory Carrier
Do not fit an accessory carrier to the
tailgate.
Bonnet
For more information about the Active bonnet ,
refer to the corresponding section. The location of the interior bonnet release
lever prevents opening of the bonnet when
the left-hand front door is shut.
When the engine is hot, handle the
exterior safety catch with care (risk of
burns), using the protected area.
When the bonnet is open, take care not to
damage the safety catch.
Do not open the bonnet under very windy
conditions.
The cooling fan may star t after
switching off the engine: take care
with articles and clothing that might
be
caught by the fan blades.
Opening
F From inside:
pull the release lever, located
on the left below the dashboard, towards you.
Before doing anything under the bonnet,
deactivate the Stop & Start system to
avoid
the risk of injury related to an
automatic change to START mode.
Practical information
Page 207 of 320
205
F From the outside: lift the safety catch and raise the bonnet.
Two bonnet struts open the bonnet and hold it
open.
Closing
F Lower the bonnet and release it near the end of its travel.
F
C
heck that it is latched correctly.
Because of the presence of electrical
equipment under the bonnet, it is
recommended that exposure to water
(rain, washing, etc.) be limited.
Engine compartment
These engines are examples provided as a guide.
The locations of the following elements may vary:
-
A
ir filter.
-
E
ngine oil dipstick.
-
E
ngine oil filler cap.
-
P
riming pump.
-
D
egassing screw.
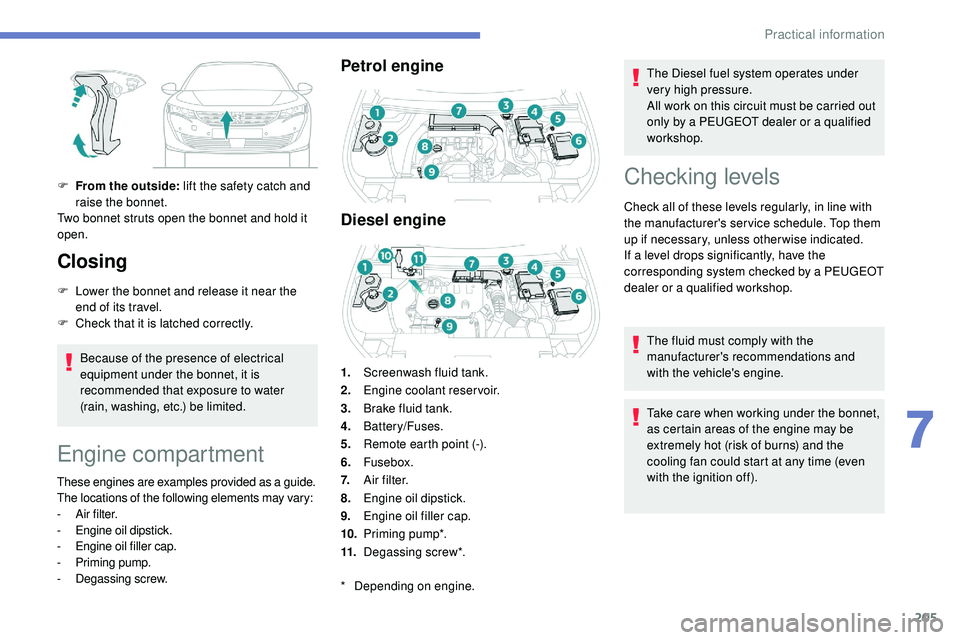
Petrol engine
Diesel engine
1.Screenwash fluid tank.
2. Engine coolant reservoir.
3. Brake fluid tank.
4. Battery/Fuses.
5. Remote earth point (-).
6. Fusebox.
7. A i r f i l t e r.
8. Engine oil dipstick.
9. Engine oil filler cap.
10. Priming pump*.
11. Degassing screw*. The Diesel fuel system operates under
very high pressure.
All work on this circuit must be carried out
only by a PEUGEOT dealer or a qualified
workshop.
Checking levels
Check all of these levels regularly, in line with
the manufacturer's service schedule. Top them
up if necessary, unless other wise indicated.
If a level drops significantly, have the
corresponding system checked by a PEUGEOT
dealer or a qualified workshop.
The fluid must comply with the
manufacturer's recommendations and
with
the vehicle's engine.
Take care when working under the bonnet,
as certain areas of the engine may be
extremely hot (risk of burns) and the
cooling fan could start at any time (even
with the ignition off).
*
D
epending on engine.
7
Practical information
Page 208 of 320
206
Used products
Avoid prolonged contact of used oil or
fluids with the skin.
Most of these fluids are harmful to health
or indeed very corrosive.Do not discard used oil or fluids into
sewers or onto the ground.
Take used oil to a PEUGEOT dealer or a
qualified workshop and dispose of in the
containers reser ved for this purpose.
Engine oil level
The check is carried out either when
the ignition is switched on using the
oil level indicator in the instrument
panel for vehicles equipped with an
electric gauge, or using the dipstick.
To ensure that the reading is correct, your
vehicle must be parked on a level sur face
with the engine stopped for more than
30
minutes.
It is normal to top up the oil level between
two ser vices (or oil changes). PEUGEOT
recommends that you check the level, and top
up if necessary, every 3,000 miles (5,000 km).
Checking using the dipstick
The location of the dipstick is shown in the
corresponding underbonnet layout view.
F
T
ake the dipstick by its coloured grip and
pull it out completely.
F
W
ipe the end of the dipstick using a clean
non-fluffy cloth.
F
R
efit the dipstick and push fully down, then
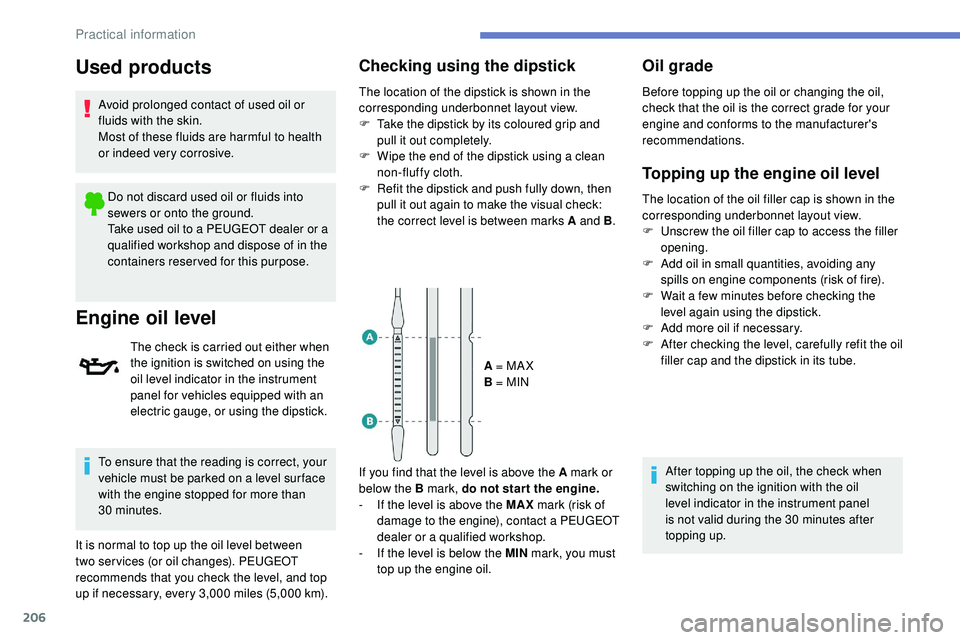
pull it out again to make the visual check:
the correct level is between marks A and B .
A = MA X
B = MIN
If you find that the level is above the A mark or
below the B mark, do not star t the engine.
-
I
f the level is above the MAX mark (risk of
damage to the engine), contact a PEUGEOT
dealer or a qualified workshop.
-
I
f the level is below the MIN mark, you must
top up the engine oil.
Oil grade
Before topping up the oil or changing the oil,
check that the oil is the correct grade for your
engine and conforms to the manufacturer's
recommendations.
Topping up the engine oil level
The location of the oil filler cap is shown in the
corresponding underbonnet layout view.
F
U
nscrew the oil filler cap to access the filler
opening.
F
A
dd oil in small quantities, avoiding any
spills on engine components (risk of fire).
F
W
ait a few minutes before checking the
level again using the dipstick.
F
A
dd more oil if necessary.
F
A
fter checking the level, carefully refit the oil
filler cap and the dipstick in its tube.
After topping up the oil, the check when
switching on the ignition with the oil
level indicator in the instrument panel
is not
valid during the 30 minutes after
topping up.
Practical information
Page 215 of 320
213
Warning triangle
As a safety precaution, before leaving your
vehicle to set up and install the triangle, switch
on the hazard warning lamps and put on your
high visibility vest.
Storage compartment
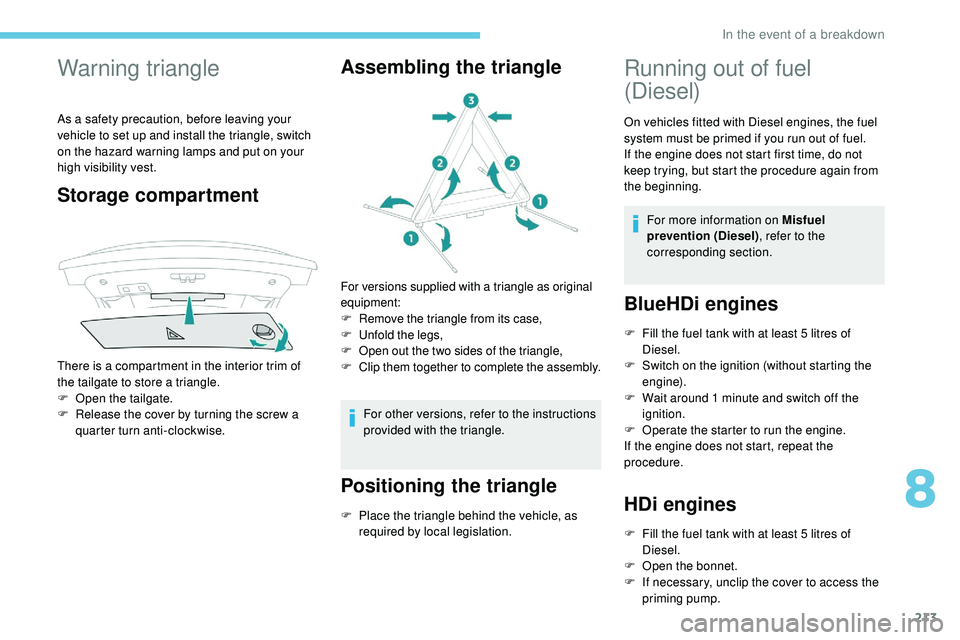
There is a compartment in the interior trim of
the tailgate to store a triangle.
F
O
pen the tailgate.
F
R
elease the cover by turning the screw a
quarter turn anti-clockwise.
Assembling the triangle
For versions supplied with a triangle as original
equipment:
F
R
emove the triangle from its case,
F
U
nfold the legs,
F
O
pen out the two sides of the triangle,
F
C
lip them together to complete the assembly.
For other versions, refer to the instructions
provided with the triangle.
Positioning the triangle
F Place the triangle behind the vehicle, as required by local legislation.
Running out of fuel
(Diesel)
On vehicles fitted with Diesel engines, the fuel
system must be primed if you run out of fuel.
If the engine does not start first time, do not
keep trying, but start the procedure again from
the beginning.
For more information on Misfuel
prevention (Diesel) , refer to the
corresponding section.
BlueHDi engines
F Fill the fuel tank with at least 5 litres of Diesel.
F
S
witch on the ignition (without starting the
engine).
F
W
ait around 1 minute and switch off the
ignition.
F
O
perate the starter to run the engine.
If the engine does not start, repeat the
procedure.
HDi engines
F Fill the fuel tank with at least 5 litres of Diesel.
F
O
pen the bonnet.
F
I
f necessary, unclip the cover to access the
priming pump.
8
In the event of a breakdown
Page 216 of 320
214
F Loosen the degassing bolt.
F O perate the priming pump until fuel appears
in the transparent tube.
F
R
etighten the degassing bolt.
F
O
perate the starter until the engine starts (if
the engine does not start at the first attempt,
wait around 15 seconds before trying
again).
F
I
f the engine does not start after a few
attempts, operate the priming pump again
then start the engine.
F
P
ut the cover back in place, clip it and
ensure it is clipped in.
F
C
lose the bonnet.
Tool kit
This is a set of tools provided with the vehicle.
Its content depends on your vehicle's
equipment:
-
t
emporary puncture repair kit,
-
spar
e wheel.
Access to the tools
The main tools are stowed in the boot under
t h e f l o o r.
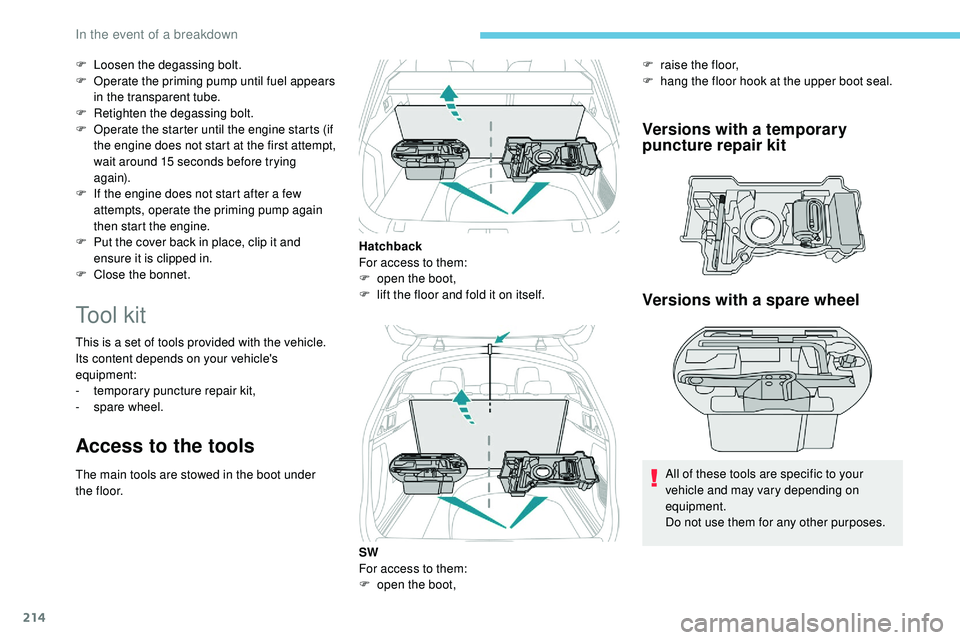
Versions with a temporary
puncture repair kit
Hatchback
For access to them:
F
o
pen the boot,
F
l
ift the floor and fold it on itself.
SW
For access to them:
F
o
pen the boot,
Versions with a spare wheel
All of these tools are specific to your
vehicle and may vary depending on
equipment.
Do not use them for any other purposes.
F
r
aise the floor,
F
h
ang the floor hook at the upper boot seal.
In the event of a breakdown
Page 226 of 320
224
Halogen bulbs
To ensure good quality lighting, check
that the bulb is correctly positioned in its
housing.
Front lamps
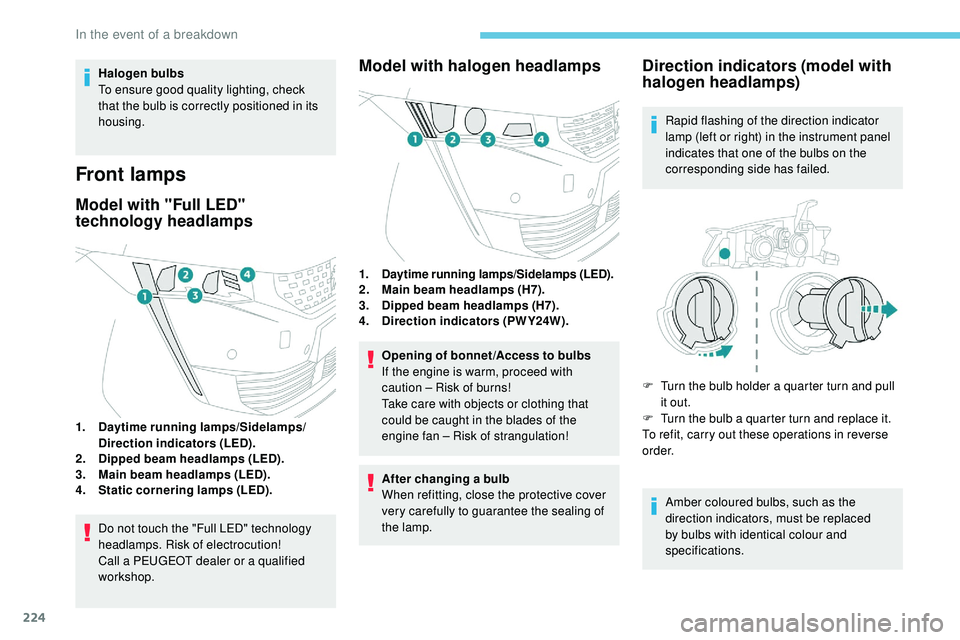
Model with "Full LED"
technology headlamps
1.Daytime running lamps/Sidelamps/
Direction indicators (LED).
2. Dipped beam headlamps (LED).
3. Main beam headlamps (LED).
4. Static cornering lamps (LED).
Do not touch the "Full LED" technology
headlamps. Risk of electrocution!
Call a PEUGEOT dealer or a qualified
workshop.
Model with halogen headlamps
1.Daytime running lamps/Sidelamps (LED).2.Main beam headlamps (H7).
3. Dipped beam headlamps (H7).
4. Direction indicators (PWY24W).
Opening of bonnet /Access to bulbs
If the engine is warm, proceed with
caution – Risk of burns!
Take care with objects or clothing that
could be caught in the blades of the
engine fan – Risk of strangulation!
After changing a bulb
When refitting, close the protective cover
very carefully to guarantee the sealing of
the lamp.
Direction indicators (model with
halogen headlamps)
Rapid flashing of the direction indicator
lamp (left or right) in the instrument panel
indicates that one of the bulbs on the
corresponding side has failed.
F
T
urn the bulb holder a quarter turn and pull
it out.
F
T
urn the bulb a quarter turn and replace it.
To refit, carry out these operations in reverse
o r d e r.
Amber coloured bulbs, such as the
direction indicators, must be replaced
by bulbs with identical colour and
specifications.
In the event of a breakdown
Page 235 of 320
233
12 V battery
Procedure for starting the engine using another
battery or charging a discharged battery.
General points
Lead-acid starter batteries
Batteries contain harmful substances
such as sulphuric acid and lead.
They must be disposed of in accordance
with regulations and must not, in any
circumstances, be discarded with
household waste.
Take used remote control batteries and
vehicle batteries to a special collection
point.
Protect your eyes and face before
handling the battery.
All operations on the battery must be
carried out in a well ventilated area and
away from naked flames and sources of
sparks, so as to avoid the risk of explosion
or fire.
Wash your hands afterwards.
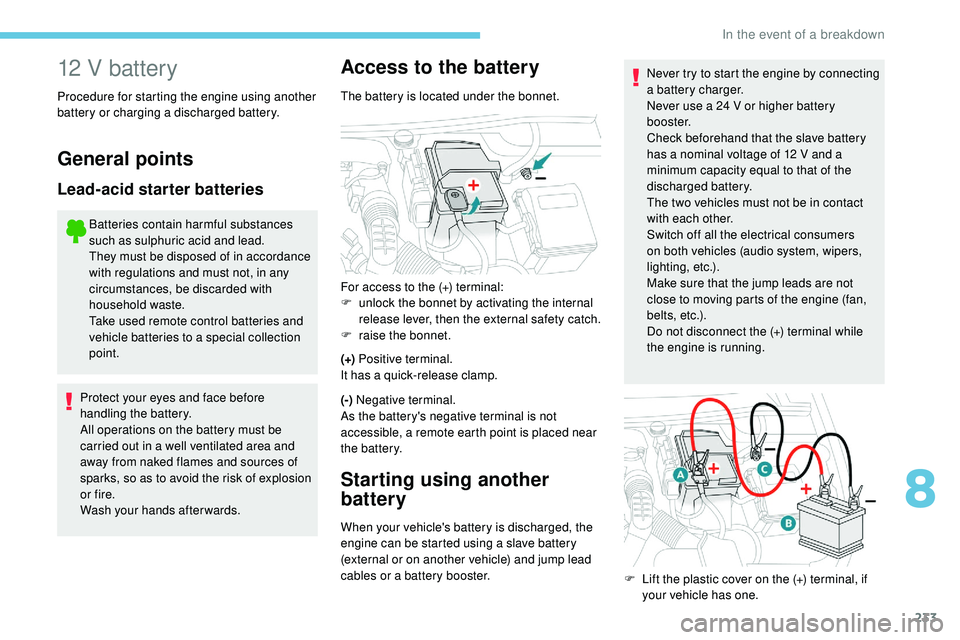
Access to the battery
The battery is located under the bonnet.
(+) Positive terminal.
It has a quick-release clamp.
(-) Negative terminal.
As the battery's negative terminal is not
accessible, a remote earth point is placed near
the battery.
Starting using another
battery
When your vehicle's battery is discharged, the
engine can be started using a slave battery
(external or on another vehicle) and jump lead
cables or a battery booster. Never try to start the engine by connecting
a battery charger.
Never use a 24 V or higher battery
b o o s t e r.
Check beforehand that the slave battery
has a nominal voltage of 12 V and a
minimum capacity equal to that of the
discharged battery.
The two vehicles must not be in contact
with each other.
Switch off all the electrical consumers
on both vehicles (audio system, wipers,
lighting, etc.).
Make sure that the jump leads are not
close to moving parts of the engine (fan,
belts, etc.).
Do not disconnect the (+) terminal while
the engine is running.
For access to the (+) terminal:
F
u
nlock the bonnet by activating the internal
release lever, then the external safety catch.
F
r
aise the bonnet.
F
L
ift the plastic cover on the (+) terminal, if
your vehicle has one.
8
In the event of a breakdown