steering Peugeot 508 2020 Owner's Guide
[x] Cancel search | Manufacturer: PEUGEOT, Model Year: 2020, Model line: 508, Model: Peugeot 508 2020Pages: 276, PDF Size: 8.43 MB
Page 106 of 276
104
Driving
in order to change mode, an alert message is
displayed in the instrument panel.
Only appropriate attempted changes of mode
are accepted.
With the engine running and the brakes
released, if R, D or M is selected, the
vehicle moves off, even without pressing the
accelerator pedal.
Never press the accelerator and brake
pedals at the same time - risk of damage
to the gearbox!
In the event of a battery failure, you must
place the chock supplied with the vehicle
tools against one of the wheels to immobilise
the vehicle.
Unlocking the gearbox
– From mode P:
► Fully depress the brake pedal.
►
Press the
Unlock button.
►
While continuing to press the brake pedal
and the
Unlock button, select another mode.
–
From neutral
N, at a speed below 3 mph
(5
km/h):
►
Fully depress the brake pedal.
►
While continuing to depress the brake
pedal, select another mode.
Engaging reverse gear
► Slow down until you come to a stop.
► Depress the brake pedal, then press the
Unlock button.
►
While maintaining the presses, select
mode
R.
Permanent manual mode
Entering the mode:
With EAT8 without Full Park Assist button and
EAT6:
►
With mode
D initially selected.
►
Press button
M; the green indicator lamp in
the button comes on.
With EAT8 and Full Park Assist button:
►
Press the
DRIVE MODE control.
►
Select "Manual" mode, which is displayed on
the instrument panel.
Exiting the mode:
►
Push forwards once to return to
D.
or
►
Press button
M; the indicator lamp in the
button goes off.
or
►
Select another mode using the DRIVE MODE
control.
Switching off the ignition
To switch off the ignition, the vehicle must be
stationary.
Changing to free-wheeling
For more information on Changing to free-
wheeling , refer to the corresponding section.
If you open the driver's door while mode
N is engaged, an audible signal will
sound. It will stop when you close the driver's
door again.
Special aspects of automatic mode
The gearbox selects the gear that offers
optimum performance, taking account of the
outside temperature, the road profile, the vehicle
load and the driving style.
For maximum acceleration, press the accelerator
fully down (kick-down). The gearbox changes
down automatically or holds the selected gear
until the maximum engine speed is reached.
Steering mounted controls allow the driver to
temporarily select a gear, if the vehicle speed
and engine speed conditions permit.
Special aspects of manual mode
The gearbox only changes from one gear to
another if the vehicle speed and engine speed
conditions permit.
Starting the vehicle
From mode P:
►
Fully depress the brake pedal.
►
Start the engine.
►
Maintaining pressure on the brake pedal,
press the
Unlock button.
►
Push once or twice rearwards to select
the automatic mode
D, or forwards to engage
reverse
R.
From neutral
N:
►
Fully depress the brake pedal.
► Start the engine.
► Maintaining pressure on the brake pedal,
push rearwards to select the automatic mode D,
or forwards, while pressing the Unlock button to
engage reverse R.
Then, from D or R:
► Release the brake pedal.
► Accelerate gradually to automatically release
the electric parking brake.
The vehicle moves off immediately.
With an automatic gearbox, never try to
start the engine by pushing the vehicle.
Stopping the vehicle
Whatever the state of the gearbox, when the
ignition is switched off, mode P is engaged
automatically and immediately.
However, in mode N, mode P will be engaged
after a delay of 5 seconds (allowing for the
process of putting the vehicle into free-wheeling
mode).
Check that mode P has been engaged and
that the electric parking brake was applied
automatically; if not, apply it manually.
The corresponding indicator lamps in the selector and the electric parking brake
control lever must be on, as well as those in the
instrument panel.
Page 107 of 276
105
Driving
6► Start the engine.
► Maintaining pressure on the brake pedal,
push rearwards to select the automatic mode
D
,
or forwards, while pressing the Unlock
button to
engage reverse
R
.
Then, from
D or R:
►
Release the brake pedal.
►
Accelerate gradually to automatically release
the electric parking brake.
The vehicle moves off immediately
.
With an automatic gearbox, never try to
start the engine by pushing the vehicle.
Stopping the vehicle
Whatever the state of the gearbox, when the
ignition is switched off, mode P is engaged
automatically and immediately.
However, in mode N, mode P will be engaged
after a delay of 5 seconds (allowing for the
process of putting the vehicle into free-wheeling
mode).
Check that mode
P has been engaged and
that the electric parking brake was applied
automatically; if not, apply it manually.
The corresponding indicator lamps in the selector and the electric parking brake
control lever must be on, as well as those in the
instrument panel.
Gearbox malfunction
This warning lamp comes on, accompanied by an audible signal and the
display of a message.
Visit a PEUGEOT dealer or a qualified workshop.
Do not drive faster than 62
mph (100 km/h),
keeping to the speed limit.
The gearbox switches to back-up mode: mode
D
is locked in third gear, the steering-mounted
control paddles are inoperative, mode
M
is no
longer available. You may feel a significant jolt
on engaging reverse gear. This will not damage
the gearbox.
Selector malfunction
Minor malfunction
This warning lamp comes on, accompanied by the display of a message
and an audible signal.
Drive cautiously and visit a PEUGEOT dealer or
a qualified workshop.
In certain cases, the selector indicator lamps
may no longer come on, but the gearbox state is
still displayed on the instrument panel.
Major malfunction
This warning lamp comes on, accompanied by the display of a
message.
Stop as soon as it is safe to do so, away
from traffic, and call a PEUGEOT dealer
or a qualified workshop.
e-EAT8 electric automatic
gearbox (Hybrid)
Automatic 8-speed gearbox with a push selector and regenerative braking function.
With the exception of manual mode and
regenerative braking, the operation is identical to
that of other EAT8 gearboxes.
For more information on the Operation or the
Malfunctions of the EAT8 gearbox, refer to the
corresponding sections.
Gearbox selector positions
P. Car park
For parking the vehicle: the front wheels
are blocked.
R. Reverse gear
N. Neutral
For moving the vehicle with the ignition
off: in certain car washing machines,
when towing the vehicle, etc.
D/B. Automatic forward gear ( D) or automatic
forward gear with regenerative braking
(B)
The gearbox manages gear changes
according to the style of driving, the road
profile and the vehicle load. With the
regenerative braking function activated,
the gearbox also controls braking when
the accelerator pedal is released.
Page 110 of 276
108
Driving
COMFORT
(with Active Suspension Control)
Allows more comfortable driving and softer
suspension.
NORMAL
Restores the vehicle’s original settings.
Together with Active Suspension Control, this
mode offers the best compromise between
comfort and handling.
SPORT
Enables more dynamic driving, acting on the
power steering, accelerator and gear changes
with an automatic gearbox and the possibility of
displaying the vehicle’s dynamic settings on the
instrument panel.
MANUAL
Permanent "Manual" mode with an automatic
gearbox and Full Park Assist.
Enables manual gear changing using the
steering-mounted paddles.
With hybrid engine
Each time the ignition is switched on, ELECTRIC
mode is selected by default.
ELECTRIC
Allows 100% electric driving. The maximum
speed is approximately 84 mph (135 km/h).
When starting the vehicle, if the conditions do not
allow the activation or retention of
ELECTRIC
mode, the message
“Electric mode currently
unavailable” is displayed in the instrument panel.
The vehicle automatically changes to HYBRID
mode.
The lighting of a blue LED under the interior
rear view mirror, visible from outside the vehicle,
confirms driving in ELECTRIC mode.
The lighting of the LED can be
deactivated by inserting the tip of a paper
clip type accessory into the hole under the
mirror
.
Conditions of activation
–
Adequate battery charge level. Charging
the vehicle after each drive is therefore
recommended.
The ELECTRIC mode is
available as long as there is power left in the
battery.
–
Exterior temperature between 0°C and 45°C.
Manually exiting the mode
–
Fully depress the accelerator pedal.
–
Select another mode.
In case of non-use of the vehicle for a
long period (several months), a restart of
the petrol engine may occur even if the
battery is charged.
HYBRID
Optimises the fuel consumption of the vehicle
by managing the alternating or simultaneous
operation of the two types of engine ,
according to road conditions and driving style.
In HYBRID mode, it is possible to drive in
100% electric mode if the battery charge level
is sufficient and acceleration requirements are
moderate.
When navigation is activated, the use
of HYBRID mode is advisable to optimise
electrical consumption.
SPORT
Allows more dynamic driving to take advantage
of the vehicle's maximum performance.
Electric power is used to supplement the petrol
engine as long as there is energy left in the
battery.
COMFORT
Depending on equipment.
Combines the HYBRID mode and Active
Suspension Control (controlled shock absorption
option).
In COMFORT mode, the suspension favours soft
shock absorption to improve driving comfort on
uneven surfaces.
For more information on Active
Suspension Control , refer to the
corresponding section.
Gear efficiency indicator
This system helps reduce fuel consumption by
recommending the most appropriate gear.
Operation
Depending on the driving situation and the
vehicle's equipment, the system may advise
skipping one or more gears.
Gear engagement recommendations are only
optional. In fact, the configuration of the road,
the traffic density and safety remain determining
factors when choosing the best gear. Therefore,
the driver remains responsible for deciding
whether or not to follow the system’s advice.
This function cannot be deactivated.
With an automatic gearbox, the system is
only active in manual operation.
The information appears in the instrument panel in the form of an arrow and the
recommended gear.
The system adapts its gear shift recommendation according to the driving
conditions (slope, load, etc.) and the driver’s
requirements (power, acceleration, braking,
etc.).
The system never suggests:
– engaging first gear,
– engaging reverse.
Stop & Start
The Stop & Start function puts the engine
temporarily into standby - STOP mode - during
phases when the vehicle is stopped (red lights,
Page 112 of 276
11 0
Driving
Putting the engine into standby
(STOP mode)
The engine automatically goes into standby
as soon as the driver indicates the intention of
stopping.
–
W
ith a manual gearbox, at a speed below 2
mph (3
km/h), when you place the gear lever in
neutral and release the clutch pedal.
–
W
ith an automatic gearbox:
•
at a speed below 12 mph (20
km/h) for
BlueHDi versions, or below 0.6 mph (1
km/h)
for PureTech 180 and 225 versions, when
you brake hard with the gear selector in
mode D,
•
with the vehicle stationary
, when you place
the gear selector in mode N.
Time counter
A time counter adds up the time spent in standby
during a journey. It resets to zero every time the
ignition is switched on.
Special cases:
The engine will not go into standby if all of the
conditions for operation are not met and in the
following cases.
–
Steep slope (ascending or descending).
–
Needed
to maintain a comfortable temperature
in the passenger compartment.
–
Demisting active.
In these cases, this indicator lamp flashes
for a few seconds, then goes off.
After the engine has restarted, STOP mode is not available until the vehicle
has reached a speed of 5 mph (8
km/h).
During parking manoeuvres, STOP mode
is not available for a few seconds after
coming out of reverse gear or turning the
steering wheel.
Engine restarting (START mode)
The engine automatically restarts as soon as the
driver indicates the intention of moving off again.
►
W
ith a manual gearbox: with the clutch
pedal fully depressed.
►
W
ith an automatic gearbox:
•
With the selector in position D
or M: with the
brake pedal released.
•
With the selector in position N
and the brake
pedal released: with the selector at D or M.
•
With the selector in position P
and the brake
pedal depressed: with the selector at R, N,
D or M.
•
Reverse gear engaged.
Special cases
The engine restarts automatically if all the
operating conditions are met again and in the
following cases.
–
With a manual gearbox: vehicle speed
exceeds 2.5 mph (4
km/h),
–
With an automatic gearbox, in mode N
, vehicle
speed exceeds 0.6 mph (1
km/h).
In these cases, this indicator lamp flashes
for a few seconds, then goes off.
Malfunctions
In the event of a malfunction, this warning
lamp flashes for a few moments, then
remains on, accompanied by an onscreen
message.
Have the vehicle checked by a PEUGEOT
dealer or a qualified workshop.
The vehicle stalls in STOP mode
All of the instrument panel warning lamps come
on if there is a fault.
►
Switch off the ignition then start the engine
again with the " ST
ART/STOP" button.
The Stop & Start system requires a 12 V
battery of specific technology and
specification.
All work concerning the battery must be
carried out only by a PEUGEOT
dealer or a
qualified workshop.
Under-inflation detection
This system automatically checks the pressures of the tyres while driving.
It compares the information given by the wheel
speed sensors with reference values, which
must be reinitialised every time the tyre
pressures are adjusted or a wheel changed.
Page 113 of 276
111
Driving
6The system triggers an alert as soon as it
detects a drop in the inflation pressure of one or
more tyres.
Under-inflation detection does not
replace the need for vigilance on the part
of the driver.
This system does not avoid the need to
regularly check the tyre pressures (including
the spare wheel) as well as before a long
journey.
Driving with under-inflated tyres, particularly
in adverse conditions (heavy load, high
speed, long journey):
–
worsens road-holding.
–
lengthens braking distances.
–
causes premature wear of the tyres.
–
increases fuel consumption.
The inflation pressures defined for the vehicle can be found on the tyre pressure
label.
For more information on the Identification
markings, refer to the corresponding section.
Checking tyre pressures
This check should be done when the
tyres are "cold" (vehicle stopped for 1 hour or
after a journey of less than 6 miles (10
km) at
moderate speeds).
Otherwise, add 0.3 bar to the pressures
shown on the label.
Snow chains
The system does not have to be
reinitialised after fitting or removing snow
chains.
Under-inflation alert
This is signalled by the fixed illumination of this warning lamp, accompanied by an
audible signal and, depending on equipment, the
display of a message.
►
Reduce speed immediately
, avoid excessive
steering movements and avoid sudden braking.
►
Stop the vehicle as soon as it is safe to do
so.
The loss of pressure detected does not always cause visible bulging of the tyre.
Do not rely on just a visual check.
►
Using a compressor
, such as the one in
the temporary puncture repair kit, check the
pressures of the four tyres when cold.
►
If it is not possible to make this check
immediately
, drive carefully at reduced speed.
►
In the event of a puncture, use the
temporary puncture repair kit or the spare wheel
(depending on equipment).
The alert is kept active until the system is reinitialised.
Reinitialisation
Reinitialise the system after adjusting one or
more tyre pressures and after changing one or
more wheels.
Before reinitialising the system, make
sure that the pressures of the four tyres
are correct for the conditions of use of the
vehicle and conform to the values written on
the tyre pressure label.
Check the pressures of the four tyres before
performing the reinitialisation.
The system does not advise if a pressure is
incorrect at the time of reinitialisation.
With the vehicle stationary, the system is
reinitialised via the Driving /
V
ehicle touch screen menu..
Malfunction
These warning lamps come on in the event of a malfunction.
A message appears, accompanied by an audible
signal.
In this case, the tyre under-inflation monitoring
function is no longer performed.
Have the system checked by a PEUGEOT
dealer or a qualified workshop.
Page 114 of 276
11 2
Driving
Driving and manoeuvring
aids - General
recommendations
Driving and manoeuvring aids cannot, in
any circumstances, replace the need for
vigilance on the part of the driver.
The driver must comply with the Highway
Code, must remain in control of the vehicle in
all circumstances and must be able to retake
control of it at all times. The driver must adapt
the speed to climactic conditions, traffic and
the state of the road.
It is the driver's responsibility to constantly
check the traffic, to assess the relative
distances and speeds of other vehicles and to
anticipate their movements before indicating
and changing lane.
The systems cannot exceed the limits of the
laws of physics.
Driving aids
You should hold the steering wheel
with both hands, always use the interior and
exterior rear view mirrors, always keep the
feet close to the pedals and take a break
every two hours.
Manoeuvring aids
The driver must always check the
surroundings of the vehicle before and during
the whole manoeuvre, in particular using the
mirrors.
Radar
The operation of the radar as well as the
associated functions may be impaired through
the accumulation of dirt (mud, frost, etc.), in
certain difficult weather conditions (very heavy
rain, snow) or if the bumper is damaged.
If the front bumper is to be repainted, contact
a PEUGEOT dealer or a qualified workshop;
certain types of paint could interfere with the
operation of the radar.
Driving aids camera
This camera and its associated functions
may be impaired or not work if the windscreen
area in front of the camera is dirty, misty,
frosty, covered with snow, damaged or
masked by a sticker.
On versions with camera alone, this message
indicates to you that the camera is obstructed:
"Driving aids camera: visibility limited, see
user guide".
In humid and cold weather, demist the
windscreen regularly.
Poor visibility (inadequate street lighting,
heavy rain, thick fog, snowfall), dazzle
(headlamps of an oncoming vehicle, low sun,
reflections on a damp road, leaving a tunnel,
alternating shade and light) can also impair
detection performance.
In the event of a windscreen replacement,
contact a PEUGEOT dealer or a qualified
workshop to recalibrate the camera;
otherwise, the operation of the associated
driving aids may be disrupted.
Other cameras
The images from the camera(s)
displayed on the touch screen or on the
instrument panel may be distorted by the
relief.
In the presence of areas in shade, or in
conditions of bright sunlight or inadequate
lighting, the image may be darkened and with
lower contrast.
Obstacles may appear further away than they
actually are.
Sensors
The operation of the sensors as well as
the associated functions may be disturbed
by sound interference such as that emitted
by noisy vehicles and machinery (e.g. lorries,
pneumatic drills), by the accumulation of
snow or dead leaves on the road or in the
event of damaged bumpers and mirrors.
When reverse gear is engaged, an audible
signal (long beep) indicates that the sensors
may be dirty.
A front or rear impact to the vehicle can
upset the sensors’ settings, which is not
always detected by the system: distance
measurements may be distorted.
The sensors do not systematically detect
obstacles that are too low (pavements, studs)
or too thin (trees, posts, wire fences).
Certain obstacles located in the sensors’ blind
spots may not be detected or may no longer
be detected during the manoeuvre.
Certain materials (fabrics) absorb sound
waves: pedestrians may not be detected.
Maintenance
Clean the bumpers and door mirrors and
the field of vision of the cameras regularly.
When washing your vehicle at high pressure,
direct the spray from at least 30 cm away
from the radar, sensors and cameras.
Mats
The use of mats not approved by
PEUGEOT may interfere with the operation of
the speed limiter or cruise control.
To avoid any risk of jamming the pedals:
► ensure that the mat is secured correctly,
► never fit one mat on top of another.
Page 117 of 276
11 5
Driving
6Information displayed on
the instrument panel
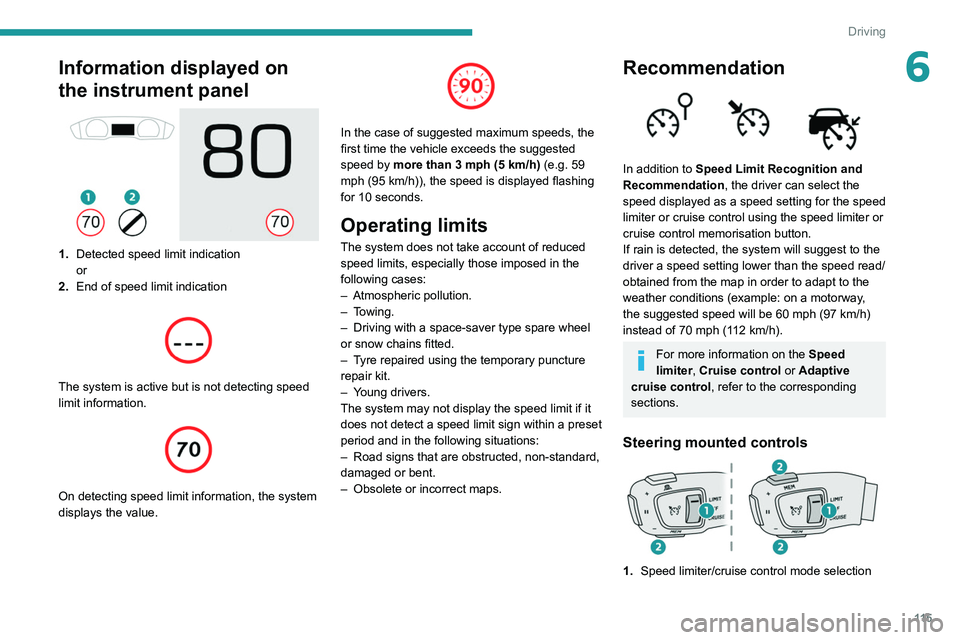
1.Detected speed limit indication
or
2. End of speed limit indication
The system is active but is not detecting speed
limit information.
On detecting speed limit information, the system
displays the value.
In the case of suggested maximum speeds, the
first time the vehicle exceeds the suggested
speed by more than 3 mph (5
km/h) (e.g. 59
mph (95
km/h)), the speed is displayed flashing
for 10 seconds.
Operating limits
The system does not take account of reduced
speed limits, especially those imposed in the
following cases:
–
Atmospheric pollution.
–
Towing.
–
Driving with a space-saver type spare wheel
or snow chains fitted.
–
T
yre repaired using the temporary puncture
repair kit.
–
Y
oung drivers.
The system may not display the speed limit if it
does not detect a speed limit sign within a preset
period and in the following situations:
–
Road signs that are obstructed, non-standard,
damaged or bent.
–
Obsolete or incorrect maps.
Recommendation
In addition to Speed Limit Recognition and
Recommendation, the driver can select the
speed displayed as a speed setting for the speed
limiter or cruise control using the speed limiter or
cruise control memorisation button.
If rain is detected, the system will suggest to the
driver a speed setting lower than the speed read/
obtained from the map in order to adapt to the
weather conditions (example: on a motorway,
the suggested speed will be 60 mph (97 km/h)
instead of 70 mph (112 km/h).
For more information on the Speed
limiter, Cruise control or Adaptive
cruise control, refer to the corresponding
sections.
Steering mounted controls
1. Speed limiter/cruise control mode selection
Page 118 of 276
11 6
Driving
2.Memorise the speed setting
Information displayed on the
instrument panel
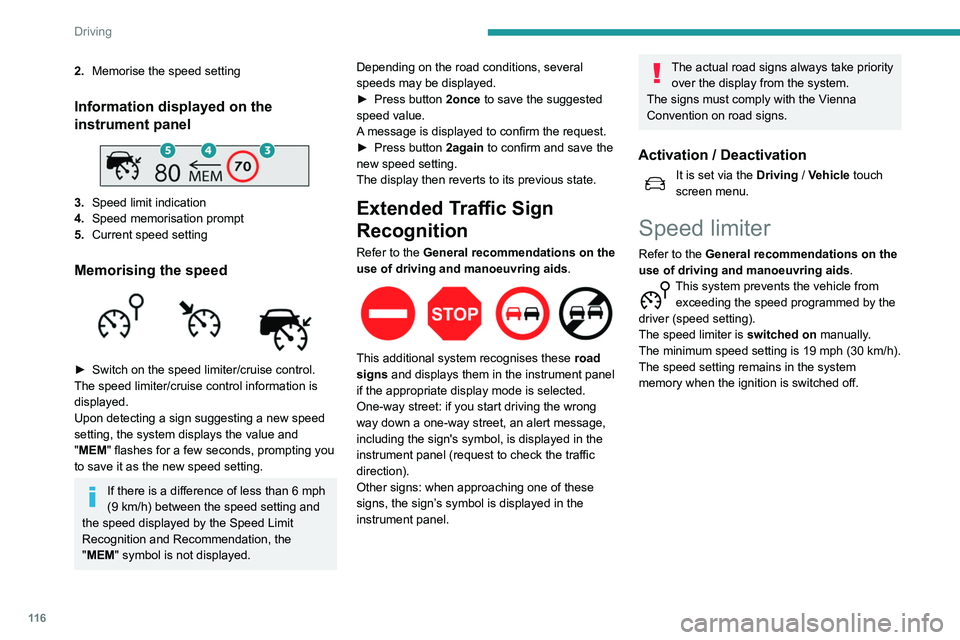
3.Speed limit indication
4. Speed memorisation prompt
5. Current speed setting
Memorising the speed
► Switch on the speed limiter/cruise control.
The speed limiter/cruise control information is
displayed.
Upon detecting a sign suggesting a new speed
setting, the system displays the value and
"
MEM" flashes for a few seconds, prompting you
to save it as the new speed setting.
If there is a difference of less than 6 mph
(9 km/h) between the speed setting and
the speed displayed by the Speed Limit
Recognition and Recommendation, the
"MEM" symbol is not displayed. Depending on the road conditions, several
speeds may be displayed.
►
Press button
2once to save the suggested
speed value.
A message is displayed to confirm the request.
►
Press button
2again to confirm and save the
new speed setting.
The display then reverts to its previous state.
Extended Traffic Sign
Recognition
Refer to the General recommendations on the
use of driving and manoeuvring aids .
This additional system recognises these road
signs and displays them in the instrument panel
if the appropriate display mode is selected.
One-way street: if you start driving the wrong
way down a one-way street, an alert message,
including the sign's symbol, is displayed in the
instrument panel (request to check the traffic
direction).
Other signs: when approaching one of these
signs, the sign’s symbol is displayed in the
instrument panel.
The actual road signs always take priority over the display from the system.
The signs must comply with the Vienna
Convention on road signs.
Activation / Deactivation
It is set via the Driving / Vehicle touch
screen menu.
Speed limiter
Refer to the General recommendations on the
use of driving and manoeuvring aids .
This system prevents the vehicle from
exceeding the speed programmed by the
driver (speed setting).
The speed limiter is switched on manually.
The minimum speed setting is 19 mph (30
km/h).
The speed setting remains in the system
memory when the ignition is switched off.
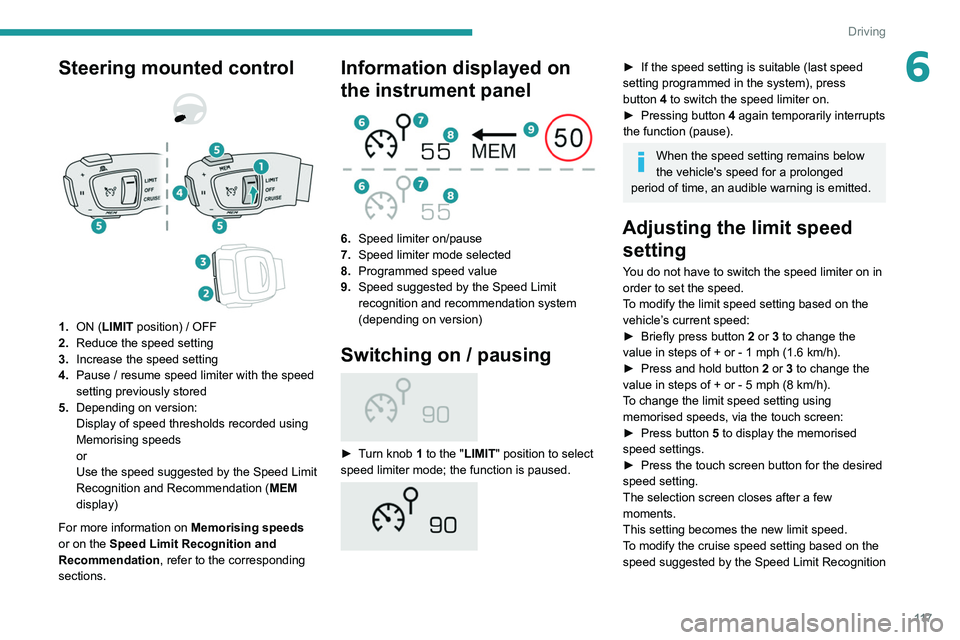
Steering mounted control
1. ON (LIMIT position) / OFF
2. Reduce the speed setting
3. Increase the speed setting
4. Pause / resume speed limiter with the speed
setting previously stored
5. Depending on version:
Display of speed thresholds recorded using
Memorising speeds
or
Use the speed suggested by the Speed Limit
Recognition and Recommendation ( MEM
display)
For more information on Memorising speeds
or on the Speed Limit Recognition and
Recommendation, refer to the corresponding
sections.
Page 119 of 276
11 7
Driving
6Steering mounted control
1. ON (LIMIT position) / OFF
2. Reduce the speed setting
3. Increase the speed setting
4. Pause / resume speed limiter with the speed
setting previously stored
5. Depending on version:
Display of speed thresholds recorded using
Memorising speeds
or
Use the speed suggested by the Speed Limit
Recognition and Recommendation ( MEM
display)
For more information on Memorising speeds
or on the Speed Limit Recognition and
Recommendation, refer to the corresponding
sections.
Information displayed on
the instrument panel
6. Speed limiter on/pause
7. Speed limiter mode selected
8. Programmed speed value
9. Speed suggested by the Speed Limit
recognition and recommendation system
(depending on version)
Switching on / pausing
► Turn knob 1 to the "LIMIT " position to select
speed limiter mode; the function is paused.
► If the speed setting is suitable (last speed
setting programmed in the system), press
button
4 to switch the speed limiter on.
►
Pressing button 4
again temporarily interrupts
the function (pause).
When the speed setting remains below
the vehicle's speed for a prolonged
period of time, an audible warning is emitted.
Adjusting the limit speed setting
You do not have to switch the speed limiter on in
order to set the speed.
To modify the limit speed setting based on the
vehicle’s current speed:
►
Briefly press button
2 or 3 to change the
value in steps of +
or - 1 mph (1.6 km/h).
►
Press and hold button
2
or 3 to change the
value in steps of +
or - 5 mph (8 km/h).
To change the limit speed setting using memorised speeds, via the touch screen:
►
Press button
5 to display the memorised
speed settings.
►
Press the touch screen button for the desired
speed setting.
The selection screen closes after a few
moments.
This setting becomes the new limit speed.
T
o modify the cruise speed setting based on the
speed suggested by the Speed Limit Recognition
Page 121 of 276
11 9
Driving
6– On slippery or flooded roads.
– In poor weather conditions.
–
Driving on a speed circuit.
–
Driving on a rolling road.
–
When using snow chains, non-slip covers
or studded tyres.
Programmable cruise
control
Refer to the General recommendations on the
use of driving and manoeuvring aids and to
Cruise control - particular recommendations.
This system automatically keeps the vehicle’s speed at the cruise value
programmed by the driver (speed setting),
without using the accelerator pedal.
The cruise control is switched on manually.
It requires a minimum vehicle speed of 25 mph
(40
km/h).
With a manual gearbox, third gear or higher must
be engaged.
With an automatic gearbox, mode
D
or second
gear or higher in mode
M
must be engaged.
The cruise control remains active after changing gear, regardless of the gearbox
type, on engines fitted with Stop & Start.
Switching off the ignition cancels any
speed setting.
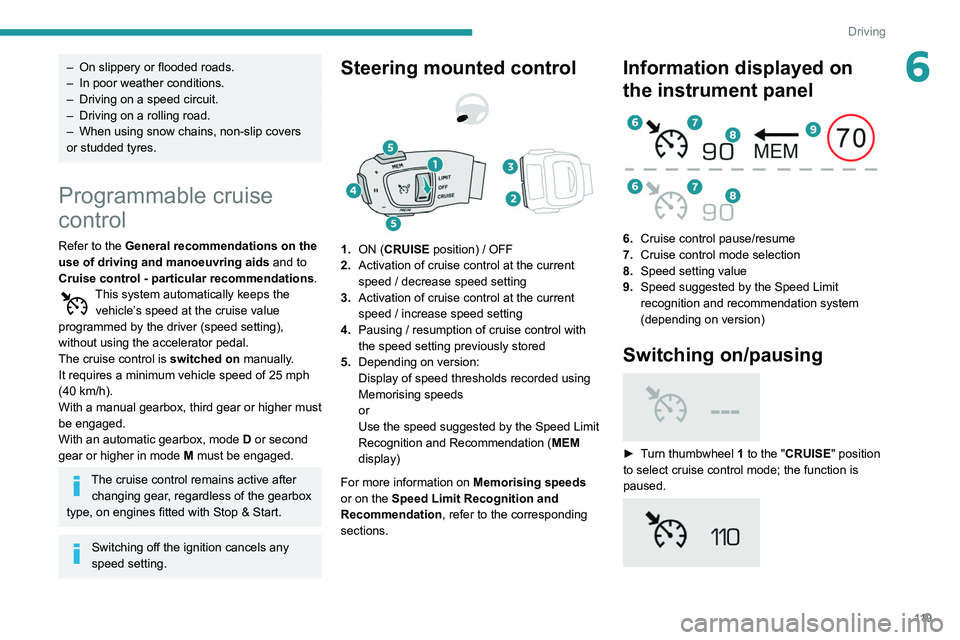
Steering mounted control
1. ON (CRUISE position) / OFF
2. Activation of cruise control at the current
speed / decrease speed setting
3. Activation of cruise control at the current
speed / increase speed setting
4. Pausing / resumption of cruise control with
the speed setting previously stored
5. Depending on version:
Display of speed thresholds recorded using
Memorising speeds
or
Use the speed suggested by the Speed Limit
Recognition and Recommendation ( MEM
display)
For more information on Memorising speeds
or on the Speed Limit Recognition and
Recommendation, refer to the corresponding
sections.
Information displayed on
the instrument panel
6. Cruise control pause/resume
7. Cruise control mode selection
8. Speed setting value
9. Speed suggested by the Speed Limit
recognition and recommendation system
(depending on version)
Switching on/pausing
► Turn thumbwheel 1 to the "CRUISE" position
to select cruise control mode; the function is
paused.